一、UGUI
1. Define
通过 3D 网格系统构建的 UI 系统。
1.1 实现
使用 UGUI 制作一个图元(图片、按钮...),会先构建一个方形网格,然后绑定材质球,材质球里存放了要显示的图片。
1.2 问题
材质球和网格的渲染,性能开销过大,drawcell 过高。
1.3 解决
- 减少材质球:一部分类型相同的图片,进行合图。多个图元可以只是用一个材质球,改变模型顶点上的 UV 就能显示不同的图片了。
- 合并网格:将有相同材质球(图片、shader)和相同层级的网格,进行合并。
2 . 源码文件结构(v2019.1)
- EventSystem 输入事件
- EventData 事件数据
- InputModules 输入事件捕捉模块
- Raycasters 射线碰撞检测
- EventHandle 事件处理和回调
- Animation 动画
- CoroutineTween 补间动画
- Core 渲染核心
- Culling 裁剪
- Layout 布局
- MaterialModifies 材质球修改器
- SpecializedCollections 特殊集合
- Utility 工具集
- VertexModifies 顶点修改器
二、部分组件
1. Canvas
类似于画画的画布。Canvas 包含了上述解决步骤中的合并网格的功能。
1.1 Render Mode
- Screen Space - Overlay:不与空间上的排序有任何关系,常用在纯 UI。Sort Order 值越大,显示越前面
- Screen Space - Camera:依赖 Camera 的平面透视,能够加入非 UGUI的元素到 UI 中。【常用】
- World Space: UI 物体会放出现在世界空间中,常在世界空间中与普通3D物体一同展示,列如场景中对象的血条。
2. Canvas Scale
缩放比例组件,用来指定 Canvas 中元素的比例大小。
2.1 UI Scale Mode
- Constant Pixel Size:指定比例大小。
- Scale With Screen Size:以屏幕基准自动缩放,能设置以宽还是以高。【手游项目常用】
- Constant Physical Size:以物理大小为基准。
2.2 ScreenMatchMode.MatchWidthOrHeight
根据屏幕高宽匹配。使用对数空间转换能够有更好的表现。
float logWidth = Mathf.Log(screenSize.x / m_ReferenceResolution.x, 2);
float logHeight = Mathf.Log(screenSize.y / m_ReferenceResolution.y, 2);
float logWeightedAverage = Mathf.Lerp(logWidth, logHeight, m_MatchWidthOrHeight);
scaleFactor = Mathf.Pow(2, logWeightedAverage);
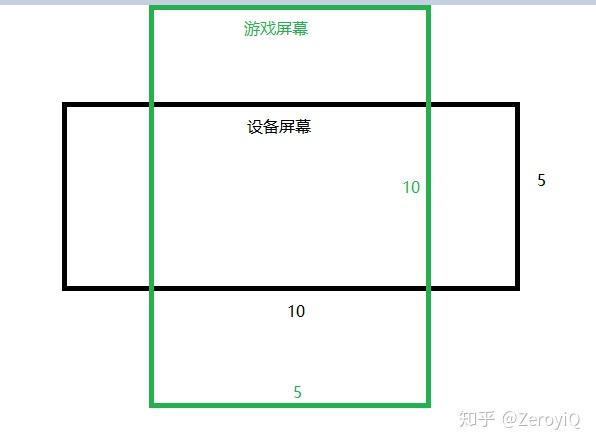
e.g. 设备和游戏屏幕比例,宽是 10/5 = 2,高是 5/10 = 0.5,匹配值设定为 0.5。
正常空间平均值计算:(2+0.5)* 0.5 = 1.25,会放大 Canvas。
对数空间平均值计算:2^((log2(2)+log2(0.5))*0.5) =2^((1+-1)*0.5) = 1 ,Canvas 比例不变。
3. Image 、RawImage
对于图片、图集展示的组件。
3.1 区别
- Image:展示图集中的图元,能够参与合并。
- RawImage:能展示单张图片,不能合并。
3.2 选择
图片尺寸小,能够打成图集 -> Image
图片尺寸大,合图效率低 -> RawIamge
图片相同类型数量多,合并图集太大,实际展示图片又很少 -> RawIamge
4. RectTransForm
虽然 RectTransform 是 UnityEngine 下的类,但是在 UGUI 中大量使用,也需要有所了解。
简单来说,UGUI 通过 RectTransform 来定义 UI 的位置、大小、旋转。
4.1 Anchors
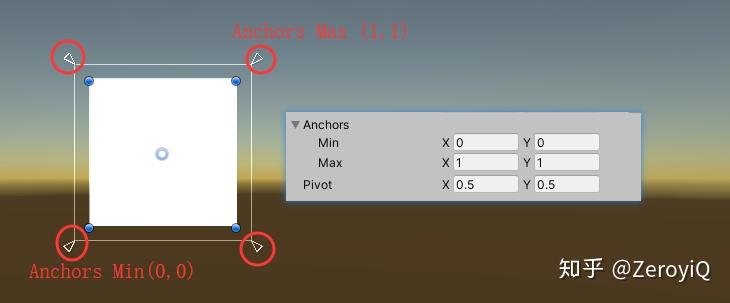
锚点:子节点相对于父节点的对齐依据。数值为相对于父节点的比例。
100X100的图片,全展 Anchors,父节点 120X120 效果如下。
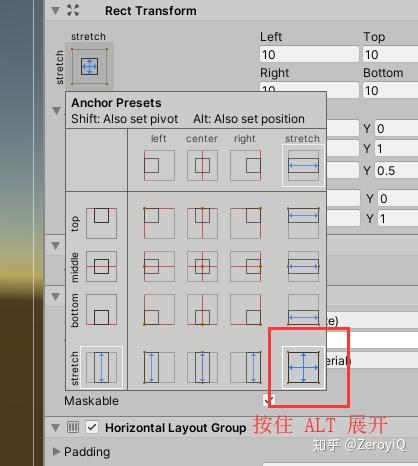
Anchors Presets 工具,列出了常用的 Anchor 布局。按住 Shift 可以连同 Pivot 一同改变,按住 Alt 可以连同位置一同改变,在子节点铺满父节点的时候非常好用。
添加图片注释,不超过 140 字(可选)
4.2 Pivot
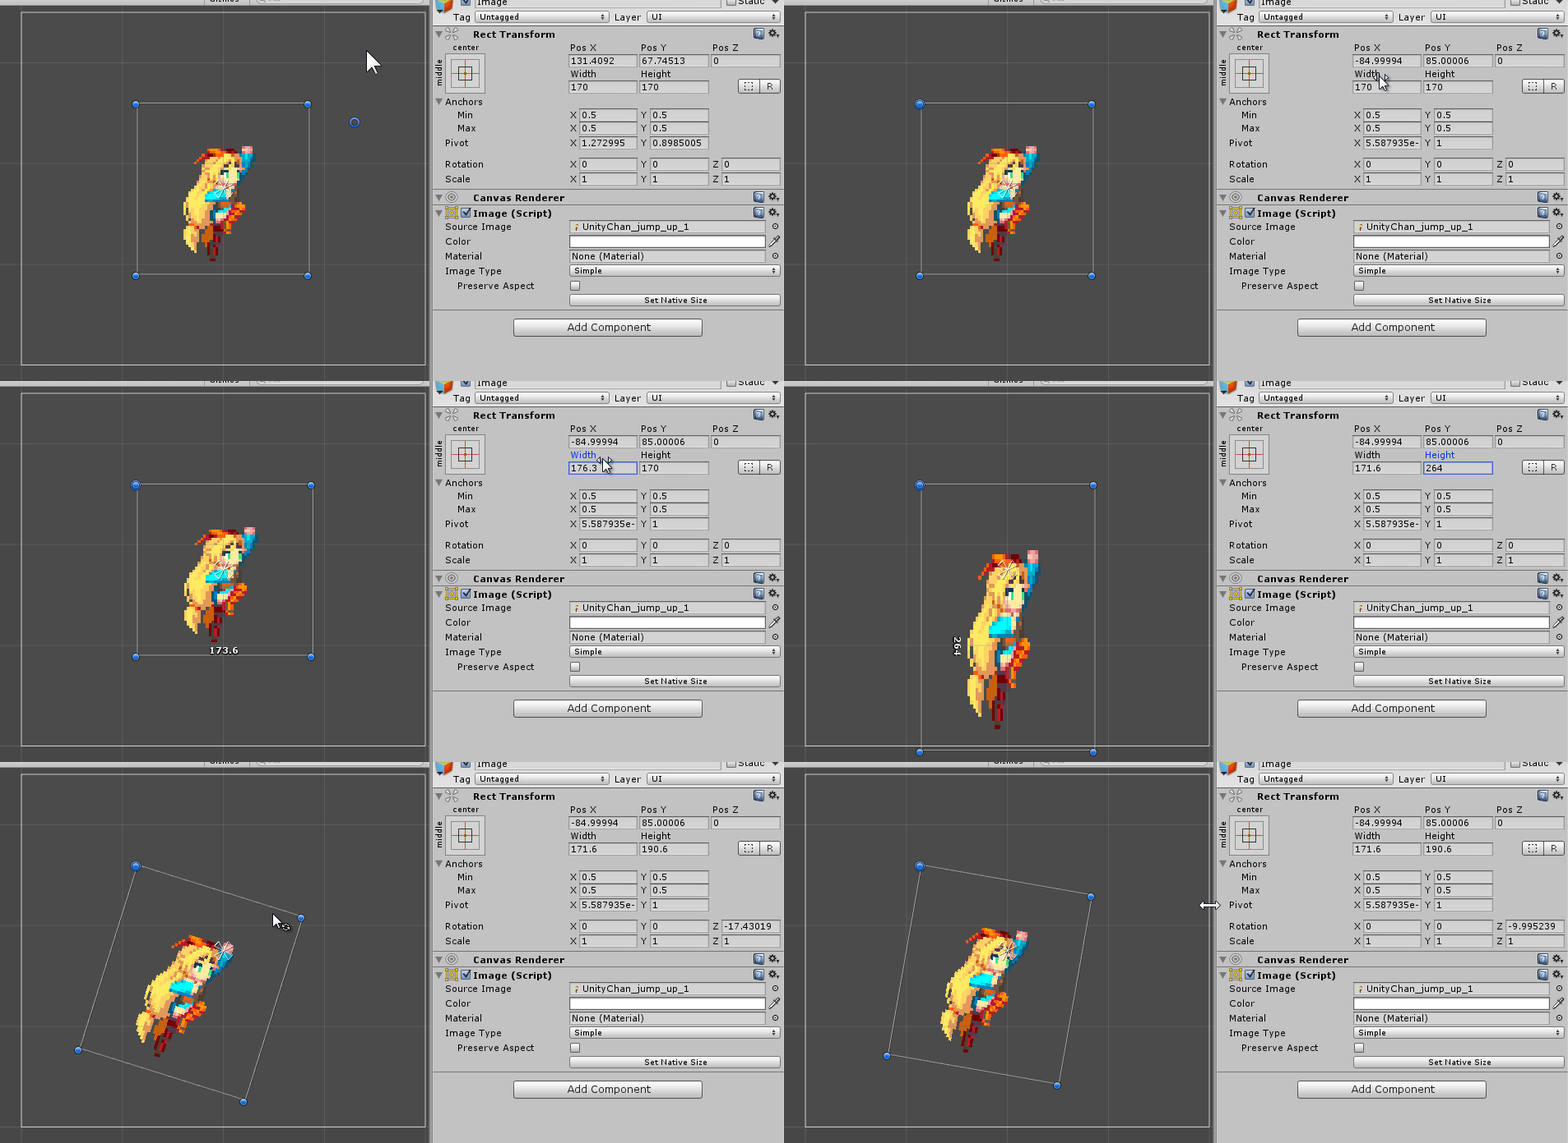
物体自身的支点,影响物体旋转、缩放、位置。
三、输入事件
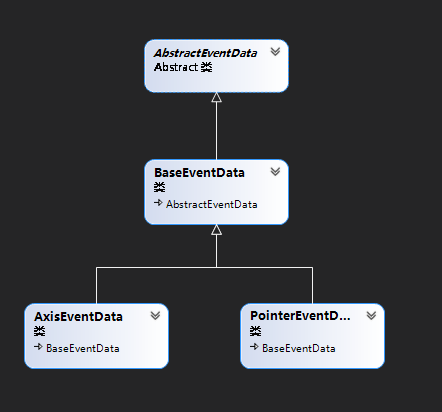
1. EventData 事件数据
- BaseEventData 基础事件数据
- AxisEventData 滚轮事件数据
- PointerEventData 点位事件数据
1.1 BaseEventData 基础事件数据
基础事件数据。包含了 EventSystem,能够获取 currentInputModule(当前输入模式)和 selectObject(选择对象)。
1.2 AxisEventData 滚轮事件数据
轴向事件数据。包含了moveDirection (移动方向)和 moveVector(移动矢量)。
1.3 PointerEventData 点位事件数据
点位数据,包含了点击和触发相关的数据,有着大量事件系统逻辑需要的数据。比如按下的位置,松开与按下的时间差,拖动的位移差等等。
public class PointerEventData : BaseEventData
{
    //...
    public GameObject pointerEnter { get; set; }

    // 接收OnPointerDown事件的物体
    private GameObject m_PointerPress;
    // 上一下接收OnPointerDown事件的物体
    public GameObject lastPress { get; private set; }
    // 接收按下事件的无法响应处理的物体
    public GameObject rawPointerPress { get; set; }
    // 接收OnDrag事件的物体
    public GameObject pointerDrag { get; set; }

    public RaycastResult pointerCurrentRaycast { get; set; }
    public RaycastResult pointerPressRaycast { get; set; }

    public List<GameObject> hovered = new List<GameObject>();

    public bool eligibleForClick { get; set; }

    public int pointerId { get; set; }

    // 鼠标或触摸时的点位
    public Vector2 position { get; set; }
    // 滚轮的移速
    public Vector2 delta { get; set; }
    // 按下时的点位
    public Vector2 pressPosition { get; set; }

    // 为双击服务的上次点击时间
    public float clickTime { get; set; }
    // 为双击服务的点击次数
    public int clickCount { get; set; }

    public Vector2 scrollDelta { get; set; }
    public bool useDragThreshold { get; set; }
    public bool dragging { get; set; }

    public InputButton button { get; set; }
     //...
}
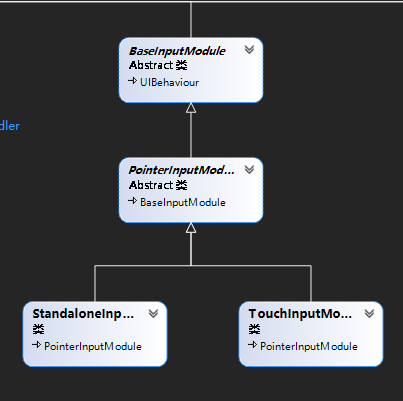
2. InputModules 输入事件捕捉模块
- BaseInputModule:抽象基类,提供基本属性和接口。
- PointerInputModule:指针输入模块,扩展了点位的输入逻辑,增加了输入类型和状态。
- StandaloneInputModule:独立输入模块,扩展了鼠标、键盘、控制器输入。(触摸也支持了)
- TouchInputModule:触摸输入模块,扩展了触控输入。(已经过时,触摸输入在 StandaloneInputModule 中处理)
2.1 StandaloneInputModule 独立输入模块
输入检测的逻辑,是通过 EventSystem 在 Update 中每帧调用当前输入模块(StandaloneInputModule)的 Progress 方法实现不断检测的。
关键方法就是 Progress。在 Progress 方法中,因为鼠标模拟层的原因,触摸需要先进行判断,然后根据判断是否有鼠标(input.mousePresent),进行鼠标事件处理。
2.2 ProcessTouchEvent 处理触摸事件
private bool ProcessTouchEvents()
{
    for (int i = 0; i < input.touchCount; ++i)
    {
        Touch touch = input.GetTouch(i);

        if (touch.type == TouchType.Indirect)
            continue;

        bool released;
        bool pressed;
        var pointer = GetTouchPointerEventData(touch, out pressed, out released);
        // 处理触摸按压 or 释放
        ProcessTouchPress(pointer, pressed, released);

        if (!released)
        {
            // 触摸没有释放,需要处理移动和拖拽
            ProcessMove(pointer);
            ProcessDrag(pointer);
        }
        else
            RemovePointerData(pointer);
    }
    return input.touchCount > 0;
}
protected void ProcessTouchPress(PointerEventData pointerEvent, bool pressed, bool released)
{
    var currentOverGo = pointerEvent.pointerCurrentRaycast.gameObject;

    // 处理按压
    // PointerDown notification
    if (pressed)
    {
        // 初始化 pointerEvent
        pointerEvent.eligibleForClick = true;
        pointerEvent.delta = Vector2.zero;
        pointerEvent.dragging = false;
        pointerEvent.useDragThreshold = true;
        pointerEvent.pressPosition = pointerEvent.position;
        pointerEvent.pointerPressRaycast = pointerEvent.pointerCurrentRaycast;

        DeselectIfSelectionChanged(currentOverGo, pointerEvent);

        if (pointerEvent.pointerEnter != currentOverGo)
        {
            // 当前按压对象与上一进入对象不同,触发 exit 和 enter
            // send a pointer enter to the touched element if it isn't the one to select...
            HandlePointerExitAndEnter(pointerEvent, currentOverGo);
            // 更新进入对象
            pointerEvent.pointerEnter = currentOverGo;
        }

        // 依照当前对象所在树状结构(Hierarchy)自下而上寻找能够执行 PointerDown 的对象
        // search for the control that will receive the press
        // if we can't find a press handler set the press
        // handler to be what would receive a click.
        var newPressed = ExecuteEvents.ExecuteHierarchy(currentOverGo, pointerEvent, ExecuteEvents.pointerDownHandler);

        // 如果没有找到执行 PointerDown 事件的对象,尝试 Click 事件,同样自下而上查找
        // didnt find a press handler... search for a click handler
        if (newPressed == null)
            newPressed = ExecuteEvents.GetEventHandler<IPointerClickHandler>(currentOverGo);

        // Debug.Log("Pressed: " + newPressed);

        float time = Time.unscaledTime;

        // 响应的是同一个对象,与上一次点击间隔小于0.3,点击次数才会增加
        if (newPressed == pointerEvent.lastPress)
        {
            var diffTime = time - pointerEvent.clickTime;
            if (diffTime < 0.3f)
                ++pointerEvent.clickCount;
            else
                pointerEvent.clickCount = 1;

            pointerEvent.clickTime = time;
        }
        else
        {
            pointerEvent.clickCount = 1;
        }
        // 更新数据
        pointerEvent.pointerPress = newPressed;
        pointerEvent.rawPointerPress = currentOverGo;

        pointerEvent.clickTime = time;

        // 初始化一个潜在的拖拽 drop 事件
        // Save the drag handler as well
        pointerEvent.pointerDrag = ExecuteEvents.GetEventHandler<IDragHandler>(currentOverGo);

        if (pointerEvent.pointerDrag != null)
            ExecuteEvents.Execute(pointerEvent.pointerDrag, pointerEvent, ExecuteEvents.initializePotentialDrag);

        m_InputPointerEvent = pointerEvent;
    }

    // 处理释放
    // PointerUp notification
    if (released)
    {
        // 处理 PointerUp 事件
        // Debug.Log("Executing pressup on: " + pointer.pointerPress);
        ExecuteEvents.Execute(pointerEvent.pointerPress, pointerEvent, ExecuteEvents.pointerUpHandler);

        // Debug.Log("KeyCode: " + pointer.eventData.keyCode);

        // see if we mouse up on the same element that we clicked on...
        var pointerUpHandler = ExecuteEvents.GetEventHandler<IPointerClickHandler>(currentOverGo);

        // 如果 PointerPress 和 PointerUp 的对象相同,执行 PointerClick 事件
        // PointerClick and Drop events
        if (pointerEvent.pointerPress == pointerUpHandler && pointerEvent.eligibleForClick)
        {
            ExecuteEvents.Execute(pointerEvent.pointerPress, pointerEvent, ExecuteEvents.pointerClickHandler);
        }
        else if (pointerEvent.pointerDrag != null && pointerEvent.dragging) // 判断是否有拖拽,执行拖拽 drop 事件
        {
            ExecuteEvents.ExecuteHierarchy(currentOverGo, pointerEvent, ExecuteEvents.dropHandler);
        }
        // 更新数据,清除点击对象
        pointerEvent.eligibleForClick = false;
        pointerEvent.pointerPress = null;
        pointerEvent.rawPointerPress = null;

        // 执行 EndDrog 事件
        if (pointerEvent.pointerDrag != null && pointerEvent.dragging)
            ExecuteEvents.Execute(pointerEvent.pointerDrag, pointerEvent, ExecuteEvents.endDragHandler);

        pointerEvent.dragging = false;
        pointerEvent.pointerDrag = null;

        // 执行 Exit 事件
        // send exit events as we need to simulate this on touch up on touch device
        ExecuteEvents.ExecuteHierarchy(pointerEvent.pointerEnter, pointerEvent, ExecuteEvents.pointerExitHandler);
        pointerEvent.pointerEnter = null;

        m_InputPointerEvent = pointerEvent;
    }
}
2.3 ProcessMouseEvent 处理鼠标事件
protected void ProcessMouseEvent(int id)
{
    var mouseData = GetMousePointerEventData(id);
    var leftButtonData = mouseData.GetButtonState(PointerEventData.InputButton.Left).eventData;

    m_CurrentFocusedGameObject = leftButtonData.buttonData.pointerCurrentRaycast.gameObject;

    // 处理左键
    // Process the first mouse button fully
    ProcessMousePress(leftButtonData);
    ProcessMove(leftButtonData.buttonData);
    ProcessDrag(leftButtonData.buttonData);

    // 处理右键和中键
    // Now process right / middle clicks
    ProcessMousePress(mouseData.GetButtonState(PointerEventData.InputButton.Right).eventData);
    ProcessDrag(mouseData.GetButtonState(PointerEventData.InputButton.Right).eventData.buttonData);
    ProcessMousePress(mouseData.GetButtonState(PointerEventData.InputButton.Middle).eventData);
    ProcessDrag(mouseData.GetButtonState(PointerEventData.InputButton.Middle).eventData.buttonData);

    // 处理滚轮事件
    if (!Mathf.Approximately(leftButtonData.buttonData.scrollDelta.sqrMagnitude, 0.0f))
    {
        var scrollHandler = ExecuteEvents.GetEventHandler<IScrollHandler>(leftButtonData.buttonData.pointerCurrentRaycast.gameObject);
        ExecuteEvents.ExecuteHierarchy(scrollHandler, leftButtonData.buttonData, ExecuteEvents.scrollHandler);
    }
}
ProcessMousePress 与 ProcessTouchPress 极其相似,不过多叙述。
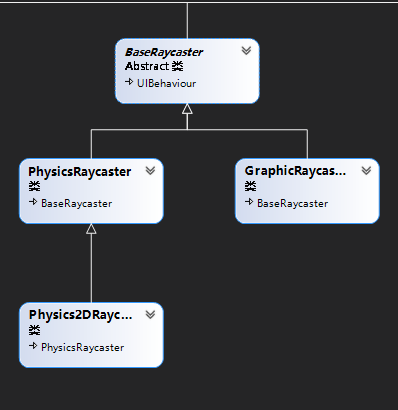
3. Raycasters 射线碰撞检测
- BaseRaycaster:抽象类
- PhysicsRaycaster:3D 射线碰撞检测,用射线的方式做碰撞检测,碰撞结果根据距离远近排序。
- Physics2DRaycaster:2D 射线碰撞检测,与 3D 的区别是预留了 2D 的层级顺序进行排序。
- GraphicRaycaster:图形射线碰撞检测,通过遍历可点击 UGUI 元素,根据点位判断。【常用】
3.1 GraphicRaycaster 图形射线碰撞检测
[NonSerialized] static readonly List<Graphic> s_SortedGraphics = new List<Graphic>();
private static void Raycast(Canvas canvas, Camera eventCamera, Vector2 pointerPosition, IList<Graphic> foundGraphics, List<Graphic> results)
{
    // Necessary for the event system
    int totalCount = foundGraphics.Count;
    for (int i = 0; i < totalCount; ++i)
    {
        Graphic graphic = foundGraphics[i];

        // 依次判断所有图形,depth 不为 -1,是射线目标,没有被渲染剔除(可点击)
        // depth 深度为 -1 代表未被 Canvas 处理,还没有被绘制出来
        if (graphic.depth == -1 || !graphic.raycastTarget || graphic.canvasRenderer.cull)
            continue;

        if (!RectTransformUtility.RectangleContainsScreenPoint(graphic.rectTransform, pointerPosition, eventCamera))
            continue;

        if (eventCamera != null && eventCamera.WorldToScreenPoint(graphic.rectTransform.position).z > eventCamera.farClipPlane)
            continue;
        // 判断点位是否落在图形上
        if (graphic.Raycast(pointerPosition, eventCamera))
        {
            s_SortedGraphics.Add(graphic);
        }
    }
    // 根据 depth 排序
    s_SortedGraphics.Sort((g1, g2) => g2.depth.CompareTo(g1.depth));
    totalCount = s_SortedGraphics.Count;
    for (int i = 0; i < totalCount; ++i)
        results.Add(s_SortedGraphics[i]);

    s_SortedGraphics.Clear();
}
4. EventHandle 事件处理和回调
主要逻辑集中在 EventSystem 中,是整个事件模块的入口,继承了 MonoBehavior,在 Update 中帧循环做轮询。
protected virtual void Update()
{
    if (current != this)
        return;
    // tick 模块(输入模块运行 UpdateModule)
    TickModules();

    bool changedModule = false;
    for (var i = 0; i < m_SystemInputModules.Count; i++)
    {
        var module = m_SystemInputModules[i];
        if (module.IsModuleSupported() && module.ShouldActivateModule())
        {
            if (m_CurrentInputModule != module)
            {
                ChangeEventModule(module);
                changedModule = true;
            }
            break;
        }
    }

    // 没有设置输入模块,设置第一个
    if (m_CurrentInputModule == null)
    {
        for (var i = 0; i < m_SystemInputModules.Count; i++)
        {
            var module = m_SystemInputModules[i];
            if (module.IsModuleSupported())
            {
                ChangeEventModule(module);
                changedModule = true;
                break;
            }
        }
    }
    // 调用输入模块 Progress
    if (!changedModule && m_CurrentInputModule != null)
        m_CurrentInputModule.Process();
}
四、Core
1. Culling 裁剪
Culling 下都是裁剪的工具类,大都用在了 Mask 遮罩上。Clipping 中包含了 RectMask2D 的裁剪方法。
/// <summary>
/// Find the Rect to use for clipping.
/// Given the input RectMask2ds find a rectangle that is the overlap of all the inputs.
/// </summary>
/// <param name="rectMaskParents">RectMasks to build the overlap rect from.</param>
/// <param name="validRect">Was there a valid Rect found.</param>
/// <returns>The final compounded overlapping rect</returns>
public static Rect FindCullAndClipWorldRect(List<RectMask2D> rectMaskParents, out bool validRect)
{
    if (rectMaskParents.Count == 0)
    {
        validRect = false;
        return new Rect();
    }

    // 比较出 rectMask CanvasRect 交集部分,min取大值,max取小值
    Rect current = rectMaskParents[0].canvasRect;
    float xMin = current.xMin;
    float xMax = current.xMax;
    float yMin = current.yMin;
    float yMax = current.yMax;
    for (var i = 1; i < rectMaskParents.Count; ++i)
    {
        current = rectMaskParents[i].canvasRect;
        if (xMin < current.xMin)
            xMin = current.xMin;
        if (yMin < current.yMin)
            yMin = current.yMin;
        if (xMax > current.xMax)
            xMax = current.xMax;
        if (yMax > current.yMax)
            yMax = current.yMax;
    }

    validRect = xMax > xMin && yMax > yMin;
    if (validRect)
        return new Rect(xMin, yMin, xMax - xMin, yMax - yMin);
    else
        return new Rect();
}
2. Layout 布局
主要是布局类和自动适配类,以及部分接口。
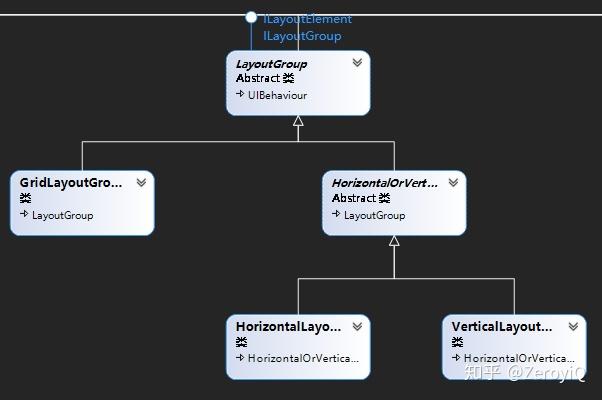
布局类如下:
- LayoutGroup:布局抽象类,实现 ILayoutElement 和 ILayoutGroup 接口
- GridLayoutGroup:网格布局
- HorizontalOrVerticalLayoutGroup:横向或纵向布局
- HorizontalLayoutGroup:横向布局
- VerticalLayoutGroup:纵向布局
2.1 LayoutGroup
主要关注 SetDirt 方法,该方法会在LayoutGroup 以下几处触发,导致更新布局。
// LayoutGroup 被激活
protected override void OnEnable()
{
    base.OnEnable();
    SetDirty();
}

// RectTransform 发送变化
protected override void OnRectTransformDimensionsChange()
{
    base.OnRectTransformDimensionsChange();
    if (isRootLayoutGroup)
        SetDirty();
}
// 有 Transform 的子对象数量发送变化
protected virtual void OnTransformChildrenChanged()
{
    SetDirty();
}
// 动画改编属性
protected override void OnDidApplyAnimationProperties()
{
    SetDirty();
}

// 设置不同属性
protected void SetProperty<T>(ref T currentValue, T newValue)
{
    if ((currentValue == null && newValue == null) || (currentValue != null && currentValue.Equals(newValue)))
        return;
    currentValue = newValue;
    SetDirty();
}
2.2 CalculateLayoutInputXxx
ILayoutElement 定义了 CalculateLayoutInputXxx 相关方法,可以计算水平(CalculateLayoutInputHorizontal)和垂直(CalculateLayoutInputVertical)的值(minWidth,preferredWidth,flexibleWidth)。
- minWidth:需要为此对象分配的最小宽度
- preferredWidth:如果空间充足的话,应当为此对象分配的宽度
- flexibleWidth:如果有多余的空间的话,可以为此对象额外分配的相对宽度
在Rebuild 的时候,会先调 CalculateLayoutInputXxx ,再 SetLayoutXxx。
LayoutGroup 中只重写了 CalculateLayoutInputHorizontal,用来查询和统计排除掉不参与布局(ignoreLayout = true)的子节点。
VerticalLayoutGroup 和 HorizontalLayoutGroup 都会调用父类 HorizontalOrVerticalLayoutGroup 的 CalcAlongAxis 方法。
/// <summary>
/// 通过给定的轴,计算子元素位置和大小
/// </summary>
/// <param name="axis">轴,0是水平,1是垂直</param>
/// <param name="isVertical">是否是垂直布局</param>
protected void CalcAlongAxis(int axis, bool isVertical)
{
    float combinedPadding = (axis == 0 ? padding.horizontal : padding.vertical);
    bool controlSize = (axis == 0 ? m_ChildControlWidth : m_ChildControlHeight);
    bool useScale = (axis == 0 ? m_ChildScaleWidth : m_ChildScaleHeight);
    bool childForceExpandSize = (axis == 0 ? m_ChildForceExpandWidth : m_ChildForceExpandHeight);

    float totalMin = combinedPadding;
    float totalPreferred = combinedPadding;
    float totalFlexible = 0;

    // 轴与当前布局相反
    bool alongOtherAxis = (isVertical ^ (axis == 1));
    for (int i = 0; i < rectChildren.Count; i++)
    {
        RectTransform child = rectChildren[i];
        float min, preferred, flexible;
        GetChildSizes(child, axis, controlSize, childForceExpandSize, out min, out preferred, out flexible);

        if (useScale)
        {
            float scaleFactor = child.localScale[axis];
            min *= scaleFactor;
            preferred *= scaleFactor;
            flexible *= scaleFactor;
        }

        if (alongOtherAxis)
        {
            totalMin = Mathf.Max(min + combinedPadding, totalMin);
            totalPreferred = Mathf.Max(preferred + combinedPadding, totalPreferred);
            totalFlexible = Mathf.Max(flexible, totalFlexible);
        }
        else
        {
            // 轴与布局相同的时候,需要加上 spacing
            totalMin += min + spacing;
            totalPreferred += preferred + spacing;

            // Increment flexible size with element's flexible size.
            totalFlexible += flexible;
        }
    }

    if (!alongOtherAxis && rectChildren.Count > 0)
    {
        // 相同轴,删除最后一个 spacing
        totalMin -= spacing;
        totalPreferred -= spacing;
    }
    totalPreferred = Mathf.Max(totalMin, totalPreferred);
    // 保存计算后的结果
    SetLayoutInputForAxis(totalMin, totalPreferred, totalFlexible, axis);
}
GridLayoutGroup 是通过网格行列数来计算 width 值的。
public override void CalculateLayoutInputHorizontal()
{
    base.CalculateLayoutInputHorizontal();

    int minColumns = 0;
    int preferredColumns = 0;
    if (m_Constraint == Constraint.FixedColumnCount)
    {
        minColumns = preferredColumns = m_ConstraintCount;
    }
    else if (m_Constraint == Constraint.FixedRowCount)
    {
        minColumns = preferredColumns = Mathf.CeilToInt(rectChildren.Count / (float)m_ConstraintCount - 0.001f);
    }
    else
    {
        minColumns = 1;
        preferredColumns = Mathf.CeilToInt(Mathf.Sqrt(rectChildren.Count));
    }

    SetLayoutInputForAxis(
        padding.horizontal + (cellSize.x + spacing.x) * minColumns - spacing.x,
        padding.horizontal + (cellSize.x + spacing.x) * preferredColumns - spacing.x,
        -1, 0);
}

public override void CalculateLayoutInputVertical()
{
    int minRows = 0;
    if (m_Constraint == Constraint.FixedColumnCount)
    {
        minRows = Mathf.CeilToInt(rectChildren.Count / (float)m_ConstraintCount - 0.001f);
    }
    else if (m_Constraint == Constraint.FixedRowCount)
    {
        minRows = m_ConstraintCount;
    }
    else
    {
        float width = rectTransform.rect.width;
        int cellCountX = Mathf.Max(1, Mathf.FloorToInt((width - padding.horizontal + spacing.x + 0.001f) / (cellSize.x + spacing.x)));
        minRows = Mathf.CeilToInt(rectChildren.Count / (float)cellCountX);
    }

    float minSpace = padding.vertical + (cellSize.y + spacing.y) * minRows - spacing.y;
    SetLayoutInputForAxis(minSpace, minSpace, -1, 1);
}
2.3 SetLayoutXxx
在 CalculateLayoutInputXxx 后,ILayoutElement 各元素都能取到正确值,接下来就是根据这些值来控制子节点的了。
VerticalLayoutGroup 和 HorizontalLayoutGroup 依旧都会调用父类 HorizontalOrVerticalLayoutGroup 的 SetChildrenAlongAxis 方法。`
protected void SetChildrenAlongAxis(int axis, bool isVertical)
{
    // 初始化参数
    float size = rectTransform.rect.size[axis];
    bool controlSize = (axis == 0 ? m_ChildControlWidth : m_ChildControlHeight);
    bool useScale = (axis == 0 ? m_ChildScaleWidth : m_ChildScaleHeight);
    bool childForceExpandSize = (axis == 0 ? m_ChildForceExpandWidth : m_ChildForceExpandHeight);
    // 根据对齐方式,返回浮点数
    // axis=0 水平,返回 0(左),0.5(中),1(右)
    // axis=1 垂直,返回 0(上),0.5(中),1(下)
    float alignmentOnAxis = GetAlignmentOnAxis(axis);

    bool alongOtherAxis = (isVertical ^ (axis == 1));
    if (alongOtherAxis)
    {
        float innerSize = size - (axis == 0 ? padding.horizontal : padding.vertical);
        for (int i = 0; i < rectChildren.Count; i++)
        {
            RectTransform child = rectChildren[i];
            float min, preferred, flexible;
            GetChildSizes(child, axis, controlSize, childForceExpandSize, out min, out preferred, out flexible);
            float scaleFactor = useScale ? child.localScale[axis] : 1f;

            float requiredSpace = Mathf.Clamp(innerSize, min, flexible > 0 ? size : preferred);
            float startOffset = GetStartOffset(axis, requiredSpace * scaleFactor);
            if (controlSize)
            {
                // 如果控制子节点的 Size,就不需要设置偏移,
                SetChildAlongAxisWithScale(child, axis, startOffset, requiredSpace, scaleFactor);
            }
            else
            {
                float offsetInCell = (requiredSpace - child.sizeDelta[axis]) * alignmentOnAxis;
                SetChildAlongAxisWithScale(child, axis, startOffset + offsetInCell, scaleFactor);
            }
        }
    }
    else
    {
        float pos = (axis == 0 ? padding.left : padding.top);
        float itemFlexibleMultiplier = 0;
        float surplusSpace = size - GetTotalPreferredSize(axis);

        // LayoutGroup 的尺寸比 preferred 大
        if (surplusSpace > 0)
        {
            if (GetTotalFlexibleSize(axis) == 0)
                pos = GetStartOffset(axis, GetTotalPreferredSize(axis) - (axis == 0 ? padding.horizontal : padding.vertical));
            else if (GetTotalFlexibleSize(axis) > 0)
                itemFlexibleMultiplier = surplusSpace / GetTotalFlexibleSize(axis);
        }

        // Preferred 不等于 min 的时候,计算出 min 和 Preferred 之间插值的系数
        float minMaxLerp = 0;
        if (GetTotalMinSize(axis) != GetTotalPreferredSize(axis))
            minMaxLerp = Mathf.Clamp01((size - GetTotalMinSize(axis)) / (GetTotalPreferredSize(axis) - GetTotalMinSize(axis)));

        for (int i = 0; i < rectChildren.Count; i++)
        {
            RectTransform child = rectChildren[i];
            float min, preferred, flexible;
            GetChildSizes(child, axis, controlSize, childForceExpandSize, out min, out preferred, out flexible);
            float scaleFactor = useScale ? child.localScale[axis] : 1f;

            float childSize = Mathf.Lerp(min, preferred, minMaxLerp);
            childSize += flexible * itemFlexibleMultiplier;
            if (controlSize)
            {
                SetChildAlongAxisWithScale(child, axis, pos, childSize, scaleFactor);
            }
            else
            {
                float offsetInCell = (childSize - child.sizeDelta[axis]) * alignmentOnAxis;
                SetChildAlongAxisWithScale(child, axis, pos + offsetInCell, scaleFactor);
            }
            pos += childSize * scaleFactor + spacing;
        }
    }
}
protected void SetChildAlongAxisWithScale(RectTransform rect, int axis, float pos, float size, float scaleFactor)
{
    if (rect == null)
        return;

    m_Tracker.Add(this, rect,
                  DrivenTransformProperties.Anchors |
                  (axis == 0 ?
                   (DrivenTransformProperties.AnchoredPositionX | DrivenTransformProperties.SizeDeltaX) :
                   (DrivenTransformProperties.AnchoredPositionY | DrivenTransformProperties.SizeDeltaY)
                  )
                 );

    // Inlined rect.SetInsetAndSizeFromParentEdge(...) and refactored code in order to multiply desired size by scaleFactor.
    // sizeDelta must stay the same but the size used in the calculation of the position must be scaled by the scaleFactor.

    // 设置 (0,1) 锚点
    rect.anchorMin = Vector2.up;
    rect.anchorMax = Vector2.up;

    // 赋值 尺寸
    Vector2 sizeDelta = rect.sizeDelta;
    sizeDelta[axis] = size;
    rect.sizeDelta = sizeDelta;

    // 赋值 位置
    Vector2 anchoredPosition = rect.anchoredPosition;
    anchoredPosition[axis] = (axis == 0) ? (pos + size * rect.pivot[axis] * scaleFactor) : (-pos - size * (1f - rect.pivot[axis]) * scaleFactor);
    rect.anchoredPosition = anchoredPosition;
}
2.4 自适应
- AspectRatioFitter:朝向自适应
- CanvasScaler:画布大小自适应,具体内容可以看 二、2 CanvasScale
- ContentSizeFitter:内容自适应
AspectRatioFitter 主要定义了一个枚举类型 AspectMode。
public enum AspectMode
{
	//不使用适合的纵横比
	None,

	//让Height随着Width自动调节
	WidthControlsHeight,

	//让Width随着Height自动调节
	HeightControlsWidth,

	//宽度、高度、位置和锚点都会被自动调整,以使得该矩形拟合父物体的矩形内,同时保持宽高比
    FitInParent,

	//宽度、高度、位置和锚点都会被自动调整,以使得该矩形覆盖父物体的整个区域,同时保持宽高比
	EnvelopeParent
}
核心方法 UpdateRect,在 OnEnable、OnRectTransformDimensionsChange 和 SetDirty 的时候都会调用。UpdateRect 根据 AspectMode 调整自身的 RectTransform 值。
private void UpdateRect()
{
    if (!IsActive())
        return;

    m_Tracker.Clear();

    switch (m_AspectMode)
    {
            #if UNITY_EDITOR
                case AspectMode.None:
            {
                if (!Application.isPlaying)
                    m_AspectRatio = Mathf.Clamp(rectTransform.rect.width / rectTransform.rect.height, 0.001f, 1000f);

                break;
            }
            #endif
                case AspectMode.HeightControlsWidth:
            {
                m_Tracker.Add(this, rectTransform, DrivenTransformProperties.SizeDeltaX);
                rectTransform.SetSizeWithCurrentAnchors(RectTransform.Axis.Horizontal, rectTransform.rect.height * m_AspectRatio);
                break;
            }
        case AspectMode.WidthControlsHeight:
            {
                m_Tracker.Add(this, rectTransform, DrivenTransformProperties.SizeDeltaY);
                rectTransform.SetSizeWithCurrentAnchors(RectTransform.Axis.Vertical, rectTransform.rect.width / m_AspectRatio);
                break;
            }
        case AspectMode.FitInParent:
        case AspectMode.EnvelopeParent:
            {
                m_Tracker.Add(this, rectTransform,
                              DrivenTransformProperties.Anchors |
                              DrivenTransformProperties.AnchoredPosition |
                              DrivenTransformProperties.SizeDeltaX |
                              DrivenTransformProperties.SizeDeltaY);

                rectTransform.anchorMin = Vector2.zero;
                rectTransform.anchorMax = Vector2.one;
                rectTransform.anchoredPosition = Vector2.zero;

                Vector2 sizeDelta = Vector2.zero;
                Vector2 parentSize = GetParentSize();
                // 按照宽高比计算父节点大小
                if ((parentSize.y * aspectRatio < parentSize.x) ^ (m_AspectMode == AspectMode.FitInParent))
                {
                    sizeDelta.y = GetSizeDeltaToProduceSize(parentSize.x / aspectRatio, 1);
                }
                else
                {
                    sizeDelta.x = GetSizeDeltaToProduceSize(parentSize.y * aspectRatio, 0);
                }
                rectTransform.sizeDelta = sizeDelta;

                break;
            }
    }
}
ContentSizeFitter是通过 SetDirty 调用的,同样是在 OnEnable、OnRectTransformDimensionsChange、改变参数的时候,会设置 Dirty。
protected void SetDirty()
{
    if (!IsActive())
        return;
	// layout reduild
    LayoutRebuilder.MarkLayoutForRebuild(rectTransform);
}
重构布局,会调用 SetLayoutHorizontal、SetLayoutVertical,最终调用到了核心方法 HandleSelfFittingAlongAxis。
private void HandleSelfFittingAlongAxis(int axis)
{
    FitMode fitting = (axis == 0 ? horizontalFit : verticalFit);
    if (fitting == FitMode.Unconstrained)
    {
        // Keep a reference to the tracked transform, but don't control its properties:
        m_Tracker.Add(this, rectTransform, DrivenTransformProperties.None);
        return;
    }

    m_Tracker.Add(this, rectTransform, (axis == 0 ? DrivenTransformProperties.SizeDeltaX : DrivenTransformProperties.SizeDeltaY));

    // Set size to min or preferred size
    if (fitting == FitMode.MinSize)
        // getMinSize 是获取 CalculateLayoutInputXxx 的值
        rectTransform.SetSizeWithCurrentAnchors((RectTransform.Axis)axis, LayoutUtility.GetMinSize(m_Rect, axis));
    else
        // GetPreferredSize 同上
        rectTransform.SetSizeWithCurrentAnchors((RectTransform.Axis)axis, LayoutUtility.GetPreferredSize(m_Rect, axis));
}
3. Utility 工具
3.1ObjectPool
对象池,由一个栈实现。
internal class ObjectPool<T> where T : new()
{
    private readonly Stack<T> m_Stack = new Stack<T>();
    private readonly UnityAction<T> m_ActionOnGet;
    private readonly UnityAction<T> m_ActionOnRelease;

    public int countAll { get; private set; }
    public int countActive { get { return countAll - countInactive; } }
    public int countInactive { get { return m_Stack.Count; } }

    public ObjectPool(UnityAction<T> actionOnGet, UnityAction<T> actionOnRelease)
    {
        m_ActionOnGet = actionOnGet;
        m_ActionOnRelease = actionOnRelease;
    }

    public T Get()
    {
        T element;
        // 池子为空
        if (m_Stack.Count == 0)
        {
            element = new T();
            countAll++;
        }
        else
        {
            // 从池子取出对象
            element = m_Stack.Pop();
        }
        if (m_ActionOnGet != null)
            m_ActionOnGet(element);
        return element;
    }

    public void Release(T element)
    {
        if (m_Stack.Count > 0 && ReferenceEquals(m_Stack.Peek(), element))
            Debug.LogError("Internal error. Trying to destroy object that is already released to pool.");
        if (m_ActionOnRelease != null)
            m_ActionOnRelease(element);
        // 放入池子
        m_Stack.Push(element);
    }
}
3.2 ListPool
在对象池 ObjectPooL 基础上实现的一个静态列表对象池。
internal static class ListPool<T>
{
    // Object pool to avoid allocations.
    private static readonly ObjectPool<List<T>> s_ListPool = new ObjectPool<List<T>>(null, Clear);
    static void Clear(List<T> l) { l.Clear(); }

    public static List<T> Get()
    {
        return s_ListPool.Get();
    }

    public static void Release(List<T> toRelease)
    {
        s_ListPool.Release(toRelease);
    }
}
3.3 VertexHelper
该类十分重要,是储存用来生成 Mesh 网格需要的所有数据。该类利用了上面两个类 ObjectPool 和 ListPool 来使得数据高效利用,本身不负责计算和生成 Mesh,仅仅是数据的储存集合。
public class VertexHelper : IDisposable
{
    private List<Vector3> m_Positions;
    private List<Color32> m_Colors;
    private List<Vector2> m_Uv0S;
    private List<Vector2> m_Uv1S;
    private List<Vector2> m_Uv2S;
    private List<Vector2> m_Uv3S;
    private List<Vector3> m_Normals;
    private List<Vector4> m_Tangents;
    private List<int> m_Indices;

    private static readonly Vector4 s_DefaultTangent = new Vector4(1.0f, 0.0f, 0.0f, -1.0f);
    private static readonly Vector3 s_DefaultNormal = Vector3.back;

    private bool m_ListsInitalized = false;

    private void InitializeListIfRequired()
    {
        if (!m_ListsInitalized)
        {
            m_Positions = ListPool<Vector3>.Get();
            m_Colors = ListPool<Color32>.Get();
            m_Uv0S = ListPool<Vector2>.Get();
            m_Uv1S = ListPool<Vector2>.Get();
            m_Uv2S = ListPool<Vector2>.Get();
            m_Uv3S = ListPool<Vector2>.Get();
            m_Normals = ListPool<Vector3>.Get();
            m_Tangents = ListPool<Vector4>.Get();
            m_Indices = ListPool<int>.Get();
            m_ListsInitalized = true;
        }
    }
}
4. SpecializedCollections 特殊集合
4.1IndexedSet
由一个 List
public bool AddUnique(T item)
{
    // 判断添加重复
    if (m_Dictionary.ContainsKey(item))
        return false;

    m_List.Add(item);
    m_Dictionary.Add(item, m_List.Count - 1);

    return true;
}
public bool Contains(T item)
{
    return m_Dictionary.ContainsKey(item);
}
public bool Remove(T item)
{
    int index = -1;
    if (!m_Dictionary.TryGetValue(item, out index))
        return false;

    RemoveAt(index);
    return true;
}
public void RemoveAt(int index)
{
    T item = m_List[index];
    m_Dictionary.Remove(item);
    if (index == m_List.Count - 1)
        m_List.RemoveAt(index);
    else
    {
        // List 交换删除位置和末位,然后删除末位
        int replaceItemIndex = m_List.Count - 1;
        T replaceItem = m_List[replaceItemIndex];
        m_List[index] = replaceItem;
        m_Dictionary[replaceItem] = index;	// 修改 Dictionary 末位的 Index 值
        m_List.RemoveAt(replaceItemIndex);
    }
}
5. VertexModifies 顶点修改器
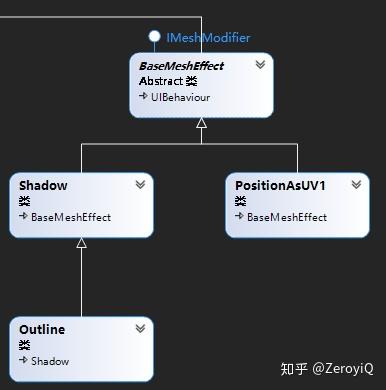
- BaseMeshEffect:抽象基类,提供修改UI元素网格需要的变量和接口,关键接口 ModifyMesh,集成类通过该接口实现效果
- PositionAsUV1:修改位置 UV
- Shadow:增加阴影
- Outline:增加包边
5.1 PositionAsUV1
public override void ModifyMesh(VertexHelper vh)
{
    UIVertex vert = new UIVertex();
    for (int i = 0; i < vh.currentVertCount; i++)
    {
        vh.PopulateUIVertex(ref vert, i);
        // 根据坐标点设置 uv1 坐标
        vert.uv1 =  new Vector2(vert.position.x, vert.position.y);
        vh.SetUIVertex(vert, i);
    }
}
5.2 Shadow
public override void ModifyMesh(VertexHelper vh)
{
    if (!IsActive())
        return;

    var output = ListPool<UIVertex>.Get();
    vh.GetUIVertexStream(output);
	// 添加阴影
    ApplyShadow(output, effectColor, 0, output.Count, effectDistance.x, effectDistance.y);
    vh.Clear();
    vh.AddUIVertexTriangleStream(output);
    ListPool<UIVertex>.Release(output);
}
protected void ApplyShadow(List<UIVertex> verts, Color32 color, int start, int end, float x, float y)
{
    ApplyShadowZeroAlloc(verts, color, start, end, x, y);
}
protected void ApplyShadowZeroAlloc(List<UIVertex> verts, Color32 color, int start, int end, float x, float y)
{
    UIVertex vt;

    // 增加顶点容量
    var neededCapacity = verts.Count + end - start;
    if (verts.Capacity < neededCapacity)
        verts.Capacity = neededCapacity;

    for (int i = start; i < end; ++i)
    {
        vt = verts[i];
        verts.Add(vt);

        Vector3 v = vt.position;
        // 设置顶点偏移
        v.x += x;
        v.y += y;
        vt.position = v;
        var newColor = color;
        if (m_UseGraphicAlpha)
            newColor.a = (byte)((newColor.a * verts[i].color.a) / 255);
        vt.color = newColor;
        verts[i] = vt;
    }
}
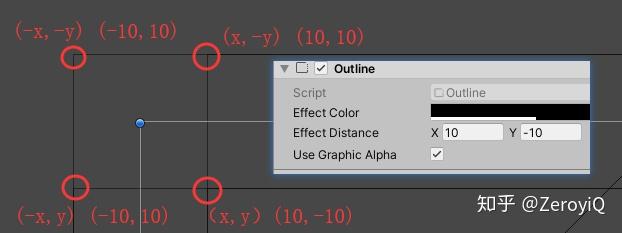
5.3 Outline
public override void ModifyMesh(VertexHelper vh)
{
    if (!IsActive())
        return;

    var verts = ListPool<UIVertex>.Get();
    vh.GetUIVertexStream(verts);

    var neededCpacity = verts.Count * 5; // 增加四个顶点
    if (verts.Capacity < neededCpacity)
        verts.Capacity = neededCpacity;

    var start = 0;
    var end = verts.Count;
    // 对应图 (x,y)
    ApplyShadowZeroAlloc(verts, effectColor, start, verts.Count, effectDistance.x, effectDistance.y);

    start = end;
    end = verts.Count;
    // 对应图 (x,-y)
    ApplyShadowZeroAlloc(verts, effectColor, start, verts.Count, effectDistance.x, -effectDistance.y);

    start = end;
    end = verts.Count;
    // 对应图 (-x,y)
    ApplyShadowZeroAlloc(verts, effectColor, start, verts.Count, -effectDistance.x, effectDistance.y);

    start = end;
    end = verts.Count;
    // 对应图 (-x,-y)
    ApplyShadowZeroAlloc(verts, effectColor, start, verts.Count, -effectDistance.x, -effectDistance.y);

    vh.Clear();
    vh.AddUIVertexTriangleStream(verts);
    ListPool<UIVertex>.Release(verts);
}
6 .核心渲染
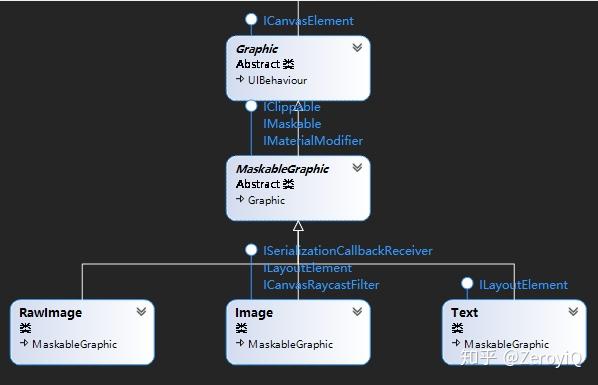
- Graphic:图形的基类,能够通知元素重新布局,重新构建材质球,重新构建网格。
- MaskableGraphic:增加了被遮罩能力。
- Image:UI 层级上的一个 Texture 元素。
- RawImage:在 UI 上展示一个 Texture2D 图片。会增加格外的 draw call,因此最好只用于背景或者临时课件图片。
- Text:展示文字的图形。
6.1 SetDirty 重构流程
关键在于 SetDirty 进行刷新的流程。
public virtual void SetAllDirty()
{
    // Optimization: Graphic layout doesn't need recalculation if
    // the underlying Sprite is the same size with the same texture.
    // (e.g. Sprite sheet texture animation)

    if (m_SkipLayoutUpdate)
    {
        m_SkipLayoutUpdate = false;
    }
    else
    {
        SetLayoutDirty();
    }

    if (m_SkipMaterialUpdate)
    {
        m_SkipMaterialUpdate = false;
    }
    else
    {
        SetMaterialDirty();
    }

    SetVerticesDirty();
}

public virtual void SetLayoutDirty()
{
    if (!IsActive())
        return;

    LayoutRebuilder.MarkLayoutForRebuild(rectTransform);

    if (m_OnDirtyLayoutCallback != null)
        m_OnDirtyLayoutCallback();
}

public virtual void SetVerticesDirty()
{
    if (!IsActive())
        return;

    m_VertsDirty = true;
    CanvasUpdateRegistry.RegisterCanvasElementForGraphicRebuild(this);

    if (m_OnDirtyVertsCallback != null)
        m_OnDirtyVertsCallback();
}


public virtual void SetMaterialDirty()
{
    if (!IsActive())
        return;

    m_MaterialDirty = true;
    CanvasUpdateRegistry.RegisterCanvasElementForGraphicRebuild(this);

    if (m_OnDirtyMaterialCallback != null)
        m_OnDirtyMaterialCallback();
}
SetLayoutDirty 会通知 LayoutRebuilder 布局管理类进行重新布局, LayoutRebuilder.MarkLayoutForRebuild 最后会调用CanvasUpdateRegistry.TryRegisterCanvasElementForLayoutRebuild 加入重构队伍。
CanvasUpdateRegistry 接到通知后不会立即重构,而是将需要重构元素(ICanvasElement)添加到队列(IndexSet)中,等待下次重构。
因此最后三个 SetDirty 都会通知 CanvasUpdateRegistry,添加到对应的重构队列中。SetLayoutDirty 会添加到布局重构队列 m_LayoutRebuildQueue,SetVerticesDirty 和 SetMaterialDirty 都会添加到图形重构队列 m_GraphicRebuildQueue 中。
CanvasUpdateRegistry 在 PerformUpdate 中处理添加到重构队列中的元素。
private void PerformUpdate()
{
    UISystemProfilerApi.BeginSample(UISystemProfilerApi.SampleType.Layout);
    CleanInvalidItems();

    m_PerformingLayoutUpdate = true;

    // 重构布局
    m_LayoutRebuildQueue.Sort(s_SortLayoutFunction);
    for (int i = 0; i <= (int)CanvasUpdate.PostLayout; i++)
    {
        for (int j = 0; j < m_LayoutRebuildQueue.Count; j++)
        {
            var rebuild = instance.m_LayoutRebuildQueue[j];	// 实现 ICanvasElement 接口的 LayoutBuilder 元素
            try
            {
                if (ObjectValidForUpdate(rebuild))
                    rebuild.Rebuild((CanvasUpdate)i);
            }
            catch (Exception e)
            {
                Debug.LogException(e, rebuild.transform);
            }
        }
    }
	// 通知布局重构完成
    for (int i = 0; i < m_LayoutRebuildQueue.Count; ++i)
        m_LayoutRebuildQueue[i].LayoutComplete();

    instance.m_LayoutRebuildQueue.Clear();
    m_PerformingLayoutUpdate = false;

    // 剪裁
    // now layout is complete do culling...
    ClipperRegistry.instance.Cull();

    // 重构图形
    m_PerformingGraphicUpdate = true;
    for (var i = (int)CanvasUpdate.PreRender; i < (int)CanvasUpdate.MaxUpdateValue; i++)
    {
        for (var k = 0; k < instance.m_GraphicRebuildQueue.Count; k++)
        {
            try
            {
                var element = instance.m_GraphicRebuildQueue[k]; // 实现 ICanvasElement 的 Graphic 元素
                if (ObjectValidForUpdate(element))
                    element.Rebuild((CanvasUpdate)i);
            }
            catch (Exception e)
            {
                Debug.LogException(e, instance.m_GraphicRebuildQueue[k].transform);
            }
        }
    }

    // 通知图形重构完成
    for (int i = 0; i < m_GraphicRebuildQueue.Count; ++i)
        m_GraphicRebuildQueue[i].GraphicUpdateComplete();

    instance.m_GraphicRebuildQueue.Clear();
    m_PerformingGraphicUpdate = false;
    UISystemProfilerApi.EndSample(UISystemProfilerApi.SampleType.Layout);
}
6.2 DoMeshGeneration 网格初始化
重构图形,会调用到 Graphic 另一个重要方法 DoMeshGeneration。进行网格的重建,注意的是 Graphic 只负责重建网格,不负责渲染和合并。
private void DoMeshGeneration()
{
    if (rectTransform != null && rectTransform.rect.width >= 0 && rectTransform.rect.height >= 0)
		// 初始化网格顶点信息(四个顶点构成两个三角形)
        OnPopulateMesh(s_VertexHelper);
    else
        s_VertexHelper.Clear(); // clear the vertex helper so invalid graphics dont draw.

    // 查找会修改顶点的组件,e.g.  上文的 Shadow、OutLine
    var components = ListPool<Component>.Get();
    GetComponents(typeof(IMeshModifier), components);

    for (var i = 0; i < components.Count; i++)
        ((IMeshModifier)components[i]).ModifyMesh(s_VertexHelper);

    ListPool<Component>.Release(components);

    // 填充网格, 并将网格提交到 CanvasRenderer
    s_VertexHelper.FillMesh(workerMesh);
    canvasRenderer.SetMesh(workerMesh);
}
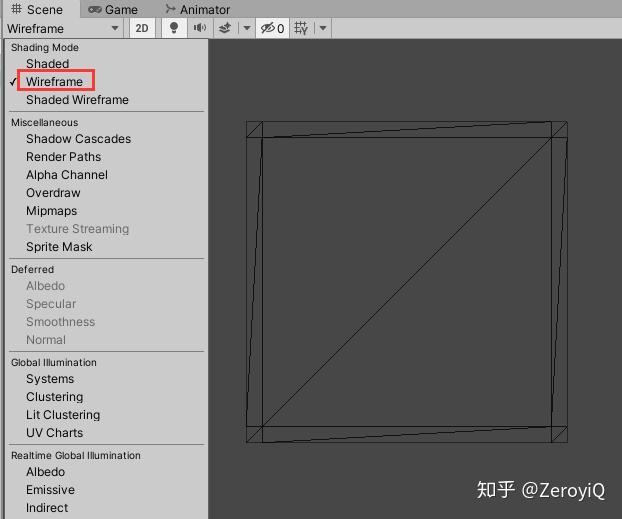
组件中 Image、RawImage、Text 都重写了 OnPopulateMesh 的方法。这些组件自己定义了不同网格样式。可以结合 Wireframe 线框图模式,查看生成的 Mesh。
6.3 Mask
Mask 是通过着色器中模板缓冲(stencil buffer)实现遮罩的,UI 组件继承了 MaskableGraphic,提供了被遮罩的能力(进行模板测试)。
stencil buffer 简单来说就是 GPU 为每一个像素提供了 1字节(8bit) 的内存区域,多个 draw call 可以通过这个共享内存,来传递消息,实现效果。
MaskableGraphic 实现了 IMaterialModifier 接口的 GetModifiedMaterial 方法,能够修改材质。
public virtual Material GetModifiedMaterial(Material baseMaterial)
{
    var toUse = baseMaterial;

    if (m_ShouldRecalculateStencil)
    {
        var rootCanvas = MaskUtilities.FindRootSortOverrideCanvas(transform);
        m_StencilValue = maskable ? MaskUtilities.GetStencilDepth(transform, rootCanvas) : 0;
        m_ShouldRecalculateStencil = false;
    }

    // if we have a enabled Mask component then it will
    // generate the mask material. This is an optimisation
    // it adds some coupling between components though :(
    Mask maskComponent = GetComponent<Mask>();
    if (m_StencilValue > 0 && (maskComponent == null || !maskComponent.IsActive()))
    {
			//设置模板缓冲值,并且设置在该区域内的显示,不在的裁切掉
                var maskMat = StencilMaterial.Add(toUse,  // Material baseMat
                    (1 << m_StencilValue) - 1, // 参考值
                    StencilOp.Keep, // 保持模板值不做修改
                    CompareFunction.Equal,  // 判断相等
                    ColorWriteMask.All, // ColorMask
                    (1 << m_StencilValue) - 1,// Readmask
                    0);//  WriteMask
        StencilMaterial.Remove(m_MaskMaterial);
        m_MaskMaterial = maskMat;
        toUse = m_MaskMaterial;
    }
    return toUse;
}
Mask 也实现了相同接口。
public virtual Material GetModifiedMaterial(Material baseMaterial)
{
    if (!MaskEnabled())
        return baseMaterial;

    var rootSortCanvas = MaskUtilities.FindRootSortOverrideCanvas(transform);
    // 获取模板深度值 (小于8 因为 stencil buffer 就 8bit)
    var stencilDepth = MaskUtilities.GetStencilDepth(transform, rootSortCanvas);
    if (stencilDepth >= 8)
    {
        Debug.LogWarning("Attempting to use a stencil mask with depth > 8", gameObject);
        return baseMaterial;
    }

    int desiredStencilBit = 1 << stencilDepth;

    // if we are at the first level...
    // we want to destroy what is there
    // 第一层 比较方法就是 Always,总是指向
    if (desiredStencilBit == 1)
    {
        // Mask 自身使用 maskMaterial
        var maskMaterial = StencilMaterial.Add(baseMaterial, 1, StencilOp.Replace, CompareFunction.Always, m_ShowMaskGraphic ? ColorWriteMask.All : 0);
        StencilMaterial.Remove(m_MaskMaterial);
        m_MaskMaterial = maskMaterial;

        // 非遮罩材质 unmaskMaterial 交给 CanvasRenderer
        var unmaskMaterial = StencilMaterial.Add(baseMaterial, 1, StencilOp.Zero, CompareFunction.Always, 0);
        StencilMaterial.Remove(m_UnmaskMaterial);
        m_UnmaskMaterial = unmaskMaterial;
        graphic.canvasRenderer.popMaterialCount = 1;
        graphic.canvasRenderer.SetPopMaterial(m_UnmaskMaterial, 0);

        return m_MaskMaterial;
    }

    //otherwise we need to be a bit smarter and set some read / write masks
    // 非第一层,就需要比较缓冲值是否相等,
    var maskMaterial2 = StencilMaterial.Add(baseMaterial, desiredStencilBit | (desiredStencilBit - 1), StencilOp.Replace, CompareFunction.Equal, m_ShowMaskGraphic ? ColorWriteMask.All : 0, desiredStencilBit - 1, desiredStencilBit | (desiredStencilBit - 1));
    StencilMaterial.Remove(m_MaskMaterial);
    m_MaskMaterial = maskMaterial2;

    graphic.canvasRenderer.hasPopInstruction = true;
    var unmaskMaterial2 = StencilMaterial.Add(baseMaterial, desiredStencilBit - 1, StencilOp.Replace, CompareFunction.Equal, 0, desiredStencilBit - 1, desiredStencilBit | (desiredStencilBit - 1));
    StencilMaterial.Remove(m_UnmaskMaterial);
    m_UnmaskMaterial = unmaskMaterial2;
    graphic.canvasRenderer.popMaterialCount = 1;
    graphic.canvasRenderer.SetPopMaterial(m_UnmaskMaterial, 0);

    return m_MaskMaterial;
}
为了方便理解,参照该博客,列出了如下表格。最后一层是 MaskableGraphic 进行的操作。

首层,则都写入缓冲值,非首层,通过 ReadMask 读取比当前层小的 缓存值,找到相同,填入新的缓冲值(bit|bit-1),e.g. bit =3 填入值就是 1000|0111 =1111
MaskGraph 会进行相等测试,只有模板测试通过的,图形才会显示出来。
6.4 RectMask2D
RectMask2D 与 Mask 不一样,是通过关联对象的 RectTransform,直接计算出不需要裁剪的部分。
public virtual void PerformClipping()
{
    if (ReferenceEquals(Canvas, null))
    {
        return;
    }

    // if the parents are changed
    // or something similar we
    // do a recalculate here
    if (m_ShouldRecalculateClipRects)
    {
        // 获取所有 RectMesh2D 遮罩范围
        MaskUtilities.GetRectMasksForClip(this, m_Clippers);
        m_ShouldRecalculateClipRects = false;
    }

    // get the compound rects from
    // the clippers that are valid
    bool validRect = true;
    // 计算出了裁切后保留的部分
    Rect clipRect = Clipping.FindCullAndClipWorldRect(m_Clippers, out validRect);

    // If the mask is in ScreenSpaceOverlay/Camera render mode, its content is only rendered when its rect
    // overlaps that of the root canvas.
    RenderMode renderMode = Canvas.rootCanvas.renderMode;
    bool maskIsCulled =
        (renderMode == RenderMode.ScreenSpaceCamera || renderMode == RenderMode.ScreenSpaceOverlay) &&
        !clipRect.Overlaps(rootCanvasRect, true);

    if (maskIsCulled)
    {
        // Children are only displayed when inside the mask. If the mask is culled, then the children
        // inside the mask are also culled. In that situation, we pass an invalid rect to allow callees
        // to avoid some processing.
        clipRect = Rect.zero;
        validRect = false;
    }

    if (clipRect != m_LastClipRectCanvasSpace)
    {
        foreach (IClippable clipTarget in m_ClipTargets)
        {
            clipTarget.SetClipRect(clipRect, validRect);
        }

        foreach (MaskableGraphic maskableTarget in m_MaskableTargets)
        {
            maskableTarget.SetClipRect(clipRect, validRect);
            maskableTarget.Cull(clipRect, validRect);	// 对UI元素进行裁切
        }
    }
    else if (m_ForceClip)
    {
        foreach (IClippable clipTarget in m_ClipTargets)
        {
            clipTarget.SetClipRect(clipRect, validRect);
        }

        foreach (MaskableGraphic maskableTarget in m_MaskableTargets)
        {
            maskableTarget.SetClipRect(clipRect, validRect);

            if (maskableTarget.canvasRenderer.hasMoved)
                maskableTarget.Cull(clipRect, validRect);// 对UI元素进行裁切
        }
    }
    else
    {
        foreach (MaskableGraphic maskableTarget in m_MaskableTargets)
        {
            if (maskableTarget.canvasRenderer.hasMoved)
                maskableTarget.Cull(clipRect, validRect);// 对UI元素进行裁切
        }
    }

    m_LastClipRectCanvasSpace = clipRect;
    m_ForceClip = false;
}