HTTP无状态
HTTP具有无状态的特性,这使得每次用户的访问都需要自己输入用户名及密码进行登录,像现在诸如淘宝、京东等购物网址根本无法使用。
Cookie技术
为了解决上述问题,产生了Cookie技术。
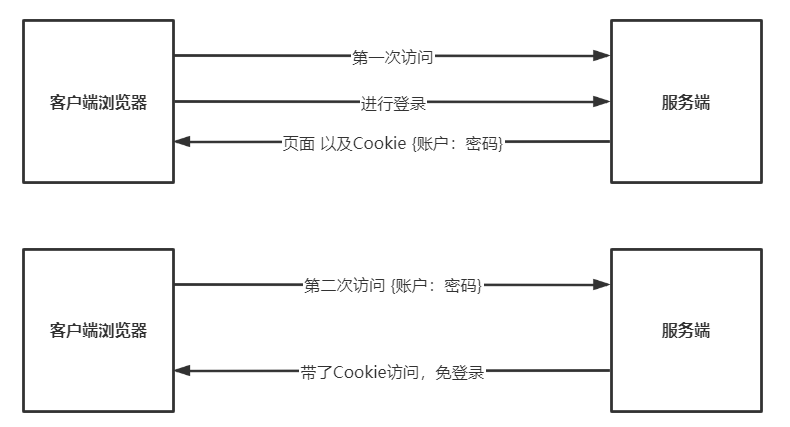
Cookie是服务端保存至客户端浏览器上的键值对。当用户第一次登录某个网站时,该网站后端服务器会生成一组key:value的键值对(通常是账户:密码),让客户端的浏览器进行保存,下次访问的时候带上这组键值对即可。1.解决了
HTTP无状态的特性2.数据极度不安全,由于
key:value保存至本地,这使得只要窃取到该数据,就能进行伪造登录
另外,Cookie规范如下:
1.一个
Cookie所携带的内容大小上限为4KB;2.一个服务器最多在客户端浏览器上保存20个
Cookie; (20个键值对)3.一个浏览器最多保存300个
Cookie;
session技术
由于Cookie会将账户和密码的键值对全部保存至本地浏览器中,这意味着本地的Cookie一旦遭到窃取,将会面临很高的风险。
所以在数据安全等各个因素下的考虑,又出现了session技术。
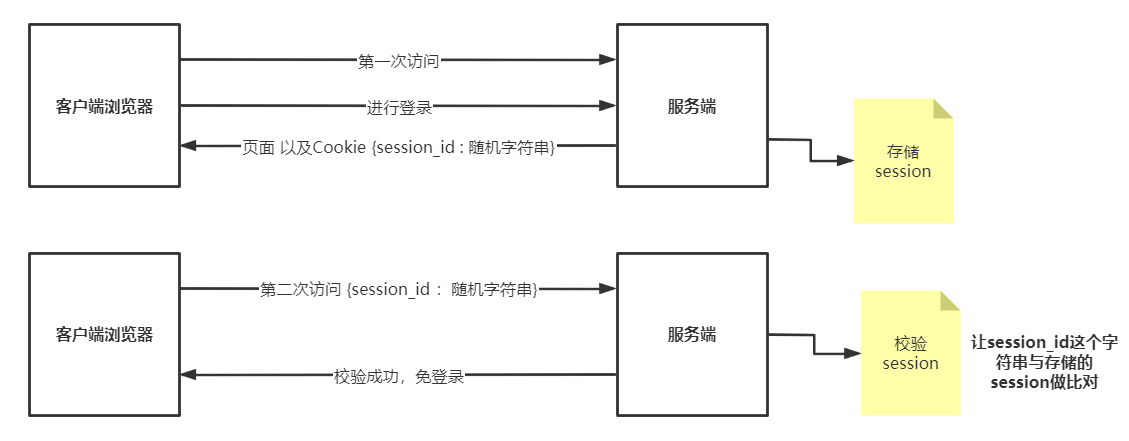
session并不会将你的账户:密码键值对交给本地的浏览器进行保存,而是在服务器上进行保存(加密保存)。但是它会返回给本地浏览器一组随机的字符串,当客户端浏览器下次访问时只要带上这一组随机字符串即可。
1.
session保存的方式多种多样,可以是存放至缓存,也可以存放至硬盘2.
session无法使得同一浏览器下同一网站同时登录不同用户3.
session可能会大量占用服务端资源4.
session基于Cookie,因为本地要放上随机字符串。
其他技术
为了解决session将数据存放至服务端造成服务端资源占用过大的情况,又出现了token以及jwt。
这里简单了解一下token,关于jwt后面会单独记录。
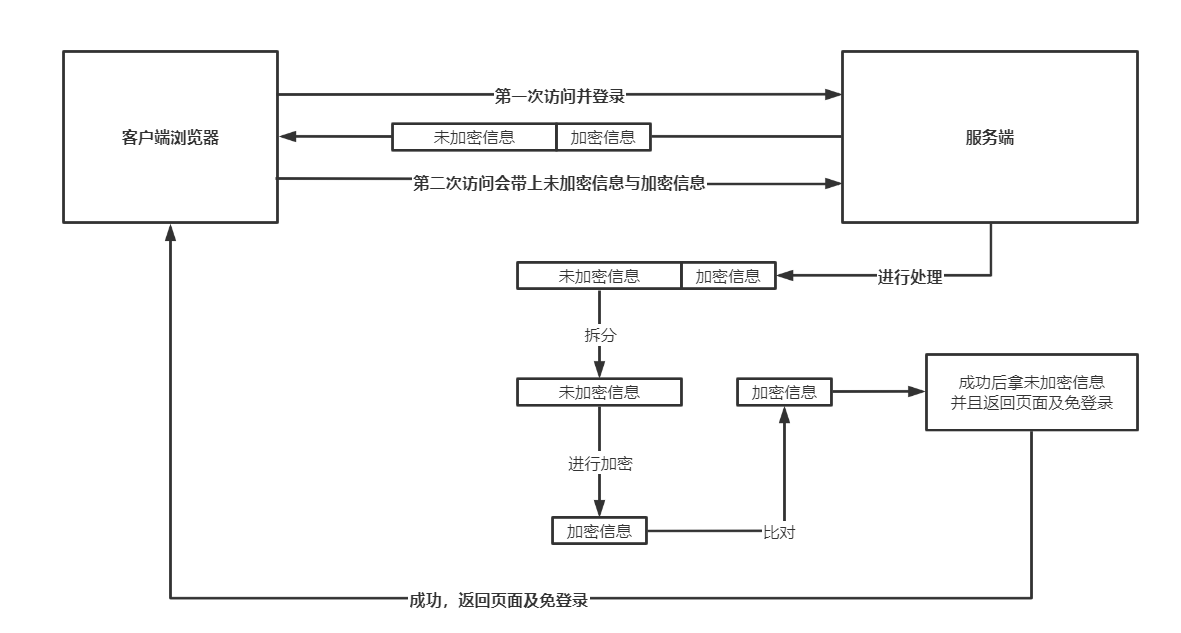
用户第一次进行访问并登录之后,将一段用户信息进行加密处理。
把这段加密之后的结果拼接在用户信息之后,将整体的这两段信息返回给浏览器保存。
用户第二次访问时,服务端截取第一段信息进行加密,并且与第二段加密信息做比对,比对成功则代表登录成功。
Django-Cookie
以下是Django中提供的操纵Cookie的方法。
| 方法名称 | 描述 | 详细信息 |
|---|---|---|
| request.COOKIES.get("cookie") | 获取Cookie | 无 |
| set_cookie("key","value") | 设置Cookie | 参见详细信息 |
| request.delete_cookie("key") | 删除Cookie | 参见详细信息 |
我该如何获取Cookie:
# 如果当前请求的cookie中存在islogin并且有值,那么就获取,没有就用这里给的默认值None
request.COOKIES.get("islogin",None)
我该如何设置Cookie:
obj = redirect("/index/")或 HttpResponse(...) 或  render(request, ...)

# 第一种方法(推荐)
	obj.set_cookie("islogin",True)  # 设置cookie值,注意这里的参数,一个是键,一个是值
	obj.set_cookie("lilz","344",20)  # 20单位为秒,代表max_age:过期时间
	obj.set_cookie("username", username)

# 第二种方法
	obj.set_cookie(key,value,...)

# 第三种方法
	obj.set_signed_cookie(key,value,salt='加密盐',...)
	这种方法在获取时,要使用另外的获取方法
	obj.get_signed_cookie(key,salt='加密盐')


# 参数注解:
max_age:过期时间
path='index'=======>表示访问index时带着cookie,其他未设置的不带cookie
domain:跨域时用
设置Cookie时的参数详解:
class HttpResponseBase:

        def set_cookie(self, key,                 键
                     value='',            值
                     max_age=None,        超长时间,通常设置这个即可
                              cookie需要延续的时间(以秒为单位)
                              如果参数是None ,这个cookie会延续到浏览器关闭为止。

                     expires=None,        超长时间,针对IE浏览器
                                 expires默认None ,cookie失效的实际日期/时间。


                     path='/',            Cookie生效的路径,
                                                  浏览器只会把cookie回传给带有该路径的页面,这样可以避免将
                                                  cookie传给站点中的其他的应用。
                                                  /表示根路径,特殊的:根路径的cookie可以被任何url的页面访问

                             domain=None,         Cookie生效的域名

                                                  你可用这个参数来构造一个跨站cookie。
                                                  如, domain=".example.com"
                                                  所构造的cookie对下面这些站点都是可读的:
                                                  www.example.com 、 www2.example.com
                                 和an.other.sub.domain.example.com 。
                                                  如果该参数设置为 None ,cookie只能由设置它的站点读取。

                     secure=False,        如果设置为 True ,浏览器将通过HTTPS来回传cookie。
                     httponly=False       只能http协议传输,无法被JavaScript获取
                                                 (不是绝对,底层抓包可以获取到也可以被覆盖)
                  ):

'''
我该如何删除Cookie:
obj.delete_cookie("cookie_key",path="/",domain=name) # 只写key也可以进行删除
Django-session
以下是Django中设置session的一些方法。
以下是注意事项:
1.如果要设置
session,则必须先运行python manage.py migrate生成物理表,session信息会存放至物理表中。2.在
Django中,session默认的超时时间为14天。
1、设置session值
		request.session["session_name"]="admin"
		request.session.set_expiry(time) 设置超时时间,为秒。如果设置为0则窗口关闭失效,可以是数字,datetime,None,0

2、获取session值
		session_name = request.session.get("session_name")
			# 取值时:
		    (1) request.COOKIE.get("sessionid") 从Cookie中获取sessionid
		    (2) 在django-session表中根据sessionid过滤session-key
		    (3) 一旦对比上了,取出过滤记录的session-data反序列化数据字典 {"susername":"egon","sis_login":True},然后存入request.session,然后我们就能通过get获取字典里的值了

3、删除session值
		del request.session["session_name"]  # 删除一组键值对
		request.session.flush()   # 删除一条记录,此操作相当于下面3个步骤
			(1) request.COOKIE.get("sessionid)   # 取cookie中的值
			(2) 在Django-session表过滤session-key的记录并删除这条记录
			(3) 删除cookie,response.delete_cookie("sessionid")
		# 为了减轻数据库的查询负担,过一段时间会自动把服务器的session删除(14天)

4、检测是否操作session值
		if "session_name" is request.session:
FBV示例
FBV下,我们可以设置装饰器,来验证请求是否带有Cookie/session,如果没有则将先进行登录。
urls.py
urlpatterns = [
    url(r'^admin/', admin.site.urls),
    url(r'^index/', views.index, name="index"),
    url(r'^login/', views.login, name="login"),
    url(r'^logout/', views.logout, name="logout"),
    url(r'^backstage/', views.backstage, name="backstage"),
    url(r'^other/', views.other, name="other"),
]
app01/views.py
from django.shortcuts import render

from django.shortcuts import render
from django.shortcuts import redirect
from django.shortcuts import reverse
from django.shortcuts import HttpResponse

# Create your views here.


def wrapp(func):
    def inner(request,*args,**kwargs):
        if request.session.get("login"):
            return func(request,*args,**kwargs)
        else:
            target_url = request.path_info

            return redirect("/login/?next={0}".format(target_url))
    return inner

def index(request):
    """ 主页 """
    return render(request,"index.html",locals())

def login(request):
    """ 登录页面 """
    target_url = request.GET.get("next",None)

    if request.method == "POST":
        username = request.POST.get("username")
        password = request.POST.get("password")

        if username == "Yunya" and password == "123456":
            request.session["login"] = True
        if not target_url:
            return redirect("/index/")  # 如果是直接点的登录页面,登陆完成后跳转到主页
        else:
            return redirect(target_url)  # 否则跳转到从其他页面过来的

    return render(request,"login.html",locals())

def logout(request):
    """ 注销登录 """
    del request.session["login"]
    request.session.flush()
    return redirect('/index/')

def backstage(request):
    """ 后台页面 """
    return HttpResponse("成功进入后台页面")

def other(request):
    """ 其他页面 """
    return HttpResponse("成功进入其他页面")
templates/index.html
<!DOCTYPE html>
<html lang="en">

<head>
    <meta charset="UTF-8">
    <meta name="viewport" content="width=device-width, initial-scale=1.0">
    <title>Document</title>
    <link href='https://cdn.bootcdn.net/ajax/libs/twitter-bootstrap/3.4.1/css/bootstrap.min.css' rel='stylesheet'>
    <script src='https://cdn.bootcdn.net/ajax/libs/jquery/3.5.1/jquery.min.js'></script>
    <script src='https://cdn.bootcdn.net/ajax/libs/twitter-bootstrap/3.4.1/js/bootstrap.min.js'></script>
</head>

<body>
    <p><a class="btn btn-primary" href="{% url 'login' %}" role="button">登录</a></p>
    <p><a class="btn btn-danger" href="{% url 'logout' %}" role="button">注销</a></p>
    <h1>
        主页
    </h1>
</body>

</html>
templates/login.html
<!DOCTYPE html>
<html lang="en">
<head>
    <meta charset="UTF-8">
    <meta name="viewport" content="width=device-width, initial-scale=1.0">
    <title>Document</title>
</head>
<body>
    <form action="" method="POST">
        <p><input type="text" placeholder="username" name="username"></p>
        <p><input type="text" placeholder="password" name="password"></p>
        <p><button type="submit">登录</button></p>
    </form>
</body>
</html>
CBV示例
以下是使用CBV添加session认证的方式。
from django.views import View
from django.utils.decorators import method_decorator

def wrapp(func):
    def inner(request, *args, **kwargs):
        if request.session.get("login"):
            return func(request, *args, **kwargs)
        else:
            target_url = request.path_info
            return redirect("/login/?next={0}".format(target_url))
    return inner

class Login(View):
    def dispatch(self, request, *args, **kwargs):
        self.target_url = request.GET.get("next", None)
        return super(Login,self).dispatch(request, *args, **kwargs)
    def get(self,request):
        return render(request, "login.html", locals())
    def post(self,request):
        username = request.POST.get("username")
        password = request.POST.get("password")
        if username == "Yunya" and password == "123456":  # 这里的验证可以新写一个方法进行
            obj = redirect("/index/")
            request.session["login"] = True
            if not self.target_url:
                return redirect("/index/")
            else:
                return redirect(self.target_url)

@method_decorator(wrapp,name="get")
class Logout(View):
    def get(self,request):
            del request.session["login"]
            request.session.flush()
            return redirect('/index/')