表格
定制表格
我们除了可以使用<table>标签进行绘制表格,在css3中display也支持进行表格的样式绘制。
| 样式规则 | 说明 |
|---|---|
| table | 对应 table |
| table-caption | 对应 caption |
| table-row | 对表 tr |
| table-cell | 对于th或td |
| table-row-group | 对应 tbody |
| table-header-group | 对应 thead |
| table-footer-group | 对应 tfoot |
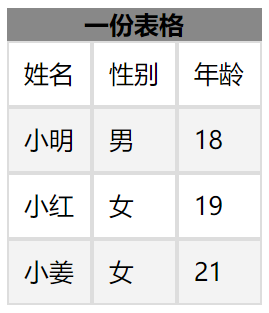

<!DOCTYPE html>
<html lang="en">
<head>
    <meta charset="UTF-8">
    <meta name="viewport" content="width=device-width, initial-scale=1.0">
    <title>Document</title>
    <link rel="stylesheet" href="./css学习.css">
</head>
<body>
    <article>
        <nav>一份表格</nav>
        <section>
            <ul>
                <li>姓名</li>
                <li>性别</li>
                <li>年龄</li>
            </ul>
        </section>
        <section>
            <ul>
                <li>小明</li>
                <li>男</li>
                <li>18</li>
            </ul>
        </section>
        <section>
            <ul>
                <li>小红</li>
                <li>女</li>
                <li>19</li>
            </ul>
        </section>
        <section>
            <ul>
                <li>小姜</li>
                <li>女</li>
                <li>21</li>
            </ul>
        </section>
    </article>
</body>
</html>

body article {
  display: table;
}
body article nav {
  display: table-caption;
  font-weight: bolder;

  text-align: center;
  vertical-align: middle;
}
body article section:nth-of-type(1) {
  display: table-header-group;
}
body article section:nth-of-type(2) {
  display: table-row-group;

}
body article section:nth-of-type(3) {
  display: table-row-group;
}
body article section:nth-of-type(4) {
  display: table-footer-group;

}
body article section ul {
  display: table-row;
}
body article section ul li {
  display: table-cell;
  border: solid 1px #ddd;
  padding: 10px;
}
表格标题
我们可以使用caption-side设置表格标题的位置,值可以是top或者bottom。
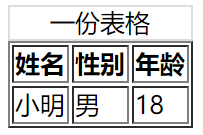
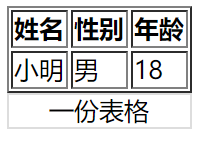

<!DOCTYPE html> <html lang="en"> <head> <meta charset="UTF-8"> <meta name="viewport" content="width=device-width, initial-scale=1.0"> <title>Document</title> <style> table>caption:first-child{ caption-side: bottom; border: solid 1px #ddd; } </style> </head> <body> <table border="1px"> <caption>一份表格</caption> <thead> <tr> <th>姓名</th> <th>性别</th> <th>年龄</th> </tr> </thead> <tbody> <tr> <td>小明</td> <td>男</td> <td>18</td> </tr> </tbody> </table> </body> </html>
内容对齐
表格中内容对齐方式可以使用text-aligen以及vertical-aligen来进行控制。
水平对齐text-aligent。
| 值 | 描述 |
|---|---|
| left | 左对齐 |
| right | 右对齐 |
| center | 居中对齐 |
垂直对齐vertical-aligen。
| 属性 | 说明 |
|---|---|
| top | 顶对齐 |
| middle | 垂直居中 |
| bottom | 底部对齐 |
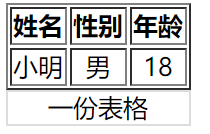

<!DOCTYPE html>
<html lang="en">
<head>
    <meta charset="UTF-8">
    <meta name="viewport" content="width=device-width, initial-scale=1.0">
    <title>Document</title>
    <style>
        table>caption:first-child{
            caption-side: bottom;
            border: solid 1px #ddd;
        }
        table tr td{
            /* 垂直与水平居中 */
            vertical-align: middle;
            text-align: center;
        }
    </style>
</head>
<body>
    <table border="1px">
        <caption>一份表格</caption>
        <thead>
            <tr>
                <th>姓名</th>
                <th>性别</th>
                <th>年龄</th>
            </tr>
        </thead>
        <tbody>
            <tr>
                <td>小明</td>
                <td>男</td>
                <td>18</td>
            </tr>
        </tbody>
    </table>
</body>
</html>
颜色设置
我们可以为<table>中的任何HTML元素进行颜色设置。
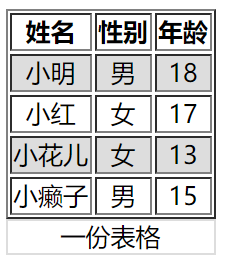

<!DOCTYPE html>
<html lang="en">
<head>
    <meta charset="UTF-8">
    <meta name="viewport" content="width=device-width, initial-scale=1.0">
    <title>Document</title>
    <style>
        table>caption:first-child{
            caption-side: bottom;
            border: solid 1px #ddd;
        }
        table tr td{
            /* 垂直与水平居中 */
            vertical-align: middle;
            text-align: center;
        }
        table tbody tr:nth-child(odd){

        }
    </style>
</head>
<body>
    <table border="1px">
        <caption>一份表格</caption>
        <thead>
            <tr>
                <th>姓名</th>
                <th>性别</th>
                <th>年龄</th>
            </tr>
        </thead>
        <tbody>
            <tr>
                <td>小明</td>
                <td>男</td>
                <td>18</td>
            </tr>
            <tr>
                <td>小红</td>
                <td>女</td>
                <td>17</td>
            </tr>
            <tr>
                <td>小花儿</td>
                <td>女</td>
                <td>13</td>
            </tr>
            <tr>
                <td>小癞子</td>
                <td>男</td>
                <td>15</td>
            </tr>
        </tbody>
    </table>
</body>
</html>
边框间距
我们可以使用border-spacing来设置边框的间距。两个值,一个对应上下,一个对应左右,单位可以是px,em,rem,%等等。
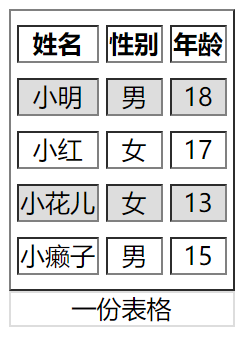

<!DOCTYPE html> <html lang="en"> <head> <meta charset="UTF-8"> <meta name="viewport" content="width=device-width, initial-scale=1.0"> <title>Document</title> <style> table{ border-spacing: 5px 10px; } table>caption:first-child{ caption-side: bottom; border: solid 1px #ddd; } table tr td{ /* 垂直与水平居中 */ vertical-align: middle; text-align: center; } table tbody tr:nth-child(odd){ } </style> </head> <body> <table border="1px"> <caption>一份表格</caption> <thead> <tr> <th>姓名</th> <th>性别</th> <th>年龄</th> </tr> </thead> <tbody> <tr> <td>小明</td> <td>男</td> <td>18</td> </tr> <tr> <td>小红</td> <td>女</td> <td>17</td> </tr> <tr> <td>小花儿</td> <td>女</td> <td>13</td> </tr> <tr> <td>小癞子</td> <td>男</td> <td>15</td> </tr> </tbody> </table> </body> </html>
边框合并
我们可以看一下上面图的表格,他们的表格边框都是有间距的。如果我们想把它设置为单线的可以使用border-collapse: collapse;进行设置。
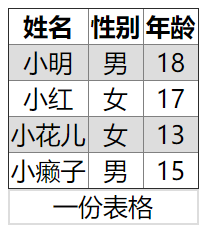

<!DOCTYPE html> <html lang="en"> <head> <meta charset="UTF-8"> <meta name="viewport" content="width=device-width, initial-scale=1.0"> <title>Document</title> <style> table{ border-spacing: 5px 10px; border-collapse: collapse; } table>caption:first-child{ caption-side: bottom; border: solid 1px #ddd; } table tr td{ /* 垂直与水平居中 */ vertical-align: middle; text-align: center; } table tbody tr:nth-child(odd){ } </style> </head> <body> <table border="1px"> <caption>一份表格</caption> <thead> <tr> <th>姓名</th> <th>性别</th> <th>年龄</th> </tr> </thead> <tbody> <tr> <td>小明</td> <td>男</td> <td>18</td> </tr> <tr> <td>小红</td> <td>女</td> <td>17</td> </tr> <tr> <td>小花儿</td> <td>女</td> <td>13</td> </tr> <tr> <td>小癞子</td> <td>男</td> <td>15</td> </tr> </tbody> </table> </body> </html>
隐藏单元格
如果想隐藏没有内容的单元格,可使用empty-cells: hide;进行设置。
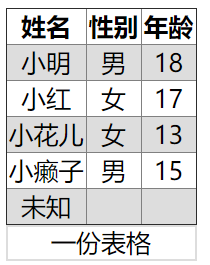

<!DOCTYPE html> <html lang="en"> <head> <meta charset="UTF-8"> <meta name="viewport" content="width=device-width, initial-scale=1.0"> <title>Document</title> <style> table{ border-spacing: 5px 10px; border-collapse: collapse; empty-cells: hide; } table>caption:first-child{ caption-side: bottom; border: solid 1px #ddd; } table tr td{ /* 垂直与水平居中 */ vertical-align: middle; text-align: center; } table tbody tr:nth-child(odd){ } </style> </head> <body> <table border="1px"> <caption>一份表格</caption> <thead> <tr> <th>姓名</th> <th>性别</th> <th>年龄</th> </tr> </thead> <tbody> <tr> <td>小明</td> <td>男</td> <td>18</td> </tr> <tr> <td>小红</td> <td>女</td> <td>17</td> </tr> <tr> <td>小花儿</td> <td>女</td> <td>13</td> </tr> <tr> <td>小癞子</td> <td>男</td> <td>15</td> </tr> <tr> <td>未知</td> <td></td> <td></td> </tr> </tbody> </table> </body> </html>
无边框表格
无边框表格需要用到之前结合的知识,使用很多选择器进行设置。
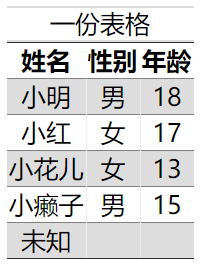

<!DOCTYPE html>
<html lang="en">
<head>
    <meta charset="UTF-8">
    <meta name="viewport" content="width=device-width, initial-scale=1.0">
    <title>Document</title>
    <style>

        table{
            border-spacing: 5px 10px;
            border-collapse: collapse;
            empty-cells: hide;
        }

        table>caption:first-child{
            caption-side: top;
            border: solid 1px #ddd;
            border-left: unset;
            border-right: unset;
        }


        table tr td{
            /* 垂直与水平居中 */
            vertical-align: middle;
            text-align: center;
            vertical-align: middle;
            text-align: center;
        }

        table tbody tr:nth-child(odd){
            background-color: #ddd;
        }

        table,table tr th,table tr td:last-child,table tr td:first-child{
            border-left: unset;
            border-right: unset;
        }

    </style>
</head>
<body>
    <table border="1px">
        <caption>一份表格</caption>
        <thead>
            <tr>
                <th>姓名</th>
                <th>性别</th>
                <th>年龄</th>
            </tr>
        </thead>
        <tbody>
            <tr>
                <td>小明</td>
                <td>男</td>
                <td>18</td>
            </tr>
            <tr>
                <td>小红</td>
                <td>女</td>
                <td>17</td>
            </tr>
            <tr>
                <td>小花儿</td>
                <td>女</td>
                <td>13</td>
            </tr>
            <tr>
                <td>小癞子</td>
                <td>男</td>
                <td>15</td>
            </tr>
            <tr>
                <td>未知</td>
                <td></td>
                <td></td>
            </tr>
        </tbody>
    </table>
</body>
</html>
数据表格
我们可以利用hover对<tr>进行一些样式上的调整。比如变色,鼠标变小手等等,让用户知道自己目前鼠标所在的表格区域。
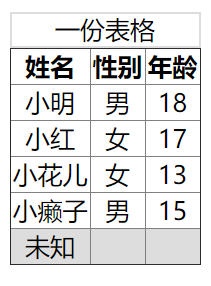

<!DOCTYPE html>
<html lang="en">
<head>
    <meta charset="UTF-8">
    <meta name="viewport" content="width=device-width, initial-scale=1.0">
    <title>Document</title>
    <style>

        table{
            border-spacing: 5px 10px;
            border-collapse: collapse;
            empty-cells: hide;
        }

        table>caption:first-child{
            caption-side: top;
            border: solid 1px #ddd;
        }


        table tr td{
            /* 垂直与水平居中 */
            vertical-align: middle;
            text-align: center;
            vertical-align: middle;
            text-align: center;
        }


        tr:hover{
            /* 鼠标停留留变色 */
            background-color: #ddd;
            /* 小手 */
            cursor: pointer;
        }

    </style>
</head>
<body>
    <table border="1px">
        <caption>一份表格</caption>
        <thead>
            <tr>
                <th>姓名</th>
                <th>性别</th>
                <th>年龄</th>
            </tr>
        </thead>
        <tbody>
            <tr>
                <td>小明</td>
                <td>男</td>
                <td>18</td>
            </tr>
            <tr>
                <td>小红</td>
                <td>女</td>
                <td>17</td>
            </tr>
            <tr>
                <td>小花儿</td>
                <td>女</td>
                <td>13</td>
            </tr>
            <tr>
                <td>小癞子</td>
                <td>男</td>
                <td>15</td>
            </tr>
            <tr>
                <td>未知</td>
                <td></td>
                <td></td>
            </tr>
        </tbody>
    </table>
</body>
</html>
列表
列表符号
默认的<ul>标签都有一个小黑点,我们可以对<ul>进行list-style-type的设置,让每个<li>都取消掉(继承性)。也可以自定义我们的列表符号。
| 值 | 描述 |
|---|---|
| none | 无标记。 |
| disc | 默认。标记是实心圆。 |
| circle | 标记是空心圆。 |
| square | 标记是实心方块。 |
| decimal | 标记是数字。 |
| decimal-leading-zero | 0开头的数字标记。(01, 02, 03, 等。) |
| lower-roman | 小写罗马数字(i, ii, iii, iv, v, 等。) |
| upper-roman | 大写罗马数字(I, II, III, IV, V, 等。) |
| lower-alpha | 小写英文字母The marker is lower-alpha (a, b, c, d, e, 等。) |
| upper-alpha | 大写英文字母The marker is upper-alpha (A, B, C, D, E, 等。) |
| lower-greek | 小写希腊字母(alpha, beta, gamma, 等。) |
| lower-latin | 小写拉丁字母(a, b, c, d, e, 等。) |
| upper-latin | 大写拉丁字母(A, B, C, D, E, 等。) |
| hebrew | 传统的希伯来编号方式 |
| armenian | 传统的亚美尼亚编号方式 |
| georgian | 传统的乔治亚编号方式(an, ban, gan, 等。) |
| cjk-ideographic | 简单的表意数字 |
| hiragana | 标记是:a, i, u, e, o, ka, ki, 等。(日文片假名) |
| katakana | 标记是:A, I, U, E, O, KA, KI, 等。(日文片假名) |
| hiragana-iroha | 标记是:i, ro, ha, ni, ho, he, to, 等。(日文片假名) |
| katakana-iroha | 标记是:I, RO, HA, NI, HO, HE, TO, 等。(日文片假名) |
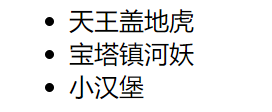

ul{
    list-style-type: none;
}
自定义列表符号可以使用list-style-image。可以是图片,或者渐变色等等。

ul{
    /* 线性渐变 */
    list-style-image:linear-gradient(45deg, red, black);
}
符号位置
我们可以使用list-style-position来定义列表符号的位置。
| 选项 | 说明 |
|---|---|
| inside | 内部 |
| outside | 外部 |

ul{
    list-style-position: inside;
}

ul{
    list-style-position: outside;
}
组合定义
我们可以使用list-style来一次性指定list-style-tpye与list-style-position。
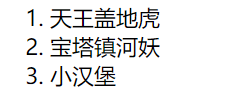
ul{
    list-style:decimal outside;
}
背景符号
我们可以为<li>来增加一个背景,然后将它调小作为列表样式符号。

ul li{
    background: url(huaji.png) no-repeat 0 6px;
    background-size: 10px 10px;
    list-style-position: inside;
    list-style: none;
    /* 文本缩进 */
    text-indent: 1em;

}
我们可以为<li>增加多背景,一个背景做列表样式符号,一个背景做标签背景。
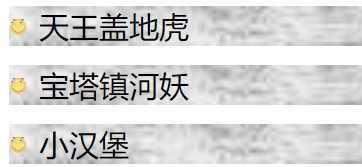
ul li{

    background: url(./huaji.png) no-repeat 0 6px,url(./bj.jpg) no-repeat;
    background-size: 10px 10px,100%;
    list-style-position: inside;
    list-style: none;
    /* 文本缩进 */
    text-indent: 1em;
    margin-bottom: 10px;

}
追加内容
基本使用
我们可以使用伪元素选择器::after向后追加内容,以及::before向前追加内容。
内容放在content中,我们可以将content增加的内容当做一个元素去看待。


<!DOCTYPE html>
<html lang="en">
<head>
    <meta charset="UTF-8">
    <meta name="viewport" content="width=device-width, initial-scale=1.0">
    <title>Document</title>
    <style>
        a{
            text-decoration: none;
        }

        a::after{
            content: "<--你就知道";
            color: blue;
        }
        a::before{
            content: "请点击-->";
            color: blue;
        }

    </style>
</head>
<body>
    <a href="http://www.baidu.com/">百度一下</a>
</body>
</html>
提取属性
我们可以使用attr()将属性提取出来。当鼠标放到连接上时,给予用户一些提示信息,如下:


<!DOCTYPE html>
<html lang="en">
<head>
    <meta charset="UTF-8">
    <meta name="viewport" content="width=device-width, initial-scale=1.0">
    <title>Document</title>
    <style>
        a{
            text-decoration: none;
        }

        a:hover::before{
            content: "您将访问:"attr(href);
            background-color: #555;
            color: white;
            position: absolute;
            top: 30px;
            padding: 5px 2px;
            border-radius: 10px;
        }

    </style>
</head>
<body>
    <a href="http://www.baidu.com/">百度一下</a>
</body>
</html>
自定义输入框
原本的表单输入框实在太丑了,我们可以给他做一些改变。


<!DOCTYPE html>
<html lang="en">
<head>
    <meta charset="UTF-8">
    <meta name="viewport" content="width=device-width, initial-scale=1.0">
    <title>Document</title>
    <style>
        body {
            padding: 80px;
        }

        .field {
            position: relative;
        }

        input {
            border: none;
            /* 去除轮廓线 */
            outline: none;
            text-align: center;
            vertical-align: middle;
        }

        .field::after {
            content: '';
            /* content的背景为渐变,高度为1px */
            background: linear-gradient(to right, white, red, green, blue, white);
            height: 30px;
            position: relative;
            /* 与输入框的大小相同 */
            width: 171px;
            height: 1px;
            display: block;
            left: 0px;
            right: 0px;
        }

        .field:hover::before {
            /* data开头的属性都是让我们提取用的....这是一种规范。 */
            content: attr(data-placeholder);
            position: absolute;
            top: -20px;
            left: 0px;
            color: #555;
            font-size: 12px;
        }
</style>
</head>
<body>
    <div class="field" data-placeholder="请输入少于100字的标题">
        <input type="text" id="name">
    </div>
</body>
</html>
