tomcat的启动:
windows下的exe文件看的话太麻烦,就找tomcat的sh脚本:

start.sh就做了一件事,启动catalina.sh脚本。
catalina.sh的执行流程如下:
1. 执行设置环境变量脚本。
2. 获取一些环境路径。
3. . "$CATALINA_HOME"/bin/setclasspath.sh (这也是一个脚本,这里不介绍)目的是设置jar和java_HOME。
4. 设置输出参数路径和配置;classpath路径,等一些java管理类的引入。
5. org.apache.catalina.startup.Bootstrap "$@" start 。
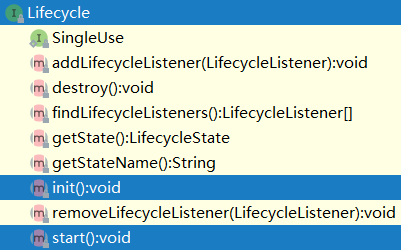
catalina.sh执行的最终目的是执行第5条步骤。下面是bootstrap类的结构图:

Bootstrap的start和stop就是tomcat生命周期的开始和结束,也就是tomcat的LifyCycle接口的功能。
1 public void start() throws Exception {#start启动函数
2         if (this.catalinaDaemon == null) {
3             this.init();
4         }
5
6         Method method = this.catalinaDaemon.getClass().getMethod("start", (Class[])null);
7         method.invoke(this.catalinaDaemon, (Object[])null);
8     }
 1 public void init() throws Exception {#初始化Catalina对象
 2         this.initClassLoaders();
 3         Thread.currentThread().setContextClassLoader(this.catalinaLoader);
 4         SecurityClassLoad.securityClassLoad(this.catalinaLoader);
 5         if (log.isDebugEnabled()) {
 6             log.debug("Loading startup class");
 7         }
 8
 9         Class<?> startupClass = this.catalinaLoader.loadClass("org.apache.catalina.startup.Catalina");
10         Object startupInstance = startupClass.getConstructor().newInstance();
11         if (log.isDebugEnabled()) {
12             log.debug("Setting startup class properties");
13         }
14
15         String methodName = "setParentClassLoader";
16         Class<?>[] paramTypes = new Class[]{Class.forName("java.lang.ClassLoader")};
17         Object[] paramValues = new Object[]{this.sharedLoader};
18         Method method = startupInstance.getClass().getMethod(methodName, paramTypes);
19         method.invoke(startupInstance, paramValues);#Catalina对象的setParentClassLoader方法,将下面初始化的classloader设置为父类clasloader
20      this.catalinaDaemon = startupInstance;
21 }
 1 private void initClassLoaders() {#这个方法初始化了classloader 属性文件在下面的catalina.properties文件中
 2         try {
 3             this.commonLoader = this.createClassLoader("common", (ClassLoader)null);
 4             if (this.commonLoader == null) {
 5                 this.commonLoader = this.getClass().getClassLoader();
 6             }
 7
 8             this.catalinaLoader = this.createClassLoader("server", this.commonLoader);
 9             this.sharedLoader = this.createClassLoader("shared", this.commonLoader);
10         } catch (Throwable var2) {
11             handleThrowable(var2);
12             log.error("Class loader creation threw exception", var2);
13             System.exit(1);
14         }
15
16     }
  1 # Licensed to the Apache Software Foundation (ASF) under one or more
  2 # contributor license agreements.  See the NOTICE file distributed with
  3 # this work for additional information regarding copyright ownership.
  4 # The ASF licenses this file to You under the Apache License, Version 2.0
  5 # (the "License"); you may not use this file except in compliance with
  6 # the License.  You may obtain a copy of the License at
  7 #
  8 #     http://www.apache.org/licenses/LICENSE-2.0
  9 #
 10 # Unless required by applicable law or agreed to in writing, software
 11 # distributed under the License is distributed on an "AS IS" BASIS,
 12 # WITHOUT WARRANTIES OR CONDITIONS OF ANY KIND, either express or implied.
 13 # See the License for the specific language governing permissions and
 14 # limitations under the License.
 15
 16 #
 17 # List of comma-separated packages that start with or equal this string
 18 # will cause a security exception to be thrown when
 19 # passed to checkPackageAccess unless the
 20 # corresponding RuntimePermission ("accessClassInPackage."+package) has
 21 # been granted.
 22 package.access=sun.,org.apache.catalina.,org.apache.coyote.,org.apache.jasper.,org.apache.tomcat.
 23 #
 24 # List of comma-separated packages that start with or equal this string
 25 # will cause a security exception to be thrown when
 26 # passed to checkPackageDefinition unless the
 27 # corresponding RuntimePermission ("defineClassInPackage."+package) has
 28 # been granted.
 29 #
 30 # by default, no packages are restricted for definition, and none of
 31 # the class loaders supplied with the JDK call checkPackageDefinition.
 32 #
 33 package.definition=sun.,java.,org.apache.catalina.,org.apache.coyote.,
 34 org.apache.jasper.,org.apache.naming.,org.apache.tomcat.
 35
 36 #
 37 #
 38 # List of comma-separated paths defining the contents of the "common"
 39 # classloader. Prefixes should be used to define what is the repository type.
 40 # Path may be relative to the CATALINA_HOME or CATALINA_BASE path or absolute.
 41 # If left as blank,the JVM system loader will be used as Catalina's "common"
 42 # loader.
 43 # Examples:
 44 #     "foo": Add this folder as a class repository
 45 #     "foo/*.jar": Add all the JARs of the specified folder as class
 46 #                  repositories
 47 #     "foo/bar.jar": Add bar.jar as a class repository
 48 #
 49 # Note: Values are enclosed in double quotes ("...") in case either the
 50 #       ${catalina.base} path or the ${catalina.home} path contains a comma.
 51 #       Because double quotes are used for quoting, the double quote character
 52 #       may not appear in a path.
 53 common.loader="${catalina.base}/lib","${catalina.base}/lib/*.jar","${catalina.home}/lib","${catalina.home}/lib/*.jar"
 54
 55 #
 56 # List of comma-separated paths defining the contents of the "server"
 57 # classloader. Prefixes should be used to define what is the repository type.
 58 # Path may be relative to the CATALINA_HOME or CATALINA_BASE path or absolute.
 59 # If left as blank, the "common" loader will be used as Catalina's "server"
 60 # loader.
 61 # Examples:
 62 #     "foo": Add this folder as a class repository
 63 #     "foo/*.jar": Add all the JARs of the specified folder as class
 64 #                  repositories
 65 #     "foo/bar.jar": Add bar.jar as a class repository
 66 #
 67 # Note: Values may be enclosed in double quotes ("...") in case either the
 68 #       ${catalina.base} path or the ${catalina.home} path contains a comma.
 69 #       Because double quotes are used for quoting, the double quote character
 70 #       may not appear in a path.
 71 server.loader=
 72
 73 #
 74 # List of comma-separated paths defining the contents of the "shared"
 75 # classloader. Prefixes should be used to define what is the repository type.
 76 # Path may be relative to the CATALINA_BASE path or absolute. If left as blank,
 77 # the "common" loader will be used as Catalina's "shared" loader.
 78 # Examples:
 79 #     "foo": Add this folder as a class repository
 80 #     "foo/*.jar": Add all the JARs of the specified folder as class
 81 #                  repositories
 82 #     "foo/bar.jar": Add bar.jar as a class repository
 83 # Please note that for single jars, e.g. bar.jar, you need the URL form
 84 # starting with file:.
 85 #
 86 # Note: Values may be enclosed in double quotes ("...") in case either the
 87 #       ${catalina.base} path or the ${catalina.home} path contains a comma.
 88 #       Because double quotes are used for quoting, the double quote character
 89 #       may not appear in a path.
 90 shared.loader=
 91
 92 # Default list of JAR files that should not be scanned using the JarScanner
 93 # functionality. This is typically used to scan JARs for configuration
 94 # information. JARs that do not contain such information may be excluded from
 95 # the scan to speed up the scanning process. This is the default list. JARs on
 96 # this list are excluded from all scans. The list must be a comma separated list
 97 # of JAR file names.
 98 # The list of JARs to skip may be over-ridden at a Context level for individual
 99 # scan types by configuring a JarScanner with a nested JarScanFilter.
100 # The JARs listed below include:
101 # - Tomcat Bootstrap JARs
102 # - Tomcat API JARs
103 # - Catalina JARs
104 # - Jasper JARs
105 # - Tomcat JARs
106 # - Common non-Tomcat JARs
107 # - Test JARs (JUnit, Cobertura and dependencies)
108 tomcat.util.scan.StandardJarScanFilter.jarsToSkip=
109 annotations-api.jar,
110 ant-junit*.jar,
111 ant-launcher.jar,
112 ant.jar,
113 asm-*.jar,
114 aspectj*.jar,
115 bootstrap.jar,
116 catalina-ant.jar,
117 catalina-ha.jar,
118 catalina-ssi.jar,
119 catalina-storeconfig.jar,
120 catalina-tribes.jar,
121 catalina.jar,
122 cglib-*.jar,
123 cobertura-*.jar,
124 commons-beanutils*.jar,
125 commons-codec*.jar,
126 commons-collections*.jar,
127 commons-daemon.jar,
128 commons-dbcp*.jar,
129 commons-digester*.jar,
130 commons-fileupload*.jar,
131 commons-httpclient*.jar,
132 commons-io*.jar,
133 commons-lang*.jar,
134 commons-logging*.jar,
135 commons-math*.jar,
136 commons-pool*.jar,
137 dom4j-*.jar,
138 easymock-*.jar,
139 ecj-*.jar,
140 el-api.jar,
141 geronimo-spec-jaxrpc*.jar,
142 h2*.jar,
143 hamcrest-*.jar,
144 hibernate*.jar,
145 httpclient*.jar,
146 icu4j-*.jar,
147 jasper-el.jar,
148 jasper.jar,
149 jaspic-api.jar,
150 jaxb-*.jar,
151 jaxen-*.jar,
152 jdom-*.jar,
153 jetty-*.jar,
154 jmx-tools.jar,
155 jmx.jar,
156 jsp-api.jar,
157 jstl.jar,
158 jta*.jar,
159 junit-*.jar,
160 junit.jar,
161 log4j*.jar,
162 mail*.jar,
163 objenesis-*.jar,
164 oraclepki.jar,
165 oro-*.jar,
166 servlet-api-*.jar,
167 servlet-api.jar,
168 slf4j*.jar,
169 taglibs-standard-spec-*.jar,
170 tagsoup-*.jar,
171 tomcat-api.jar,
172 tomcat-coyote.jar,
173 tomcat-dbcp.jar,
174 tomcat-i18n-*.jar,
175 tomcat-jdbc.jar,
176 tomcat-jni.jar,
177 tomcat-juli-adapters.jar,
178 tomcat-juli.jar,
179 tomcat-util-scan.jar,
180 tomcat-util.jar,
181 tomcat-websocket.jar,
182 tools.jar,
183 websocket-api.jar,
184 wsdl4j*.jar,
185 xercesImpl.jar,
186 xml-apis.jar,
187 xmlParserAPIs-*.jar,
188 xmlParserAPIs.jar,
189 xom-*.jar
190
191 # Default list of JAR files that should be scanned that overrides the default
192 # jarsToSkip list above. This is typically used to include a specific JAR that
193 # has been excluded by a broad file name pattern in the jarsToSkip list.
194 # The list of JARs to scan may be over-ridden at a Context level for individual
195 # scan types by configuring a JarScanner with a nested JarScanFilter.
196 tomcat.util.scan.StandardJarScanFilter.jarsToScan=
197 log4j-taglib*.jar,
198 log4j-web*.jar,
199 log4javascript*.jar,
200 slf4j-taglib*.jar
201
202 # String cache configuration.
203 tomcat.util.buf.StringCache.byte.enabled=true
204 #tomcat.util.buf.StringCache.char.enabled=true
205 #tomcat.util.buf.StringCache.trainThreshold=500000
206 #tomcat.util.buf.StringCache.cacheSize=5000
可以看出它设置了一些属性值以及一些需要的路径。
1 Method method = this.catalinaDaemon.getClass().getMethod("start", (Class[])null);
2 method.invoke(this.catalinaDaemon, (Object[])null);
上面的代码开始启动Catalina.start。
 1 public void start() {
 2         if (this.getServer() == null) {
 3             this.load();
 4         }
 5
 6         if (this.getServer() == null) {
 7             log.fatal(sm.getString("catalina.noServer"));
 8         } else {
 9             long t1 = System.nanoTime();
10
11             try {
12                 this.getServer().start();
13             } catch (LifecycleException var7) {
14                 log.fatal(sm.getString("catalina.serverStartFail"), var7);
15
16                 try {
17                     this.getServer().destroy();
18                 } catch (LifecycleException var6) {
19                     log.debug("destroy() failed for failed Server ", var6);
20                 }
21                 return;
22             }
23
24             long t2 = System.nanoTime();
25             if (log.isInfoEnabled()) {
26                 log.info(sm.getString("catalina.startup", new Object[]{(t2 - t1) / 1000000L}));
27             }
28
29             if (this.useShutdownHook) {
30                 if (this.shutdownHook == null) {
31                     this.shutdownHook = new Catalina.CatalinaShutdownHook();
32                 }
33
34                 Runtime.getRuntime().addShutdownHook(this.shutdownHook);
35                 LogManager logManager = LogManager.getLogManager();
36                 if (logManager instanceof ClassLoaderLogManager) {
37                     ((ClassLoaderLogManager)logManager).setUseShutdownHook(false);
38                 }
39             }
40
41             if (this.await) {
42                 this.await();
43                 this.stop();
44             }
45         }
46     }
上面第二行调用load方法,开始初始化server,步骤太长就不贴了,大致流程就是获取server.xml导入配置,调用server.init()。
然后在第12行启动server,至此catlina.start()结束即server.start()结束。开始新的生命周期启动流程。
让我们回到server.init()方法中:
 1 public final synchronized void init() throws LifecycleException {
 2         if (!this.state.equals(LifecycleState.NEW)) {
 3             this.invalidTransition("before_init");
 4         }
 5
 6         try {
 7             this.setStateInternal(LifecycleState.INITIALIZING, (Object)null, false);
 8             this.initInternal();
 9             this.setStateInternal(LifecycleState.INITIALIZED, (Object)null, false);
10         } catch (Throwable var2) {
11             this.handleSubClassException(var2, "lifecycleBase.initFail", this.toString());
12         }
13
14     }
这一步主要做的事情就是启动server自动定义的步骤:this.initInternal();这个没啥好说的,tomcat以standardServer类来实现这个方法。然后判断LifecycleState是否正常,如果不正常就抛出异常。如果正常就设置LifecycleState的值,这个值是个枚举,代表了当前server的状态。
让我们会到server.start()方法,这个方法也是再次重复的判断了下server现在的状态,即那个枚举值是不是已经启动,如果没有启动就重新调一边init,如果启动就打印已经启动提示语,这个方法没有什么新动作。
上面的start,init方法是lifycycle接口的方法,抽象类LifecycleBase实现了这两个方法,并且定义了自己的抽象方法initinternal方法,这三个方法在这个部分比较重要。我们知道抽象类都是定义的一些公共方法,所以这些方法会被所有实现这个功能的的组件使用。
谈到这里就不得不谈一下tomcat的设计模式了,tomcat作为一个经典之作,其内使用一定量的设计模式肯定是必须的,而且会是tomcat的灵魂,tomcat的设计模式主要包含了以下几个设计模式:
门面模式:
在tomcat中因为很多组件需要交互,所有组件之间需要获取其他组件的信息都是通过门面类来获取的,所以门面模式在tomcat中应用的也很多,比如applicaitoncontext类和它的门面类ApplicationContextFacade,他们都实现了servletContext接口,这个接口是servletContext的功能接口,applicaitoncontext持有ApplicationContextFacade,并将自己传给ApplicationContextFacade,由ApplicationContextFacade代替自己暴露自己需要提供的服务。(这就是门面模式,把自己的核心服务交给自己信得过的人(兄弟)让他完成服务提供。)
观察者设计模式:
在tomcat的实现中,观察者模式是最重要的一环,它负责初始化并启动整个tomcat的所有组件的生命周期:包括两部分:完成最重要的lifecycle接口功能以及监听事件的功能,lifecycle接口的功能表由子类去实现,这是它存在的意义。同时子类在实现这些方法的同时需要将自己事件的LifecycleState事件告诉所有注册在自己的lifecycleListeners上的监听者,让他们知道自己正在做什么,由此他们可以对自己感兴趣的事做出反应。
命令模式:
tomcat中命令模式的实现是Connector和Container。这是两个接口。Connector是抽象命令请求者,Container是抽象命令接收者,server是这一切的缘由,HttpProcessor是抽象命令。
这就对应上了命令模式的五个模块:client:创建一个命令,并决定接收者。command:命令接口。ConcreteCommand:具体命令。Invoker:请求者。Receiver:命令接受则。
在tomcat中的实现形式是:server需要Connector来接受来自外接的Http请求,然后Connector接受到请求,并创建了命令HttpProcessor,然后server将这个命令交给了Container接收者。
责任链模式:
在tomcat中最容易发现的就是责任链模式,这个模式也是Container容器设计的基础,整个容器就是通过一个链连接在一起的,这个链一直将请求传递给最终处理请求的那个Servlet。
它的原理:特务的工作方式就是责任链模式的原理。蒋委员长给特务部门下命令,特务部门给特务头下命令,特务头给地方特务潜伏点下任务,地方特务潜伏点给具体的特务下命令,特务给自己的小弟下命令。
这里每个环节都只能是上司对下司直接下命令,没有第三方赚差价,任务会一级一级的往下传,任务是继续下发还是被节点自己消化解决由每个节点自己决定,上司只听它直属下司的回报。
在tomcat中这个模式被强化了,tomcat中允许第三方赚差价,它是通过PipeLine和Value来实现的,我们知道tomcat一共有四个容器,分别是Host,Engine,Context,Wrapper。这些容器的实例在Connector封装HttpServletRequest的时候就已经封装到Request中了,而standardPinple定义在抽象类ContainerBase中,所以每个容器都有自己的standardPinple:

标准的Pinple的属性如下:
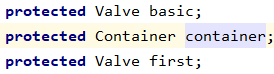
而在标准的容器中都会给自己的pipeline设置basic,举例Engine容器:
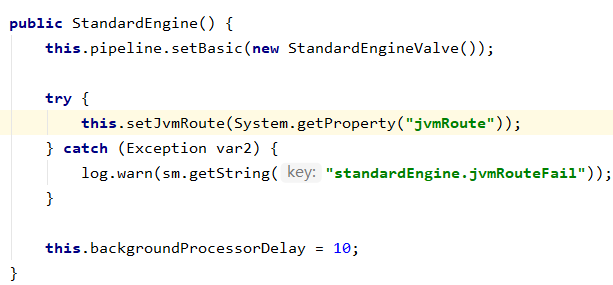
这个basic就是每个容器都会对应一个的Value,这个Value很重要。所以pipeline一共有三个属性已经被定了两个,那么最后的first是什么?查看server.xml,在Host容器下有这么一段配置:

这个配置就是在配置这个first,就是你想在传到Context容器之前对request做的操作。
好了现在讲下tomcat责任链怎么设计的,首先每个容器都有一个pipeline责任链,这个链就是数据流需要经过的地方,因为tomcat对所有组件的实现都是standard***,所以后续的***就代表了standard***。每个container持有一个pipeline,且这个容器在初始化的时候就给这个pipiline设置basic(标准Value,必须是它且不能改变当然你也改变不了),first(xml中定义的),container(this),xml中定义的first需要实现Value接口,Value接口给了默认的抽象类,只需要继承即可简单的实现自己Value。
tomcat就是通过这个pipeline来链接各个容器,每个容器的pipeline都必会有一个叫做standard**Value的Value,这个是将数据传到下个容器的Value,如下面的代码:
 1 final class StandardEngineValve extends ValveBase {
 2     public StandardEngineValve() {
 3         super(true);
 4     }
 5
 6     public final void invoke(Request request, Response response) throws IOException, ServletException {
 7         Host host = request.getHost();
 8         if (host != null) {
 9             if (request.isAsyncSupported()) {
10                 request.setAsyncSupported(host.getPipeline().isAsyncSupported());
11             }
12
13             host.getPipeline().getFirst().invoke(request, response);
14         }
15     }
16 }
前面已经讲过,一个请求的容器在request中封装,这里取出然后调用它的pipeline.invoke方法执行它的pipeline链就转到了下个容器中了。
这里讲下Value接口的抽象类:
1 public abstract class ValveBase extends LifecycleMBeanBase implements Contained, Valve {
2     protected static final StringManager sm = StringManager.getManager(ValveBase.class);
3     protected boolean asyncSupported;
4     protected Container container;
5     protected Log containerLog;
6     protected Valve next;
看到next了吗,这是个链表,所以pipeline链指的不是pipeline是个链表,而是pipeline的first指向的是个链表,所以***Value中的会只调用一次pipeline.getFirst.invoke,后续会继续调用下一个Value,比如xml中提到的AccessLogValve,它的抽象类就会调用下一个的invoke:
 1 public abstract class AbstractAccessLogValve extends ValveBase implements AccessLog
 2
 3 public void invoke(Request request, Response response) throws IOException, ServletException {
 4         if (this.tlsAttributeRequired) {
 5             request.getAttribute("javax.servlet.request.X509Certificate");
 6         }
 7
 8         AbstractAccessLogValve.CachedElement[] var3 = this.cachedElements;
 9         int var4 = var3.length;
10
11         for(int var5 = 0; var5 < var4; ++var5) {
12             AbstractAccessLogValve.CachedElement element = var3[var5];
13             element.cache(request);
14         }
15
16         this.getNext().invoke(request, response);
17     }
在最开始提到了Standard***Value很重要,就在这里,因为Standard***Value就是链接各个容器的链接口,能不能到下个容器就靠这个Standard***Value对象。而这个对象总实会被加到各个容器的pipeline的最后:
 1 public void addValve(Valve valve) {
 2         if (valve instanceof Contained) {
 3             ((Contained)valve).setContainer(this.container);
 4         }
 5
 6         if (this.getState().isAvailable() && valve instanceof Lifecycle) {
 7             try {
 8                 ((Lifecycle)valve).start();
 9             } catch (LifecycleException var3) {
10                 log.error(sm.getString("standardPipeline.valve.start"), var3);
11             }
12         }
13
14         if (this.first == null) {
15             this.first = valve;
16             valve.setNext(this.basic);
17         } else {
18             for(Valve current = this.first; current != null; current = current.getNext()) {
19                 if (current.getNext() == this.basic) {
20                     current.setNext(valve);
21                     valve.setNext(this.basic);
22                     break;
23                 }
24             }
25         }
26
27         this.container.fireContainerEvent("addValve", valve);
28     }
这是因为每个Value在添加它的下个Value的时候都会将Standard***Value加到最后面,以保证它会将数据留到正确的容器,而不是流没了。
参考文章 https://blog.csdn.net/fcc7619666/article/details/52022007