ShapeDrawable
ShapeDrawable用于定义一个基本的几何图像(如,矩形、圆形、线条.......)。
定义ShapeDrawable的XML文件的根元素是<shape.../>,该元素可指定如下属性:
android:shape=["rectangle"|"oval"|"ling"|"ring"]——指定定义那种类型的几何图形。

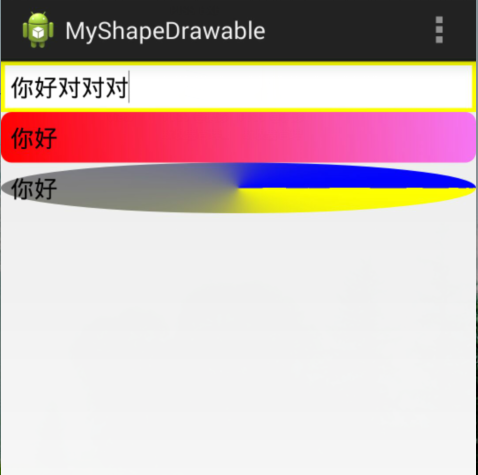
实例如下:椭圆、渐变背景的文本框
drawable资源文件==》

myshape1.xml==>
<?xml version="1.0" encoding="utf-8"?>
<shape xmlns:android="http://schemas.android.com/apk/res/android"
    android:shape="rectangle" >

    <!-- 设置填充颜色 -->
    <solid android:color="#fff" />
    <!-- 设置四周的内边距 -->
    <padding
        android:bottom="7dp"
        android:left="7dp"
        android:right="7dp"
        android:top="7dp" />
    <!-- 设置边框 -->
    <stroke
        android:width="3dip"
        android:color="#ff0" />

</shape>

myshape2.xml==>
<?xml version="1.0" encoding="utf-8"?>
<shape xmlns:android="http://schemas.android.com/apk/res/android"
    android:shape="rectangle" >

    <!-- 定义填充渐变色 angle,角度 -->
    <gradient
        android:angle="45"
        android:endColor="#80FF00FF"
        android:startColor="#FFFF0000" />
    <!-- 设置四周的内边距 -->
    <padding
        android:bottom="7dp"
        android:left="7dp"
        android:right="7dp"
        android:top="7dp" />
    <!-- 设置圆角矩形 -->
    <corners android:radius="8dp" />

</shape>

myshape3.xml==>
<?xml version="1.0" encoding="utf-8"?>
<shape xmlns:android="http://schemas.android.com/apk/res/android"
    android:shape="oval" >

    <!-- 定义填充渐变色 -->
    <gradient
        android:angle="45"
        android:endColor="#00f"
        android:startColor="#ff0"
        android:type="sweep" />
    <!-- 设置四周的内边距 -->
    <padding
        android:bottom="7dp"
        android:left="7dp"
        android:right="7dp"
        android:top="7dp" />
 <!-- 设置圆角矩形 -->
    <corners android:radius="8dp" />

</shape>

布局文件==》
<LinearLayout xmlns:android="http://schemas.android.com/apk/res/android"
    xmlns:tools="http://schemas.android.com/tools"
    android:layout_width="match_parent"
    android:layout_height="match_parent"
    android:orientation="vertical"
    tools:context=".MainActivity" >

    <EditText
        android:layout_width="match_parent"
        android:layout_height="wrap_content"
        android:background="@drawable/myshape1" />

 <EditText
     android:layout_width="match_parent"
     android:layout_height="wrap_content"
     android:background="@drawable/myshape2" />

  <EditText
        android:layout_width="match_parent"
        android:layout_height="wrap_content"
        android:background="@drawable/myshape3" />
</LinearLayout>
运行效果:
