Django的Form主要具有一下几大功能:
- 生成HTML标签
- 验证用户数据(显示错误信息)
- HTML Form提交保留上次提交数据
- 初始化页面显示内容
后台逻辑(导包+建类)


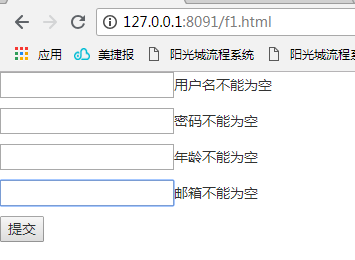
from django.shortcuts import render,redirect,HttpResponse

from django import forms
from django.forms import fields

class F1Form(forms.Form):
    user=fields.CharField(
        required=True,
        min_length=6,
        max_length=16,
        error_messages={
            'required':'用户名不能为空',
            'min_length':'至少为6个字符',
            'max_length': '最多为16个字符',
        }
    )
    pwd = fields.CharField(
        required=True,
        min_length=6,
        max_length=16,
        error_messages={
            'required': '密码不能为空',
            'min_length': '至少为6个字符',
            'max_length': '最多为16个字符',
        }
    )
    age = fields.IntegerField(
        required=True,
        error_messages={
            'required': '年龄不能为空',
            'invalid': '年龄格式不正确',
        }
    )
    email = fields.EmailField(
        required=True,
        min_length=6,
        max_length=18,
        error_messages={
            'required': '邮箱不能为空',
            'min_length': '至少为6个字符',
            'max_length': '最多为18个字符',
            'invalid': '邮箱格式不正确',
        }
    )
def f1(request):
    if request.method=="GET":
        obj=F1Form()
        return render(request,'f1.html',{'obj':obj})
    else:
        obj = F1Form(request.POST)
        # 校验是否成功
        if obj.is_valid():
            return redirect('http://www.baidu.com')
        else:
            return render(request,'f1.html',{'obj':obj})
<!DOCTYPE html>
<html lang="en">
<head>
    <meta charset="UTF-8">
    <title>Title</title>
    <link rel="stylesheet" href="/static/plugins/bootstrap/css/bootstrap.css">
</head>
<body>
     <form id="fm" action="/f1.html" method="POST">
         <p>{{obj.user}}{{ obj.errors.user.0 }}</p>
         <p>{{obj.pwd}}{{ obj.errors.pwd.0 }}</p>
         <p>{{obj.age}}{{ obj.errors.age.0 }}</p>
         <p>{{obj.email}}{{ obj.errors.email.0 }}</p>
         <input type="submit" value="提交"/>
     </form>
    <script src="/static/js/jquery-3.3.1.min.js"></script>

</body>
</html>
小试牛刀:实现一套“增删改”
1:创建Model模型并生成数据表
from django.db import models

# Create your models here.
class UserInfo(models.Model):
    username=models.CharField(max_length=16)
    email = models.EmailField(max_length=16)
2:创建Form文件
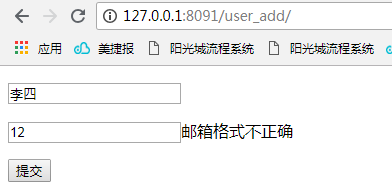
from django import forms
from django.forms import fields


class UserInfoForm(forms.Form):
    username = forms.CharField(
        required=True,
        max_length=16,
        error_messages={
            "required": "姓名不能为空",
            "max_length": '姓名最大长度不能超过16位'
        }
    )
    email = forms.EmailField(
        required=True,
        min_length=6,
        error_messages={
        "required": "邮箱不能为空",
        "min_length": '邮箱最小长度不能低于6位',
        "invalid":"邮箱格式不正确"
    })
3:创建View文件并修改url配置
from django.shortcuts import render, redirect, HttpResponse
from App01.models import UserInfo
from App01.Forms.UserInfo import UserInfoForm


def user_list(request):
    # 获取用户信息列表
    obj = UserInfo.objects.all()
    return render(request, "FormTest/user_list.html", {"obj": obj})


def user_add(request):
    # 添加用户
    if request.method == 'GET':
        obj = UserInfoForm()
        return render(request, "FormTest/user_add.html", {"obj": obj})
    else:
        obj = UserInfoForm(request.POST)
        if obj.is_valid():
            UserInfo.objects.create(**obj.cleaned_data)
            return redirect('/user_list')
        else:
            return render(request, "FormTest/user_add.html", {"obj": obj})


def user_edit(request,nid):
    # 编辑用户
    if request.method == 'GET':
        enti = UserInfo.objects.filter(id=nid).first()
        obj = UserInfoForm({"username":enti.username,"email":enti.email})
        return render(request, "FormTest/user_edit.html", {"obj": obj,"nid":nid})
    else:
        obj = UserInfoForm(request.POST)
        if obj.is_valid():
            UserInfo.objects.filter(id=nid).update(**obj.cleaned_data)
            return redirect('/user_list')
        else:
            return render(request, "FormTest/user_edit.html", {"obj": obj, "nid": nid})


def user_del(request):
    # 删除用户
    if request.method=='GET':
        nid = request.GET.get("nid")
        UserInfo.objects.filter(id=nid).delete()
    return redirect("/user_list")
"""StudyForm URL Configuration

The `urlpatterns` list routes URLs to views. For more information please see:
    https://docs.djangoproject.com/en/2.1/topics/http/urls/
Examples:
Function views
    1. Add an import:  from my_app import views
    2. Add a URL to urlpatterns:  path('', views.home, name='home')
Class-based views
    1. Add an import:  from other_app.views import Home
    2. Add a URL to urlpatterns:  path('', Home.as_view(), name='home')
Including another URLconf
    1. Import the include() function: from django.urls import include, path
    2. Add a URL to urlpatterns:  path('blog/', include('blog.urls'))
"""
from django.contrib import admin
from django.urls import path
from django.conf.urls import url
from App01.Views import FormTest

urlpatterns = [
    path('admin/', admin.site.urls),
    url(r'^user_list', FormTest.user_list),
    url(r'^user_add', FormTest.user_add),
    url(r'^user_edit-(d+)', FormTest.user_edit),
    url(r'^user_del', FormTest.user_del),
]
4:HTML页面
<!DOCTYPE html>
<html lang="en">
<head>
    <meta charset="UTF-8">
    <title>Title</title>
</head>
<body>
<a href="/user_add">添加</a>
<table id="tbStudentsList" class="table table-hover table-bordered">
    <thead>
    <tr>
        <th>ID</th>
        <th>姓名</th>
        <th>邮箱</th>
        <th>操作</th>
    </tr>
    </thead>
    <tbody>
    {% for row in obj %}
        <tr nid="{{ row.id }}">
            <td>{{ row.id }}</td>
            <td>{{ row.username }}</td>
            <td>{{ row.email }}</td>
            <td>
                <a href="user_edit-{{ row.id }}">修改</a>
                |
                <a href="user_del?nid={{ row.id }}">删除</a>
            </td>
        </tr>
    {% endfor %}
    </tbody>
</table>
</body>
</html>
<!DOCTYPE html>
<html lang="en">
<head>
    <meta charset="UTF-8">
    <title>Title</title>
</head>
<body>

<form action="/user_add/" method="post" novalidate>
    {% csrf_token %}
    <p>{{ obj.username }}{{ obj.errors.username.0 }}</p>
    <p>{{ obj.email }}{{ obj.errors.email.0 }}</p>
    <input type="submit" value="提交"/>
</form>
</body>
</html>
<!DOCTYPE html>
<html lang="en">
<head>
    <meta charset="UTF-8">
    <title>Title</title>
</head>
<body>

<form action="/user_edit-{{ nid }}/" method="post" novalidate>
    {% csrf_token %}
    <p>{{ obj.username }}{{ obj.errors.username.0 }}</p>
    <p>{{ obj.email }}{{ obj.errors.email.0 }}</p>
    <input type="submit" value="提交"/>
</form>
</body>
</html>

Form组件 进阶篇
Field
    required=True,               是否允许为空
    widget=None,                 HTML插件
    label=None,                  用于生成Label标签或显示内容
    initial=None,                初始值
    help_text='',                帮助信息(在标签旁边显示)
    error_messages=None,         错误信息 {'required': '不能为空', 'invalid': '格式错误'}
    show_hidden_initial=False,   是否在当前插件后面再加一个隐藏的且具有默认值的插件(可用于检验两次输入是否一直)
    validators=[],               自定义验证规则
    localize=False,              是否支持本地化
    disabled=False,              是否可以编辑
    label_suffix=None            Label内容后缀


CharField(Field)
    max_length=None,             最大长度
    min_length=None,             最小长度
    strip=True                   是否移除用户输入空白

IntegerField(Field)
    max_value=None,              最大值
    min_value=None,              最小值

FloatField(IntegerField)
    ...

DecimalField(IntegerField)
    max_value=None,              最大值
    min_value=None,              最小值
    max_digits=None,             总长度
    decimal_places=None,         小数位长度

BaseTemporalField(Field)
    input_formats=None          时间格式化

DateField(BaseTemporalField)    格式:2015-09-01
TimeField(BaseTemporalField)    格式:11:12
DateTimeField(BaseTemporalField)格式:2015-09-01 11:12

DurationField(Field)            时间间隔:%d %H:%M:%S.%f
    ...

RegexField(CharField)
    regex,                      自定制正则表达式
    max_length=None,            最大长度
    min_length=None,            最小长度
    error_message=None,         忽略,错误信息使用 error_messages={'invalid': '...'}

EmailField(CharField)
    ...

FileField(Field)
    allow_empty_file=False     是否允许空文件

ImageField(FileField)
    ...
    注:需要PIL模块,pip3 install Pillow
    以上两个字典使用时,需要注意两点:
        - form表单中 enctype="multipart/form-data"
        - view函数中 obj = MyForm(request.POST, request.FILES)

URLField(Field)
    ...


BooleanField(Field)
    ...

NullBooleanField(BooleanField)
    ...

ChoiceField(Field)
    ...
    choices=(),                选项,如:choices = ((0,'上海'),(1,'北京'),)
    required=True,             是否必填
    widget=None,               插件,默认select插件
    label=None,                Label内容
    initial=None,              初始值
    help_text='',              帮助提示


ModelChoiceField(ChoiceField)
    ...                        django.forms.models.ModelChoiceField
    queryset,                  # 查询数据库中的数据
    empty_label="---------",   # 默认空显示内容
    to_field_name=None,        # HTML中value的值对应的字段
    limit_choices_to=None      # ModelForm中对queryset二次筛选

ModelMultipleChoiceField(ModelChoiceField)
    ...                        django.forms.models.ModelMultipleChoiceField


TypedChoiceField(ChoiceField)
    coerce = lambda val: val   对选中的值进行一次转换
    empty_value= ''            空值的默认值

MultipleChoiceField(ChoiceField)
    ...

TypedMultipleChoiceField(MultipleChoiceField)
    coerce = lambda val: val   对选中的每一个值进行一次转换
    empty_value= ''            空值的默认值

ComboField(Field)
    fields=()                  使用多个验证,如下:即验证最大长度20,又验证邮箱格式
                               fields.ComboField(fields=[fields.CharField(max_length=20), fields.EmailField(),])

MultiValueField(Field)
    PS: 抽象类,子类中可以实现聚合多个字典去匹配一个值,要配合MultiWidget使用

SplitDateTimeField(MultiValueField)
    input_date_formats=None,   格式列表:['%Y--%m--%d', '%m%d/%Y', '%m/%d/%y']
    input_time_formats=None    格式列表:['%H:%M:%S', '%H:%M:%S.%f', '%H:%M']

FilePathField(ChoiceField)     文件选项,目录下文件显示在页面中
    path,                      文件夹路径
    match=None,                正则匹配
    recursive=False,           递归下面的文件夹
    allow_files=True,          允许文件
    allow_folders=False,       允许文件夹
    required=True,
    widget=None,
    label=None,
    initial=None,
    help_text=''

GenericIPAddressField
    protocol='both',           both,ipv4,ipv6支持的IP格式
    unpack_ipv4=False          解析ipv4地址,如果是::ffff:192.0.2.1时候,可解析为192.0.2.1, PS:protocol必须为both才能启用

SlugField(CharField)           数字,字母,下划线,减号(连字符)
    ...

UUIDField(CharField)           uuid类型
    ...
其中常用的是:
1:label=None,用于生成Label标签或显示内容。但也有其局限性,就是修改起来不方便。
{ obj.username.label }}
2:validators=[],自定义验证规则。需要注意引入验证模板
from django.core.validators import RegexValidator
3:自定义扩展
3.1 验证某个字段,例如判断用户是否存在。通过clean_字段名
    from django import forms
    from django.forms import fields
    from django.forms import widgets
    from django.core.exceptions import ValidationError
    from django.core.validators import RegexValidator

    class FInfo(forms.Form):
        username = fields.CharField(max_length=5,
                                    validators=[RegexValidator(r'^[0-9]+$', 'Enter a valid extension.', 'invalid')], )
        email = fields.EmailField()

        def clean_username(self):
            #自定义方法 clean_字段名
            #必须有返回值 value
            #如果出错,就抛出异常ValidationError
            value = self.cleaned_data['username']
            if "666" in value:
                raise ValidationError('用户名已存在', 'invalid')
            return value
3.2 验证多个字段,例如判断用户两次输入的密码是否一致
class AccountInfoForm(forms.Form):
    username = fields.CharField(
        required=True,
        label='用户名:',
        min_length=6,
        max_length=16,
        error_messages={
            'required': '用户名不能为空',
            'min_length': '至少为6个字符',
            'max_length': '最多为16个字符',
        }
    )
    pwd = fields.CharField(
        label='密码:',
        required=True,
        min_length=6,
        max_length=16,
        validators=[RegexValidator(r'^(?=.*[0-9])(?=.*[a-zA-Z])(?=.*[!@#$\%^&*()])[0-9a-zA-Z!@#$\%^&*()]{8,32}$','密码过于简单(包含数字、字母的8位以上数字)')],
        error_messages={
            'required': '密码不能为空',
            'min_length': '至少为6个字符',
            'max_length': '最多为16个字符',
        }
    )
    confirmPwd = fields.CharField(
        label='确认密码:',
        required=True,
        min_length=6,
        max_length=16,
        error_messages={
            'required': '密码不能为空',
            'min_length': '至少为6个字符',
            'max_length': '最多为16个字符',
        }
    )
    email = fields.EmailField(
        label='邮箱:',
        required=True,
        min_length=6,
        max_length=18,
        error_messages={
            'required': '邮箱不能为空',
            'min_length': '至少为6个字符',
            'max_length': '最多为18个字符',
            'invalid': '邮箱格式不正确',
        }
    )
    def clean(self):
        value_data = self.cleaned_data
        v1=value_data.get("pwd")
        v2=value_data.get("confirmPwd")
        if v1 != v2:
            self.add_error("confirmPwd", "密码不一致")
            raise ValidationError("密码不一致")
        return self.cleaned_data
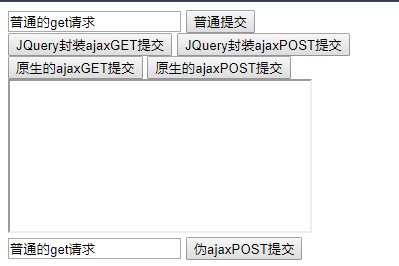
三种ajax请求(jQuery封装后的ajax+原生的ajax+伪ajax(form+iframe))
"""StudyForm URL Configuration

The `urlpatterns` list routes URLs to views. For more information please see:
    https://docs.djangoproject.com/en/2.1/topics/http/urls/
Examples:
Function views
    1. Add an import:  from my_app import views
    2. Add a URL to urlpatterns:  path('', views.home, name='home')
Class-based views
    1. Add an import:  from other_app.views import Home
    2. Add a URL to urlpatterns:  path('', Home.as_view(), name='home')
Including another URLconf
    1. Import the include() function: from django.urls import include, path
    2. Add a URL to urlpatterns:  path('blog/', include('blog.urls'))
"""
from django.contrib import admin
from django.urls import path
from django.conf.urls import url
from App01.Views import FormTest,UploadTest,AjaxTest

urlpatterns = [
    path('admin/', admin.site.urls),
    url(r'^user_list', FormTest.user_list),
    url(r'^user_add', FormTest.user_add),
    url(r'^user_edit-(d+)', FormTest.user_edit),
    url(r'^user_del', FormTest.user_del),
    # 文件上传
    url(r'^upload.html$', UploadTest.upload),

    #Ajax练习
    # 一、普通的form提交+jQuery封装后的Ajax
    url(r'^ajax1.html$', AjaxTest.ajax1),
    url(r'^ajax11.html$', AjaxTest.ajax11),
    #二、原生态的Ajax
    url(r'^ajax2.html$', AjaxTest.ajax2),
    #三、伪Ajax(form+iframe)
    url(r'^ajax3.html$', AjaxTest.ajax3),
    # 文件上传
    url(r'^ajaxUpload$', AjaxTest.ajaxUpload),
]
<!DOCTYPE html>
<html lang="en">
<head>
    <meta charset="UTF-8">
    <title>Title</title>
    <script type="text/javascript" src="/static/js/jquery-3.3.1.min.js"></script>
</head>
<body>
{% csrf_token %}

<form action="ajax1.html" method="post">
    <input type="text" id="ajaxText" name="ajaxText" placeholder="请输入测试数据" value="{{ qMethod }}">
    <input type="submit" value="普通提交">
    <br/>
    <input type="button" value="JQuery封装ajaxGET提交" onclick="ajax1Get()">
    <input type="button" value="JQuery封装ajaxPOST提交" onclick="ajax1Post()">
    <br/>
    <input type="button" value="原生的ajaxGET提交" onclick="nativeAjax1Get()">
    <input type="button" value="原生的ajaxPOST提交" onclick="nativeAjax1Post()">
    <br/>

</form>
<iframe id="iframe" name="ifra"></iframe>
<form id="fm" action="/ajax3.html" method="POST" target="ifra">
    <input type="text" id="aText" name="aText" placeholder="请输入测试数据" value="{{ qMethod }}">
    <input type="button" value="伪ajaxPOST提交" onclick="fakeAjax1Post()">
    <br/>
</form>
<hr/>

<iframe id="uploadFR" name="uploadFR" style="display: none"></iframe>
<form id="uploadFM" name="uploadFM" method="post" action="ajaxUpload" enctype="multipart/form-data" target="uploadFR">
    <input type="file" id="img" name="val">
    <input type="button" value="通过ajax+formData上传" onclick="upload1()">
    <input type="button" value="通过原生xhr+formData上传" onclick="upload2()">
    <input type="button" value="伪ajax上传" onclick="upload3()">
</form>
<script>
    function ajax1Get() {
        {#jQuery封装后的ajax-get#}
        var st = $("#ajaxText").val();
        var soft = {'ajaxTest': st}
        $.ajax({
            url: 'ajax11.html',
            type: 'GET',
            dataType: 'json',
            data: soft,
            success: function (arg) {
                alert(arg.data)
            }
        })
    }

    function ajax1Post() {
        {#jQuery封装后的ajax-post#}
        var st = $("#ajaxText").val();
        $.ajax({
            url: 'ajax11.html',
            type: 'POST',
            dataType: 'json',
            data: {"ajaxTest": st},
            success: function (arg) {
                alert(arg.data)
            }
        })
    }

    function nativeAjax1Get() {
        {#1:创建对象#}
        var xhr = new XMLHttpRequest()
        {#2:创建句柄对象#}
        xhr.onreadystatechange = function () {
            {#4LoadedHTTP 响应已经完全接收。#}
            if (xhr.readyState == 4) {
                alert(xhr.responseText)
            }
        }
        {#3:设置请求方式,指定url路径#}
        var st = $("#ajaxText").val();
        xhr.open("GET", "ajax2.html?ajaxTest=" + st)
        {#4:发送#}
        xhr.send()
    }

    function nativeAjax1Post() {
        {#1:创建对象#}
        var xhr = new XMLHttpRequest()
        {#2:创建句柄对象#}
        xhr.onreadystatechange = function () {
            {#4LoadedHTTP 响应已经完全接收。#}
            if (xhr.readyState == 4) {
                alert(xhr.responseText)
            }
        }
        {#3:设置请求方式,指定url路径#}
        var st = $("#ajaxText").val();
        xhr.open("POST", "ajax2.html")
        xhr.setRequestHeader('Content-Type', 'application/x-www-form-urlencoded; charset-UTF-8');
        {#4:发送#}
        xhr.send("ajaxTest=" + st)
    }

    function fakeAjax1Post() {
        document.getElementById("iframe").onload = reloadIframe;
        var form1 = document.getElementById('fm');
        form1.submit();
    }

    function reloadIframe() {
        var countent = this.contentWindow.document.body.innerHTML
        var obj = JSON.parse(countent)
        if (obj.status) {
            alert(obj.message)
        }
    }

    function upload1() {
        var dataForm = new FormData()
        dataForm.append("val", document.getElementById("img").files[0])
        $.ajax({
            url: "ajaxUpload",
            type: "POST",
            data: dataForm,
            success: function (arg) {
                alert("ajax上传文件成功")
            },
            processData: false,  // tell jQuery not to process the data
            contentType: false  // tell jQuery not to set contentType
        })
    }

    function upload2() {
        var dataForm = new FormData()
        dataForm.append("val", document.getElementById("img").files[0])

        var xhr = new XMLHttpRequest()
        xhr.onreadystatechange = function () {
            {#4LoadedHTTP 响应已经完全接收。#}
            if (xhr.readyState == 4) {
                alert("原生ajax上传文件成功")
            }
        }
        xhr.open("POST", "ajaxUpload")
        xhr.send(dataForm)
    }

    function upload3(){
        document.getElementById("uploadFR").onload=reloadIframe
        var form1 = document.getElementById('uploadFM');
        form1.submit();
    }

</script>
</body>
</html>
from django.shortcuts import HttpResponse,render
import os,uuid

import json
def ajax1(request):
    if request.method=="GET":
        QMethod='普通的get请求'
        return render(request,"AjaxTest/ajax1.html",{"qMethod":QMethod})
    else:
        QMethod = '普通的Post请求------'+request.POST.get("ajaxText")
        return render(request,"AjaxTest/ajax1.html",{"qMethod":QMethod})
def ajax11(request):
    if request.method=="GET":
        QMethod = 'Ajax的get请求------' + request.GET.get("ajaxTest")
        ret = {'status': True, 'data': QMethod, 'message': QMethod}
        return HttpResponse(json.dumps(ret))
    else:
        QMethod = 'Ajax的Post请求------'+ request.POST.get("ajaxTest")
        ret = {'status': True, 'data': QMethod, 'message': QMethod}
        return HttpResponse(json.dumps(ret))

def ajax2(request):
    if request.method=="GET":
        QMethod="原生的Ajax的get请求-----"+request.GET.get("ajaxTest")
        return HttpResponse(QMethod)
    else:
        QMethod = "原生的Ajax的post请求-----" + request.POST.get("ajaxTest")
        return HttpResponse(QMethod)

def ajax3(request):
    if request.method == "GET":
        QMethod = '伪Ajax的get请求------' + request.GET.get("aText")
        ret = {'status': True, 'data': QMethod, 'message': QMethod}
        return render(request, "AjaxTest/ajax1.html", {"qMethod": QMethod})
    else:
        QMethod = '伪Ajax的Post请求------'+request.POST.get("aText")
        ret = {'status': True, 'data': QMethod, 'message': QMethod}
        return HttpResponse(json.dumps(ret))

def ajaxUpload(request):
     # 通过uuid获取到自动编号,防止重复
    nid = str(uuid.uuid4())
    # 通过request获取上传对象
    obj=request.FILES.get("val")
    # 写文件
    file_path=os.path.join("static/files",nid+obj.name)
    f = open(file_path,'wb')
    for line in obj.chunks():
        f.write(line)
    f.close()
    ret = {'status': True, 'data': None, 'message': None}
    ret["data"]=file_path
    #返回
    return HttpResponse(json.dumps(ret))
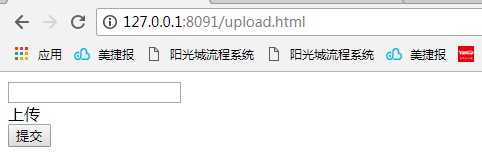
附件上传
from django.shortcuts import render, redirect, HttpResponse

def upload(request):
    if request.method=="GET":
        return render(request, 'UploadTest/upload.html')
    else:
        user = request.POST.get("user")
        img=request.FILES.get('img')
        f=open(img.name,'wb')
        for line  in img.chunks():
            f.write(line)
        f.close()
        return render(request, 'UploadTest/upload.html')
<!DOCTYPE html>
<html lang="en">
<head>
    <meta charset="UTF-8">
    <title>Title</title>
</head>
<body>
<form action="upload.html" method="post" enctype="multipart/form-data">
    {% csrf_token %}
    <input type="text" name="user"/>
    <div style="position: relative">
        <a>上传</a>
        <input type="file" name="img" style="opacity: 0;position:absolute;top:0;left: 0;"/>
    </div>
    <input type="submit" value="提交"/>
</form>
</body>
</html>
与 三种ajax请求相似,同样存在三种附件上传(代码内容已包含在里面)

Jsonp 示例
<!DOCTYPE html>
<html lang="en">
<head>
    <meta charset="UTF-8">
    <title>Title</title>
    <script src="/static/js/jquery-3.3.1.min.js"></script>
</head>
<body>
<input type="button" value="jsonp测试" onclick="submitJsonp()"/>
<script>
    function submitJsonp() {
        $.ajax({
            {#江西卫视的jsonp只能使用固定的callback函数list()#}
            {#url: "http://www.jxntv.cn/data/jmd-jxtv2.html",#}
            url: "https://sug.so.360.cn/suggest",
            type: 'GET',
            dataType: 'jsonp',
            jsonp: 'callback',
            jsonpCallback: 'func',
        })
    }

    function func(arg) {
       alert("可自定义jsonpCallback的函数函数名称")
    }

</script>
</body>

</html>
from django.shortcuts import HttpResponse,render

def jsonp(request):
    print(1111)
    return render(request, "JsonpTest/jsonp.html", {"qMethod": "123456"})
