• java NIO的基本用法


    NIO的基本用法

    1、什么是NIO

    一种新IO流,可以实现对文件的读写操作,效率比IO流高

    2、NIO和IO的区别

    • IO是面向流(Stream)的;NIO是面向通道(Channel)和缓冲区(Buffer)的,数据总是从通道读取到缓冲区中,或者从缓冲区写入到通道中

    • IO流是阻塞的,这意味着,当一个线程调用read() 或 write()时,该线程被阻塞,直到有一些数据被读取,或数据完全写入。该线程在此期间不能再干任何事情了。NIO是非阻塞的,NIO的非阻塞模式,使一个线程从某通道发送请求读取数据,但是它仅能得到目前可用的数据,如果目前没有数据可用时,就什么都不会获取。而不是保持线程阻塞,所以直至数据变得可以读取之前,该线程可以继续做其他的事情。

    3、NIO中的Channel的主要实现

    • FileChannel:文件通道

    • DatagramChannel:通过 UDP 读写网络中的数据通道。

    • SocketChannel:通过 TCP 读写网络中的数据

    • ServerSocketChannel:可以监听新进来的 TCP 连接,对每一个新进来的连接都会创建一个 SocketChannel

    我们这里主要讲解FileChannel

    4、NIO中的关键Buffer实现

    NIO中的关键Buffer实现有:ByteBuffer, CharBuffer, DoubleBuffer, FloatBuffer, IntBuffer, LongBuffer, ShortBuffer,分别对应基本数据类型: byte, char, double, float, int, long, short。当然NIO中还有MappedByteBuffer, HeapByteBuffer, DirectByteBuffer等这里先不进行陈述。

    5、缓冲区Buffer的基本属性

    • 容量 (capacity) :表示 Buffer 最大数据容量,缓冲区容量不能为负,并且创建后不能更改。

    • 限制 (limit) :第一个不应该读取或写入的数据的索引,即位于 limit 后的数据不可读写。缓冲区的限制不能为负,并且不能大于其容量。

    • 位置 (position):下一个要读取或写入的数据的索引。缓冲区的位置不能为负,并且不能大于其限制
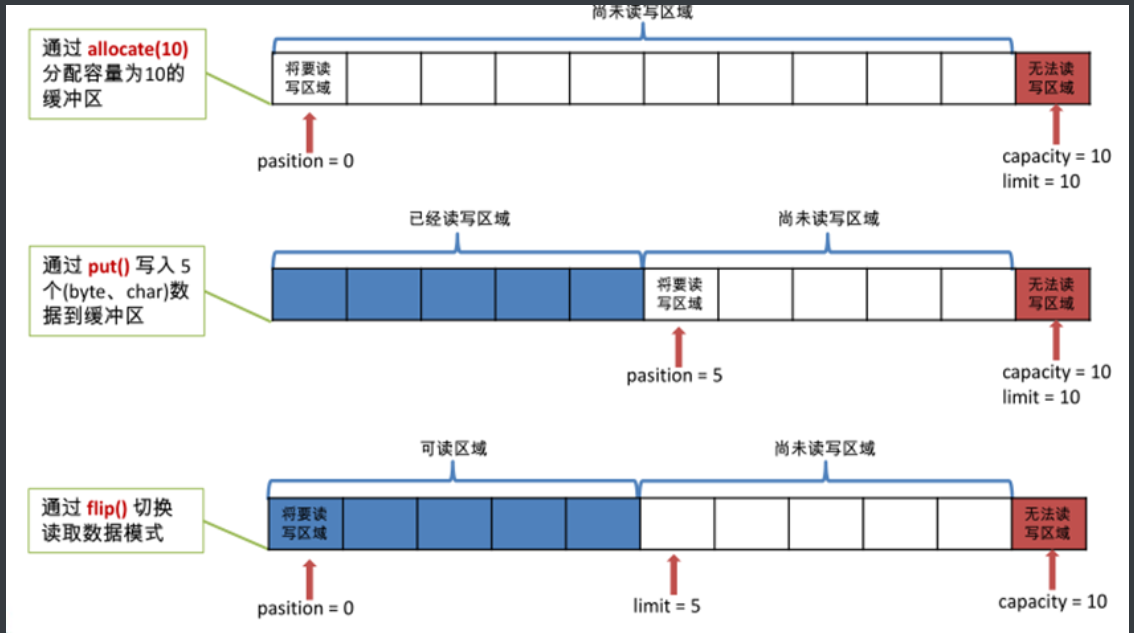
      image-20200804201959667

    6、FileChannel用法(实现文本复制)

    a、方式一(读取文件到缓冲区)

    public static void main(String[] args) throws IOException {
           //字节输入流
           FileInputStream fileInputStream=new FileInputStream(new File("object02/src/a.txt"));
           //字节输出流
           FileOutputStream fileOutputStream=new FileOutputStream(new File("object02/src/b.txt"));
           //获取通道,通过文件对应io流获取对应通道
           FileChannel fromFileChannel=fileInputStream.getChannel();
           FileChannel toFileChannel=fileOutputStream.getChannel();
           //创建缓冲区并分配空间
           ByteBuffer byteBuffer=ByteBuffer.allocate(1024);
           //读取文件数据到缓冲区
           while (fromFileChannel.read(byteBuffer)!=-1){
               //设置缓冲区为读模式(看源码)
               byteBuffer.flip();
               //写数据
               toFileChannel.write(byteBuffer);
               //清空缓冲区(不清空缓冲区无法进行下一次读取,因为position=capacity,看源码)
               byteBuffer.clear();
          }
           //关闭资源
           fileInputStream.close();
           fileOutputStream.close();
           fromFileChannel.close();
           toFileChannel.close();
      }

    b、方式二(通过channel的映射内存实现)

    @Test
    public void testCopyFile02() throws IOException
    {
    //建立1.mp4的通道(就是连接点), StandardOpenOption.READ打开读权限
    FileChannel fileChannelA=FileChannel.open(Paths.get("d:/1.mp4"), StandardOpenOption.READ);
    FileChannel fileChannelB=FileChannel.open(Paths.get("d:/2.mp4"),
    StandardOpenOption.WRITE, //写权限
    StandardOpenOption.READ, //读权限
    StandardOpenOption.CREATE);//创建一个新的文件,如果该文件已经存在失败
    //建立fileChannelA通道的映射内存,MapMode.READ_ONLY:只读,从0读到fileChannelA.size()
    MappedByteBuffer inMappedBuf = fileChannelA.map(MapMode.READ_ONLY, 0, fileChannelA.size());
    //建立fileChannelB通道的映射内存,MapMode.READ_WRITE:读写,从0读到fileChannelA.size()
    MappedByteBuffer outMappedBuf = fileChannelB.map(MapMode.READ_WRITE, 0, fileChannelA.size());
    //创建一个字节数组,存储读取的数据
    byte[] dst = new byte[inMappedBuf.limit()];
      //从映射内存读取数据
    inMappedBuf.get(dst);
      //将读取的数据写到d:/2.mp4
    outMappedBuf.put(dst);
    //关闭通道
    fileChannelA.close();
    fileChannelB.close();
    }

    c、方式三(方式二的简化)

        @Test
    public void testCopyFile03() throws IOException
    {
           //建立1.mp4的通道(就是连接点), StandardOpenOption.READ打开读权限
    FileChannel fileChannelA=FileChannel.open(Paths.get("d:/1.mp4"), StandardOpenOption.READ);
    FileChannel fileChannelB=FileChannel.open(Paths.get("d:/2.mp4"),
    StandardOpenOption.WRITE, //写权限
    StandardOpenOption.READ, //读权限
    StandardOpenOption.CREATE);//创建一个新的文件,如果该文件已经存在失败
           //复制fileChannelA的内容到fileChannelB
    fileChannelB.transferFrom(fileChannelA, 0, fileChannelA.size());
    //关闭通道
    fileChannelA.close();
    fileChannelB.close();
    }


    记得快乐
  • 相关阅读:
    如何利用docker制作自己的镜像
    python 获取当前运行的 class 和 方法的名字
    UnitTest-case参数化
    值得推崇的一种图书出版的方式----开源图书
    Django中对数据查询、删除、修改
    wireshark网络实战分析二
    wireshark网络抓包分析
    邮件传输协议实战抓包分析
    socket服务端给客户端发送数据第一次不成功,第二次成功
    转载:Wireshark抓包详解
  • 原文地址:https://www.cnblogs.com/Y-wee/p/13435939.html
Copyright © 2020-2023  润新知