一、常见的Web集群调度器
·目前常见的Web集群调度器分为软件和硬件
·软件通常使用开源的LVS、Haproxy、Nginx
·硬件一般使用比较多的是F5,也有很多人使用国内的一些产品,如梭子鱼、绿盟等
二、Haproxy应用分析
1、LVS在企业应用中抗负载能力很强,但存在不足
·LVS不支持正则处理,不能实现动静分离
·对于大型网站,LVS的实施配置复杂,维护成本相对较高
2、Haproxy是一款可提供高可用性、负载均衡、及基于TCP和HTTP应用的代理的软件
·适用于负载大的Web站点
·运行在硬件上可支持数以万计的并发连接的连接请求
三、Haproxy调度算法原理
Haproxy支持多种调度算法,最常用的有三种
1、RR(Round Robin)
·RR算法是最简单最常用的一种算法,即轮询调度
理解举例:
(1)、有三个节点A、B、C
(2)、第一个用户访问会被指派到节点A
(3)、第二个用户访问会被指派到节点B
(4)、第三个用户访问会被指派到节点C
(5)、第四个用户访问继续指派到节点A,轮询分配访问请求实现负载均衡效果
2、LC(Least Connections)
·最小连接数算法,根据后端的节点连接数大小动态分配前端请求
理解举例:
(1)、有三个节点A、B、C,各节点的连接数分别为A:4、B:5、C:6
(2)、第一个用户连接请求,会被指派到A上,连接数变为A:5、B:5、C:6、
(3)、第二个用户请求会继续分配到A上,连接数变为A:6、B:5、C:6;再有新的请求会分配给B,每次将新的请求指派给连接数最小的客户端
(4)、由于实际情况下A、B、C的连接数会动态释放,很难会出现一样连接数的情况
(5)、此算法相比较rr算法有很大改进,是目前用到比较多的一种算法
3、SH(Source Hashing)
·基于来源访问调度算法,用于一些有Session会话记录在服务器端的场景,可以基于来源的IP、Cookie等做集群调度
理解举例:
(1)、有三个节点A、B、C,第一个用户第一次访问被指派到了A,第二个用户第一次访问被指派到了B
(2)、当第一个用户第二次访问时会被继续指派到A,第二个用户第二次访问时依旧会被指派到B,只要负载均衡调度器不重启,第一个用户访问都会被指派到A,第二个用户访问都会被指派到B,实现集群的调度
(3)、此调度算法好吃是实现会话保持,但某些IP访问量非常大时会引起负载不均衡,部分节点访问量超大,影响业务使用
4、Haproxy配置文件详解
(1)、Haproxy配置文件通常分为三个部分
①global:为全局配置
②defaults:为默认配置
③listen:为应用组件配置
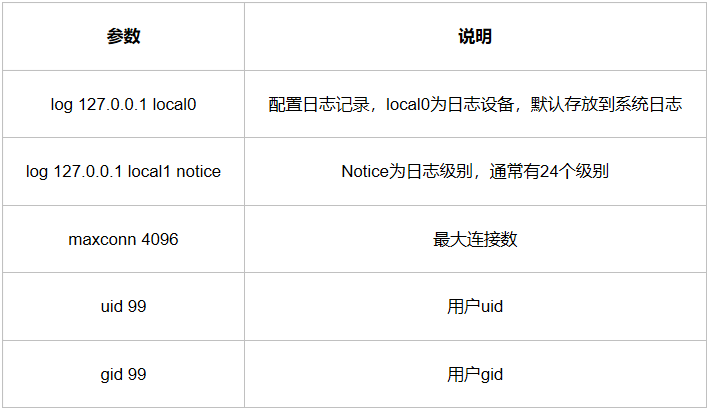
(2)、global配置参数
(3)、defaults配置项默认参数,一般会被应用组件继承
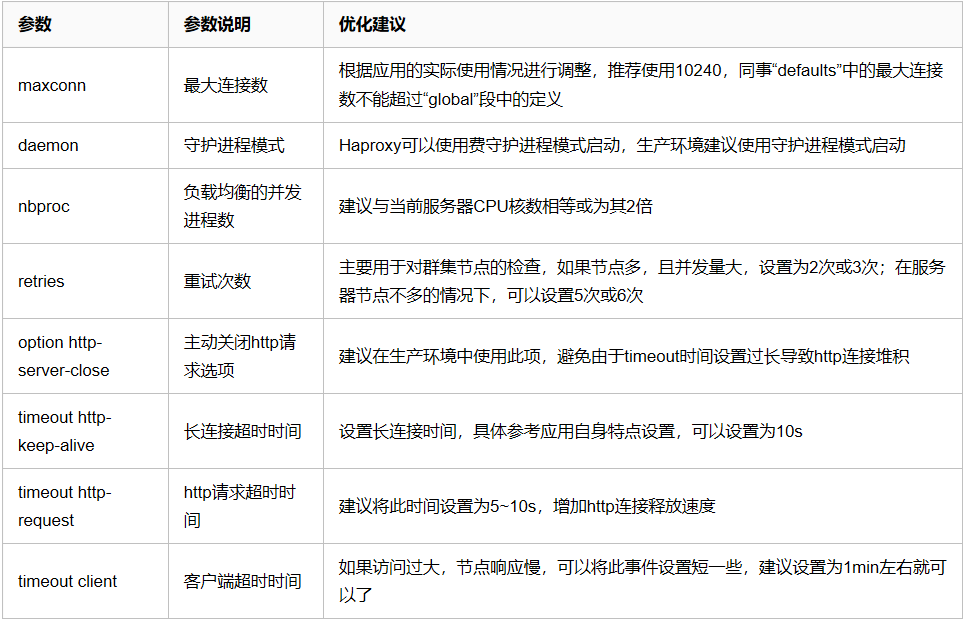
(4)、Haproxy参数优化,随着企业网站负载增加,Haproxy参数优化相当重要
5、日志管理
(1)、默认是输出到系统的syslog中,生成环境中一般单独定义
(2)、定义的方法步骤
①修改Haproxy配置文件中关于日志配置的选项,加入配置
log /dev/log local0 info
log /dev/log local0 notice
②修改rsyslog配置,将Haproxy相关的配置独立定义到haproxy.conf,并放到/etc/rsyslog.d/下
③保存配置文件并重启rsyslog服务,完成rsyslog配置
(3)、访问Haproxy集群测试网页并查看日志信息
四、案例:使用Haproxy搭建Web群集
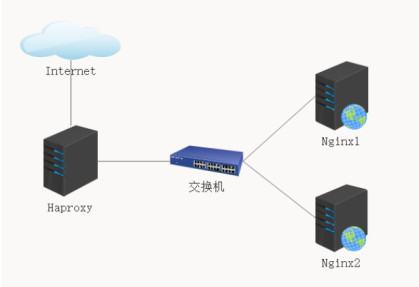
1、案例拓扑图
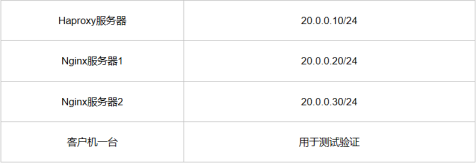
2、环境
用一台客户端,三台虚拟服务器模拟搭建一套Web集群
3、配置Nginx1服务器
[root@nginx1 ~]# yum -y install gcc gcc-c++ make pcre-devel zlib-devel
[root@nginx1 ~]# useradd -M -s /sbin/nologin nginx
[root@nginx1 ~]# tar zxf nginx-1.12.2.tar.gz
[root@nginx1 ~]# cd nginx-1.12.2/
[root@nginx1 nginx-1.12.2]# ./configure --prefix=/usr/local/nginx --user=nginx --group=nginx
[root@nginx1 nginx-1.12.2]# make && make install
[root@nginx1 nginx-1.12.2]# ln -s /usr/local/nginx/sbin/nginx /usr/local/sbin/
[root@nginx1 nginx-1.12.2]# nginx -t
nginx: the configuration file /usr/local/nginx/conf/nginx.conf syntax is ok
nginx: configuration file /usr/local/nginx/conf/nginx.conf test is successful
[root@nginx1 nginx-1.12.2]# nginx
[root@nginx1 nginx-1.12.2]# netstat -anpt | grep nginx
tcp 0 0 0.0.0.0:80 0.0.0.0:* LISTEN 16640/nginx: master
[root@nginx1 nginx-1.12.2]# echo "web1" >/usr/local/nginx/html/index.html
[root@nginx1 nginx-1.12.2]# curl http://localhost
web1
4、配置Nginx2服务器
[root@nginx2 ~]# yum -y install gcc gcc-c++ make pcre-devel zlib-devel
[root@nginx2 ~]# useradd -M -s /sbin/nologin nginx
[root@nginx2 ~]# tar zxf nginx-1.12.2.tar.gz
[root@nginx2 ~]# cd nginx-1.12.2/
[root@nginx2 nginx-1.12.2]# ./configure --prefix=/usr/local/nginx --user=nginx --group=nginx
[root@nginx2 nginx-1.12.2]# make && make install
[root@nginx2 nginx-1.12.2]# ln -s /usr/local/nginx/sbin/nginx /usr/local/sbin/
[root@nginx2 nginx-1.12.2]# nginx -t
nginx: the configuration file /usr/local/nginx/conf/nginx.conf syntax is ok
nginx: configuration file /usr/local/nginx/conf/nginx.conf test is successful
[root@nginx2 nginx-1.12.2]# nginx
[root@nginx2 nginx-1.12.2]# netstat -anpt | grep nginx
tcp 0 0 0.0.0.0:80 0.0.0.0:* LISTEN 16640/nginx: master
[root@nginx2 nginx-1.12.2]# echo "web2" >/usr/local/nginx/html/index.html
[root@nginx2 nginx-1.12.2]# curl http://localhost
web2
5、配置Haproxy服务器
[root@haproxy ~]# yum -y install gcc gcc-c++ make pcre-devel bzip2-devel
[root@haproxy ~]# tar zxf haproxy-1.4.24.tar.gz
[root@haproxy ~]# cd haproxy-1.4.24/
[root@haproxy haproxy-1.4.24]# uname -r
3.10.0-693.el7.x86_64
[root@haproxy haproxy-1.4.24]# make TARGET=linux26
[root@haproxy haproxy-1.4.24]# make install
[root@haproxy haproxy-1.4.24]# mkdir /etc/haproxy
[root@haproxy haproxy-1.4.24]# cp examples/haproxy.cfg /etc/haproxy/
[root@haproxy haproxy-1.4.24]# vi /etc/haproxy/haproxy.cfg
####将文件里下面两行注释####
#chroot /usr/share/haproxy
#redispatch
####将所有listen删除,增加下面的内容####
......省略部分内容
listen webcluster 0.0.0.0:80
option httpchk GET /index.html
balance roundrobin
server web1 20.0.0.20:80 check inter 2000 fall 3
server web2 20.0.0.30:80 check inter 2000 fall 3
[root@haproxy haproxy-1.4.24]# cp examples/haproxy.init /etc/init.d/haproxy
[root@haproxy haproxy-1.4.24]# vi /etc/init.d/haproxy
[root@haproxy haproxy-1.4.24]# chmod 755 /etc/init.d/haproxy
[root@haproxy haproxy-1.4.24]# chkconfig --add /etc/init.d/haproxy
[root@haproxy haproxy-1.4.24]# ln -s /usr/local/sbin/haproxy /usr/sbin/haproxy
[root@haproxy haproxy-1.4.24]# systemctl start haproxy
[root@haproxy haproxy-1.4.24]# systemctl status haproxy.service
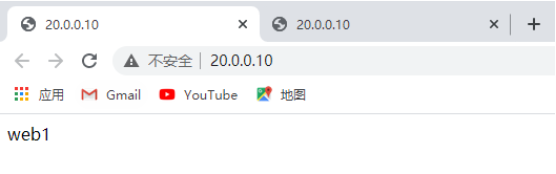
6、测试


7、配置日志功能
(1)、再Haproxy服务器上配置
修改配置文件
#修改global下面两项
log /dev/log local0 info
log /dev/log local0 notice
[root@haproxy haproxy-1.4.24]# touch /etc/rsyslog.d/haproxy.conf
[root@haproxy haproxy-1.4.24]# vi /etc/rsyslog.d/haproxy.conf
if ($programname == 'haproxy' and $syslogseverity-text == 'info')
then -/var/log/haproxy/haproxy-info.log
&~
if ($programname == 'haproxy' and $syslogseverity-text == 'notice')
then -/var/log/haproxy/haproxy-notice.log
&~
[root@haproxy log]# systemctl restart haproxy.service
[root@haproxy log]# systemctl restart rsyslog.service
[root@haproxy rsyslog.d]# cd /var/log
[root@haproxy log]# ll
drwx------. 2 root root 56 11月 5 16:26 haproxy
(2)、访问网页

(3)、查看日志内容
[root@haproxy haproxy]# cat haproxy-info.log
Nov 5 16:25:24 haproxy haproxy[15653]: 20.0.0.1:53977 [05/Nov/2020:16:25:15.723] webcluster webcluster/web1 0/0/0/1/9089 304 356 - - ---- 0/0/0/0/0 0/0 "GET / HTTP/1.1"
Nov 5 16:25:47 haproxy haproxy[15653]: 20.0.0.1:53978 [05/Nov/2020:16:25:32.515] webcluster webcluster/web2 0/0/0/0/14663 200 239 - - ---- 0/0/0/0/0 0/0 "GET / HTTP/1.1"
[root@haproxy haproxy]# cat haproxy-notice.log
Nov 5 16:24:22 haproxy haproxy[15652]: Proxy webcluster started.
Nov 5 16:24:22 haproxy haproxy[15652]: Proxy webcluster started.