一、简介
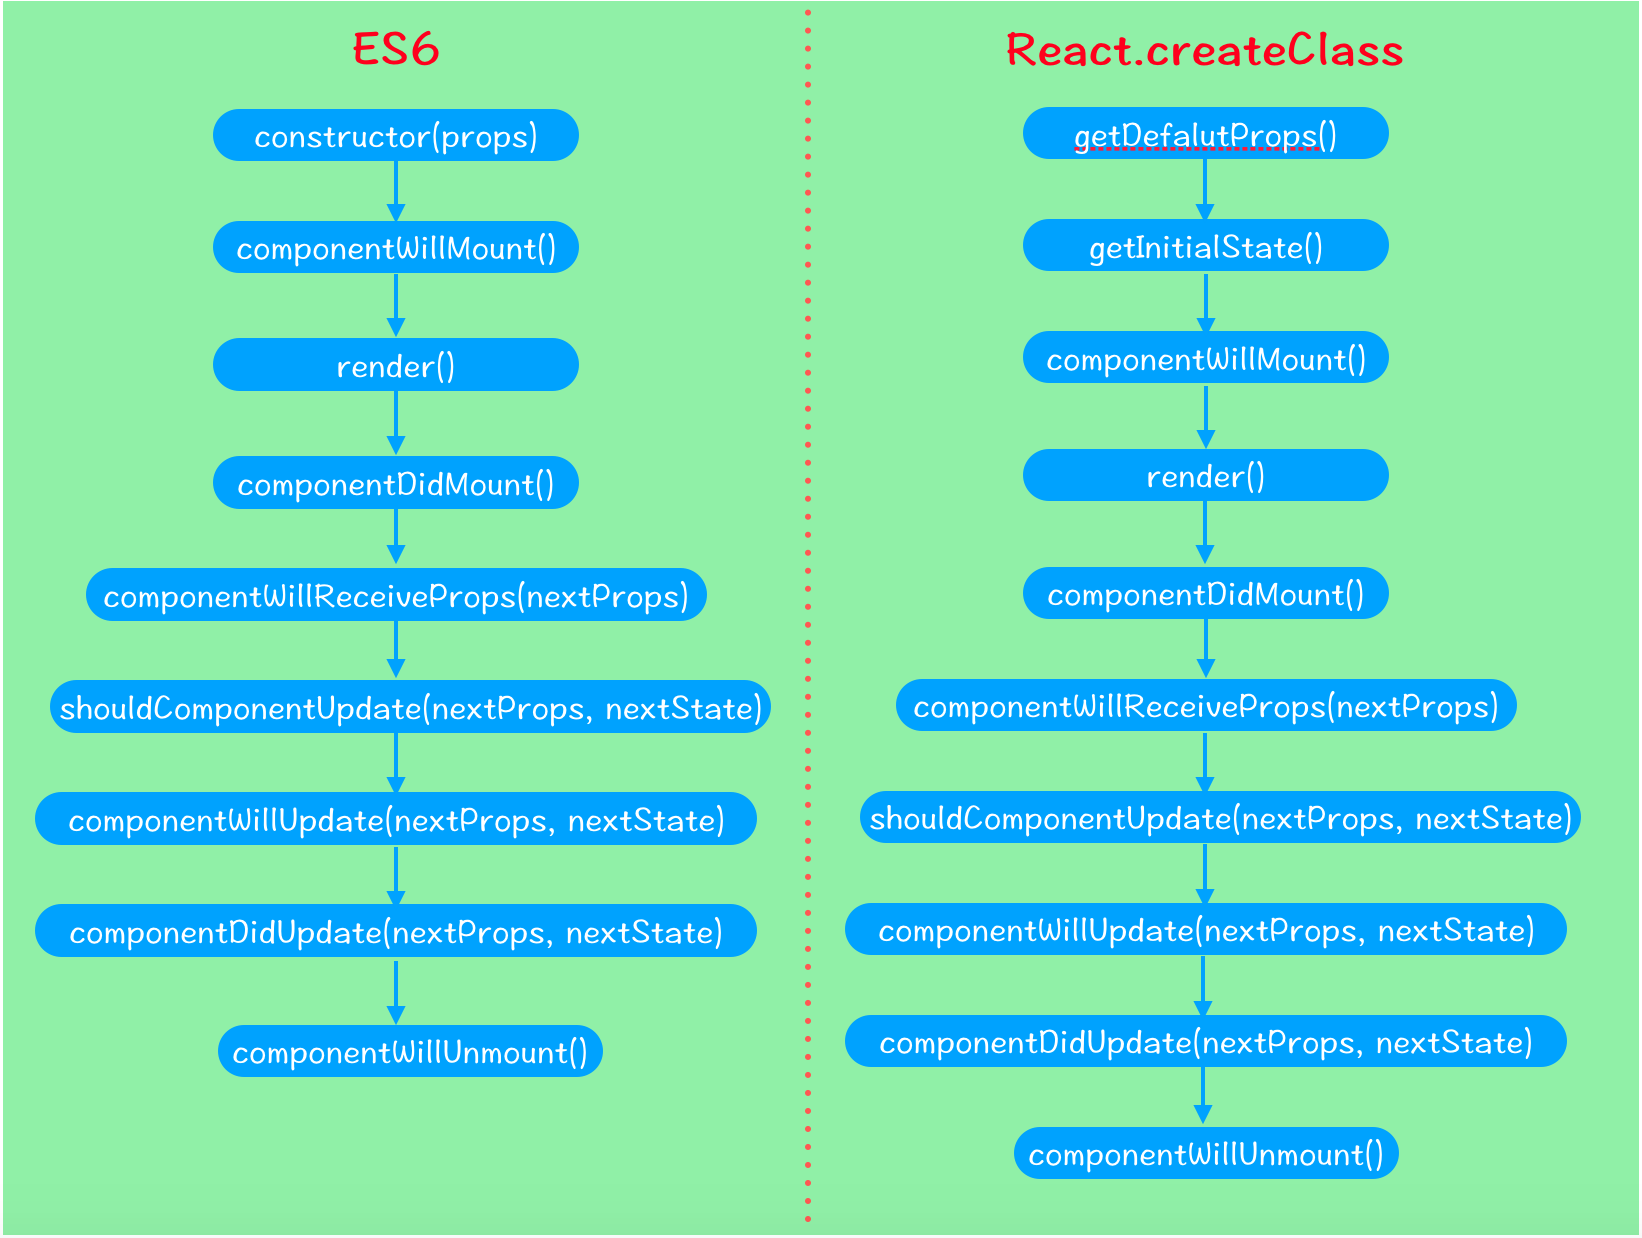
在前面的第二篇博文中对组件的生命周期虽然做了一个大略介绍,但总感觉说的过于简单,毕竟生命周期是React组件的核心部分。在我们熟练使用React挂载和合成组件来创建应用表现层的过程中,针对数据异步或延时问题,只有充分利用组件的生命周期来把握框架载入和数据处理的时机,才能将组件性能发挥到合理水平,并提高应用程序的健壮性。基本来说,组件的生命周期可分为挂载生命周期和更新生命周期两大部分,它们都包括一系列方法,这些方法在组件渲染前后会被触发,事实上,render方法本身也是组件生命周期的一部分。当然,根据用户使用的是ES6类创建组件还是React.createClass创建组件,它们体现的生命周期有一点点的区别。使用React.createClass创建组件时,开发者可以默认在getDefalutProps和getInitialState函数中分别初始化属性和state,而使用ES6类创建组件时,这两个函数被取而代之是constructor构造函数,在构造函数内部可以获取默认属性并且设置state。完整的生命周期对比如图所示:

二、详解
1、挂载生命周期
包括方法有:constructor/getDefault/getInitialState、componentWillMount、render、componentDidMount、componentWillUnmout。

2、更新生命周期
包括方法有:componentWillReceiveProps、shouldComponentUpdate、componentWillUpdate、componentDidUpdate。

三、示例
1、React.createClass
<!DOCTYPE html>
<html>
<head lang="en">
    <meta charset="UTF-8">
    <title>Hello React</title>
    <script src="react/react.js"></script>
    <script src="react/react-dom.js"></script>
    <script src="react/browser.min.js"></script>
</head>
<body>
    <div id="container"></div>
    <script type="text/babel">

        const targetNode = document.getElementById("container");

        const Component = React.createClass({

            getDefaultProps(){
                console.log("---getDefaultProps---");
                return {}
            },

            getInitialState(){
                console.log("---getInitialState---");
                return ({
                    count: 0
                })
            },

            componentWillMount(){
                console.log("---componentWillMount---")
            },

            render(){
                console.log("---render---");
                return (
                    <div>
                        <h1>{`${this.props.title} ${this.state.count}`}</h1>
                    </div>
                )
            },

            componentDidMount(){
                console.log("---componentDidMount---");
                this.setProps({
                    title:"I AM XYQ! Welcome me, current count is"
                })
            },
            /*
            * 现象:父组件更新子组件的props,在子组件接收到新的props时,更新子组件的state,但是却没有重新渲染。
            * 原因:官方说在该函数中调用 this.setState() 将不会引起第二次渲染。每次子组件接收到新的props,都会重新渲染一次,
            * 除非你做了处理来阻止(比如使用:shouldComponentUpdate)。 但是你可以在这次渲染前,根据新的props更新state,
            * 更新state也会触发一次重新渲染,但react基于性能考虑,只会渲染一次。
            * */
            componentWillReceiveProps(nextProps){
                console.log("---componentWillReceiveProps---");
                this.setState({
                    count: this.state.count + 1
                })
            },

            shouldComponentUpdate(nextProps, nextState){
                console.log("---shouldComponentUpdate---"+`count is ${nextState.count}`);
                return true
            },

            componentWillUpdate(nextProps, nextState){
                console.log("---componentWillUpdate---")
            },

            componentDidUpdate(nextProps, nextState){
                console.log("---componentDidUpdate---");
                ReactDOM.unmountComponentAtNode(targetNode); //卸载根组件
            },

            componentWillUnmount(){
                console.log("---componentWillUnmout---");
            }

        });

        ReactDOM.render(
            <Component/>,
            targetNode
        )

    </script>
</body>
</html>
结果与分析 【需要把ReactDOM.unmountComponentAtNode()方法注释掉,才会显示结果,不然组件就从DOM上卸载了】


2、ES6
<!DOCTYPE html>
<html>
<head lang="en">
    <meta charset="UTF-8">
    <title>Hello React</title>
    <script src="react/react.js"></script>
    <script src="react/react-dom.js"></script>
    <script src="react/browser.min.js"></script>
</head>
<body>
    <div id="container"></div>
    <script type="text/babel">

        const targetNode = document.getElementById("container");

        //父组件
        class Parent extends React.Component {

            constructor(props){
                super(props)
                this.state = {title:""}
                this.deleteComponent = this.deleteComponent.bind(this)
            };

            deleteComponent(){
                ReactDOM.unmountComponentAtNode(targetNode); //卸载根组件
            }

            render(){
                return (
                    <div onClick={this.deleteComponent}>
                        <Children name={this.state.title}/>
                    </div>)
            };

            //父组件修改传递给子组件的属性值,子组件会触发componentWillReceiveProps函数
            componentDidMount(){
                this.setState({
                    title: "I AM XYQ! Welcome me, current count is"
                })
            };
        }

        //子组件
        class Children extends React.Component{

            constructor(props){
                super(props);
                this.state = {count:0};
                console.log("---constructor---")
            };

            componentWillMount(){
                console.log("---componentWillMount---")
            };

            render(){
                console.log("---render---");
                return (
                    <h1>{`${this.props.name} ${this.state.count}`}</h1>
                )
            };

            componentDidMount(){
                console.log("---componentDidMount---");
            };

            //此处获取的nextProps就是父组件的state中的title属性
            componentWillReceiveProps(nextProps){
                console.log("---componentWillReceiveProps---");
                this.setState({
                    count: this.state.count + 1
                })
            };

            shouldComponentUpdate(nextProps, nextState){
                console.log("---shouldComponentUpdate---"+`count is ${nextState.count}`);
                return true
            };

            componentWillUpdate(nextProps, nextState){
                console.log("---componentWillUpdate---")
            };

            componentDidUpdate(nextProps, nextState){
                console.log("---componentDidUpdate---");
            };

            componentWillUnmount(){
                console.log("---componentWillUnmout---");
            }
        }

        ReactDOM.render(
            <Parent/>,
            targetNode
        )

    </script>
</body>
</html>
结果与分析 【点击deleteComponent()事件,组件就从DOM上卸载了】

