引言
前面已经和大家介绍过 Unittest 测试框架的数据驱动框架 DDT,以及其实现原理。今天和大家分享的是 Pytest 测试框架的数据驱动,Pytest 测试框架的数据驱动是由 pytest 自带的pytest.mark.parametrize()来实现的。
pytest.mark.parametrize 实现数据驱动
pytest.mark.parametrize 是 pytest 的内置装饰器,它允许你在 function 或者 class 上定义多组参数和 fixture 来实现数据驱动。
@pytest.mark.parametrize() 装饰器接收两个参数:
第一个参数以字符串的形式存在,它代表能被被测试函数所能接受的参数,如果被测试函数有多个参数,则以逗号分隔;
第二个参数用于保存测试数据。如果只有一组数据,以列表的形式存在,如果有多组数据,以列表嵌套元组的形式存在(例如:[1,1]或者[(1,1), (2,2)])。
针对装饰器的单参数和多参数,分别举例如下。
1.pytest.mark.parametrize 单参数
# test_singal.py
import pytest

@pytest.mark.parametrize("number", [1, 0])
def test_equal(number):
    assert number == 1


if __name__ == "__main__":
    pytest.main([])
以上是单参数的一个例子,在这个例子中,test_equal 函数接收一个参数 number,这个参数有两组数据,分别是 1 和 0。
tips:
装饰器 pytest.mark.parametrize 的第一个参数里的参数名称必须与测试函数中的参数称保持一致。
即:test_equal这个函数方法的参数 number 必须与装饰器里的第一个参数的名称 number 保持一致。
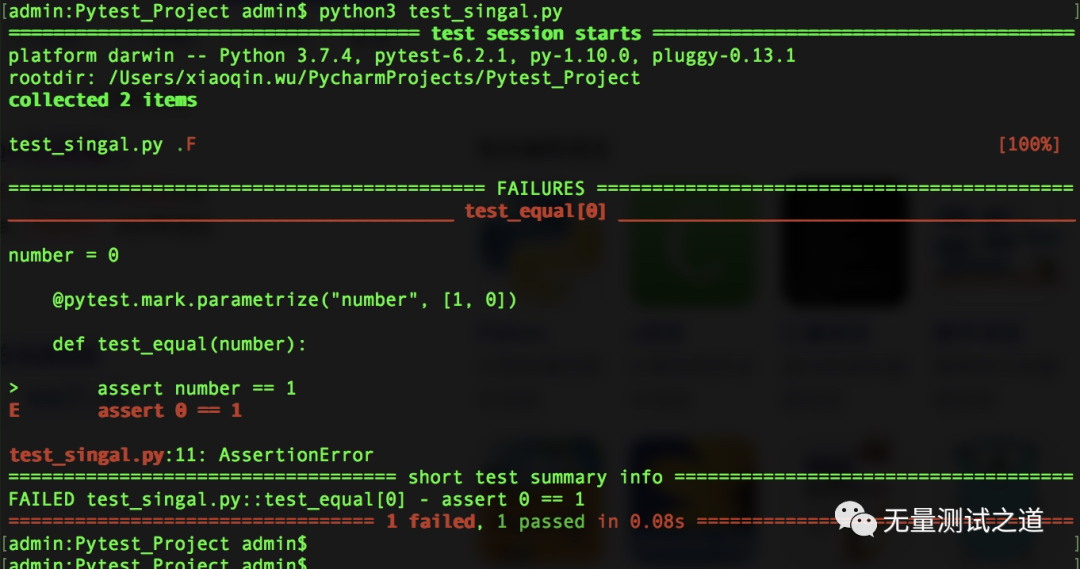
运行以上代码,结果如下图所示: 

可以看到,函数 test_equal 提供了两组参数 1 和 0,所以它也执行了 2 次。
2.pytest.mark.parametrize 多参数
pytest.mark.parametrize 不仅支持单个参数,也可以支持多个参数,多个参数比较常见,因为在日常工作中,我们提供测试数据,不仅仅包括用于测试的数据,还包括用于验证的数据,所以多参数还是比较常见的。
pytest.mark.parametrize 可以支持多参数,举例如下:
# test_baidu.py

import time
import pytest
from selenium import webdriver

@pytest.mark.baidu
class TestBaidu:
    def setup_method(self):
        self.driver = webdriver.Chrome()
        self.driver.implicitly_wait(30)
        self.base_url = "http://www.baidu.com/"

    @pytest.mark.parametrize('search_string, expect_string', [('Testing', 'Testing'), ('helloworld.com', 'Testing')])
    def test_baidu_search(self, search_string, expect_string):
        driver = self.driver
        driver.get(self.base_url + "/")
        driver.find_element_by_id("kw").send_keys(search_string)
        driver.find_element_by_id("su").click()
        time.sleep(2)
        search_results = driver.find_element_by_xpath('//*[@id="1"]/h3/a').get_attribute('innerHTML')
        assert (expect_string in search_results) is True

    def teardown_method(self):
        self.driver.quit()


if __name__ == "__main__":
    pytest.main(["-m", "baidu", "-s", "-v", "-k", "test_baidu_search", "test_baidu.py"])
上面这段代码,被测试函数 test_baidu_search 有两个参数,分别是 search_string 和 expect_string。那么对应着,在 pytest.mark.parametrize 这个装饰器的第一个参数里,也包含 search_string 和 expect_string。
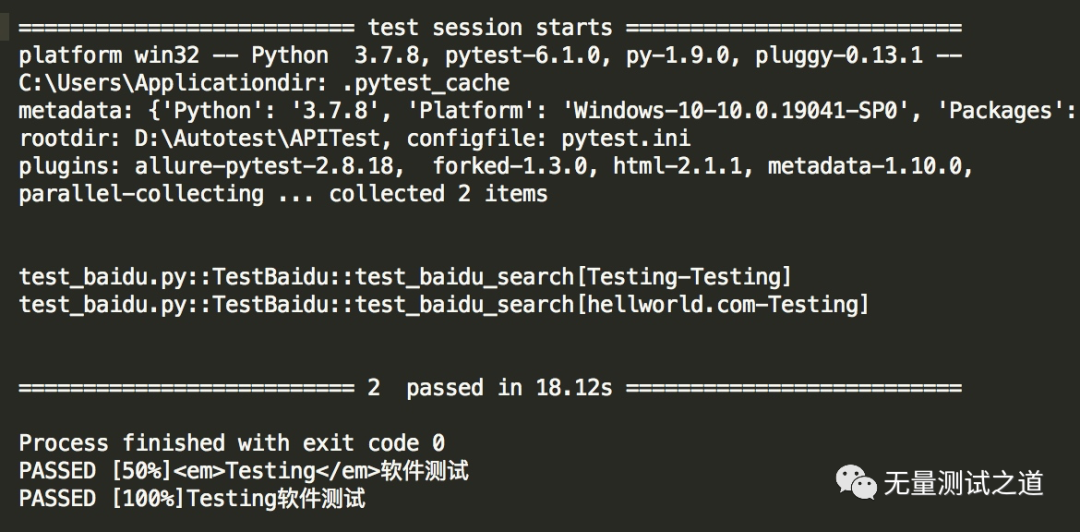
在命令行中运行结果如下: 

pytest.fixture 扩展数据驱动
做过自动化测试的小伙伴,应该都很清楚地知道,无论 API 还是 UI 的自动化测试可以总结为三个步骤:
测试前的准备 —> 执行测试 —> 测试后的清理。
在日常的测试中,测试前的准备通常就是测试需要的前置条件,它可以是简单的登录操作、联合查询数据库操作、测试数据读取准备操作,甚至是逻辑复杂的函数操作。
和 unittest 框架一样,在 pytest 中也可以通过使用 setup 和 teardown 来完成测试前置工作。
例如:
-
使用 setup_method、setup_class、setup_module 来分别完成测试类方法、测试类,以及测试 module 的 准备操作;
-
使用 teardown_method、teardown_class、teardown_module 来分别完成测试类方法、测试类,以及测试 module 清理操作。
但是这种方式存在一个比较明显的缺陷。
例如,在同一个测试类中,存在多个测试方法,假设每一个测试方法需要不同的 setup 或者 teardown 函数,此时该怎么办呢?
又比如,setup 和 teardown 其实都属于测试夹具(Test Fixtures),如果我想把所有测试夹具全部放到一个函数中去管理,能做到吗?
pytest 考虑到了这种情况,并且提供了一个更加高级的功能,那就是 fixture 装饰器。
fixtures 可用作初始化测试服务、数据和状态,也常常用来在测试执行前或测试执行后进行测试的前置操作或后置操作。
fixtures 可作为共享数据使用,也可被其他函数、模块、类或者整个项目,甚至另外的 fixtures 调用。
1.fixtures 语法
pytest.fixtures 的语法如下:
fixture(scope="function", params=None, autouse=False, ids=None, name=None)
从语法可以看到 fixture 的5个参数如下:
scope:用于控制 fixture 的作用范围
这个参数有以下4个级别:
-
function:在每一个 function 或者类方法中都会调用(默认)。
-
class:在每一个类中只调用一次。
-
module:每一个 .py 文件调用一次;该文件内可以有多个 function 和 class。
-
session:一个 session 调用一次。
params:一个可选的参数列表
params 以可选的参数列表形式存在。在测试函数中使用时,可通过 request.param 接收设置的返回值(即 params 列表里的值)。params 中有多少元素,在测试时,引用此 fixture 的函数就会调用几次。
autouse:是否自动执行设置的 fixtures
当 autouse 为 True 时,测试函数即使不调用 fixture 装饰器,定义的 fixture 函数也会被执行。
ids:指定每个字符串 id
当有多个 params 时,针对每一个 param,可以指定 id,这个 id 将变为测试用例名字的一部分。如果没有提供 id,则 id 将自动生成。
name:fixture 的名称
name 是 fixtures 的名称, 它默认是你装饰的那个 fixture 函数的名称。你可以通过 name 参数来更改这个 fixture 名称,更改后,如果这个 fixture 被调用,则使用你更改过的名称即可。
2.fixtures 用法
fixtures 有多种使用方式,举例说明如下。
(1)、通过 fixture 函数名直接使用
#test_fixture_usage.py

import pytest
# 首先, 在fixture函数上,加@pytest.fixture()

@pytest.fixture()
def my_method():
    print('This is testing fixture')

# 其次,把fixture函数的函数名作为参数,传入被测试用例

def test_use_fixtures(my_method):
    print('Please follow Testing from WL')
通过 fixture 函数名使用 fixture 的步骤是:
-
在 fixture 函数上,加 @pytest.fixture(),上例中 my_method 这个方法将作为 fixture 使用;
-
把 fixture 函数的函数名作为参数,传入被测试用例。
注意:函数 test_use_fixtures 的入参必须是 my_method 这个方法名,跟 fixture 函数保持一致。
通过运行以上代码,在运行结果里,你会发现,my_method 即定义的 fixture 的方法先于测试函数的其他语句开始执行(相当于setup功能)。
(2)、通过 usefixtures 装饰器使用
通过把 fixture 作为测试函数入参的方式,可以达到为每一个测试函数配置不同的 setup和teardown 的功能,但这样会让 fixture 和我的测试函数耦合在一块,不利于测试函数的重用与测试框架的架构清晰。
因此 pytest 提供了 pytest.mark.usefixtures 这个装饰器。
以下代码举例说明了 usefixtures 的具体用法:
#test_fixture_usage.py

import pytest

@pytest.fixture()
def my_method():
    print('This is Testing fixture')

# 函数直接使用fixture
@pytest.mark.usefixtures('my_method')
def test_use_fixtures():
    print('Please follow Testing from WL')

class TestClass1:
    # 类方法使用fixture
    @pytest.mark.usefixtures('my_method')
    def test_class_method_usage(self):
        print('[classMethod]Please follow Testing from WL')


# 类直接使用fixture
@pytest.mark.usefixtures('my_method')
class TestClass2:
    def test_method_usage_01(self):
        pass

    def test_method_usage_02(self):
        pass
由这段代码你可以看到,usefixtures 可以被函数、类方法,以及类调用。
(3)、fixture 多参数使用
上述使用方式实现了使不同的测试函数调用不同的测试 fixtures,那么如果我们 fixture 带参数该怎么办呢?请看如下代码:
import pytest


@pytest.fixture(params=['hello', 'Testing'])
def my_method(request):
    return request.param

def test_use_fixtures_01(my_method):
    print('this is the first test')
    print(my_method)


@pytest.mark.usefixtures('my_method')
def test_use_fixtures_02():
    print('this is the second test')

    # 注意,如果在这里想通过print(my_mthod)来打印出fixuture提供的参数,是不行的, 因为使用usefixtures无法获取fixture的返回值,如需要fixture的返回值,则需用test_use_fixtures_01那样的调用方式
执行这段代码,将会看到有4条测试用例被执行。由此可见,pytest 通过 fixture 和其参数 params 实现了数据驱动。
(4)、通过 autouse 参数隐式使用
以上方式实现了 fixtures 和测试函数的松耦合,但是仍然存在问题:每个测试函数都需要显式声明要用哪个 fixtures。
基于此,pytest 提供了autouse 参数,允许我们在不调用 fixture 装饰器的情况下使用定义的fixture,请看下面的例子:
#test_fixture_usage.py

import pytest

@pytest.fixture(params=['hello', 'Testing'], autouse=True, ids=['test1', 'test2'], name='test')
def my_method(request):
    print(request.param)

def test_use_fixtures_01():
    print('this is the first test')

def test_use_fixtures_02():
    print('this is the second test')
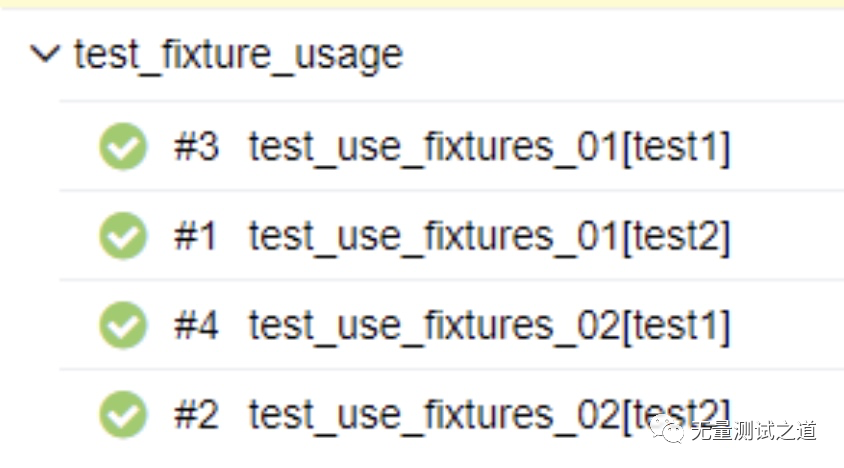
通过运行上段代码,并使用 allure[allure如何生成测试报告推文链接] 生成测试报告的结果如下:![]()

当定义了 fixture 函数,并且 autouse 为 True 时,无须显式的在测试函数中声明要使用 fixture(在本例中,你看不到 my_method 这个 fixture 在测试方法中被显式调用)。定义的 fixture 将在 pytest.fixtures 指定的范围内,对其下的每一个测试函数都应用 fixture。
在本例中,scope 参数没有定义,将使用默认值“function”, 即每一个测试函数都会执行, 而我们的 params 又提供了两组参数,所以共 4 条测试用例被执行。
请注意下测试用例名称,针对每一个测试用例,因为在@pytest.fixture 指定了 ids 为 ['test1', 'test2'], 故测试用例名中也包括了指定的 id。
(5)、多 fixture 笛卡尔积使用
当你有多个 fixture 需要叠加使用时, 可以叠加使用。注意:此方式将把 fixure 的各组参数以笛卡尔积的形式组织,以下列代码为例,执行将生成 4 条测试用例。
import pytest

class TestClass:
    @pytest.fixture(params=['hello', 'Testing'], autouse=True)
    def my_method1(self, request):
        print('the param are:{}'.format(request.param))
        return request.param

    @pytest.fixture(params=['world', 'is good'], autouse=True)
    def my_method2(self, request):
        print('the param are:{}'.format(request.param))
        return request.param

    def test_use_fixtures_01(self):
        pass
(6)、使用 conftest.py 来共享 fixture
通过上面的举例学习,大家应该掌握了如何在同一个文件中进行 fixture 的定义、共享和使用。但在日常工作测试中,我们常常需要在全局范围内使用同一个测试前置操作。
例如:测试开始时首先进行登录操作,接着连接数据库等操作。
这种情况下,我们就需要使用 conftest.py。在 conftest.py 中定义的 fixture 不需要进行 import,pytest 会自动查找使用。pytest 查找 fixture 的顺序是首先查找测试类(Class),接着查找测试模块(Module),然后是 conftest.py 文件,最后是内置或者第三方插件。
下面来看下如何使用 conftest.py
假设目录结构如下:
|--APITest

    |--tests

        |--test_fixture1.py

        |--test_baidu_fixture_sample.py

        |--conftest.py

        |--__init__.py
conftest.py 的代码如下:
# conftest.py

import pytest
import requests
from selenium import webdriver


@pytest.fixture(scope="session")
# 此方法名可以是你登录的业务代码,也可以是其他,这里暂命名为login
def login():
    driver = webdriver.Chrome()
    driver.implicitly_wait(30)
    base_url = "http://www.baidu.com/"
    s = requests.Session()

    yield driver, s, base_url
    print('turn off browser driver')
    driver.quit()
    print('turn off requests driver')

    s.close()


@pytest.fixture(scope="function", autouse=True)
def connect_db():
    print('connecting db')
    # 此处写你的连接db的业务逻辑
    pass
test_fixture1.py 的代码如下:
# test_fixture1.py

import pytest

class TestClass:
    def test_use_fixtures_01(self, login):
        print('I am data:{}'.format(login))
test_baidu_fixture_sample.py 的代码如下:
import time
import pytest


@pytest.mark.baidu
class TestBaidu:

    @pytest.mark.parametrize('search_string, expect_string', [('Testing', 'Testing'), ('helloworld.com', 'Testing')])
    def test_baidu_search(self, login, search_string, expect_string):
        driver, s, base_url = login
        driver.get(base_url + "/")
        driver.find_element_by_id("kw").send_keys(search_string)
        driver.find_element_by_id("su").click()
        time.sleep(2)

        search_results = driver.find_element_by_xpath('//*[@id="1"]/h3/a').get_attribute('innerHTML')
        print(search_results)
        assert (expect_string in search_results) is True


if __name__ == "__main__":
    pytest.main([])
在命令行中通过如下代码执行:
D:AutoAPITest>pytest -s -q --tb=no tests --alluredir=./allure_reports
测试执行完成后,查看执行结果:![]()

从上图中可以注意到,connecting db 这条语句被打印了三次,是因为在 conftest.py 里把 connect_db 这个 fixture 的 scope 设置为 function 且 autouse 的属性值是 True。而 turn off browser driver,turn off requests driver 这两条语句仅仅执行了一次,是因为 login 这个 fixture 的 scope 是 session,故它在整个 session 中仅仅执行了一次。
另外请注意下在 fixture login 中,有如下的语句:
...
...

yield driver, s, base_url
print('turn off browser driver')
driver.quit()

print('turn off requests driver')
s.close()
这个是什么意思呢?在 pytest 的 fixture 里,yield关键字语句之前的属于 set up,而 yield 以后的语句属于 tear down。
这样你就明白了,为什么以下语句是最后执行的了:
print('turn off browser driver')
driver.quit()
print('turn off requests driver')
s.close()
pytest.mark.parametrize 和 pytest.fixture 结合使用
通过上面的讲解我们了解到,在 pytest 中可以使用 pytest.mark.parametrize 装饰器进行数据驱动测试,可以使用 pytest.fixture 装饰器进行测试的 setup、teardown,以及 fixture 共享的测试。
当 pytest.mark.parametrize 和 pytest.fixture 结合起来,能起到什么效果呢?
(1)、减少了重复代码,实现了代码全局共享
所有的测试前置及后置功能均可以定义在 conftest.py 文件中,供整个测试使用,而不必在每一个测试类中定义。这样做大大减少了重复代码,且 conftest.py 定义在项目根目录,就可以应用在全局,定义在某一个文件夹,就可以应用于这个文件夹下的所有测试文件。
(2)、可以使测试仅关注测试自身
测试仅围绕自身业务进行编码即可,配合使用 conftest.py 及 pytest.fixture 可实现,在一个测试类中,仅仅包括测试自身的代码,而不必考虑测试前的准备以及测试后的清理工作。
(3)、框架迁移更容易
如果是 UI 自动化测试,可在 conftest.py 文件中包括 Web Driver 的所有操作,如果是 API 测试,可在 conftest.py 文件中编写所有接口请求操作。这样当新项目需要应用自动化框架时,仅需更改 tests 文件夹下的测试用例即可。
pytest.mark.parametrize 和 pytest.fixture 结合示例:
# test_sample.py

import pytest


@pytest.fixture()
def is_odd(request):
    print('Now the parameter are:--{}
'.format(request.param))
    if int(request.param) % 2 == 0:
        return False
    else:
        return True


@pytest.mark.parametrize("is_odd", [1, 0], indirect=True)
def test_is_odd(is_odd):
    if is_odd:
        print("is odd number")
    else:
        print("is not odd number")


if __name__ == "__main__":
    pytest.main([])
上述代码定义了一个 fixture 方法 is_odd 和一个数据驱动的方法 test_is_odd。其中,fixture 方法 is_odd 判断一个数是否是奇数;而数据驱动的方法 test_is_odd 会提供一组数据,并且调用 is_odd 这个 fixture 进行判断。
总结
今天的分享内容是 pytest 测试框架如何进行数据驱动,可以通过结合使用 pytest.mark.parametrize 和 pytest.fixture 装饰器。如果你学会了 pytest.mark.parametrize 和 pytest.fixture 的各种用法,对你的测试框架将可以运用自如。
欢迎关注【无量测试之道】公众号,回复【领取资源】
Python编程学习资源干货、
Python+Appium框架APP的UI自动化、
Python+Selenium框架Web的UI自动化、
Python+Unittest框架API自动化、
资源和代码 免费送啦~
文章下方有公众号二维码,可直接微信扫一扫关注即可。
备注:我的个人公众号已正式开通,致力于测试技术的分享,包含:大数据测试、功能测试,测试开发,API接口自动化、测试运维、UI自动化测试等,微信搜索公众号:“无量测试之道”,或扫描下方二维码:
添加关注,让我们一起共同成长!