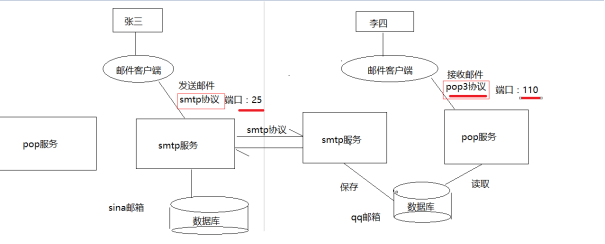
邮件发送过程
协议:规定了数据传输的格式。
工具类
/**
 *
 * @param to            : 邮件接收者
 * @param subject       :主题
 * @param content       :邮件正文
 * @throws Exception
 */
public static void sendMsg(String to ,String subject ,String content) throws Exception{
   //1.发送邮件设置
   Properties props = new Properties();
   props.setProperty("mail.smtp.host", "smtp.sina.com");  //设置主机地址   smtp.qq.com    smtp.sina.com
   props.setProperty("mail.smtp.auth", "true");//认证

   //2.产生一个用于邮件发送的Session对象
   Session session = Session.getInstance(props);

   //3.产生一个邮件的消息对象
   MimeMessage message = new MimeMessage(session);

   //4.设置消息的发送者
   Address fromAddr = new InternetAddress("004@sina.com");
   message.setFrom(fromAddr);

   //5.设置消息的接收者
   Address toAddr = new InternetAddress(to);
   //TO 直接发送  CC抄送    BCC密送
   message.setRecipient(MimeMessage.RecipientType.TO, toAddr);

   //6.设置主题
   message.setSubject(subject);
   //7.设置正文
   message.setText(content);

   //8.准备发送,得到火箭
   Transport transport = session.getTransport("smtp");
   //9.设置火箭的发射目标
   transport.connect("smtp.sina.com", "004@sina.com", "loveyou");
   //10.发送
   transport.sendMessage(message, message.getAllRecipients());

   //11.关闭
   transport.close();
}
新增用户发送邮件
/**
 * 新增用户
 *      1.获取表单数据构造user对象
 *      2.添加对应的企业属性
 * 更新用户
 */
@RequestMapping(value = "/edit" , name = "编辑用户")
public String edit(User user) {
   user.setCompanyId(companyId);
   user.setCompanyName(companyName);
   //1.判断是否具有id属性
   if(UtilFuns.isEmpty(user.getId())) {
      String password = user.getPassword();
      //2.没有id,保存
      userService.save(user);
      //发送邮件
      try{
         MailUtil.sendMsg(user.getEmail(),"恭喜申请成功","尊敬的xxx用户您好:欢迎加入xxxxx,您的登录账号为:"+
               user.getEmail()+",登录密码为:"+password);//接收者,主体,正文
      }catch (Exception e) {
         e.printStackTrace();
      }
   }else{
      //3.具有id,更新
      userService.update(user);
   }
   return "redirect:/system/user/list.do";
}
消息中间件
概述
消息中间件利用高效可靠的消息传递机制进行平台无关的数据交流,并基于数据通信来进行分布式系统的集成。通过提供消息传递和消息排队模型,
它可以在分布式环境下扩展进程间的通信。消息队列中间件是分布式系统中重要的组件,主要解决应用解耦,异步消息,流量削锋等问题,
实现高性能,高可用,可伸缩和最终一致性架构。
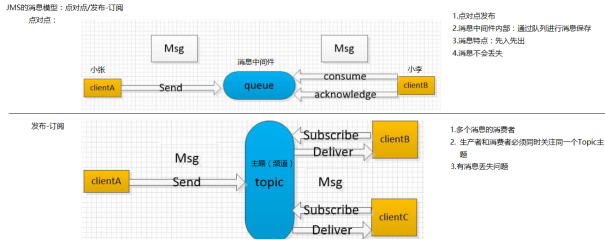
对于消息中间件,常见的角色大致也就有 Producer(生产者)、Consumer(消费者)。
常见消息中间件
常见的消息中间件产品:
(1 )ActiveMQ
ActiveMQ 是 Apache 出品,最流行的,能力强劲的开源消息总线。ActiveMQ 是一个完全支持 JMS1.1 和J2EE 1.4 规范的 JMS Provider 实现。
(2)RabbitMQ
AMQP 协议的领导实现,支持多种场景。淘宝的 MySQL 集群内部有使用它进行通讯,OpenStack 开源云平台的通信组件,最先在金融行业得到运用。
(3)ZeroMQ
史上最快的消息队列系统
(4)Kafka
Apache 下的一个子项目 。特点:高吞吐,在一台普通的服务器上既可以达到 10W/s 的吞吐速率;完全的分布式系统。适合处理海量数据。
消息的两种模式
ActiveMQ
软件安装
绿色版解压即可
spring整合ActiveMQ
消息生产者
引入坐标
<properties>
    <spring.version>5.0.2.RELEASE</spring.version>
</properties>

<dependencies>
    <!-- Spring -->
    <dependency>
        <groupId>org.springframework</groupId>
        <artifactId>spring-context</artifactId>
        <version>${spring.version}</version>
    </dependency>
    <dependency>
        <groupId>org.springframework</groupId>
        <artifactId>spring-beans</artifactId>
        <version>${spring.version}</version>
    </dependency>
    <dependency>
        <groupId>org.springframework</groupId>
        <artifactId>spring-jms</artifactId>
        <version>${spring.version}</version>
    </dependency>
    <dependency>
        <groupId>org.springframework</groupId>
        <artifactId>spring-test</artifactId>
        <version>${spring.version}</version>
    </dependency>
    <dependency>
        <groupId>org.apache.activemq</groupId>
        <artifactId>activemq-all</artifactId>
        <version>5.11.2</version>
    </dependency>
    <dependency>
        <groupId>javax.jms</groupId>
        <artifactId>javax.jms-api</artifactId>
        <version>2.0.1</version>
    </dependency>
    <dependency>
        <groupId>junit</groupId>
        <artifactId>junit</artifactId>
        <version>4.12</version>
    </dependency>
</dependencies>
配置文件
<?xml version="1.0" encoding="UTF-8"?>
<beans xmlns="http://www.springframework.org/schema/beans"
xmlns:xsi="http://www.w3.org/2001/XMLSchema-instance" xmlns:aop="http://www.springframework.org/schema/aop"
xmlns:context="http://www.springframework.org/schema/context"
xmlns:tx="http://www.springframework.org/schema/tx"
xmlns:amq="http://activemq.apache.org/schema/core"
xmlns:jms="http://www.springframework.org/schema/jms"
xsi:schemaLocation="
http://www.springframework.org/schema/beans http://www.springframework.org/schema/beans/spring-beans.xsd
http://www.springframework.org/schema/aop http://www.springframework.org/schema/aop/spring-aop.xsd
http://www.springframework.org/schema/context http://www.springframework.org/schema/context/spring-context.xsd
http://www.springframework.org/schema/tx http://www.springframework.org/schema/tx/spring-tx.xsd
http://www.springframework.org/schema/jms
http://www.springframework.org/schema/jms/spring-jms.xsd
http://activemq.apache.org/schema/core
http://activemq.apache.org/schema/core/activemq-core.xsd">
<context:component-scan base-package="cn.jia"></context:component-scan>
<!--
spring和activeMq整合:通过整合JmsTemplate对象进行消息发送
-->
<!--1.连接工厂-->
<bean id="activeMQConnectionFactory" class="org.apache.activemq.ActiveMQConnectionFactory">
<property name="brokerURL" value="tcp://127.0.0.1:61616"></property>
</bean>
<!--2.spring管理连接工厂-->
<bean id="connectionFactory" class="org.springframework.jms.connection.CachingConnectionFactory">
<property name="targetConnectionFactory" ref="activeMQConnectionFactory"></property>
</bean>
<!--3.指定目的地址:queue或者topic-->
<bean id="queue" class="org.apache.activemq.command.ActiveMQQueue">
<!--value:表示在activeMQ中创建的列表名称-->
<constructor-arg value="test-spring-queue"></constructor-arg>
</bean>
<!--4.通过连接工厂创建jmstemplate-->
<bean id="jmsTemplate" class="org.springframework.jms.core.JmsTemplate">
<property name="connectionFactory" ref="connectionFactory"></property>
</bean>
<!--3.指定目的地址:queue或者topic-->
<bean id="topic" class="org.apache.activemq.command.ActiveMQTopic">
<!--value:表示在activeMQ中创建的列表名称-->
<constructor-arg value="test-spring-topic"></constructor-arg>
</bean>
</beans>
消息提供者java代码
@Component
public class ActivemqProducer {

    @Autowired
    private Destination queue; //注入queue

    @Autowired
    private Destination topic; //注入topic

    @Autowired
    private JmsTemplate jmsTemplate; //注入工具类

    public void sendQueue(final String msg){
        //参数1:表示消息要传递到哪个队列中   参数2:消息创建器对象
        jmsTemplate.send(queue, new MessageCreator() {
            //session:消息对象
            public Message createMessage(Session session) throws JMSException {
                //创建一个字符串类型消息
                TextMessage textMessage = session.createTextMessage(msg);
                return textMessage;
            }
        });
    }

    public void sendTopic(final String msg){
        //参数1:表示消息要传递到哪个队列中   参数2:消息创建器对象
        jmsTemplate.send(topic, new MessageCreator() {
            //session:消息对象
            public Message createMessage(Session session) throws JMSException {
                //创建一个字符串类型消息
                TextMessage textMessage = session.createTextMessage(msg);
                return textMessage;
            }
        });
    }
}
测试
// @RunWith(SpringJUnit4ClassRunner.class)
@RunWith(SpringRunner.class)
@ContextConfiguration("classpath:applicationContext-jms.xml")
public class TestActiveMq {


    @Autowired
    private ActivemqProducer activemqProducer;

    @Test
    //测试queue
    public void test1(){
        activemqProducer.sendQueue("hello123");
    }

    @Test
    //测试topic
    public void test2(){
        activemqProducer.sendTopic("hello tom");
    }
}
消息消费者
配置文件
 <context:component-scan base-package="cn.jia"></context:component-scan>

    <!--
        spring和activeMq整合:通过整合JmsTemplate对象进行消息发送
    -->
    <!--1.连接工厂-->
    <bean id="activeMQConnectionFactory" class="org.apache.activemq.ActiveMQConnectionFactory">
        <property name="brokerURL" value="tcp://127.0.0.1:61616"></property>
    </bean>
    <!--2.spring管理连接工厂-->
    <bean id="connectionFactory"  class="org.springframework.jms.connection.CachingConnectionFactory">
        <property name="targetConnectionFactory" ref="activeMQConnectionFactory"></property>
    </bean>

    <!--告知消费者业务类,去哪个队列中获取消息-->
    <!--配置监听器管理器
       配置的都是基于queue类型的消息监听    -->
    <jms:listener-container destination-type="queue" connection-factory="connectionFactory">
        <jms:listener destination="test-spring-queue" ref="activeMqConsumer"/>
    </jms:listener-container>

    <!--告知消费者业务类,去哪个队列中获取消息-->
    <!--配置监听器管理器
       配置的都是基于topic类型的消息监听    -->
    <jms:listener-container destination-type="topic" connection-factory="connectionFactory">
        <jms:listener destination="test-spring-topic" ref="activeMqTopicConsumer"/>
    </jms:listener-container>

</beans>
web.xml配置监听器
   <!-- 监听器监听其他的spring配置文件 -->
    <context-param>
        <param-name>contextConfigLocation</param-name>
        <param-value>classpath:applicationContext-jms.xml</param-value>
    </context-param>
    <listener>
        <listener-class>org.springframework.web.context.ContextLoaderListener</listener-class>
    </listener>
</web-app>
测试
@Component
public class ActiveMqConsumer implements MessageListener{


    public void onMessage(Message message) {
        //把消息类型转换成字符串类型消息
        TextMessage textMessage = (TextMessage) message;
        try {
            //输出消息
            System.out.println("Queue: "+textMessage.getText());
        } catch (JMSException e) {
            e.printStackTrace();
        }
    }
}
@Component
public class ActiveMqTopicConsumer implements MessageListener {

    public void onMessage(Message message) {
        //把消息类型转换成字符串类型消息
        TextMessage textMessage = (TextMessage) message;
        try {
            //输出消息
            System.out.println("Topic: "+textMessage.getText());
        } catch (JMSException e) {
            e.printStackTrace();
        }
    }
}
改造邮件发送
引入坐标
  <!--activeMq-->
        <dependency>
            <groupId>org.apache.activemq</groupId>
            <artifactId>activemq-all</artifactId>
            <version>${activemq.version}</version>
        </dependency>
        <dependency>
            <groupId>javax.jms</groupId>
            <artifactId>javax.jms-api</artifactId>
            <version>2.0.1</version>
        </dependency>
<dependency>
<groupId>org.springframework</groupId>
<artifactId>spring-jms</artifactId>
<version>${spring.version}</version>
</dependency>
编写配置
哪个发邮件在哪编写配置文件
<?xml version="1.0" encoding="UTF-8"?>
<beans xmlns="http://www.springframework.org/schema/beans"
       xmlns:xsi="http://www.w3.org/2001/XMLSchema-instance" xmlns:aop="http://www.springframework.org/schema/aop"
       xmlns:context="http://www.springframework.org/schema/context"
       xmlns:tx="http://www.springframework.org/schema/tx"
       xmlns:amq="http://activemq.apache.org/schema/core"
       xmlns:jms="http://www.springframework.org/schema/jms"
       xsi:schemaLocation="
        http://www.springframework.org/schema/beans http://www.springframework.org/schema/beans/spring-beans.xsd
        http://www.springframework.org/schema/aop http://www.springframework.org/schema/aop/spring-aop.xsd
        http://www.springframework.org/schema/context http://www.springframework.org/schema/context/spring-context.xsd
        http://www.springframework.org/schema/tx http://www.springframework.org/schema/tx/spring-tx.xsd
        http://www.springframework.org/schema/jms
        http://www.springframework.org/schema/jms/spring-jms.xsd
        http://activemq.apache.org/schema/core
        http://activemq.apache.org/schema/core/activemq-core.xsd">

   <!-- <context:component-scan base-package="cn.jia"></context:component-scan>-->

    <!--
        spring和activeMq整合:通过整合JmsTemplate对象进行消息发送
    -->
    <!--1.连接工厂-->
    <bean id="activeMQConnectionFactory" class="org.apache.activemq.ActiveMQConnectionFactory">
        <property name="brokerURL" value="tcp://127.0.0.1:61616"></property>
    </bean>
    <!--2.spring管理连接工厂-->
    <bean id="connectionFactory"  class="org.springframework.jms.connection.CachingConnectionFactory">
        <property name="targetConnectionFactory" ref="activeMQConnectionFactory"></property>
    </bean>
    <!--3.指定目的地址:queue或者topic-->
    <bean id="queue" class="org.apache.activemq.command.ActiveMQQueue">
        <!--value:表示在activeMQ中创建的列表名称-->
        <constructor-arg value="email-queue"></constructor-arg>
    </bean>
    <!--4.通过连接工厂创建jmstemplate-->
    <bean id="jmsTemplate" class="org.springframework.jms.core.JmsTemplate">
        <property name="connectionFactory" ref="connectionFactory"></property>
    </bean>

</beans>
service实现类
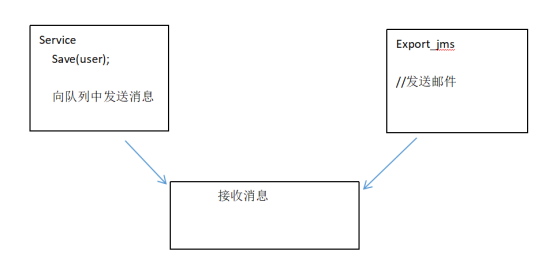
 @Autowired
    private Destination queue; //点对点消息模型

    @Autowired
    private JmsTemplate jmsTemplate;

    public void save(User user) {
        String pwd = user.getPassword();
        //1、保存用户
        user.setId(UUID.randomUUID().toString());
        user.setPassword(Encrypt.md5(user.getPassword(),user.getEmail()));
        userDao.save(user);

        //2、给用户发送邮件
        jmsTemplate.send(queue, new MessageCreator() {
            @Override
            public Message createMessage(Session session) throws JMSException {
                MapMessage mapMessage = session.createMapMessage();
                mapMessage.setStringProperty("to",user.getEmail());
                mapMessage.setStringProperty("subject","xxx邮件");
                mapMessage.setStringProperty("content","欢迎您加入xxx有限公司!您的账号为:"+user.getEmail()+",初始密码是:"+pwd);
                return mapMessage;
            }
        });
/*try {
MailUtil.sendMsg(user.getEmail(),"xxx邮件","欢迎您加入xxx有限公司!您的账号为:"+user.getEmail()+",初始密码是:"+pwd);
} catch (Exception e) {
e.printStackTrace();
}*/
新建消费者模块
引入坐标(父工程已有)
依赖common里的发送邮件的工具类
配置文件
<?xml version="1.0" encoding="UTF-8"?>
<beans xmlns="http://www.springframework.org/schema/beans"
       xmlns:xsi="http://www.w3.org/2001/XMLSchema-instance" xmlns:aop="http://www.springframework.org/schema/aop"
       xmlns:context="http://www.springframework.org/schema/context"
       xmlns:tx="http://www.springframework.org/schema/tx"
       xmlns:amq="http://activemq.apache.org/schema/core"
       xmlns:jms="http://www.springframework.org/schema/jms"
       xsi:schemaLocation="
        http://www.springframework.org/schema/beans http://www.springframework.org/schema/beans/spring-beans.xsd
        http://www.springframework.org/schema/aop http://www.springframework.org/schema/aop/spring-aop.xsd
        http://www.springframework.org/schema/context http://www.springframework.org/schema/context/spring-context.xsd
        http://www.springframework.org/schema/tx http://www.springframework.org/schema/tx/spring-tx.xsd
        http://www.springframework.org/schema/jms
        http://www.springframework.org/schema/jms/spring-jms.xsd
        http://activemq.apache.org/schema/core
        http://activemq.apache.org/schema/core/activemq-core.xsd">

    <context:component-scan base-package="cn.jia"></context:component-scan>

    <!--
        spring和activeMq整合:通过整合JmsTemplate对象进行消息发送
    -->
    <!--1.连接工厂-->
    <bean id="activeMQConnectionFactory" class="org.apache.activemq.ActiveMQConnectionFactory">
        <property name="brokerURL" value="tcp://127.0.0.1:61616"></property>
    </bean>
    <!--2.spring管理连接工厂-->
    <bean id="connectionFactory"  class="org.springframework.jms.connection.CachingConnectionFactory">
        <property name="targetConnectionFactory" ref="activeMQConnectionFactory"></property>
    </bean>

    <!--告知消费者业务类,去哪个队列中获取消息-->
    <!--配置监听器管理器
       配置的都是基于queue类型的消息监听    -->
    <jms:listener-container destination-type="queue" connection-factory="connectionFactory">
        <jms:listener destination="email-queue" ref="emailListener"/>
    </jms:listener-container>


</beans>
web.xml配置监听器
    <!-- 监听器监听其他的spring配置文件 -->
    <context-param>
        <param-name>contextConfigLocation</param-name>
        <param-value>classpath:spring/applicationContext-jms.xml</param-value>
    </context-param>
    <listener>
        <listener-class>org.springframework.web.context.ContextLoaderListener</listener-class>
    </listener>
</web-app>
emailListener
@Component
public class EmailListener implements MessageListener{
    //参数:队列中的消息对象
    public void onMessage(Message message) {
        try {
            //1、获取消息数据
            MapMessage mapMessage = (MapMessage) message;
            String to = mapMessage.getStringProperty("to");
            String subject = mapMessage.getStringProperty("subject");
            String content = mapMessage.getStringProperty("content");
            //2、发送邮件
            MailUtil.sendMsg(to,subject,content);

        } catch (Exception e) {
            e.printStackTrace();
        }

    }
}