介绍
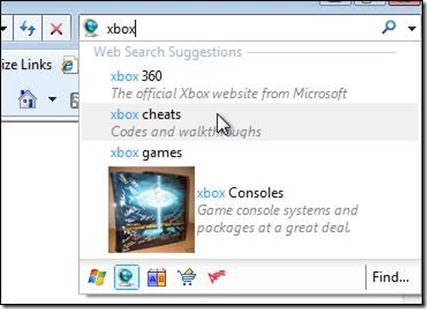
本文会为大家展示如果使用VS 2008 来创建基于IE8 的搜索提供程序, 以及在其中添加文本搜索建议和带有图片的搜索建议.
目的
- 学习如何使用VS 2008 来制作自己的搜索提供程序
步骤1 – 创建搜索提供程序项目
- 打开VS 2008, 选择File -> New -> Project…:
- 在弹出的项目创建向导种选择Visual C# -> Web -> ASP.NET Web Application:
- 输入项目名称为 SearchDemo并点击OK按钮创建项目:
- 在SearchDemo项目上右击选择其Properties, 在属性窗口中选择Web, 并将其Specific Port设置为9999:
- 在SearchDemo项目上右击选择Add -> New Item…:
- 在弹出的新建对话框中选择XML File, 并输入文件名为Provider.xml, 点击Add按钮创建文件:
- 打开Provider.xml文件将下面代码覆盖该文件原有内容:
<?xml version="1.0" encoding="utf-8" ?>
<OpenSearchDescription xmlns="http://a9.com/-/spec/opensearch/1.1/">
<ShortName>Web Search</ShortName>
<Description>Use SSW to search the Web.</Description>
<Tags>example web</Tags>
<Contact>admin@ssw.com.au</Contact>>
<Url type="text/html"
template="http://localhost:9999/?q={searchTerms}"/>
<LongName>Test Web Search</LongName>
<Query role="example" searchTerms="cat" />
<Developer>SSW Development Team</Developer>
<Attribution>
Search data Copyright 2005, SSW Inc., All Rights Reserved
</Attribution>
<SyndicationRight>open</SyndicationRight>
<AdultContent>false</AdultContent>
<Language>en-au</Language>
<OutputEncoding>UTF-8</OutputEncoding>
<InputEncoding>UTF-8</InputEncoding>
</OpenSearchDescription>
- 然后打开Default.aspx页面, 将下面内容覆盖该页面中所有内容:
<%@ Page Language="C#" AutoEventWireup="true" CodeBehind="Default.aspx.cs" Inherits="SearchDemo._Default" %>
<!DOCTYPE html PUBLIC "-//W3C//DTD XHTML 1.0 Transitional//EN" "http://www.w3.org/TR/xhtml1/DTD/xhtml1-transitional.dtd">
<html xmlns="http://www.w3.org/1999/xhtml" >
<head id="Head1" runat="server">
<title></title>
</head>
<body>
<form id="form1" runat="server">
<div>
<a href="#" onclick="window.external.AddSearchProvider('http://localhost:9999/Provider.xml')">
Add Search Provider Example</a>
</div>
</form>
</body>
</html>
- 然后选择Debug进行调试:
- 第一次调试会弹出如下对话框, 选择OK即可:
- 调试运行成功后可以看到在IE中有如下界面:
- 选择Add Search Provider Example链接, 在弹出的窗口中选择OK进行我们搜索提供程序的添加:
- 添加完成后选择IE地址栏右侧搜索栏的下拉箭头, 可以看到我们制作的Web Search已经被成功添加了:
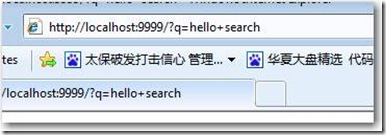
- 最后看到地址栏地址如下则表示我们的搜索提供程序创建成功:
- 这样我们创建完成了一个最基本的搜索提供程序, 然后我们对其进行扩展,
步骤2 – 添加基于JSON方式的搜索建议
- 在SearchDemo项目上右击选择Add -> New Item…:
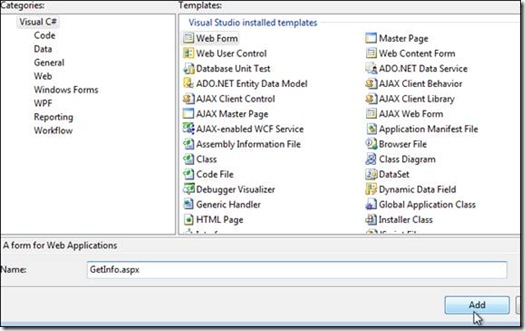
- 在弹出的新建对话框中选择Web Form, 并输入文件名为GetInfo.aspx, 点击Add按钮创建文件:
- 将下面代码覆盖GetInfo.aspx中已有内容:
<%@ Page Language="C#" AutoEventWireup="true" Inherits="SearchDemo.GetInfo" %>
["<%=HttpUtility.HtmlEncode(Request["q"])%>",
["<%=HttpUtility.HtmlEncode(Request["q"])%>","<%=HttpUtility.HtmlEncode(Request["q"])%> and more","<%=HttpUtility.HtmlEncode(Request["q"])%> ","search <%=HttpUtility.HtmlEncode(Request["q"])%> in Google","<%=HttpUtility.HtmlEncode(Request["q"])%>.com","<%=HttpUtility.HtmlEncode(Request["q"])%> and so on"],
["7,390,000 results","17,900,000 results","25,700,000 results","1,220,000,000 results","1 result","17,600,000 results"],
["http://example.com?q=sears","http://example.com?q=search+engines","http://example.com?q=search+engine","http://example.com?q=search","http://example.com?q=sears.com","http://example.com?q=seattle+times"]]
["<%=HttpUtility.HtmlEncode(Request["q"])%>",
["<%=HttpUtility.HtmlEncode(Request["q"])%>","<%=HttpUtility.HtmlEncode(Request["q"])%> and more","<%=HttpUtility.HtmlEncode(Request["q"])%>
 ","search <%=HttpUtility.HtmlEncode(Request["q"])%> in Google","<%=HttpUtility.HtmlEncode(Request["q"])%>.com","<%=HttpUtility.HtmlEncode(Request["q"])%> and so on"],
 ["7,390,000 results","17,900,000 results","25,700,000 results","1,220,000,000 results","1 result","17,600,000 results"],
["http://example.com?q=sears","http://example.com?q=search+engines","http://example.com?q=search+engine","http://example.com?q=search","http://example.com?q=sears.com","http://example.com?q=seattle+times"]]
- 保存后打开Provider.xml文件将所有内容替换为如下内容:
<?xml version="1.0" encoding="utf-8" ?>
<OpenSearchDescription xmlns="http://a9.com/-/spec/opensearch/1.1/">
<ShortName>Web Search</ShortName>
<Description>Use SSW to search the Web.</Description>
<Tags>example web</Tags>
<Contact>admin@ssw.com.au</Contact>>
<Url type="text/html"
template="http://localhost:9999/?q={searchTerms}"/>
<Url type="application/x-suggestions+json"
template="http://localhost:9999/GetInfo.aspx?q={searchTerms}" />
<LongName>Test Web Search</LongName>
<Query role="example" searchTerms="cat" />
<Developer>SSW Development Team</Developer>
<Attribution>
Search data Copyright 2005, SSW Inc., All Rights Reserved
</Attribution>
<SyndicationRight>open</SyndicationRight>
<AdultContent>false</AdultContent>
<Language>en-au</Language>
<OutputEncoding>UTF-8</OutputEncoding>
<InputEncoding>UTF-8</InputEncoding>
</OpenSearchDescription>
黄色高亮部分为在原来基础添加的内容, 也可以直接添加这部分内容.
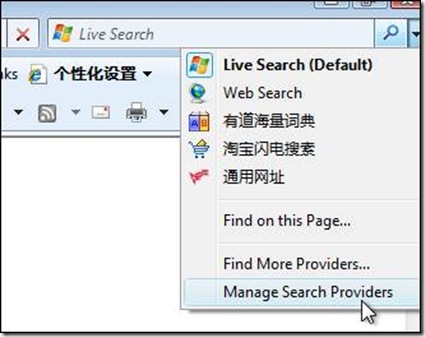
- 添加完成后点击调试按钮进行调试, 并选择搜索框后的下拉按钮中的Manage Search Providers:
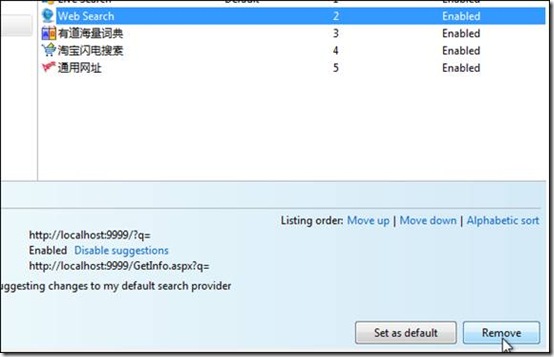
- 在窗口中移除我们之前添加的Web Search搜索提供程序:
- 返回 http://localhost:9999/ 页面后点击页面上的Add Search Provider Example 链接并安装搜索提供程序:
- 然后并选择搜索框后的下拉按钮中的Web Search:
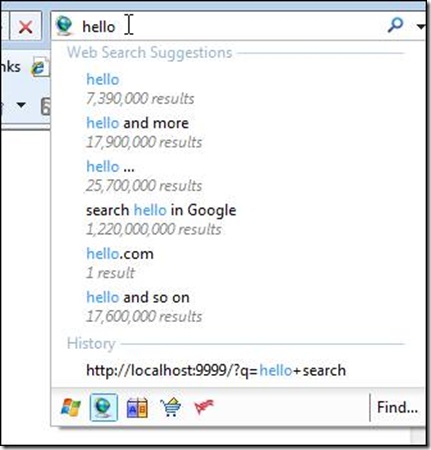
- 选择后在搜索框中输入任意关键字:
- 这里我们可以看到搜索建议效果.
步骤3 – 添加基于XML方式的带有图片的搜索建议
- 在SearchDemo项目上右击选择Add -> New Item…:
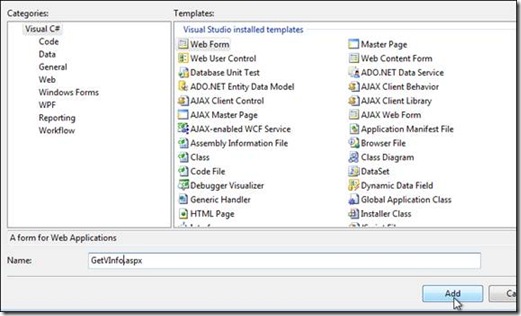
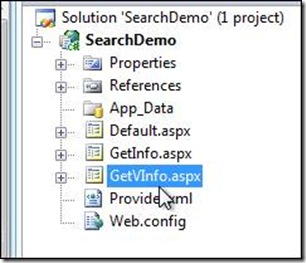
- 在弹出的新建对话框中选择Web Form, 并输入文件名为GetVInfo.aspx, 点击Add按钮创建文件:
- 将下面代码覆盖GetVInfo.aspx中已有内容:
<%@ Page Language="C#" AutoEventWireup="true" CodeBehind="GetVInfo.aspx.cs" Inherits="SearchDemo.GetVInfo" %>
<SearchSuggestion>
<Query><%=HttpUtility.HtmlEncode(Request["q"])%></Query>
<Section>
<Item>
<Text><%=HttpUtility.HtmlEncode(Request["q"])%> 360</Text>
<Description>The official Xbox website from Microsoft</Description>
<Url>http://www.xbox.com</Url>
</Item>
<Item>
<Text><%=HttpUtility.HtmlEncode(Request["q"])%> cheats</Text>
<Description>Codes and walkthroughs</Description>
</Item>
<Item>
<Text><%=HttpUtility.HtmlEncode(Request["q"])%> games</Text>
</Item>
<Item>
<Text><%=HttpUtility.HtmlEncode(Request["q"])%> Consoles</Text>
<Description>Game console systems and packages at a great deal.</Description>
<Image source="http://localhost:9999/1.jpg" alt="Xbox 360 Consoles" width="75" height="75"/>
<Url>http://localhost:9999/</Url>
</Item>
</Section>
</SearchSuggestion>
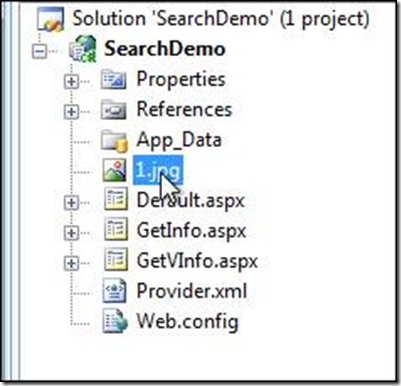
- 任意找一张图片(可以使用我们和文档一同提供的图片1.jpg)命名为1.jpg, 并辅之该图片, 选择项目SearchDemo后, 按Ctrl+V键进行粘贴, 这样该图片就加入到项目SearchDemo根目录了:
- 然后打开Provider.xml文件将所有内容替换为如下内容:
<?xml version="1.0" encoding="utf-8" ?>
<OpenSearchDescription xmlns="http://a9.com/-/spec/opensearch/1.1/">
<ShortName>Web Search</ShortName>
<Description>Use SSW to search the Web.</Description>
<Tags>example web</Tags>
<Contact>admin@ssw.com.au</Contact>>
<Url type="text/html"
template="http://localhost:9999/?q={searchTerms}"/>
<Url type="application/x-suggestions+xml"
template="http://localhost:9999/GetVInfo.aspx?q={searchTerms}" />
<LongName>Test Web Search</LongName>
<Query role="example" searchTerms="cat" />
<Developer>SSW Development Team</Developer>
<Attribution>
Search data Copyright 2005, SSW Inc., All Rights Reserved
</Attribution>
<SyndicationRight>open</SyndicationRight>
<AdultContent>false</AdultContent>
<Language>en-au</Language>
<OutputEncoding>UTF-8</OutputEncoding>
<InputEncoding>UTF-8</InputEncoding>
</OpenSearchDescription>
黄色高亮部分为在原来基础修改的内容, 也可以直接添加这部分内容.
- 添加完成后点击调试按钮进行调试, 并选择搜索框后的下拉按钮中的Manage Search Providers:
- 在窗口中移除我们之前添加的Web Search搜索提供程序:
- 返回 http://localhost:9999/ 页面后点击页面上的Add Search Provider Example 链接并安装搜索提供程序:
- 然后并选择搜索框后的下拉按钮中的Web Search:
- 选择后在搜索框中输入任意关键字:
- 这里我们可以看到带有图片的搜索建议效果.
总结
在本文中我们学习了如何定制自己的搜索提供程序, 以及添加两种样式的搜索建议, 这些只是一个基础的知识, 在其中还可以扩展很多东西.
PS: Open Day 的时候大家都照了那么多照片, 给我发点!


![clip_image020[1] clip_image020[1]](https://www.cnblogs.com/images/cnblogs_com/WilsonWu/WindowsLiveWriter/IE8SearchProvider_121A2/clip_image020%5B1%5D_thumb.jpg)



![clip_image020[2] clip_image020[2]](https://www.cnblogs.com/images/cnblogs_com/WilsonWu/WindowsLiveWriter/IE8SearchProvider_121A2/clip_image020%5B2%5D_thumb.jpg)
![clip_image046[1] clip_image046[1]](https://www.cnblogs.com/images/cnblogs_com/WilsonWu/WindowsLiveWriter/IE8SearchProvider_121A2/clip_image046%5B1%5D_thumb.jpg)
![clip_image048[1] clip_image048[1]](https://www.cnblogs.com/images/cnblogs_com/WilsonWu/WindowsLiveWriter/IE8SearchProvider_121A2/clip_image048%5B1%5D_thumb.jpg)
![clip_image050[1] clip_image050[1]](https://www.cnblogs.com/images/cnblogs_com/WilsonWu/WindowsLiveWriter/IE8SearchProvider_121A2/clip_image050%5B1%5D_thumb.jpg)
![clip_image052[1] clip_image052[1]](https://www.cnblogs.com/images/cnblogs_com/WilsonWu/WindowsLiveWriter/IE8SearchProvider_121A2/clip_image052%5B1%5D_thumb.jpg)
