源代码:13033480群共享

三、使用 FormView控件更新数据
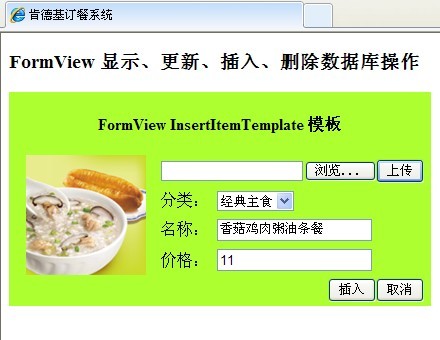
1、编辑InsertItemTemplate模板,代码如下:
<InsertItemTemplate>
                <table border="0" cellpadding="0" cellspacing="0" width="420">
                    <tr>
                        <td colspan="6" height="30" width="420" align="center">
                        <h4>FormView InsertItemTemplate 模板</h4>
                        </td>
                    </tr>
                    <tr>
                        <td width="30">
                        </td>
                        <td rowspan="4" width="120">
                            <asp:Image ID="imgItem" runat="server" Width="120px" Height="120px" ImageUrl='<%# Eval("Image") %>'
                                AlternateText="上传浏览图片" /></td>
                        <td width="30">
                        </td>
                        <td colspan="2">
                            <asp:FileUpload ID="fupImage" runat="server" Width="100%"/></td>
                        <td width="60">
                            <asp:Button ID="btnUpload" Text="上传" OnClick="btnUpload_Click" runat="server"></asp:Button></td>
                    </tr>
                    <tr>
                        <td width="30">
                        </td>
                        <td width="30">
                        </td>
                        <td width="60">
                            分类:</td>
                        <td width="120">
                            <asp:DropDownList ID="ddlCategory" runat="server" DataSourceID="sdsCategory" DataTextField="Name"
                                DataValueField="CategoryId">
                            </asp:DropDownList></td>
                        <td width="60">
                        </td>
                    </tr>
                    <tr>
                        <td width="30">
                        </td>
                        <td width="30">
                        </td>
                        <td width="60">
                            名称:</td>
                        <td width="120">
                            <asp:TextBox ID="txtName" Text='<%# Bind("Name") %>' runat="server" /></td>
                        <td width="60">
                        </td>
                    </tr>
                    <tr>
                        <td width="30">
                        </td>
                        <td width="30">
                        </td>
                        <td width="60">
                            价格:
                        </td>
                        <td width="120">
                            <asp:TextBox ID="txtPrice" Text='<%# Bind("Price") %>' runat="server" /></td>
                        <td width="60">
                        </td>
                    </tr>
                    <tr>
                        <td height="30" width="30">
                        </td>
                        <td height="30" width="120">
                        </td>
                        <td height="30" width="30">
                        </td>
                        <td height="30" width="60">
                        </td>
                        <td height="30" width="120" align="right">
                            <asp:Button ID="btnInsert" Text="插入" CommandName="Insert" runat="server" /></td>
                        <td height="30" width="60">
                            <asp:Button ID="btnCancel" Text="取消" CommandName="Cancel" runat="server" /></td>
                    </tr>
                </table>
            </InsertItemTemplate>
        </asp:FormView>
        <asp:SqlDataSource ID="sdsItem"  runat="server" ConnectionString="<%$ ConnectionStrings:NetShopConnString %>"
            SelectCommand="SELECT Item.ItemId AS ItemId,Item.CategoryId AS CategoryId,Item.Name AS Name,Item.Price AS Price,Item.Image AS Image,Category.Name As CategoryName FROM Item INNER JOIN Category ON Item.CategoryId=Category.CategoryId"
            UpdateCommand="UPDATE Item SET CategoryId=@CategoryId,Name=@Name,Price=@Price,Image=@Image WHERE ItemId=@ItemId"
            InsertCommand="INSERT INTO Item(CategoryId,Name,Price,Image) VALUES (@CategoryId,@Name,@Price,@Image)">
            <UpdateParameters>
                <asp:Parameter Name="CategoryId" />
                <asp:Parameter Name="Name" />
                <asp:Parameter Name="Price" />
                <asp:Parameter Name="Image" />
                <asp:Parameter Name="ItemId" />
            </UpdateParameters>
            <InsertParameters>
                <asp:Parameter Name="CategoryId" />
                <asp:Parameter Name="Name" />
                <asp:Parameter Name="Price" />
                <asp:Parameter Name="Image" />
            </InsertParameters>
2、这个模板和编辑模板基本一样,就是点击“新建”按钮进入时,没有绑定数据而已,因此,“上传”按钮的响应函数可复用,更新前的赋值操作也基本是一样的。
为fvwItem添加响应函数,代码如下:
 protected void fvwItem_ItemInserting(object sender, FormViewInsertEventArgs e)
 {
     DropDownList ddl = (DropDownList)fvwItem.FindControl("ddlCategory");
     sdsItem.InsertParameters["CategoryId"].DefaultValue = ddl.SelectedValue;

     Image img = (Image)fvwItem.FindControl("imgItem");
     sdsItem.InsertParameters["Image"].DefaultValue = img.ImageUrl;
 }
3、别忘了添加fvwItem的InsertCommand命令,并添加参数变量UpdateParameters:
InsertCommand="INSERT INTO Item(CategoryId,Name,Price,Image) VALUES (@CategoryId,@Name,@Price,@Image)"
<asp:SqlDataSource ID="sdsCategory" runat="server" ConnectionString="<%$ ConnectionStrings:NetShopConnString %>"
    SelectCommand="SELECT CategoryId,Name FROM Category">
</asp:SqlDataSource>
4、在浏览器中查看运行结果。
四、使用 FormView控件删除数据
这个操作不需要参数,所了也就最简单了,只要在sdsItem中添加一个DeleteCommand="DELETE FROM Item WHERE(ItemId=@ItemId)"命令就可以了。
为了在删除数据库中的图片地址的同时,也删除服务器端的图片文件,还是添加了一个消息响应函数,代码如下:
    protected void fvwItem_ItemDeleting(object sender, FormViewDeleteEventArgs e)
    {
        Image img = (Image)fvwItem.FindControl("imgItem");
        File.Delete(Server.MapPath(img.ImageUrl));
    }
protected void fvwItem_ItemDeleting(object sender,FormViewDeleteEventArgs e)
{
Image img = (Image)fvwItem.FindControl("imgItem");
File.Delete(Server.MapPath(img.ImageUrl));
}
参考网址:http://msdn.microsoft.com/zh-cn/library/system.web.ui.webcontrols.formview%28v=VS.80%29.aspx