一、创建Web项目,引入jar包
①、Struts2的jar包
-
- asm-7.3.1.jar:提供了字节码的读写的功能,包含了核心的功能,而其他的jar,都是基于这个核心的扩展.
- asm-commons-7.3.1.jar:提供了基于事件的表现形式。
- asm-tree-7.3.1.jar:提供了基于对象的表现形式。
- commons-fileupload-1.4.jar:文件上传组件,2.1.6版本后需要加入此文件
- commons-io-2.6.jar:传文件依赖的jar包
- commons-lang3-3.8.1.jar:对java.lang包的增强
- freemarker-2.3.30.jar:Struts 2的UI标签的模板使用FreeMarker编写
- javassist-3.20.0-GA.jar:代码生成工具, struts2用它在运行时扩展 Java类
- log4j-api-2.12.1.jar:日志
- log4j-core-2.12.1.jar:日志
- ognl-3.1.28.jar:对象图导航语言(Object Graph Navigation Language), struts2框架通过其读写对象的属性
- struts2-convention-plugin-2.5.25.jar:Struts2的注解开发包
- struts2-core-2.5.25.jar:Struts 2框架的核心类库
- struts2-json-plugin-2.5.25.jar:Struts2整合Ajax的开发包
- struts2-spring-plugin-2.5.25.jar:Struts2整合Spring的开发包
②、Hibernate的jar包
-
- Hibernate必须包(hibernate-release-5.4.23.Finallib equired)
- 数据库驱动
- 使用C3P0连接池(hibernate-release-5.4.23.Finalliboptionalc3p0)
注意:Struts2和Hibernate都引入了一个相同的jar包(javassist包)。删除一个
③、Spring的jar包
-
- IOC的开发
- com.springsource.org.apache.commons.logging-1.1.1.jar
- spring-beans-5.2.9.RELEASE.jar
- spring-context-5.2.9.RELEASE.jar
- spring-core-5.2.9.RELEASE.jar
- spring-expression-5.2.9.RELEASE.jar
- AOP的开发
- com.springsource.org.aspectj.weaver-1.6.8.RELEASE.jar
- spring-aop-5.2.9.RELEASE.jar
- spring-aspects-5.2.9.RELEASE.jar
- JDBC模板的开发
- spring-jdbc-5.2.9.RELEASE.jar
- spring-tx-5.2.9.RELEASE.jar (事务管理)
- 整合web项目的开发
- spring-web-5.2.9.RELEASE.jar
- 整合单元测试的开发
- spring-test-5.2.9.RELEASE.jar
- 整合Hibernate的开发
- spring-orm-5.2.9.RELEASE.jar
- spring-jdbc-5.2.9.RELEASE.jar
- spring-tx-5.2.9.RELEASE.jar (事务管理)
- 使用C3P0需要引入hibernate-release-5.4.23.Finalliboptionalc3p0中
-
c3p0-0.9.5.5.jar
-
hibernate-c3p0-5.4.23.Final.jar
-
mchange-commons-java-0.2.19.jar
-
- IOC的开发
二、引入配置文件
- Struts的配置文件
- web.xml:Struts2的核心配置
-
    <filter>
        <filter-name>struts2</filter-name>
        <filter-class>org.apache.struts2.dispatcher.filter.StrutsPrepareAndExecuteFilter</filter-class>

    </filter>

    <filter-mapping>
        <filter-name>struts2</filter-name>
        <url-pattern>/*</url-pattern>
    </filter-mapping>
-
- struts.xml:管理Action
-
<?xml version="1.0" encoding="UTF-8" ?>

<!DOCTYPE struts PUBLIC
        "-//Apache Software Foundation//DTD Struts Configuration 2.5//EN"
        "http://struts.apache.org/dtds/struts-2.5.dtd">


<struts>

</struts>
-
- Hibernate的配置文件
- hibernate.cfg.xml
-
<!DOCTYPE hibernate-configuration PUBLIC
    "-//Hibernate/Hibernate Configuration DTD 3.0//EN"
    "http://www.hibernate.org/dtd/hibernate-configuration-3.0.dtd">
<hibernate-configuration>
    <session-factory>
        <!-- 连接数据库基本参数 -->
        <property name="hibernate.connection.driver_class">com.microsoft.sqlserver.jdbc.SQLServerDriver</property>
        <property name="hibernate.connection.url">jdbc:sqlserver://localhost:1433;databaseName=HibernateDB;</property>
        <property name="hibernate.connection.username">sa</property>
        <property name="hibernate.connection.password">AAA@111</property>

        <!-- 配置Hibernate的方言 HQL、QBC在实现分页调用setFirstResult和setMaxResults方法一直报java.lang.UnsupportedOperationException: query result offset is not supported的异常 -->
        <property name="hibernate.dialect">org.hibernate.dialect.SQLServer2008Dialect</property>
        <!-- 可选配置start -->
        <!-- 控制台打印sql语句 -->
        <property name="hibernate.show_sql">true</property>
        <!-- 控制台打印sql语句 格式化-->
        <property name="hibernate.format_sql">true</property>

        <property name="hibernate.hbm2ddl.auto">update</property>
        <!--
        事务隔离级别
            1-Read uncommitted
            2-Read committed
            4-Repeatable read
            8-Serializable
         -->
        <property name="hibernate.connection.isolation">2</property>

        <!-- 配置session绑定本地线程
        thread:Session对象的生命周期与本地线程一致,线程关闭session关闭,所以不需要手动关闭(session.close())
        jta:session对象的生命周期与JTA事务绑定(跨数据库的)
        managed:Hibernate委托程序来关联Session对象的生命周期
        -->
        <property name="hibernate.current_session_context_class">thread</property>
        <!-- 可选配置end -->

        <!-- 配置C3P0连接池 -->
        <property name="connection.provider_class">org.hibernate.connection.C3P0ConnectionProvider</property>
        <!--在连接池中可用的数据库连接的最少数目 -->
        <property name="c3p0.min_size">5</property>
        <!--在连接池中所有数据库连接的最大数目  -->
        <property name="c3p0.max_size">20</property>
        <!--设定数据库连接的过期时间,以秒为单位,
        如果连接池中的某个数据库连接处于空闲状态的时间超过了timeout时间,就会从连接池中清除 -->
        <property name="c3p0.timeout">120</property>
         <!--每3000秒检查所有连接池中的空闲连接 以秒为单位-->
        <property name="c3p0.idle_test_period">3000</property>

        <!-- 配置映射 -->
    </session-factory>
</hibernate-configuration>
- 映射文件(类名.hbm.xml):持久化类必要配置 Hibernate抓取策略
-
<hibernate-mapping>
    <!-- 建立类与表的映射
    batch-size:Hibernate抓取策略
    -->
    <class name="com.xxx.ssh.domain.Customer" table="cst_customer" batch-size="6">
        <!-- 建立类中的属性与表中的主键对应 -->
        <id name="cust_id" column="cust_id">
            <generator class="native"></generator>
        </id>

        <!-- 建立类中的普通属性与表中的字段对应 -->
        <property name="cust_name" column="cust_name"></property>
        <property name="cust_source" column="cust_source"></property>
        <property name="cust_industry" column="cust_industry"></property>
        <property name="cust_level" column="cust_level"></property>
        <property name="cust_phone" column="cust_phone"></property>
        <property name="cust_mobile" column="cust_mobile"></property>

    </class>
</hibernate-mapping>
- Spring的配置文件
- web.xml:Spring的核心监听器
-
<!-- 指定 Ioc容器(就是applicationContext.xml)的位置 -->
    <context-param>
        <!-- 监听器的父类ContextLoader中有一个属性contextConfigLocation,
        该属性值 保存着 容器配置文件applicationContext.xml的位置 -->
        <param-name>contextConfigLocation</param-name>
        <param-value>classpath:applicationContext.xml</param-value>
    </context-param>
    <listener>
        <!-- 配置spring-web.jar提供的监听器,此监听器 可以在服务器启动时 初始化Ioc容器。
        初始化Ioc容器(applicationContext.xml)
             1.告诉监听器 此容器的位置:context-param
            2.默认约定的位置 :WEB-INF/applicationContext.xml -->
        <listener-class>org.springframework.web.context.ContextLoaderListener</listener-class>
    </listener>
- applicationContext.xml:Spring的核心配置(主要用于管理Bean,整合Struts2和Hibernate)
-
<beans xmlns="http://www.springframework.org/schema/beans"
    xmlns:xsi="http://www.w3.org/2001/XMLSchema-instance"
    xmlns:context="http://www.springframework.org/schema/context"
    xmlns:aop="http://www.springframework.org/schema/aop"
    xmlns:tx="http://www.springframework.org/schema/tx"
    xsi:schemaLocation="http://www.springframework.org/schema/beans
    http://www.springframework.org/schema/beans/spring-beans.xsd
    http://www.springframework.org/schema/context
    http://www.springframework.org/schema/context/spring-context.xsd
    http://www.springframework.org/schema/aop
    http://www.springframework.org/schema/aop/spring-aop.xsd
    http://www.springframework.org/schema/tx
    http://www.springframework.org/schema/tx/spring-tx.xsd">

</beans>
- web.xml:Struts2的核心配置
日志配置文件
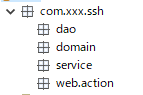
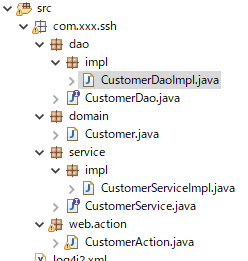
三、创建包结构
四、创建相关类
五、编写Url
<TD class=menuSmall><A class=style2 href="${ pageContext.request.contextPath }/jsp/customer/add.jsp" target=main>- 新增客户</A></TD>
六、编写新增页面
<FORM id=form1 name=form1
        action="${pageContext.request.contextPath }/customer_save.action"
        method=post>
<TABLE cellSpacing=0 cellPadding=5  border=0>
    <TR>
        <td>客户名称:</td>
        <td>
        <INPUT class=textbox id=sChannel2
                                style="WIDTH: 180px" maxLength=50 name="cust_name">
        </td>
        <td>客户级别 :</td>
        <td>
        <INPUT class=textbox id=sChannel2
                                style="WIDTH: 180px" maxLength=50 name="cust_level">
        </td>
    </TR>

    <TR>
        <td>信息来源 :</td>
        <td>
        <INPUT class=textbox id=sChannel2
                                style="WIDTH: 180px" maxLength=50 name="cust_source">
        </td>
        <td>所属行业 :</td>
        <td>
        <INPUT class=textbox id=sChannel2
                                style="WIDTH: 180px" maxLength=50 name="cust_industry">
        </td>
    </TR>

    <TR>
        <td>固定电话 :</td>
        <td>
        <INPUT class=textbox id=sChannel2
                                style="WIDTH: 180px" maxLength=50 name="cust_phone">
        </td>
        <td>移动电话 :</td>
        <td>
        <INPUT class=textbox id=sChannel2
                                style="WIDTH: 180px" maxLength=50 name="cust_mobile">
        </td>
    </TR>
    <tr>
        <td rowspan=2>
        <INPUT class=button id=sButton2 type=submit
                                value=" 保存 " name=sButton2>
        </td>
    </tr>
</TABLE>
</FORM>
七、疏通基盘
①、编写Action
public class CustomerAction extends ActionSupport implements ModelDriven<Customer> {
    private Customer customer=new Customer();
    @Override
    public Customer getModel() {

    return customer;
    }

    public void save() {
    System.out.println("Action中save方法执行了");
    }
}
②、配置struts.xml
    <package name="bean" extends="struts-default" namespace="/">
        <action name="customer_*" class="com.xxx.ssh.web.action.CustomerAction" method="{1}"></action>
    </package>
八、在Action访问Service
①、传统方式
    WebApplicationContext webApplicationContext = WebApplicationContextUtils.getWebApplicationContext(ServletActionContext.getServletContext());
    Object bean = webApplicationContext.getBean("CustomerServiceImpl");
②、Spring整合Struts2方式一:Action由Struts2管理
Ⅰ、引入struts-spring-plugin.jar
Ⅱ、在struts.xml中设置常量struts.objectFactory
<constant name="struts.objectFactory" value="spring"/>
开启此常量会使得struts.objectFactory.spring.autowire=name常量有效,此常量(struts.objectFactory.spring.autowire)主要将Service按照名称(是指applicationContext.xml中bean标签中id)自动注入到Action中
Ⅲ、配置applicationContext.xml,将CustomerServiceImpl交给Spring管理
<bean id="customerService" class="com.xxx.ssh.service.impl.CustomerServiceImpl"></bean>
Ⅳ、编写Action
public class CustomerAction extends ActionSupport implements ModelDriven<Customer> {
    private Customer customer=new Customer();
    @Override
    public Customer getModel() {
    return customer;
    }

    // 属性注入
    private CustomerService customerService;

    public void setCustomerService(CustomerService customerService) {
        this.customerService = customerService;
    }

    public String save() {
    System.out.println("Action中save方法执行了");
    customerService.save(customer);
    return NONE;
    }
}
③、Spring整合Struts2方式一:Action由Spring管理
Ⅰ、引入struts-spring-plugin.jar
Ⅱ、将Action交给Spring管理,并注入Service
    <bean id="customerAction" class="com.xxx.ssh.web.action.CustomerAction" scope="prototype">
        <property name="customerService" ref="customerService"></property>
    </bean>
注意:配置Action为多例(scope="prototype")
Ⅲ、配置struts.xml的Action,action标签中class=“”的值为上面Spring的bean标签中的id的值
    <package name="bean" extends="struts-default" namespace="/">
        <action name="customer_*" class="customerAction" method="{1}"></action>
    </package>
九、Service访问Dao
①、将Dao交给Spring管理
    <bean id="customerDao" class="com.xxx.ssh.dao.impl.CustomerDaoImpl" scope="prototype">
    </bean>
②、Dao注入到Service中
    <bean id="customerService" class="com.xxx.ssh.service.impl.CustomerServiceImpl">
        <property name="customerDao" ref="customerDao"></property>
    </bean>
public class CustomerServiceImpl implements CustomerService {

    //属性注入
    private CustomerDao customerDao;

    public void setCustomerDao(CustomerDao customerDao) {
        this.customerDao = customerDao;
    }

    @Override
    public void save(Customer customer) {
    System.out.println("CustomerServiceImpl的save方法执行了");
    customerDao.save(customer);
    }
}
十、Dao方法Hibernate
①、创建持久化类
Ⅰ、创建类
public class Customer {
    private Long cust_id;
    private String cust_name;

    private String cust_source;
    private String cust_industry;
    private String cust_level;
    private String cust_phone;
    private String cust_mobile;
}
Ⅱ、映射文件
<hibernate-mapping>
    <!-- 建立类与表的映射
    batch-size:Hibernate抓取策略
    -->
    <class name="com.xxx.ssh.domain.Customer" table="cst_customer" batch-size="6">
        <!-- 建立类中的属性与表中的主键对应 -->
        <id name="cust_id" column="cust_id">
            <generator class="native"></generator>
        </id>

        <!-- 建立类中的普通属性与表中的字段对应 -->
        <property name="cust_name" column="cust_name"></property>
        <property name="cust_source" column="cust_source"></property>
        <property name="cust_industry" column="cust_industry"></property>
        <property name="cust_level" column="cust_level"></property>
        <property name="cust_phone" column="cust_phone"></property>
        <property name="cust_mobile" column="cust_mobile"></property>

    </class>
</hibernate-mapping>
Ⅲ、hibernate.cfg.xml添加映射
<mapping resource="com/xxx/ssh/domain/Customer.hbm.xml"/>
②、Spring整合Hibernate(需要引入spring-orm-5.2.9.RELEASE.jar)
Ⅰ、使用Hibernate的配置文件
1、在Spring的配置文件中,加载Hibernate的配置文件
    <bean id="sessionFactory" class="org.springframework.orm.hibernate5.LocalSessionFactoryBean">
        <!-- 加载hibernate配置文件 -->
        <property name="configLocations" value="classpath:hibernate.cfg.xml"/>
    </bean>
2、DAO继承HibernateDaoSupport,Spring提供了一个Hibernate的模板类简化Hibernate开发
2.1、HibernateDaoSupport中由sessionfactory属性,可用于属性注入,并且在设置sessionFactory时,会创建Hibernate的模板类(hibernateTemplate)
    public final void setSessionFactory(SessionFactory sessionFactory) {
        if (this.hibernateTemplate == null || sessionFactory != this.hibernateTemplate.getSessionFactory()) {
            this.hibernateTemplate = createHibernateTemplate(sessionFactory);
        }
    }
2.2、编写Dao
public class CustomerDaoImpl extends HibernateDaoSupport implements CustomerDao {

    @Override
    public void save(Customer customer) {
    System.out.println("CustomerDaoImpl的save方法执行了");
    this.getHibernateTemplate().save(customer);
    }

}
2.3、在Dao中注入sessionfactory
    <bean id="customerDao" class="com.xxx.ssh.dao.impl.CustomerDaoImpl" scope="prototype">
        <property name="sessionFactory" ref="sessionFactory"></property>
    </bean>
测试抛出异常:Turn your Session into FlushMode.COMMIT/AUTO or remove 'readOnly' marker from transaction definition.
2.3.1、解决方案:配置Spring的事务管理
2.3.1.1、配置事务管理器
    <bean id="transactionManager" class="org.springframework.orm.hibernate5.HibernateTransactionManager">
        <property name="sessionFactory" ref="sessionFactory"/>
    </bean>
2.3.1.2、开启事务注解
<tx:annotation-driven transaction-manager="transactionManager"/>
2.3.1.3、在Service上使用事务注解
@Transactional
public class CustomerServiceImpl implements CustomerService {
Ⅱ、将hibernate的配置交给Spring管理
1、hibernate配置文件中有以下内容
-
-
- 数据库连接
- Hibernate的相关属性配置
- 方言
- 显示SQL
- 格式化SQL
- C3P0连接池相关配置
- 映射配置
-
2、将hibernate的配置交给Spring管理
2.1、设置数据库连接(配置到属性文件jdbc.properties中)
jdbc.driverClass=com.microsoft.sqlserver.jdbc.SQLServerDriver
jdbc.url=jdbc:sqlserver://localhost:1433;databaseName=HibernateDB;
jdbc.username=sa
jdbc.password=AAA@111
2.2、applicationContext.xml配置Hibernate
<!-- 引入数据库连接属性文件 -->
    <context:property-placeholder location="classpath:jdbc.properties"/>

    <!-- 配置C3P0连接池 -->
    <bean id="dataSource" class="com.mchange.v2.c3p0.ComboPooledDataSource">
        <property name="driverClass" value="${jdbc.driverClass}"/>
        <property name="jdbcUrl" value="${jdbc.url}"/>
        <property name="user" value="${jdbc.username}"/>
        <property name="password" value="${jdbc.password}"/>
    </bean>

    <bean id="sessionFactory" class="org.springframework.orm.hibernate5.LocalSessionFactoryBean">
        <!-- 加载hibernate配置文件 -->
        <!-- <property name="configLocations" value="classpath:hibernate.cfg.xml"/> -->

        <!-- 注入连接池 -->
        <property name="dataSource" ref="dataSource"/>

        <!-- 配置Hibernate的相关属性
                private Properties hibernateProperties;对应使用<props>标签
         -->
        <property name="hibernateProperties">
            <props>
                <!-- 方言 -->
                <prop key="hibernate.dialect">org.hibernate.dialect.SQLServer2008Dialect</prop>
                <!-- 控制台打印sql语句 -->
                <prop key="hibernate.show_sql">true</prop>
                <!-- 控制台打印sql语句 格式化-->
                <prop key="hibernate.format_sql">true</prop>
                <!-- 自动创建修改表 -->
                <prop key="hibernate.hbm2ddl.auto">update</prop>
            </props>
        </property>

        <!-- 配置映射
                private String[] mappingResources;对应<list>标签
        -->
        <property name="mappingResources">
            <list>
                <value>com/xxx/ssh/domain/Customer.hbm.xml</value>
            </list>
        </property>
    </bean>