前言
在我们平时开发中,使用数据库连接池时使用阿里的Druid连接池已经比较常见了,但是我们在集成到Springboot时似乎非常简单,只需要简单的配置即可使用,那么Druid是怎么加载的呢,本文就从源码层面进行揭秘
使用
首先简单的介绍下如何使用
1、pom.xml加载jar包,直接使用集成springboot的jar
<dependency>
    <groupId>com.alibaba</groupId>
    <artifactId>druid-spring-boot-starter</artifactId>
    <version>1.1.10</version>
</dependency>
2、application.properties进行配置
spring.datasource.url=jdbc:mysql://localhost:3306/mynote
spring.datasource.username=root
spring.datasource.password=root
# 使用阿里的DruidDataSource数据源
spring.datasource.type=com.alibaba.druid.pool.DruidDataSource
spring.datasource.driverClassName=com.mysql.cj.jdbc.Driver
# 初始化连接数,默认为0
spring.datasource.druid.initial-size=0
# 最大连接数,默认为8
spring.datasource.druid.max-active=8
主要配置参数就是初始化连接数和最大连接数,最大连接数一般不需要配置的太大,一般8核cpu使用8个线程就可以了,原因是8核cpu同时可以处理的线程数只有8,设置的太大反而会造成CPU时间片的频繁切换
源码
首先我们没有做任何代码上的配置,为什么druid可以加载呢?那么就很容易联想到springboot的自动装配机制,所以我们看druid-spring-boot-starter jar包,这是一个start组件,所以我们直接看他的spring.factories文件,自动装配的机制这里不做介绍,可以看这篇文章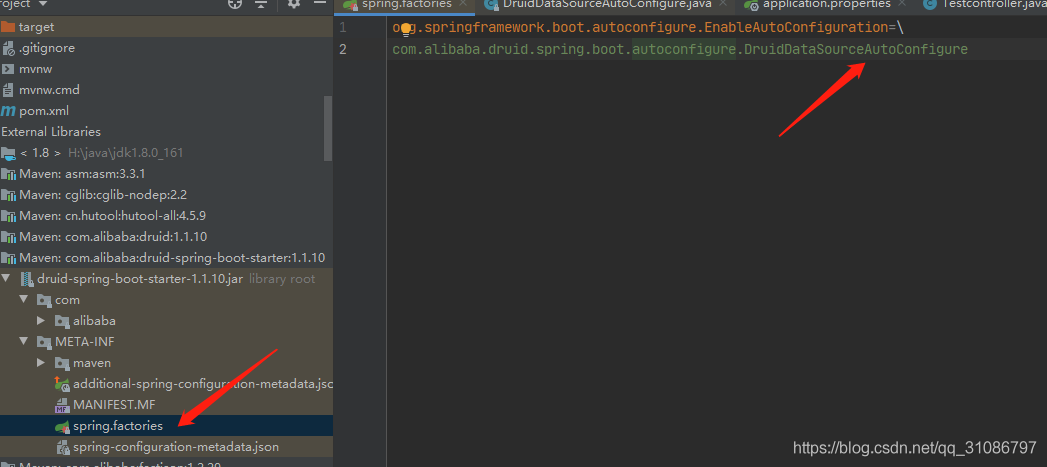
 1 @Configuration
 2 @ConditionalOnClass(DruidDataSource.class)
 3 @AutoConfigureBefore(DataSourceAutoConfiguration.class)
 4 @EnableConfigurationProperties({DruidStatProperties.class, DataSourceProperties.class})
 5 @Import({DruidSpringAopConfiguration.class,
 6     DruidStatViewServletConfiguration.class,
 7     DruidWebStatFilterConfiguration.class,
 8     DruidFilterConfiguration.class})
 9 public class DruidDataSourceAutoConfigure {
10
11     private static final Logger LOGGER = LoggerFactory.getLogger(DruidDataSourceAutoConfigure.class);
12
13     @Bean(initMethod = "init")
14     @ConditionalOnMissingBean
15     public DataSource dataSource() {
16         LOGGER.info("Init DruidDataSource");
17         return new DruidDataSourceWrapper();
18     }
19 }
初始化了一个DataSource,实现类是DruidDataSourceWrapper,这个DataSource就是我们jdk提供jdbc操作的一个很重要的接口
到这里DataSource已经初始化完成了
我们开始从使用的地方入手,我的项目是基于Mybatis查询数据库的,这里从Mybatis查询开始入手
我们都知道Mybatis查询最终必定会从mybatis的Executor的query开始执行
所以我们在BaseExecutor的query方法打上断点,果然进来了,然后我们继续看
 1 @Override
 2   public <E> List<E> query(MappedStatement ms, Object parameter, RowBounds rowBounds, ResultHandler resultHandler, CacheKey key, BoundSql boundSql) throws SQLException {
 3     ErrorContext.instance().resource(ms.getResource()).activity("executing a query").object(ms.getId());
 4     if (closed) {
 5       throw new ExecutorException("Executor was closed.");
 6     }
 7     if (queryStack == 0 && ms.isFlushCacheRequired()) {
 8       clearLocalCache();
 9     }
10     List<E> list;
11     try {
12       queryStack++;
13       list = resultHandler == null ? (List<E>) localCache.getObject(key) : null;
14       if (list != null) {
15         handleLocallyCachedOutputParameters(ms, key, parameter, boundSql);
16       } else {
17           // 核心代码
18         list = queryFromDatabase(ms, parameter, rowBounds, resultHandler, key, boundSql);
19       }
20     } finally {
21       queryStack--;
22     }
23    ......
24     return list;
25   }
我们只看核心代码,进入queryFromDatabase
private <E> List<E> queryFromDatabase(MappedStatement ms, Object parameter, RowBounds rowBounds, ResultHandler resultHandler, CacheKey key, BoundSql boundSql) throws SQLException {
    List<E> list;
    localCache.putObject(key, EXECUTION_PLACEHOLDER);
    try {
      // 核心代码
      list = doQuery(ms, parameter, rowBounds, resultHandler, boundSql);
    } finally {
      localCache.removeObject(key);
    }
    localCache.putObject(key, list);
    if (ms.getStatementType() == StatementType.CALLABLE) {
      localOutputParameterCache.putObject(key, parameter);
    }
    return list;
  }
继续跟
 1 @Override
 2   public <E> List<E> doQuery(MappedStatement ms, Object parameter, RowBounds rowBounds, ResultHandler resultHandler, BoundSql boundSql) throws SQLException {
 3     Statement stmt = null;
 4     try {
 5       Configuration configuration = ms.getConfiguration();
 6       StatementHandler handler = configuration.newStatementHandler(wrapper, ms, parameter, rowBounds, resultHandler, boundSql);
 7       // 核心代码
 8       stmt = prepareStatement(handler, ms.getStatementLog());
 9       return handler.query(stmt, resultHandler);
10     } finally {
11       closeStatement(stmt);
12     }
13   }
这里我们看到获取了一个Statement ,这个Statement 是我们java原生操作数据库的一个很重要的类,这个Statement 应该是需要从一个数据库连接(Connection)上获取的,这里就很重要了,所以我们就需要看在里面是怎么获取Connection的就可以了
1   private Statement prepareStatement(StatementHandler handler, Log statementLog) throws SQLException {
2     Statement stmt;
3     // 核心
4     Connection connection = getConnection(statementLog);
5     stmt = handler.prepare(connection, transaction.getTimeout());
6     handler.parameterize(stmt);
7     return stmt;
8   }
继续
1 protected Connection getConnection(Log statementLog) throws SQLException {
2     // 核心代码
3     Connection connection = transaction.getConnection();
4     if (statementLog.isDebugEnabled()) {
5       return ConnectionLogger.newInstance(connection, statementLog, queryStack);
6     } else {
7       return connection;
8     }
9   }
核心代码,获取Connection,进入了SpringManagedTransaction的getConnection方法
1 @Override
2   public Connection getConnection() throws SQLException {
3     if (this.connection == null) {
4       // 核心代码
5       openConnection();
6     }
7     return this.connection;
8   }
继续
private void openConnection() throws SQLException {
    // 核心代码
    this.connection = DataSourceUtils.getConnection(this.dataSource);
    this.autoCommit = this.connection.getAutoCommit();
    this.isConnectionTransactional = DataSourceUtils.isConnectionTransactional(this.connection, this.dataSource);

    LOGGER.debug(() ->
        "JDBC Connection ["
            + this.connection
            + "] will"
            + (this.isConnectionTransactional ? " " : " not ")
            + "be managed by Spring");
  }
核心代码处,这个this.dataSource就是我们一开始通过自动装配初始化的。
DataSourceUtils这个类是spring提供的,也就是最终数据源的策略是通过spring提供的扩展机制,实现不同的dataSource来实现不同功能的
继续
public static Connection getConnection(DataSource dataSource) throws CannotGetJdbcConnectionException {
        try {
            // 核心代码
            return doGetConnection(dataSource);
        }
        catch (SQLException ex) {
            throw new CannotGetJdbcConnectionException("Failed to obtain JDBC Connection", ex);
        }
        catch (IllegalStateException ex) {
            throw new CannotGetJdbcConnectionException("Failed to obtain JDBC Connection: " + ex.getMessage());
        }
    }
继续
public static Connection doGetConnection(DataSource dataSource) throws SQLException {
        Assert.notNull(dataSource, "No DataSource specified");

        ConnectionHolder conHolder = (ConnectionHolder) TransactionSynchronizationManager.getResource(dataSource);
        if (conHolder != null && (conHolder.hasConnection() || conHolder.isSynchronizedWithTransaction())) {
            conHolder.requested();
            if (!conHolder.hasConnection()) {
                logger.debug("Fetching resumed JDBC Connection from DataSource");
                conHolder.setConnection(fetchConnection(dataSource));
            }
            return conHolder.getConnection();
        }
        // Else we either got no holder or an empty thread-bound holder here.

        logger.debug("Fetching JDBC Connection from DataSource");
        // 核心代码
        Connection con = fetchConnection(dataSource);

        ......
        return con;
    }
private static Connection fetchConnection(DataSource dataSource) throws SQLException {
        // 核心代码
        Connection con = dataSource.getConnection();
        if (con == null) {
            throw new IllegalStateException("DataSource returned null from getConnection(): " + dataSource);
        }
        return con;
    }
public DruidPooledConnection getConnection(long maxWaitMillis) throws SQLException {
        // 核心代码1
        init();

        if (filters.size() > 0) {
            FilterChainImpl filterChain = new FilterChainImpl(this);
            // 核心代码2
            return filterChain.dataSource_connect(this, maxWaitMillis);
        } else {
            return getConnectionDirect(maxWaitMillis);
        }
    }
这里的核心代码1也很重要的,这里我们后续再看
继续看dataSource_connect
@Override
public DruidPooledConnection dataSource_connect(DruidDataSource dataSource, long maxWaitMillis) throws SQLException {
    if (this.pos < filterSize) {
        // 核心代码
        DruidPooledConnection conn = nextFilter().dataSource_getConnection(this, dataSource, maxWaitMillis);
        return conn;
    }

    return dataSource.getConnectionDirect(maxWaitMillis);
}
继续,进入了StatFilter的dataSource_getConnection
@Override
    public DruidPooledConnection dataSource_getConnection(FilterChain chain, DruidDataSource dataSource,
                                                          long maxWaitMillis) throws SQLException {
        // 核心代码
        DruidPooledConnection conn = chain.dataSource_connect(dataSource, maxWaitMillis);

        if (conn != null) {
            conn.setConnectedTimeNano();

            StatFilterContext.getInstance().pool_connection_open();
        }

        return conn;
    }
继续,然后又回到了FilterChainImpl的dataSource_connect
@Override
    public DruidPooledConnection dataSource_connect(DruidDataSource dataSource, long maxWaitMillis) throws SQLException {
        if (this.pos < filterSize) {
            DruidPooledConnection conn = nextFilter().dataSource_getConnection(this, dataSource, maxWaitMillis);
            return conn;
        }
		// 核心代码
        return dataSource.getConnectionDirect(maxWaitMillis);
    }
这个时候走了下面这个方法
public DruidPooledConnection getConnectionDirect(long maxWaitMillis) throws SQLException {
        int notFullTimeoutRetryCnt = 0;
        for (;;) {
            // handle notFullTimeoutRetry
            DruidPooledConnection poolableConnection;
            try {
            	// 核心代码
                poolableConnection = getConnectionInternal(maxWaitMillis);
            } catch (GetConnectionTimeoutException ex) {
                if (notFullTimeoutRetryCnt <= this.notFullTimeoutRetryCount && !isFull()) {
                    notFullTimeoutRetryCnt++;
                    if (LOG.isWarnEnabled()) {
                        LOG.warn("get connection timeout retry : " + notFullTimeoutRetryCnt);
                    }
                    continue;
                }
                throw ex;
            }
            ......
 }
  private DruidPooledConnection getConnectionInternal(long maxWait) throws SQLException {
  		DruidConnectionHolder holder;
   		......
   		// 上面做了各种逻辑判断,此处不关注

           if (maxWait > 0) {
               holder = pollLast(nanos);
           } else {
           	// 核心代码1
               holder = takeLast();
           }

           ......

        holder.incrementUseCount();
		// 核心代码2
        DruidPooledConnection poolalbeConnection = new DruidPooledConnection(holder);
        return poolalbeConnection;
    }
核心代码1处获取了一个DruidConnectionHolder,DruidConnectionHolder里面有个关键的成员变量,就是我们的连接Connection
DruidConnectionHolder takeLast() throws InterruptedException, SQLException {
        try {
            while (poolingCount == 0) {
                emptySignal(); // send signal to CreateThread create connection

                if (failFast && failContinuous.get()) {
                    throw new DataSourceNotAvailableException(createError);
                }

                notEmptyWaitThreadCount++;
                if (notEmptyWaitThreadCount > notEmptyWaitThreadPeak) {
                    notEmptyWaitThreadPeak = notEmptyWaitThreadCount;
                }
                try {
                    notEmpty.await(); // signal by recycle or creator
                } finally {
                    notEmptyWaitThreadCount--;
                }
                notEmptyWaitCount++;

                if (!enable) {
                    connectErrorCountUpdater.incrementAndGet(this);
                    throw new DataSourceDisableException();
                }
            }
        } catch (InterruptedException ie) {
            notEmpty.signal(); // propagate to non-interrupted thread
            notEmptySignalCount++;
            throw ie;
        }
		// 核心代码1
        decrementPoolingCount();
        // 核心代码2
        DruidConnectionHolder last = connections[poolingCount];
        connections[poolingCount] = null;

        return last;
    }
这里的decrementPoolingCount就是把一个int的变量poolingCount-1,然后在connections数组里面取某一个Connection
这里就已经看到核心代码了,connections就是我们的线程池了,是一个数组类型,里面存放了我们需要的连接,依靠一个指针poolingCount来控制当前应该可以取哪一个下标的Connection
查看断点,可以看到里面有8个Connection,也就是我们初始线程池数量
接下来再看下之前没看的init
public void init() throws SQLException {
        ......
			// 核心代码1
            connections = new DruidConnectionHolder[maxActive];
            evictConnections = new DruidConnectionHolder[maxActive];
            keepAliveConnections = new DruidConnectionHolder[maxActive];

            SQLException connectError = null;

            if (createScheduler != null) {
                for (int i = 0; i < initialSize; ++i) {
                    createTaskCount++;
                    CreateConnectionTask task = new CreateConnectionTask(true);
                    this.createSchedulerFuture = createScheduler.submit(task);
                }
            } else if (!asyncInit) {
                try {
                    // init connections
                    for (int i = 0; i < initialSize; ++i) {
                        // 核心代码2
                        PhysicalConnectionInfo pyConnectInfo = createPhysicalConnection();
                        DruidConnectionHolder holder = new DruidConnectionHolder(this, pyConnectInfo);
                        connections[poolingCount] = holder;
                        incrementPoolingCount();
                    }

                    if (poolingCount > 0) {
                        poolingPeak = poolingCount;
                        poolingPeakTime = System.currentTimeMillis();
                    }
                } catch (SQLException ex) {
                    LOG.error("init datasource error, url: " + this.getUrl(), ex);
                    connectError = ex;
                }
            }

            ......
        }
    }
核心代码1,初始化了一个最大连接数的数组
核心代码2,初始化初始连接数数量的线程池连接
到这里,核心代码就全部看完了,本文是从Mybatis查询开始看代码的,实际上核心代码可以直接从DataSource的getConnection方法开始看
总结
Druid连接池的核心功能主要就是注册一个DataSource的bean,连接池、获取连接等都依赖于DataSource的实现类DruidDataSourceWrapper,连接池功能主要是维护了一个数组,在项目启动时提前创建了一些数据库连接放到了里面复用
参考:https://blog.csdn.net/qq_31086797/article/details/114631032