并发编程-ReentrantLock锁源码分析&Condition设计
上一篇我们分析了Lock锁的实现,这一篇我们来着眼于他的底层实现,以及来分析Condition,并且对比他和wait()以及notify()。
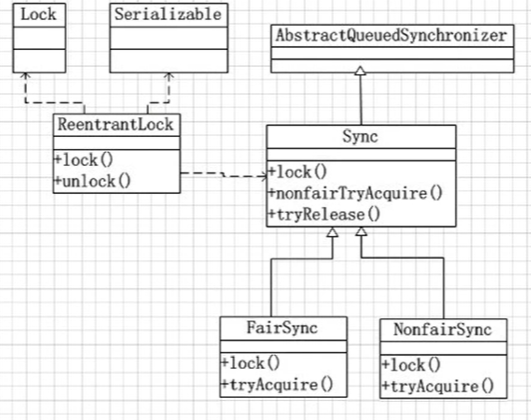
Lock源码分析
首先Lock下面有ReentrantLock的实现,在ReentrantLock中又依赖了一个Sync的抽象类,这个抽象类继承了AbstractQueuedSynchronizer(AQS)。这个抽象类是专门实现锁的同步的流程,我们在上一篇已经提到,然后针对公平和非公平,我们有两个类FairSync和NonfairSync。那么流程就是:
- 当我们new出了ReentrantLock然后根据我们调用的是公平的还是非公平的方法,
- 然后他会去调用Sync中的方法,
- 然后Sync会去调用AbstractQueuedSynchronizer中的互斥锁公共部分的方法
公平和非公平锁
之前讲到,公平和非公平指的是:在一个线程释放了锁之后,唤醒队列中头结点的下一个节点的时候,是否允许其他的线程插队。
默认是非公平锁
公平锁:(设置状态,抢占锁的逻辑)
final void lock() {
  //这里标识要抢占一把锁
    acquire(1);
}
public final void acquire(int arg) { //这是AQS中的代码,同步逻辑
    if (!tryAcquire(arg) &&
        acquireQueued(addWaiter(Node.EXCLUSIVE), arg))
        selfInterrupt();
}
protected final boolean tryAcquire(int acquires) {
     final Thread current = Thread.currentThread();
     int c = getState();
    //获取锁的状态如果是0说明现在是无锁状态
     if (c == 0) {
        if (!hasQueuedPredecessors() && //队列中没有排队的元素才进入
                compareAndSetState(0, acquires)) {// 用CAS保证原子性
                setExclusiveOwnerThread(current);//把获得锁的线程保存在队列中
                return true;
         }
      }
     //如果当前获得锁的线程和当前抢占锁的线程是同一个,则表示重入
      else if (current == getExclusiveOwnerThread()) {
          // 增加重入次数,这里不需要用cas因为进入了这个方法,则证明当前线程已经获得锁
            int nextc = c + acquires;
            if (nextc < 0)
                throw new Error("Maximum lock count exceeded");
            setState(nextc);
            return true;
        }
        return false;
    }
}
非公平锁:(设置状态,抢占锁的逻辑)
final void lock() {
   //不去判断是否有线程判排队,直接进行插队,
    if (compareAndSetState(0, 1))
      // 设置自己进入队列中
      setExclusiveOwnerThread(Thread.currentThread());
    else
     acquire(1);
}
//同样是aqs
public final void acquire(int arg) {
    if (!tryAcquire(arg) &&
        acquireQueued(addWaiter(Node.EXCLUSIVE), arg))
        selfInterrupt();
}
protected final boolean tryAcquire(int acquires) {
        return nonfairTryAcquire(acquires);
}
final boolean nonfairTryAcquire(int acquires) {
  final Thread current = Thread.currentThread();
  int c = getState();
  //对比公平锁,这里同样没有做判断,直接用cas然后设置自己
  if (c == 0) {
     if (compareAndSetState(0, acquires)) {
       setExclusiveOwnerThread(current);
            return true;
        }
    }
    //这里和公平锁一样也是增加重入次数
    else if (current == getExclusiveOwnerThread()) {
        int nextc = c + acquires;
        if (nextc < 0) // overflow
            throw new Error("Maximum lock count exceeded");
        setState(nextc);
        return true;
    }
    return false;
}
没有抢占到锁的线程进入双向链表和自旋的过程
public final void acquire(int arg) {
    if (!tryAcquire(arg) &&
        // 这里有两个步骤
        //addWaiter(Node.EXCLUSIVE) 添加一个互斥锁的节点
        //acquireQueued 实现自旋锁和阻塞的操作
        acquireQueued(addWaiter(Node.EXCLUSIVE), arg))
        selfInterrupt();
}
添加互斥锁的节点
private Node addWaiter(Node mode) {
    //把当前线程封装成一个node节点,把当前线程传递进去,后续方便线程唤醒
    Node node = new Node(Thread.currentThread(), mode);
    Node pred = tail;
    //第一次先走的#enq去初始化了节点
    if (pred != null) {
        node.prev = pred;
        if (compareAndSetTail(pred, node)) {
            pred.next = node;
            return node;
        }
    }
    enq(node);
    return node;
}
//使用尾插法,从尾部添加节点进入链表中
 private Node enq(final Node node) {
    for (;;) {
        Node t = tail;
        //如果尾节点为空,则初始一个尾节点
        if (t == null) {
            if (compareAndSetHead(new Node()))
                tail = head;
        } else {
            //这里把咱们新增加的线程节点指向尾节点
            node.prev = t;
            if (compareAndSetTail(t, node)) {
                // 把尾节点的下一个节点指向咱们新创建的节点,这样就行程了一个双向链表
                t.next = node;
                return t;
            }
        }
    }
}
自旋操作
//Node表示当前来抢占锁的线程
final boolean acquireQueued(final Node node, int arg) {
    boolean failed = true;
    try {
        boolean interrupted = false;
        // 这里不断的重试
        for (;;) {
            //这里尝试去获得锁
            final Node p = node.predecessor();
            // 判断,如果当前节点是头节点,那就进行抢占(如果是非公平锁,这里调用的是不同锁的方法)
            //如果返回true,则直接返回
            if (p == head && tryAcquire(arg)) {
                setHead(node);
                p.next = null; // help GC
                failed = false;
                return interrupted;
            }
            //否则,让线程去阻塞
            //shouldParkAfterFailedAcquire这里判断是否在需要在失败后阻塞,true则去调用parkAndCheckInterrupt进行阻塞,否则不断进行自旋
            if (shouldParkAfterFailedAcquire(p, node) &&
                parkAndCheckInterrupt())//这里就是调用Locksupport.park()进行阻塞,意思所有的没有抢占到锁的线程就会阻塞在这里
                interrupted = true;
        }
    } finally {
        if (failed)
            cancelAcquire(node);
    }
}
是否需要阻塞逻辑
private static boolean shouldParkAfterFailedAcquire(Node pred, Node node) {
    int ws = pred.waitStatus;
    //如果前置节点的状态等于SIGNAL则表明可以直接阻塞,但是每个节点的默认状态都是0所以不会执行这个逻辑
    if (ws == Node.SIGNAL)
        return true;
    //状态是cancel的时候走这个逻辑,那就循环链表去是cancel状态的线程丢弃
    if (ws > 0) {
        do {
            // 从后向前遍历(因为我们在#enq设置的时候就是从后向前的,这样就不会产生节点是断的情况),把指向关系去掉,从而抛弃失效节点
            node.prev = pred = pred.prev;
        } while (pred.waitStatus > 0);
        pred.next = node;
    } else {
        // 修改装提前为SIGNAL这样就可以进行阻塞了
        compareAndSetWaitStatus(pred, ws, Node.SIGNAL);
    }
    return false;
}
锁的释放逻辑
public final boolean release(int arg) {
    if (tryRelease(arg)) {
        // 得到当前AQS中的head节点
        Node h = head;
        //如果head不为空
        if (h != null && h.waitStatus != 0)
            // 调用unparkSuccessor进行唤醒
            unparkSuccessor(h);
        return true;
    }
    return false;
}
protected final boolean tryRelease(int releases) { //这里不一定是0比如他重入了5次,那现在只能是4 int c = getState() - releases; if (Thread.currentThread() != getExclusiveOwnerThread()) throw new IllegalMonitorStateException(); boolean free = false; // 如果这里是0那证明释放锁成功 if (c == 0) { free = true; //设置当前队列为空 setExclusiveOwnerThread(null); } // 设置状态为0 setState(c); return free; }private void unparkSuccessor(Node node) { int ws = node.waitStatus; // 表示可以唤醒状态 if (ws < 0) //回复状态为0 compareAndSetWaitStatus(node, ws, 0); //头节点的下一个节点 此时可能是线程B因为线程A已经释放锁 Node s = node.next; //如果线程B状态大于0可能已经被销毁了,或者有异常,那就移除这个节点 if (s == null || s.waitStatus > 0) { s = null; //从尾节点到头结点进行遍历 for (Node t = tail; t != null && t != node; t = t.prev) if (t.waitStatus <= 0) // 查找小于等于0的节点 s = t; } if (s != null) //唤醒在node中被阻塞的线程 LockSupport.unpark(s.thread); }线程被唤醒后就开始继续自旋#acquireQueued,把当前的node设置为头节点,头结点指向关系去除,随后即可被垃圾回收机制回收
Condition
wait() && notify()
在多个线程之间,我们可以通过调用同一个对象的
wait()和notify()来实现不同的线程间的可见 wait()是暂停一个线程,notify()是唤醒一个线程,condition做的事情和他们是一样的,只不过他的JUC中实现的,也是线程之间的通信,而且他们的底层也相似,我们先来分析一下wait()和notify()这里用一个生产者消费者来阐述如何使用,wait 和 notify 我们看到一定是生产者先运行,要不可能造成线程死锁,这是因为notify无法释放锁,而wait是可以释放锁的。
public class Consumer implements Runnable {
    private Queue<String> bags;
    private int maxSize;
    public Consumer(Queue<String> bags, int maxSize) {
        this.bags = bags;
        this.maxSize = maxSize;
    }

    @Override
    public void run() {
        while(true){
            synchronized (bags) {
                if (bags.isEmpty()) {
                    System.out.println("bags为空");
                    try {
                        bags.wait();
                    } catch (InterruptedException e) {
                        e.printStackTrace();
                    }
                }
                try {
                    Thread.sleep(1000);
                } catch (InterruptedException e) {
                    e.printStackTrace();
                }
                String bag = bags.remove();
                System.out.println("消费者消费:" + bag);
                // 唤醒producer
                bags.notify();
            }
        }
    }
}
public class Producer implements Runnable { private Queue<String> bags; private int maxSize; public Producer(Queue<String> bags, int maxSize) { this.bags = bags; this.maxSize = maxSize; } @Override public void run() { int i=0; while(true){ i++; synchronized (bags){ //抢占锁 if(bags.size()==maxSize){ // 如果队列满了,那就让线程等待 System.out.println("full"); try { bags.wait(); } catch (InterruptedException e) { e.printStackTrace(); } } try { Thread.sleep(1000); } catch (InterruptedException e) { e.printStackTrace(); } System.out.println("生产者生产:bag"+i); bags.add("bag"+i); bags.notify(); } } } }public class ProducerConsumerDemo { public static void main(String[] args) throws InterruptedException { Queue<String>queue=new LinkedList<>(); Producer producer=new Producer(queue,10); Consumer consumer=new Consumer(queue,10); new Thread(producer).start(); Thread.sleep(1000); new Thread(consumer).start(); } }他们的流程如下,wait 和notify都要抢占到锁才能执行操作,
- 当wait抢占到锁之后,就会把当前线程放在一个等待队列(WaitQueue)中然后他释放锁资源。
- 当notify抢占到锁的时候,首先他把阻塞队列中的线程移入到同步队列中【SynchronizedQueued】中
- 然后在同步锁中的这些线程对锁进行抢占,而他的抢占逻辑由synchronize来实现,
- 如果抢占成功就执行相关的代码
condition(使用)
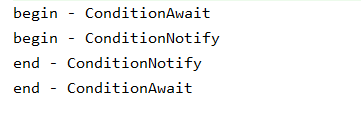
public class ConditionNotify implements Runnable {

    private Lock lock;
    private Condition condition;

    public ConditionNotify(Lock lock, Condition condition) {
        this.lock = lock;
        this.condition = condition;
    }

    @Override
    public void run() {
        System.out.println("begin - ConditionNotify");
        lock.lock();
        try {
            condition.signal();// 相当于notify
            System.out.println("end - ConditionNotify");
        } catch (Exception e) {
            e.printStackTrace();
        } finally {
            lock.unlock();
        }
    }
}
public class ConditionAwait implements Runnable {
    private Lock lock;
    private Condition condition;

    public ConditionAwait(Lock lock, Condition condition) {
        this.lock = lock;
        this.condition = condition;
    }

    @Override
    public void run() {
        System.out.println("begin - ConditionAwait");
        // 相当于synchronize锁
        lock.lock();
        try {
            condition.await();//相当于wait
        } catch (InterruptedException e) {
            e.printStackTrace();
        } finally {
            lock.unlock();
        }
        System.out.println("end - ConditionAwait");
    }
}
public class ConditionExample { public static void main(String[] args) { Lock lock=new ReentrantLock(); Condition condition=lock.newCondition(); ConditionAwait conditionAwait=new ConditionAwait(lock,condition); ConditionNotify conditionNotify=new ConditionNotify(lock,condition); new Thread(conditionAwait).start(); new Thread(conditionNotify).start(); } }分析解释:执行流程为
首先执行wait前面的代码,然后调用wait阻塞,之后notify的线程抢占到锁,执行他的逻辑,【begin和end conditionNotify】然后执行完成,释放锁,wait的代码抢占到锁,执行他自己的逻辑
condition实现原理猜想
作用:实现线程的阻塞和唤醒
前提条件:必须先获得锁
有两个方法:
- #await:让线程阻塞并且释放锁
- #signal:唤醒阻塞的线程
问题【wait】:Lock加锁的操作,必然牵扯到AQS的操作,那么在AQS中不牵扯不存在已经释放了锁的线程,那这些被释放锁的线程去了哪里?
问题【signal】:唤醒线程的时候,从哪里唤醒?
解决【wait】:所以通过await方法释放的线程,必须要有一个地方来存储,并且这些线程必须是阻塞的,因为要给await之后其他线程就要抢占了(那这里肯定就要一个队列存储)
解决【signal】:唤醒的时候,是从上面await的等待队列中唤醒一个线程,这个线程要继续放在AQS中的等待队列中,然后按照AQS的锁的抢占模式,继续抢占锁
