在前几篇文章中,我使用大量的篇幅来介绍T4在VisualStudio中如何使用。虽然在一定程度上可以提高我们的工作效率,但并没有实质上的改变。不过从另一方面来说,我们确实了解到了T4的强大。如何让这个强大的工具为我们所用呢?本章将讲解如何在自己的程序中使用T4。在原来的解决方案中新建一个窗体项目T4Generator。T4引擎被封装在了:
Microsoft.VisualStudio.TextTemplating.10.0.dll
Microsoft.VisualStudio.TextTemplating.Interfaces.10.0.dll
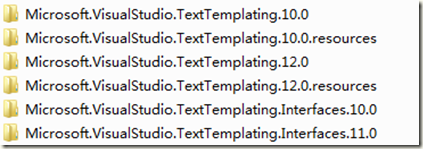
这两个dll文件中,具体位置在C:\Windows\Microsoft.NET\assembly\GAC_MSIL这个路径下找到和Microsoft.VisualStudio.TextTemplating相关的文件夹即可。这里需要注意的文件末尾的10.0是版本号。可以根据自己的VS版本选择相应的版本号,当然哪一个版本都无所谓。
我这里有10.0和12.0两个版本,为了协调我使用了10.0的版本。因为12.0版本对应的Interfaces文件版本号是11.0看着觉得变扭。将上述两个文件添加引用到自己的项目中。
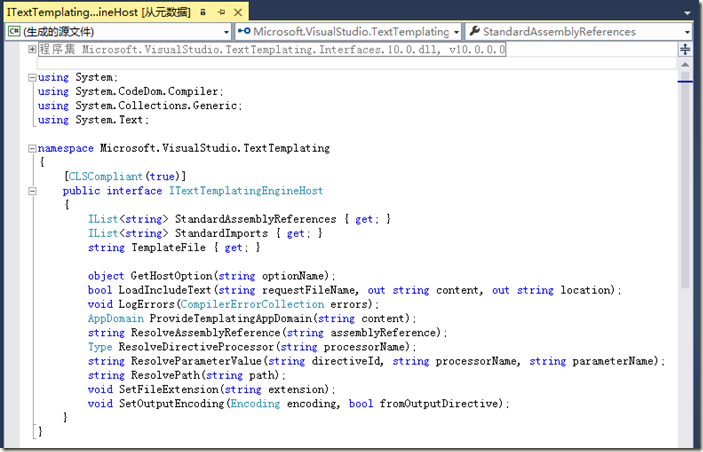
TT模板的执行需要一个宿主环境,Microsoft.VisualStudio.TextTemplating.10.0.dll提供了模板运行的环境也即引擎。TT模板和宿主环境之间怎样进行衔接?比如传递参数,这就需要一个下上文环境。Microsoft.VisualStudio.TextTemplating.Interfaces.10.0.dll接口则定义了上下文环境。我们需要做的就是实现该接口。用F12跟踪源码可见该接口定义如下:
内容挺多,但是没任何注解,这也是VS类库的最让人心碎的地方。怎么实现该接口?如果不知道具体方法的含义估计要实现该接口近乎是沮丧的。好在MSDN上资料比较齐全,在MSDN中查看该接口时提供了一个自定义模板宿主的案例。这里说明下:我理解的宿主就是指引擎本身,这个接口我理解成上下文环境。如果仅仅通过字面意思理解,可能和我说的不一样,这仅仅是理解不同,实质不冲突,我也是为了方便讲解。
MSDN案例地址:https://msdn.microsoft.com/en-us/library/bb126579.aspx
依据MSDN的案例,基本已经了解该接口实现的细节了。故此可以依葫芦画瓢打造自己的上下文环境了。在实现该接口之前还需要了解有关参数传递的方式。因为是自定义程序,提取表结构和响应用户操作全是由程序完成,模板如何接受程序传递的参数?
如图所示,主程序可以直接通过参数传递方式传递给宿主,在模版中可以获取宿主上下文对象,从而间接拿到主程序传递的参数。
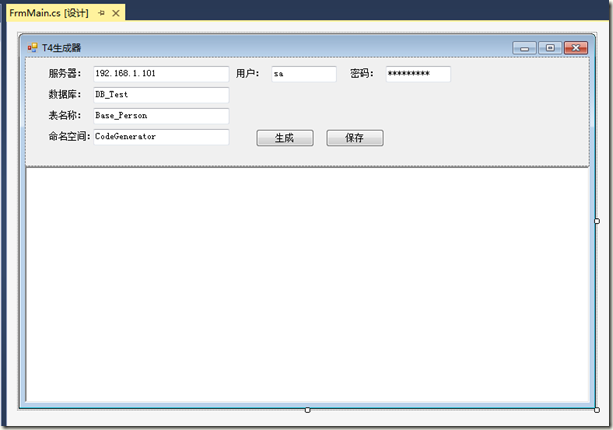
这里继续使用上一次的需求做一个实体生成器。首先打开主窗体,界面布局如下:
然后需要创建两个类文件用于封装需要传递给模板的数据。代码如下:
using System;
using System.Collections.Generic;
using System.Linq;
using System.Text;

namespace T4Generator
{
    /// <summary>
    /// 表结构信息
    /// </summary>
    [Serializable]
    public class SchemaInfo
    {
        /// <summary>
        /// 列描述信息
        /// </summary>
        public string ColumnDesc { get; set; }

        /// <summary>
        /// 列数据类型
        /// </summary>
        public string ColumnType { get; set; }

        /// <summary>
        /// 列名称
        /// </summary>
        public string ColumnName { get; set; }
    }
}
该类用于描述表结构信息用的。在上一篇的讲解中表结构使用DataSet封装,由于DataSet需要涉及到的命名空间比较多,在模板里操作不是很方便,这里就直接改用自定义类来封装数据了。
using System;
using System.Collections.Generic;
using System.Linq;
using System.Text;

namespace T4Generator
{
    /// <summary>
    /// 参数对象
    /// </summary>
    [Serializable]
    public class HostParam
    {
        /// <summary>
        /// 数据表名称
        /// </summary>
        public string TableName { get; set; }

        /// <summary>
        /// 命名空间
        /// </summary>
        public string NameSpace { get; set; }

        /// <summary>
        /// 数据表列集合
        /// </summary>
        public List<SchemaInfo> ColumnList { get; set; }
    }
}
此类用于封装一些额外数据,以便在模版中调用。需要注意的这两个作为封装数据的类一定要声明可序列化,否则执行时会出错。只要涉及在宿主环境或模板中使用的类都必须可序列化。
接下来最重要的工作就是实现接口,具体代码如下:
using System;
using System.Collections.Generic;
using System.Linq;
using System.Text;
using System.IO;
using System.CodeDom.Compiler;
using Microsoft.VisualStudio.TextTemplating;

namespace T4Generator
{
    /// <summary>
    /// 模版宿主
    /// </summary>
    [Serializable]
    public class TemplateHost : ITextTemplatingEngineHost
    {
        #region 字段
         private CompilerErrorCollection _ErrorCollection;
        private Encoding _fileEncodingValue = Encoding.UTF8;
        private string _fileExtensionValue = ".cs";
        private string _namespace = "T4Generator";
        internal string _templateFileValue;
        #endregion

        #region 属性
        /// <summary>
        /// 编译错误对象集合
        /// </summary>
        public CompilerErrorCollection ErrorCollection
        {
            get { return this._ErrorCollection; }
        }

        /// <summary>
        /// 文件编码方式
        /// </summary>
        public Encoding FileEncoding
        {
            get { return this._fileEncodingValue; }
        }

        /// <summary>
        /// 文件扩展名
        /// </summary>
        public string FileExtension
        {
            get { return this._fileExtensionValue; }
        }

        /// <summary>
        /// 宿主所在命名空间
        /// </summary>
        public string NameSpace
        {
            get { return this._namespace; }
            set { this._namespace = value; }
        }

        /// <summary>
        /// 模版需调用的其他程序集引用
        /// </summary>
        public IList<string> StandardAssemblyReferences
        {
            get
            {
                return new string[] {
            typeof(Uri).Assembly.Location,
            typeof(HostParam).Assembly.Location,
            typeof(SchemaInfo).Assembly.Location,
            typeof(TemplateHost).Assembly.Location
        };
            }
        }

        /// <summary>
        /// 模版调用标准程序集引用
        /// </summary>
        public IList<string> StandardImports
        {
            get
            {
                return new string[] {
            "System",
            "System.Text",
            "System.Collections.Generic",
            "T4Generator"
        };
            }
        }

        /// <summary>
        /// 模版文件
        /// </summary>
        public string TemplateFile
        {
            get { return this._templateFileValue; }
            set { this._templateFileValue = value; }
        }

        /// <summary>
        /// 自定义参数对象用于向模板传参
        /// </summary>
        public HostParam Param { get; set; }
        #endregion

        #region 方法
        public object GetHostOption(string optionName)
        {
            string str;
            return (((str = optionName) != null) && (str == "CacheAssemblies"));
        }

        public bool LoadIncludeText(string requestFileName, out string content, out string location)
        {
            content = string.Empty;
            location = string.Empty;
            if (File.Exists(requestFileName))
            {
                content = File.ReadAllText(requestFileName);
                return true;
            }
            return false;
        }

        public void LogErrors(CompilerErrorCollection errors)
        {
            this._ErrorCollection = errors;
        }

        public AppDomain ProvideTemplatingAppDomain(string content)
        {
            return AppDomain.CreateDomain("Generation App Domain");
        }

        public string ResolveAssemblyReference(string assemblyReference)
        {
            if (File.Exists(assemblyReference))
            {
                return assemblyReference;
            }
            string path = Path.Combine(Path.GetDirectoryName(this.TemplateFile), assemblyReference);
            if (File.Exists(path))
            {
                return path;
            }
            return "";
        }

        public Type ResolveDirectiveProcessor(string processorName)
        {
            string.Compare(processorName, "XYZ", StringComparison.OrdinalIgnoreCase);
            throw new Exception("没有找到指令处理器");
        }

        public string ResolveParameterValue(string directiveId, string processorName, string parameterName)
        {
            if (directiveId == null)
            {
                throw new ArgumentNullException("the directiveId cannot be null");
            }
            if (processorName == null)
            {
                throw new ArgumentNullException("the processorName cannot be null");
            }
            if (parameterName == null)
            {
                throw new ArgumentNullException("the parameterName cannot be null");
            }
            return string.Empty;
        }

        public string ResolvePath(string fileName)
        {
            if (fileName == null)
            {
                throw new ArgumentNullException("the file name cannot be null");
            }
            if (!File.Exists(fileName))
            {
                string path = Path.Combine(Path.GetDirectoryName(this.TemplateFile), fileName);
                if (File.Exists(path))
                {
                    return path;
                }
            }
            return fileName;
        }

        public void SetFileExtension(string extension)
        {
            this._fileExtensionValue = extension;
        }

        public void SetOutputEncoding(Encoding encoding, bool fromOutputDirective)
        {
            this._fileEncodingValue = encoding;
        }
        #endregion
    }
}
public IList<string> StandardAssemblyReferences
{
    get
    {
        return new string[] {
            typeof(Uri).Assembly.Location,
            typeof(HostParam).Assembly.Location,
            typeof(SchemaInfo).Assembly.Location,
            typeof(TemplateHost).Assembly.Location
        };
    }
}
该属性的实现就是把程序中自定义的3个类:HostParam、SchemaInfo、TemplateHost本身所在程序集位置注入到宿主环境中。
public IList<string> StandardImports
{
    get
    {
        return new string[] {
            "System",
            "System.Text",
            "System.Collections.Generic",
            "T4Generator"
        };
    }
}
这里就是把模板需要用的命名空间注入到宿主环境中。依据前面所述,模板中是可以拿到这个上下文对象的,故此我们把需要传递的参数也可以一并定义在该类中。
public HostParam Param { get; set; }
所以这里定义了一个属性用于接受程序传递的参数。
接下来只要在生成按钮的事件下调用即可,代码如下:
//定义引擎对象
private Engine engine; //Microsoft.VisualStudio.TextTemplating命名空间下

public FrmMain()
{
    InitializeComponent();
    this.engine = new Engine();
}

private void btnGenerate_Click(object sender, EventArgs e)
{
    string connString = string.Format("Data Source={0};Database={1};uid={2};pwd={3}", txtServer.Text, txtDB.Text, txtUser.Text, txtPwd.Text);

    //创建参数对象
    HostParam param = new HostParam();
    param.TableName = this.txtTableName.Text;
    param.NameSpace = this.txtNameSpace.Text;
    param.ColumnList = DBHelper.GetSchema(connString, param.TableName);

    //模板文件
    string templateFile = "Entity.txt";
    string content = File.ReadAllText(templateFile);

    //创建宿主
    TemplateHost host = new TemplateHost
    {
        TemplateFile = templateFile,
        Param = param
    };

    //生成代码
    this.txtCode.Text = engine.ProcessTemplate(content, host);
}
最后需要说明就是,在自定义程序中模板文件只要是文本文件即可,这里直接用了Entity.txt来作为模板文件。文件内容如下:
<#@ template language="c#" HostSpecific="True" #>
<#@ output extension= ".cs" #>
<#
    //获取宿主对象
    TemplateHost host = Host as TemplateHost;
#>
using System;
using System.Collections.Generic;
using System.Linq;
using System.Text;

namespace <#=host.Param.NameSpace  #>
{
    public class <#= host.Param.TableName #>Entity
    {
<#
foreach(SchemaInfo info in host.Param.ColumnList)
{
 #>
        /// <summary>
        /// <#= info.ColumnDesc #>
        /// </summary>
        public <#= info.ColumnType #> <#= info.ColumnName #> { get; set; }

<# } #>
    }
}
相比之前的TT模板简化了很多。当然功能是一样的。
<#@ template language="c#" HostSpecific="True" #>首先使用了@ template 指令指明模板宿主已变更。
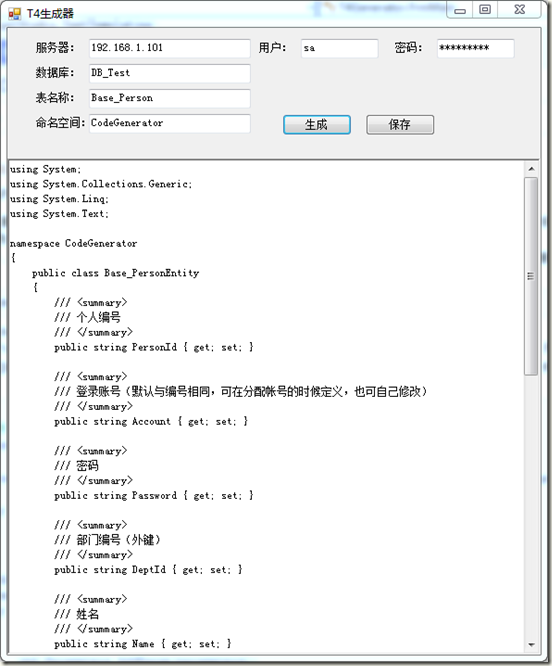
其次可以直接使用Host这个内置的对象获取宿主上下文环境。使用此对象即可获取到程序传递过来的参数。依据预先准备好的参数即可动态生成实体类,具体程序实现细节请参照源码。实现效果如下:


