HBase Shell 操作
3.1 基本操作
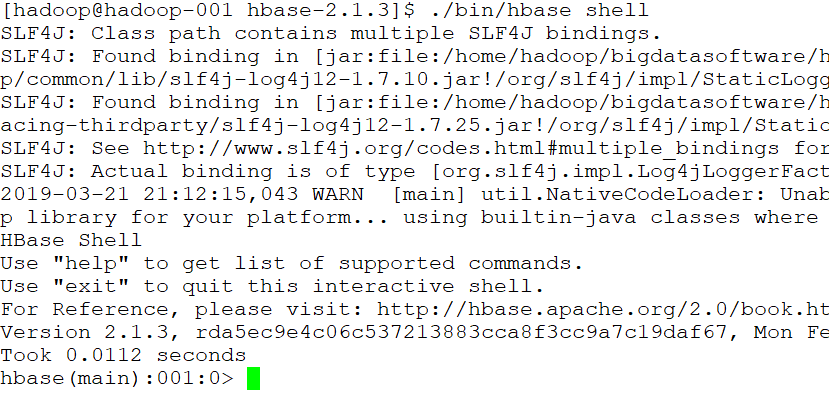
1.进入 HBase 客户端命令行,在hbase-2.1.3目录下
bin/hbase shell

2.查看帮助命令
hbase(main):001:0> help

3.查看当前数据库中有哪些表
hbase(main):002:0> list
3.2 表的操作
1.创建表
hbase(main):002:0> create 'student','info'
注意:删除字符的按键BackSpace的删除顺序是反过来的,即从左往右删。
2.插入数据到表
hbase(main):003:0> put 'student','1001','info:sex','male'
hbase(main):004:0> put 'student','1001','info:age','18'
hbase(main):005:0> put 'student','1002','info:name','Janna'
hbase(main):006:0> put 'student','1002','info:sex','female'
hbase(main):007:0> put 'student','1002','info:age','20'
3.扫描查看表数据
hbase(main):008:0> scan 'student'
hbase(main):009:0> scan 'student',{STARTROW => '1001', STOPROW => '1001'} 前闭后开
hbase(main):010:0> scan 'student',{STARTROW => '1001'}
4.查看表结构
hbase(main):0011:0> describe 'student'
5.更新指定字段的数据
hbase(main):012:0> put 'student','1001','info:name','Nick'
hbase(main):013:0> put 'student','1001','info:age','100'
6.查看【指定行】或【指定列族:列】的数据
hbase(main):014:0> get 'student','1001'
hbase(main):015:0> get 'student','1002','info:name'
7.统计表数据行数
hbase(main):021:0> count 'student'
8.删除数据
删除某 rowkey 的全部数据:
hbase(main):016:0> deleteall 'student','1001'
注意:删除操作默认的时间戳是当前时间。在 HBase 中,增删改数据都是打时间戳!!!
删除某rowkey的某一列数据:
hbase(main):017:0> delete 'student','1002','info:sex'
注意:shell删除操作会将数据的所有版本都删除掉。但是在 HBase 的 API 操作中可以细粒度的控制删除哪一个版本。
9.清空表数据
hbase(main):018:0> truncate 'student'
提示:清空表的操作顺序为先 disable,然后再 truncate。
10.删除表
首先需要先让该表为 disable 状态:
hbase(main):019:0> disable 'student'
然后才能 drop 这个表:
hbase(main):020:0> drop 'student'
提示:如果直接 drop 表,会报错:ERROR: Table student is enabled. Disable it first.
11.变更表信息
设置将info列族中的数据存放3个版本:
hbase(main):022:0> alter 'student',{NAME => 'info', VERSIONS => 3}
hbase(main):022:0> get 'student','1001',{COLUMN => 'info:name', VERSIONS => 3}
Hbase API操作
1.环境准备:
创建maven项目,更改pom.xml文件配置
<dependencies>
        <dependency>
            <groupId>org.apache.hbase</groupId>
            <artifactId>hbase-client</artifactId>
            <version>1.1.3</version>
        </dependency>


        <dependency>
            <groupId>junit</groupId>
            <artifactId>junit</artifactId>
            <version>4.11</version>
            <scope>test</scope>
        </dependency>

        <dependency>
            <groupId>org.apache.logging.log4j</groupId>
            <artifactId>log4j-core</artifactId>
            <version>2.8.2</version>
        </dependency>

        <dependency>
            <groupId>org.apache.hadoop</groupId>
            <artifactId>hadoop-common</artifactId>
            <version>2.7.2</version>
        </dependency>

        <dependency>
            <groupId>org.apache.hadoop</groupId>
            <artifactId>hadoop-hdfs</artifactId>
            <version>${hadoop.version}</version>
        </dependency>

        <dependency>
            <groupId>org.apache.hadoop</groupId>
            <artifactId>hadoop-client</artifactId>
            <version>${hadoop.version}</version>
        </dependency>
    </dependencies>
2.API
一系列API操作集合如下:
package com.gec.demo;

import org.apache.hadoop.conf.Configuration;
import org.apache.hadoop.hbase.*;
import org.apache.hadoop.hbase.client.*;

import org.apache.hadoop.hbase.protobuf.generated.ClientProtos;
import org.apache.hadoop.hbase.util.Bytes;
import sun.java2d.pipe.OutlineTextRenderer;

import java.io.IOException;

import static com.gec.demo.utli.getTable.getHTable;

public class HbaseOperation {
    static Admin admin = null;

    static Connection conn = null;

    static Configuration conf = null;

    static {
        // HBase配置文件
        conf = HBaseConfiguration.create();

        // 设置zookeeper地址
        conf.set("hbase.zookeeper.quorum", "hadoop-001");
        conf.set("hbase.zookeeper.property.clientPort", "2181");

        try {
            // 获取连接对象,执行
            conn = ConnectionFactory.createConnection(conf);
            admin = conn.getAdmin();
        } catch (IOException e) {
            e.printStackTrace();
        }
    }

    private static void close(Connection conn, Admin admin) {
        if (conn != null) {
            try {
                conn.close();
            } catch (IOException e) {
                e.printStackTrace();
            }
        }

        if (admin != null) {
            try {
                admin.close();
            } catch (IOException e) {
                e.printStackTrace();
            }
        }
    }
    public static boolean isTableExistNewAPI(String tableName) throws MasterNotRunningException, ZooKeeperConnectionException, IOException {

        // HBase配置文件
        Configuration conf = HBaseConfiguration.create();

        // 设置zookeeper地址
        conf.set("hbase.zookeeper.quorum", "hadoop-001");
        conf.set("hbase.zookeeper.property.clientPort", "2181");

        // 获取连接对象,执行
        Connection connection = ConnectionFactory.createConnection(conf);
        Admin admin = connection.getAdmin();
        boolean tableExists = admin.tableExists(TableName.valueOf(tableName));

        // 关闭资源
        admin.close();

        return tableExists;
    }
    // 创建表
    public static void createTable(String tableName, String... columnFamily) throws IOException {

        if (isTableExistNewAPI(tableName)) {
            System.out.println("表" + tableName + "已存在!");
            return;
        }

        // 创建表描述器
        HTableDescriptor hTableDescriptor = new HTableDescriptor(TableName.valueOf(tableName));

        // 添加列族
        for (String cf : columnFamily) {
            // 创建列描述器
            HColumnDescriptor HColumnDescriptor = new HColumnDescriptor(cf);
            // 指定列族的版本个数,默认个数是一个
            // HColumnDescriptor.setMaxVersions(5);
            hTableDescriptor.addFamily(HColumnDescriptor);
        }

        // 创建表操作
        admin.createTable(hTableDescriptor);
        System.out.println("表" + tableName + "创建成功!");
    }
    // 删除表
    public static void deleteTable(String tableName) throws IOException {

        if (isTableExistNewAPI(tableName)) {
            // 删除表之前先使表不可用(下线)
            admin.disableTable(TableName.valueOf(tableName));
            // 执行删除操作
            admin.deleteTable(TableName.valueOf(tableName));
            System.out.println("表" + tableName + "删除成功!");
        } else {
            System.out.println("表" + tableName + "不存在!");
        }
    }

    // 向表中插入数据(或修改)
    public static void putRowData(String tableName, String rowKey, String columnFamily, String column, String value) throws IOException {

        // 创建HTable对象
        // 旧API
        // HTable hTable = new HTable(conf, TableName.valueOf(tableName));
        // 获取Table对象
        // 新API
        Table table = conn.getTable(TableName.valueOf(tableName));

        Put put = new Put(Bytes.toBytes(rowKey));
        // 向Put对象中组装数据
        put.addColumn(Bytes.toBytes(columnFamily), Bytes.toBytes(column), Bytes.toBytes(value));

        // 执行向表中插入数据的操作
        table.put(put);

        System.out.println("插入数据成功");

        table.close();

        // 批量插入数据提示:1、同一个RowKey下添加不同的列;2、不同的RowKey,可以将RowKey(Put)放到List集合。
    }

    // 删除多行数据
    public static void deleteData(String tableName, String rowKey, String columnFamily, String column) throws IOException {

        // 获取Table对象
        // 新API
        Table table = conn.getTable(TableName.valueOf(tableName));

        // 创建Delete对象
        Delete delete = new Delete(Bytes.toBytes(rowKey));

        // 向Delete对象中组装数据,如果不组装,则删除的是行键的数据(多行数据)
        // delete.addColumn(Bytes.toBytes(columnFamily), Bytes.toBytes(column)); // 慎用这个方法,删除某个版本(默认最新版本),保留旧的版本
        // delete.addColumns(Bytes.toBytes(columnFamily), Bytes.toBytes(column)); // 公司推荐使用这个方法,删除所有版本

        // 执行删除操作
        table.delete(delete);

        System.out.println("删除多行数据成功");

        table.close();
    }
    // 获取所有数据(全表扫描)
    public static void scanTable(String tableName) throws IOException {

        // 获取Table对象
        // 新API
        Table table = conn.getTable(TableName.valueOf(tableName));

        // 构建扫描器,指定扫描的起始行和结束行,不指定的话,表示扫描全表,还可以指定其他限定
        Scan scan = new Scan();
        // scan.setStartRow(startRow);
        // scan.setStopRow(stopRow);

        // 执行扫描全表操作
        ResultScanner resultScanner = table.getScanner(scan);

        for (Result result : resultScanner) {
            Cell[] cells = result.rawCells();
            for (Cell cell : cells) {
                System.out.println("行键:" + Bytes.toString(result.getRow())
                        + " 列族:" + Bytes.toString(CellUtil.cloneFamily(cell))
                        + " 列:" + Bytes.toString(CellUtil.cloneQualifier(cell))
                        + " 值:" + Bytes.toString(CellUtil.cloneValue(cell)));
            }
        }

        table.close();
    }
    // 获取某一行数据
    public static void getRowData(String tableName, String rowKey) throws IOException {

        // 获取Table对象
        // 新API
        Table table = conn.getTable(TableName.valueOf(tableName));

        // 新建一个Get对象
        Get get = new Get(Bytes.toBytes(rowKey));
        // 显示所有版本
        // get.setMaxVersions();
        // 显示指定版本
        // get.setMaxVersions(maxVersions);
        // 显示指定时间戳的版本
        // get.setTimeStamp();

        // 执行获取某一行数据的操作
        Result result = table.get(get);
        Cell[] cells = result.rawCells();
        for (Cell cell : cells) {
            System.out.println("行键:" + Bytes.toString(result.getRow())
                    + " 列族:" + Bytes.toString(CellUtil.cloneFamily(cell))
                    + " 列:" + Bytes.toString(CellUtil.cloneQualifier(cell))
                    + " 值:" + Bytes.toString(CellUtil.cloneValue(cell))
                    + " 时间戳:" + cell.getTimestamp());
        }

        table.close();
    }
    // 获取某一行指定“列族:列”的数据
    public static void getRowQualifierData(String tableName, String rowKey, String columnFamily, String column) throws IOException {

        // 获取Table对象
        // 新API
        Table table = conn.getTable(TableName.valueOf(tableName));

        // 新建一个Get对象
        Get get = new Get(Bytes.toBytes(rowKey));
        // 指定要获取某一行的“列族:列”
        get.addColumn(Bytes.toBytes(columnFamily), Bytes.toBytes(column));

        // 执行获取某一行指定“列族:列”数据的操作
        Result result = table.get(get);
        Cell[] cells = result.rawCells();
        for (Cell cell : cells) {
            System.out.println("行键:" + Bytes.toString(result.getRow())
                    + " 列族:" + Bytes.toString(CellUtil.cloneFamily(cell))
                    + " 列:" + Bytes.toString(CellUtil.cloneQualifier(cell))
                    + " 值:" + Bytes.toString(CellUtil.cloneValue(cell))
                    + " 时间戳:" + cell.getTimestamp());
        }

        table.close();
    }
}