文章内容
从上章文章都知道,asp.net是运行在HttpRuntime里的,但是从CLR如何进入HttpRuntime的,可能大家都不太清晰。本章节就是通过深入分析.Net4的源码来展示其中的重要步骤。请先看下图:
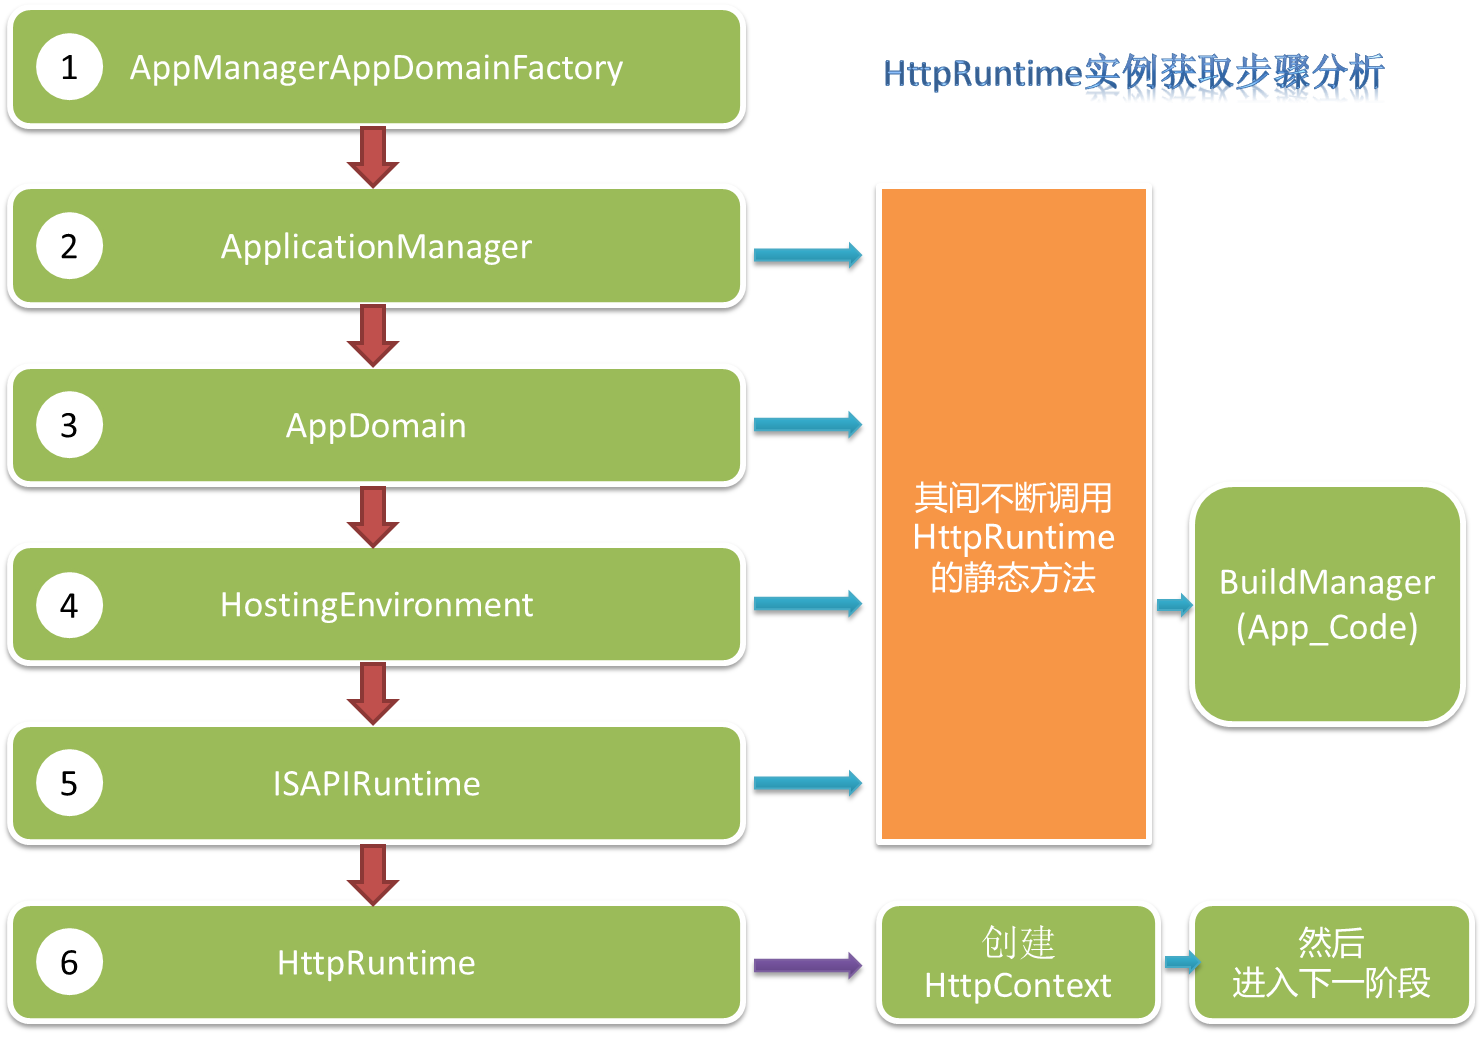
首先,CLR在初始化加载的时候,会加载一个非常重要的类AppManagerAppDomainFactory,这个类是做什么用的呢?首先这个类继承了IAppManagerAppDomainFactory接口,而这个接口是是有个可供COM调用的Create方法,代码如下:
 [ComImport, Guid("02998279-7175-4d59-aa5a-fb8e44d4ca9d"), System.Runtime.InteropServices.InterfaceTypeAttribute(System.Runtime.InteropServices.ComInterfaceType.InterfaceIsIUnknown)]
    public interface IAppManagerAppDomainFactory {
#if !FEATURE_PAL // FEATURE_PAL does not enable COM
        [return: MarshalAs(UnmanagedType.Interface)]
#else // !FEATURE_PAL
        Object Create(String appId, String appPath);
#endif // !FEATURE_PAL

        Object Create([In, MarshalAs(UnmanagedType.BStr)] String appId,
                      [In, MarshalAs(UnmanagedType.BStr)] String appPath);


        void Stop();
    }
我们来细看一下这个AppManagerAppDomainFactory是如何实现这个接口的,首先该类在默认的构造函数里,获取了一个ApplicationManager的实例用于在Create方法里使用。代码如下:
[SecurityPermission(SecurityAction.Demand, Unrestricted=true)]

public AppManagerAppDomainFactory() {

    _appManager = ApplicationManager.GetApplicationManager();

    _appManager.Open();

}
回到实现接口的Create方法,我们来看最重要的3行代码:
ISAPIApplicationHost appHost = new ISAPIApplicationHost(appId, appPath, false /*validatePhysicalPath*/);


ISAPIRuntime isapiRuntime = (ISAPIRuntime)_appManager.CreateObjectInternal(appId, typeof(ISAPIRuntime), appHost,

        false /*failIfExists*/, null /*hostingParameters*/);


isapiRuntime.StartProcessing();
代码的主要作用,就是通过ApplicationManager的CreateObjectInternal一系列操作,最终获取ISAPIRuntime的实例,然后让非托管代码调用。所以说CreateObjectInternal方法在这里发挥了至关重要的功能:创建AppDomain,创建HostingEnvironment等一系列操作。
首先来看看AppManagerAppDomainFactory的构造函数,其里面调用的ApplicationManager. GetApplicationManager()方法是一个单例的实现,代码如下:
public static ApplicationManager GetApplicationManager() {

    if (_theAppManager == null) {

        lock (_applicationManagerStaticLock) {

            if (_theAppManager == null) {

                if (HostingEnvironment.IsHosted)

                    _theAppManager = HostingEnvironment.GetApplicationManager();


                if (_theAppManager == null)

                    _theAppManager = new ApplicationManager();

            }

        }

    }


    return _theAppManager;

}
从代码看,大家可能有点疑惑,为什么HostingEnvironment属性IsHosted为true的时候会调用它的静态方法GetApplicationManager()来获取ApplicationManager的实例,这是因为ApplicationManager在后续的步骤创建HostingEnvironment对象并初始化的时候,将this自动传递给了HostingEnvironment对象实例(稍后在细说这个事情)。
回头再来看ApplicationManager实例的CreateObjectInternal方法,部分代码如下:
// get hosting environment

HostingEnvironment env = GetAppDomainWithHostingEnvironment(appId, appHost, hostingParameters);


// create the managed object in the worker app domain

// When marshaling Type, the AppDomain must have FileIoPermission to the assembly, which is not

// always the case, so we marshal the assembly qualified name instead

ObjectHandle h = env.CreateWellKnownObjectInstance(type.AssemblyQualifiedName, failIfExists);

return (h != null) ? h.Unwrap() as IRegisteredObject : null;
通过代码我们可以看到,首先要先得到HostingEnvironment的实例,然后通过该实例的CreateWellKnownObjectInstance方法返回上述Create方法需要的ISAPIRuntime的实例。那我们应该能想到GetAppDomainWithHostingEnvironment有2个作用,其一是先要获取AppDomain,其二是获取HostingEnvironment实例,来看看代码是否如我们猜想的结果,先来看代码:
private HostingEnvironment GetAppDomainWithHostingEnvironment(String appId, IApplicationHost appHost, HostingEnvironmentParameters hostingParameters) {

    LockableAppDomainContext ac = GetLockableAppDomainContext (appId);


    lock (ac) {

        HostingEnvironment env = ac.HostEnv;


        if (env != null) {

            try {

                env.IsUnloaded();

            } catch(AppDomainUnloadedException) {

                env = null;

            }

        }

        if (env == null) {

            env = CreateAppDomainWithHostingEnvironmentAndReportErrors(appId, appHost, hostingParameters);

            ac.HostEnv = env;

            Interlocked.Increment(ref _accessibleHostingEnvCount);
        }

        return env;

    }

}
代码告诉我们,首先会检查是否会有已经存在的AddDomain以及相应的HostingEnvironment实例,如果有返回,没有就会创建一个新的。通过辗转调用,最终来到一个私有方法CreateAppDomainWithHostingEnvironment,在这个300行的私有方法里,有我们所迷惑已久的东西。
首先会有关于信任级别的代码,比如是运行在FullTrust上还是MiddleTrust上,这里会有相应的处理代码,由于我们这次代码分析的重点不在这里,所以具体代码就不细说了,来看看我们需要知道的代码段:
//  Create the app domain

 AppDomain appDomain = null;

//  此处省略很多代码

if (isLegacyCas) {

    appDomain = AppDomain.CreateDomain(domainId,

#if FEATURE_PAL // FEATURE_PAL: hack to avoid non-supported hosting features

                                        null,

#else // FEATURE_PAL

GetDefaultDomainIdentity(),

#endif // FEATURE_PAL

setup);

}

else {

    appDomain = AppDomain.CreateDomain(domainId,
#if FEATURE_PAL // FEATURE_PAL: hack to avoid non-supported hosting features

                                        null,

#else // FEATURE_PAL

   GetDefaultDomainIdentity(),

#endif // FEATURE_PAL

   setup,

   permissionSet,
   fullTrustAssemblies /* fully trusted assemblies list: null means only trust GAC assemblies */);

}
通过代码可以看出,这就是传说中创建AppDomain的地方,后续所有的东西比如HttpRuntime, HttpContext都是依托于这个AppDomain,这就是为什么HttpContext为什么不能在多站点共享,而能安全存在于AppDomain的原因。
继续往下看,在创建AppDomain的代码之后有几行这样的代码:
Type hostType = typeof(HostingEnvironment);

String module = hostType.Module.Assembly.FullName;

String typeName = hostType.FullName;

ObjectHandle h = null;

//  此处省略很多代码

h = Activator.CreateInstance(appDomain, module, typeName);

//  此处省略很多代码

HostingEnvironment env = (h != null) ? h.Unwrap() as HostingEnvironment : null;

//  此处省略很多代码

if (appDomainStartupConfigurationException == null) {

    env.Initialize(this, appHost, configMapPathFactory, hostingParameters, policyLevel);

 }

 else {

    env.Initialize(this, appHost, configMapPathFactory, hostingParameters, policyLevel, appDomainStartupConfigurationException);

}

return env;
这就是创建HostingEnvironment实例的地方,创建实例以后,紧接着会调用Initialize方法来进行初始化,然后返回对象实例(注意该方法的第一个参数哦,是this,也就是ApplicationManager实例自身,就解释了上面我所说的那个为什么能通过HostingEnvironment的静态方法GetApplicationManager()来获取ApplicationManager实例了)。
通过这些代码,我们就可以简单的知道了,如何获取ISAPIRuntime实例,从而为进入HttpRuntime做准备了。但是,我依然好奇HostingEnvironment的Initialize初始化方法到底都做了什么,好吧,我们来看看。
OK,瞄到了一行重要的代码:
// initiaze HTTP-independent features

HttpRuntime.InitializeHostingFeatures(hostingFlags, policyLevel, appDomainCreationException);
该代码进入HttpRuntime的静态方法,接着调用HostingInt方法进行一些初始化工作,其中有一行代码也是我们需要知道的,如下:
// Initialize the build manager

BuildManager.InitializeBuildManager();
该BuildManager的InitializeBuildManager方法,会调用自己的Initialize方法进行初始化另外一些工作,其中包括编译App_Code目录下所有的.NET源代码。由上面的一系列介绍我们知道,在一个AppDomain内,只有一个HostringEnvironment,所以该这个BuildManager的Initialize也就只执行一次,从而保证了编译不出问题(源码的注释也是这么说的哦)。
另外HostingInit方法里在初始化失败的时候,在catch里有一行非常特殊的代码:
_hostingInitFailed = true;
这是说在创建HostingEnvironment失败的时候,会给HttpRuntime的HostingInitFailed赋值为True。后面的章节所讨论的PreApplicationStartMethodAttribute的概念和WebActivator的入口都和这个值有关系,现在先不做讨论,后面章节细再说。
好了,回到AppManagerAppDomainFactory的Create方法,在得到ISAPIRuntime的实例,并且运行StartProcessing方法以后,会返回一个ObjectHandle对象给非托管代码,其中包括了ISAPIRuntime的实例,代码如下:
return new ObjectHandle(isapiRuntime);
非托管代码接受ObjectHandle对象以后,要干什么呢?我们且看下篇文章的继续分析。
同步与推荐
本文已同步至目录索引:MVC之前的那点事儿系列
MVC之前的那点事儿系列文章,包括了原创,翻译,转载等各类型的文章,如果对你有用,请推荐支持一把,给大叔写作的动力。