一、JS事件
(一)JS事件分类
1.鼠标事件:
click/dbclick/mouseover/mouseout
2.HTML事件:
onload/onunload/onsubmit/onresize/onchange/onfoucs/onscroll
3.键盘事件:
keydown:键盘按下时触发
keypress:键盘按下并抬起的瞬间触发。
keyup:键盘抬起触发
[注意事项]
①执行顺序:keydown keypress keyup
②keypress只能捕获数字,字母,符号键,而不能捕获功能键。
③长按时循环执行keydown--keypress
④有keydown,并不一定有keyup,当长按时焦点失去,将不再触发keyup
⑤keypress区分大小写,keydown,kewup不区分。
4.事件因子:
当触发一个事件时,该事件将向事件所调用的函数中,默认传入一个参数,
这个参数就是一个事件因子,包含了该事件的各种详细信息。
|
1
2
3
4
5
6
|
document.onkeydown=function(e){ console.log(e); }document.onkeydown=function(){console.log(window.event);} |
|
1
2
3
4
5
6
7
8
|
//兼容浏览器的写法:document.onkeydown=function(e){e==e||Window.event;var Code=e.keyCode||e.which||e.charCode;if(code==13){//回车}} |
5.如何确定键盘按键?
①再出发的函数中,接收事件因子e。
②可以使用e.key直接去到按下的按键字符(不推荐使用)。
③一次可以使用keyCode/which/charCode取到按键的ASCII码值。
(兼容各种浏览器的写法)
|
1
2
3
4
5
6
7
8
9
10
11
12
13
14
15
16
17
18
19
20
21
22
23
24
25
26
27
28
29
30
31
32
33
34
35
|
var Code=e.keyCode||e.which||e.charCode;//判断组合键var isAlt=0,isEnt=0;document.onkeyup=function(e){if(e.keyCode==18){isAlt=1;} if(e.keyCode==13){isEnt=1;} if(isAlt==1&&isEnt==1){alert("同时按下Alt和Enter键");}}document.onkeyup=function(){console.log("keyup");}document.onkeypress=function(){console.log("keypress");}document.onkeydown=function(){console.log("keydown");}document.onkeypress=function(){console.log(window.event);}//判断是否按下了回车键document.onkeydown=function(e){var code=e.keyCode;if(code==13){alert("你输入的是回车键");}} |
二、事件绑定模型
(一)DOM0事件模型
绑定注意事项:
①使用window.onload加载完成后进行绑定。
window.onload =function(){//事件}
②放在body后面进行绑定。
|
1
2
3
4
5
6
7
|
//body内容<body> <button onclick="func()">内联模型绑定</button> <button id="btn1">哈哈哈哈</button> <button id="btn2">DOM2模型绑定</button> <button id="btn3">取消DOM2</button></body> |
1.内联模型(行内绑定):将函数名直接作为html标签中属性的属性值。
|
1
|
<button onclick="func()">内联模型绑定</button> |
缺点:不符合w3c中关于内容与 行为分离的基本规范。
2.脚本模型(动态绑定):通过在JS中选中某个节点,然后给节点添加onclick属性。
|
1
|
document.getElementById("btn1")=function(){} |
优点:符合w3c中关于内容与行为分离的基本规范,实现html与js的分离。
缺点:同一个节点只能添加一次同类型事件,如果添加多次,最后一个生效。
|
1
2
3
4
5
6
|
document.getElementById("btn1").onclick=function(){ alert(1234); }document.getElementById("btn1").onclick=function(){ alert(234); }//重复的只能出现最近的一次 |
3.DOM0共有缺点:通过DOM0绑定的事件,一旦绑定将无法取消。
|
1
2
3
4
5
6
7
8
|
document.getElementById("btn3").onclick=function(){//不能取消匿名函数 if(btn.detachEvent){ btn.detachEvent("onclick",func1); }else{ btn.removeEventListener("click",func1); } alert("取消DOM2");} |
(二)DOM2事件模型
1.添加DOM2事件绑定:
①IE8之前,使用.attachEvent("onclick",函数);
②IE8之后,使用.addEventListener("click",函数,true/false);
参数三:false(默认)表示事件冒泡,传入true表示事件捕获。
③兼容所有浏览器的处理方式:
|
1
2
3
4
5
6
|
var btn=document.getElementById("btn1");if(btn.attachEvent){btn.attachEvent("onclick",func1);//事件,事件需要执行的函数IE8可以}else{btn.attachEventListener("click",func1);} |
2.DOM2绑定的优点:
①同一个节点,可以使用DOM2绑定多个同类型事件。
②使用DOM2绑定的事件,可以有专门的函数进行取消。
3.取消事件绑定:
①使用attachEvent绑定,要用detachevent取消。
②使用attachEventListener绑定,要用removeEventListenter取消。
注意:如果DOM2绑定的事件,需要取消,则绑定事件时,回调函数必须是函数名,
而不能是匿名函数,因为取消事件时,取消传入函数名进行取消。
三、JS事件流模型
(一)JS中的事件流模型
1. 事件冒泡(fasle/不写):当触发一个节点的事件是,会从当前节点开始,依次触发其祖先节点的同类型事件,直到DOM根节点。
2. 事件捕获(true):当初发一个节点的事件时,会从DOM根节点开始,依次触发其祖先节点的同类型事件,直到当前节点自身。
3. 什么时候事件冒泡?什么时候事件捕获?
① 当使用addEventListener绑定事件,第三个参数传为true时表示事件捕获;
② 除此之外的所有事件绑定均为事件冒泡。
4. 阻止事件冒泡:
① IE10之前,e.cancelBubble = true;
② IE10之后,e.stopPropagation();
5. 阻止默认事件:
① IE10之前:e.returnValue = false;
② IE10之后:e.preventDefault();
|
1
2
3
4
5
6
7
8
9
10
11
12
13
14
15
16
17
18
19
20
21
22
23
24
25
26
27
28
29
30
31
32
33
34
|
//css#div1{ 300px;; height: 300px; }#div2{ 200px; height: 200px; }#div3{ 100px; height: 100px; padding: 0px 0px 0px 5px; background-image: initial; background-position: initial; background-size: initial; background-repeat: initial; background-attachment: initial; background-origin: initial; background-clip: initial; border-left: 3px solid rgb(108, 226, 108); line-height: 20px; 640px; clear: both; outline: 0px !important; border-radius: 0px !important; border-top: 0px !important; border-right: 0px !important; border-bottom: 0px !important; border-image: initial !important; bottom: auto !important; float: none !important; height: auto !important; left: auto !important; overflow: visible !important; position: static !important; right: auto !important; top: auto !important; vertical-align: baseline !important; box-sizing: content-box !important; font-family: Consolas, "Bitstream Vera Sans Mono", "Courier New", Courier, monospace !important; min-height: auto !important; color: gray !important;">#A9A9A9;}//html<div id="div1"> <div id="div2"> <div id="div3"></div> </div></div><a href="01-事件笔记.html" rel="external nofollow" onclick="func()">超链接</a>div1.addEventListener("click",function(){ console.log("div1 click");},false);div2.addEventListener("click",function(){ console.log("div2 click");},false);div3.addEventListener("click",function(){ //原来的顺序是:3-->2-->1。// myParagraphEventHandler(); //截获事件流后,只触发3.但是从2开始依然会冒泡; console.log("div3 click");},false); |
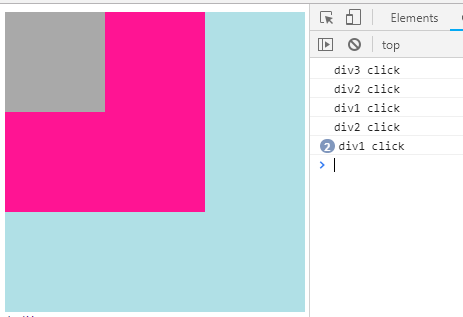
结果(事件冒泡)(由小到大div3-》div2-》div1):

|
1
2
3
4
5
6
7
8
9
10
|
div1.addEventListener("click",function(){ console.log("div1 click");},true);div2.addEventListener("click",function(){ console.log("div2 click");},true);div3.addEventListener("click",function(){ // myParagraphEventHandler(); //截获事件流后,只触发3.但是从2开始依然会冒泡; console.log("div3 click");},true); |
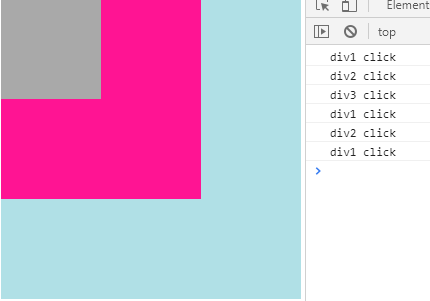
结果(事件捕获)(由小到大div3-》div2-》div1):

|
1
2
3
4
5
6
7
8
9
10
11
12
13
14
15
16
17
18
19
20
21
22
23
24
25
26
27
28
29
30
31
32
|
//依然遵循事件冒泡document.onclick=function(){ console.log("document click")}//截获事件流阻止事件冒泡function myParagraphEventHandler(e) { e = e || window.event; if (e.stopPropagation) { e.stopPropagation(); //IE10以后 } else { e.cancelBubble = true; //IE10之前 }}//截获事件流阻止事件冒泡function myParagraphEventHandler(e) { e = e || window.event; if (e.stopPropagation) { e.stopPropagation(); //IE10以后 } else { e.cancelBubble = true; //IE10之前 }}//阻止默认事件function eventHandler(e) { e = e || window.event;// 防止默认行为 if (e.preventDefault) { e.preventDefault(); //IE10之后 } else { e.returnValue = false; //IE10之前 }} |