Python常用库之Requests自我总结
简介
pip install requests
使用
requests的使用流程:
- 引入包
- 发送get, post请求
发送请求
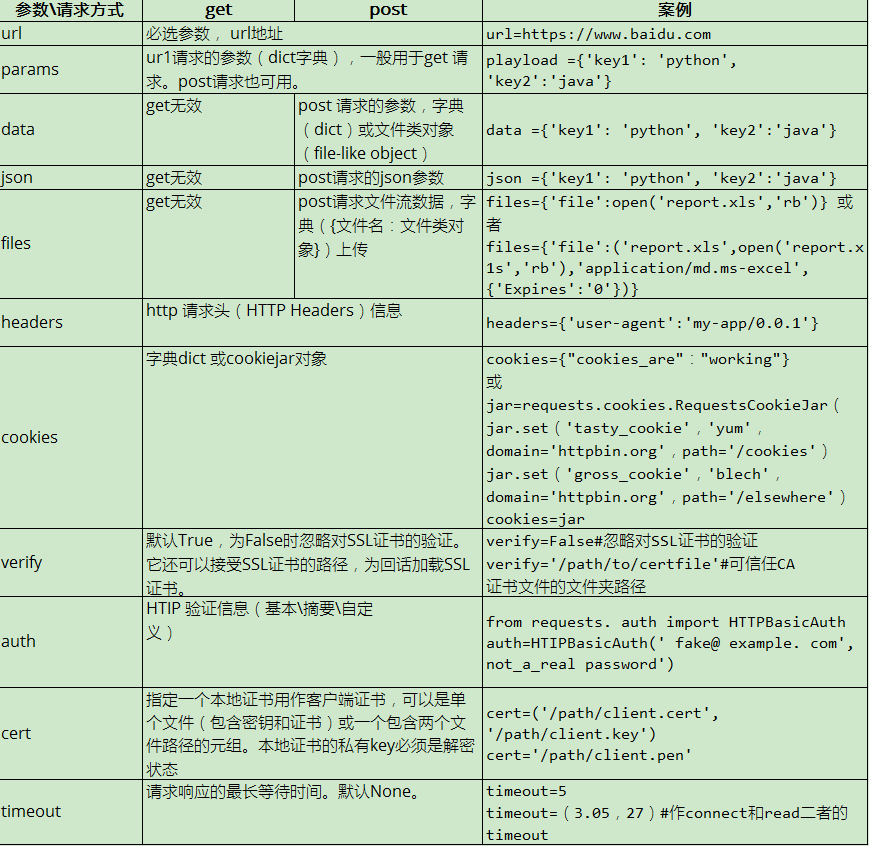
参数说明
常用的参数说明如下:
get请求
- 无参数请求, url参数必须
import requests

r = requests.get(url="https://github.com/timeline.json")
print(r.text)
{"message":"Hello there, wayfaring stranger. If you’re reading this then you probably didn’t see our blog post a couple of years back announcing that this API would go away: http://git.io/17AROg Fear not, you should be able to get what you need from the shiny new Events API instead.","documentation_url":"https://developer.github.com/v3/activity/events/#list-public-events"}
- 有参数的请求
import requests

params = {"key1":"python", "key2":"java"}

r = requests.get(url="http://httpbin.org/get", params = params)

print('url is {}'.format(r.url))
print('The status code is {}'.format(r.status_code))
print('The cookie info is {}'.format(r.cookies))
print('return body is {}'.format(r.json()))
url is http://httpbin.org/get?key1=python&key2=java
The status code is 200
The cookie info is <RequestsCookieJar[]>
return body is {'args': {'key1': 'python', 'key2': 'java'}, 'headers': {'Accept': '*/*', 'Accept-Encoding': 'gzip, deflate', 'Host': 'httpbin.org', 'User-Agent': 'python-requests/2.21.0'}, 'origin': '114.94.175.75, 114.94.175.75', 'url': 'https://httpbin.org/get?key1=python&key2=java'}
- 请求下载图片
import requests
from io import BytesIO
from PIL import Image

r = requests.get('https://pic3.zhimg.com/247d9814fec770e2c85cc858525208b2_is.jpg')
i = Image.open(BytesIO(r.content))
i.show()
Post请求:上传表单,文本,文件,图片
post请求的方式有很多种, 如上传表单,发送文本、文件或者图片以及下载文件
-
表单形式提交的post请求:
- 将数据传递给post()方法的data参数
-
json文本形式提交的post请求
- 将json数据dumps后传递给data参数
- 直接将json数据传递给post()方法的json参数
-
单个文件提交的post请求
- 将文件流给post()方法的files参数
-
多个文件提交的post请求
- 将文件设到一个元组的列表中,其中元组结构为 (form_field_name, file_info);然后将数据传递给post()方法的files
- 表单形式发送post请求
import requests

# review the dict method because they are used commonally
data = {}
data.setdefault('custname', 'woodman')
data.update({'custtel':'13012345678','custemail':'woodman@11.com', 'size':'small'})
print(data)

r = requests.post(url='http://httpbin.org/post', data=data)
r.json()
{'custname': 'woodman', 'custtel': '13012345678', 'custemail': 'woodman@11.com', 'size': 'small'}


{'args': {},
 'data': '',
 'files': {},
 'form': {'custemail': 'woodman@11.com',
  'custname': 'woodman',
  'custtel': '13012345678',
  'size': 'small'},
 'headers': {'Accept': '*/*',
  'Accept-Encoding': 'gzip, deflate',
  'Content-Length': '74',
  'Content-Type': 'application/x-www-form-urlencoded',
  'Host': 'httpbin.org',
  'User-Agent': 'python-requests/2.21.0'},
 'json': None,
 'origin': '114.94.175.75, 114.94.175.75',
 'url': 'https://httpbin.org/post'}
- post json格式请求
import requests
import json

url = 'https://api.github.com/some/endpoint'
playload = {}
playload.setdefault('some', 'data')

# use the parameter named data to transfer the data
r = requests.post(url, data=json.dumps(playload))
print(r.text)

# use the parameter named json to transfer the data
r1 = requests.post(url, json=playload)
print(r1.text)
{"message":"Not Found","documentation_url":"https://developer.github.com/v3"}
{"message":"Not Found","documentation_url":"https://developer.github.com/v3"}
- post提交单个文件
# 上传单个文件
url = 'http://httpbin.org/post'
# 注意文件打开的模式,使用二进制模式不容易发生错误
files = {'file': open('report.txt', 'rb')}
# 也可以显式地设置文件名,文件类型和请求头
# files = {'file': ('report.xls', open('report.xls', 'rb'), 'application/vnd.ms-excel', {'Expires': '0'})}
r = requests.post(url, files=files)
r.encoding = 'utf-8'
print(r.text)
---------------------------------------------------------------------------

FileNotFoundError                         Traceback (most recent call last)

<ipython-input-24-0f0c20495d4f> in <module>()
      2 url = 'http://httpbin.org/post'
      3 # 注意文件打开的模式,使用二进制模式不容易发生错误
----> 4 files = {'file': open('report.txt', 'rb')}
      5 # 也可以显式地设置文件名,文件类型和请求头
      6 # files = {'file': ('report.xls', open('report.xls', 'rb'), 'application/vnd.ms-excel', {'Expires': '0'})}


FileNotFoundError: [Errno 2] No such file or directory: 'report.txt'
- 上传多个文件
url = 'http://httpbin.org/post'
multiple_files = [
   ('images', ('foo.png', open('foo.png', 'rb'), 'image/png')),
   ('images', ('bar.png', open('bar.png', 'rb'), 'image/png'))]
r = requests.post(url, files=multiple_files)
print(r.text)
---------------------------------------------------------------------------

FileNotFoundError                         Traceback (most recent call last)

<ipython-input-25-f6b08b6db381> in <module>()
      1 url = 'http://httpbin.org/post'
      2 multiple_files = [
----> 3    ('images', ('foo.png', open('foo.png', 'rb'), 'image/png')),
      4    ('images', ('bar.png', open('bar.png', 'rb'), 'image/png'))]
      5 r = requests.post(url, files=multiple_files)


FileNotFoundError: [Errno 2] No such file or directory: 'foo.png'
- 将字符串作为文件上传
url = 'http://httpbin.org/post'
files = {'file': ('report.csv', 'some,data,to,send
another,row,to,send
')}
r = requests.post(url, files=files)
print(r.text)
{
  "args": {},
  "data": "",
  "files": {
    "file": "some,data,to,send
another,row,to,send
"
  },
  "form": {},
  "headers": {
    "Accept": "*/*",
    "Accept-Encoding": "gzip, deflate",
    "Content-Length": "184",
    "Content-Type": "multipart/form-data; boundary=c0c362abb4044e30928b8f66c8ac1c40",
    "Host": "httpbin.org",
    "User-Agent": "python-requests/2.21.0"
  },
  "json": null,
  "origin": "114.94.175.75, 114.94.175.75",
  "url": "https://httpbin.org/post"
}
get与post请求的header与cookie管理
获取get与post请求响应的header与cookie分别使用r.headers与r.cookies。
如果提交请求数据是对header与cookie有修改,需要在get()与post()方法中加入headers或cookies参数,它们值的类型都是字典。
- 定制请求头
headers 里面有两个比较重要的参数:User-Agent和 Referer
有时候访问的时候,出现service不可用的情况,要把这两个参数加上去。
注意:requests自带headers管理,一般情况下不需要设置header信息。Requests 不会基于定制 header 的具体情况改变自己的行为。只不过在最后的请求中,所有的 header 信息都会被传递进去。
import requests

url = 'https://api.github.com/some/endpoint'
headers = {'User-Agent':'my-app/0.0.1'}

r = requests.get(url=url, headers = headers)
print(r.headers)
print(r.text)
{'Date': 'Tue, 15 Oct 2019 11:21:11 GMT', 'Content-Type': 'application/json; charset=utf-8', 'Transfer-Encoding': 'chunked', 'Server': 'GitHub.com', 'Status': '404 Not Found', 'X-RateLimit-Limit': '60', 'X-RateLimit-Remaining': '58', 'X-RateLimit-Reset': '1571142057', 'X-GitHub-Media-Type': 'github.v3; format=json', 'Access-Control-Expose-Headers': 'ETag, Link, Location, Retry-After, X-GitHub-OTP, X-RateLimit-Limit, X-RateLimit-Remaining, X-RateLimit-Reset, X-OAuth-Scopes, X-Accepted-OAuth-Scopes, X-Poll-Interval, X-GitHub-Media-Type', 'Access-Control-Allow-Origin': '*', 'Strict-Transport-Security': 'max-age=31536000; includeSubdomains; preload', 'X-Frame-Options': 'deny', 'X-Content-Type-Options': 'nosniff', 'X-XSS-Protection': '1; mode=block', 'Referrer-Policy': 'origin-when-cross-origin, strict-origin-when-cross-origin', 'Content-Security-Policy': "default-src 'none'", 'Content-Encoding': 'gzip', 'X-GitHub-Request-Id': '08C7:769F:13B990D:1A07D30:5DA5ABA6'}
{"message":"Not Found","documentation_url":"https://developer.github.com/v3"}
- 定制cookies信息
# 直接以字典型时传递cookie
url = 'http://httpbin.org/cookies'
cookies = {"cookies_are":'working'}
r = requests.get(url, cookies=cookies)
# 获取响应的cookie信息,返回结果是RequestsCookieJar对象
print(r.cookies)
print(r.text)
<RequestsCookieJar[]>
{
  "cookies": {
    "cookies_are": "working"
  }
}
session和cookie存储
如果你向同一主机发送多个请求,每个请求对象让你能够跨请求保持session和cookie信息,这时我们要使用到requests的Session()来保持回话请求的cookie和session与服务器的相一致。
- 创建一个session会话
import requests

s = requests.Session()
r = s.get(url='https://github.com/timeline.json')
print(r.text)

# 使用with 去除session没有关闭的风险
with requests.Session() as s:
    r_post = s.post(url='https://github.com/timeline.json')
    print(r.json())
{"message":"Hello there, wayfaring stranger. If you’re reading this then you probably didn’t see our blog post a couple of years back announcing that this API would go away: http://git.io/17AROg Fear not, you should be able to get what you need from the shiny new Events API instead.","documentation_url":"https://developer.github.com/v3/activity/events/#list-public-events"}
{'message': 'Hello there, wayfaring stranger. If you’re reading this then you probably didn’t see our blog post a couple of years back announcing that this API would go away: http://git.io/17AROg Fear not, you should be able to get what you need from the shiny new Events API instead.', 'documentation_url': 'https://developer.github.com/v3/activity/events/#list-public-events'}
requests的session会话需要注意的是会话方法级别的参数也不会被跨请求保持。
- session的参数不会被跨请求保持
s = requests.Session()

r = s.get('http://httpbin.org/cookies', cookies={'from-my': 'browser'})
print("Using the GET for session and the response is {}".format(r.text))

r1 = s.get('http://httpbin.org/cookies')
print(r1.text)
Using the GET for session and the response is {
  "cookies": {
    "from-my": "browser"
  }
}

<html>
<head><title>502 Bad Gateway</title></head>
<body bgcolor="white">
<center><h1>502 Bad Gateway</h1></center>
<hr><center>nginx</center>
</body>
</html>
requests请求返回对象Response的常用方法
Response响应类常用属性与方法:
Response.url 请求url
Response.status_code 响应状态码
Response.text 获取响应内容
Response.json() 活动响应的JSON内容
Response.ok 请求是否成功,status_code<400 返回True
Response.headers 响应header信息
Response.cookies 响应的cookie
Response.elapsed 请求响应的时间。
Response.links 返回响应头部的links连接,相当于Response.headers.get('link')
Response.raw 获取原始套接字响应,需要将初始请求参数stream=True
Response.content 以字节形式获取响应提,多用于非文本请求
Response.iter_content() 迭代获取响应数据
Response.history 重定向请求历史记录
Response.reason 响应状态的文本原因,如:"Not Found" or "OK"
Response.close() 关闭并释放链接,释放后不能再次访问’raw’对象。一般不会调用。
%%debug

import requests

r = requests.get('http://www.baidu.com')

print('状态码:',r.status_code)
print('请求是否成功:',r.ok)
print('响应提文本内容:',r.reason)
print('重定向历史:',r.history)
print('header的link:',r.links)
print('响应时长:',r.elapsed)
# r.raw 获取到内容,请求时将stream设为True
print('原始套接字响应:',r.raw)
print('原始套接字响应:',r.raw.read())
NOTE: Enter 'c' at the ipdb> prompt to continue execution.
> [1;32m<string>[0m(3)[0;36m<module>[1;34m()[0m
ipdb> r
状态码: 200
请求是否成功: True
响应提文本内容: OK
重定向历史: []
header的link: {}
响应时长: 0:00:00.042962
原始套接字响应: <urllib3.response.HTTPResponse object at 0x0656CA50>
原始套接字响应: b''
--Return--
None
> [1;32m<string>[0m(15)[0;36m<module>[1;34m()[0m