这个我是感觉在思路上没有那么复杂啦,参考书上的提示应该能够自己写出来,就直接上代码了
#include<iostream>
#include<memory>
#include<utility>
#include<string>
#include<algorithm>
//Equivalent to " vector<string> "
class StrVec{
public:
StrVec():elements(nullptr),frist_free(nullptr),cap(nullptr){ }
StrVec( const StrVec & ) ;
StrVec( const std::initializer_list<std::string> & ) ;
StrVec& operator=( const StrVec & ) ;
~StrVec() ;
void push_back(const std::string &) ;
size_t size() const { return frist_free - elements ;} //元素数量
size_t capacity() const { return cap - elements ;} //空间总共大小
void reserve( size_t new_cap ) ;
void resize( size_t count, const std::string &value = std::string("666") ) ;
std::string *begin() const { return elements ;}
std::string *end() const { return frist_free ;}
private:
std::allocator<std::string> alloc ;
void chk_n_alloc() {
if( size() == capacity() )
reallocate();
}
std::pair<std::string * ,std::string *> alloc_n_copy(const std::string * ,const std::string * ) ;
void free() ; //销毁元素并释放内存
void reallocate(size_t temp = 1 ) ; //得到更多的内存并移动原来的元素
std::string* elements ;
std::string* frist_free;
std::string* cap ;
};
StrVec::StrVec(const StrVec &s){
auto newdata = alloc_n_copy(s.begin() ,s.end() ) ;
elements = newdata.first ;
frist_free = cap = newdata.second ;
}
StrVec::StrVec( const std::initializer_list<std::string> &v ) {
for (auto itm : v) {
this->push_back(itm) ;
}
}
StrVec& StrVec::operator=(const StrVec &s) {
/*
1.将右侧对象拷贝拷贝到一个局部临时对象中
2.销毁左侧运算对象现有成员
3.将临时局部对象拷贝到左侧运算对象的成员
*/
auto newdata = alloc_n_copy(s.begin() ,s.end() ) ;
free() ;
elements = newdata.first ;
frist_free = cap = newdata.second ;
return *this ;
}
void StrVec::push_back(const std::string &s) {
chk_n_alloc() ; //首先检查 StrVec
alloc.construct(frist_free++,s); //构造元素放入即可
}
void StrVec::reserve( size_t new_cap ) {
if( new_cap > capacity() ) { //beyond the capacity , Redistribution
reallocate(new_cap) ;
}
}
//增大容器或缩小容器,其中的对象也会被构造好
void StrVec::resize(size_t count, const std::string &value )
{
if (count > size() ) {
if (count > capacity()) reserve(count * 2) ;
for (size_t i = size(); i != count ; ++i)
alloc.construct(frist_free++, value);
}
else if (count < size( )) {
while (frist_free != elements + count)
alloc.destroy(--frist_free) ;
}
}
//拷贝和赋值StrVec 时,需要用到(StrVec)是类值的对象 ,不同对象不同内存
std::pair<std::string * ,std::string *> StrVec::alloc_n_copy(const std::string *b,const std::string *e){
auto data = alloc.allocate( e - b ) ;
return { data ,uninitialized_copy(b,e,data) } ;
}
// for loop Method
/*void StrVec::free(){ //销毁元素并释放内存
if( elements ){ // why judge it ? you should think it
for(auto p = frist_free ; p != elements ; )
alloc.destroy(--p) ; //must is --p
}
alloc.deallocate( elements ,cap - elements ) ;
}*/
// for_each and lambda Method
void StrVec::free(){
if( elements ){
for_each( elements , frist_free , [this]( std::string &p){
alloc.destroy( &p ) ; // need you to look out !!!!!!
} );
alloc.deallocate( elements ,cap - elements ) ;
}
}
void StrVec::reallocate(size_t temp ) {
size_t newcapacity ;
if(temp == 1 )
newcapacity = size() ? 2*size() : 1 ;
else
newcapacity = temp ;
auto newdata = alloc.allocate( newcapacity );
auto dest = newdata ;
auto elem = elements ;
for(size_t i= 0 ;i != size() ;i++){
alloc.construct(dest++,std::move(*elem++)) ;
}
free();
elements = newdata ;
frist_free = dest ;
cap = elements + newcapacity ;
}
StrVec::~StrVec(){
free() ;
}
int main(void){
StrVec temp ;
temp.push_back("1") ;
temp.push_back("2") ;
temp.push_back("3") ;
temp.push_back("4") ;
temp.push_back("5") ; //now the size() = 5 ,capacity() == 8
for(auto i : temp )
std::cout << i << " ";
std::cout << std::endl ;
std::cout << temp.size() << std::endl ;
std::cout << temp.capacity() << std::endl << std::endl ;
temp.reserve(52) ; //the capacity shouble is 52
for(auto i : temp )
std::cout << i << " ";
std::cout << std::endl ;
std::cout << temp.size() << std::endl ; // 5
std::cout << temp.capacity() << std::endl << std::endl ;
temp.resize(2) ; //size() = 2 ,capacity = 52
for(auto i : temp )
std::cout << i << " ";
std::cout << std::endl ;
std::cout << temp.size() << std::endl ;
std::cout << temp.capacity() << std::endl << std::endl ;
temp.resize(150) ; //capacity = 300 ,size() = 150
for(auto i : temp )
std::cout << i << " ";
std::cout << std::endl ;
std::cout << temp.size() << std::endl ;
std::cout << temp.capacity() << std::endl << std::endl ;
StrVec temp2={"6","7","8","9","10"}; //test the std::initializer_list
for(auto i : temp2 )
std::cout << i << " ";
std::cout << std::endl ;
std::cout << temp2.size() << std::endl ;
std::cout << temp2.capacity() << std::endl << std::endl ;
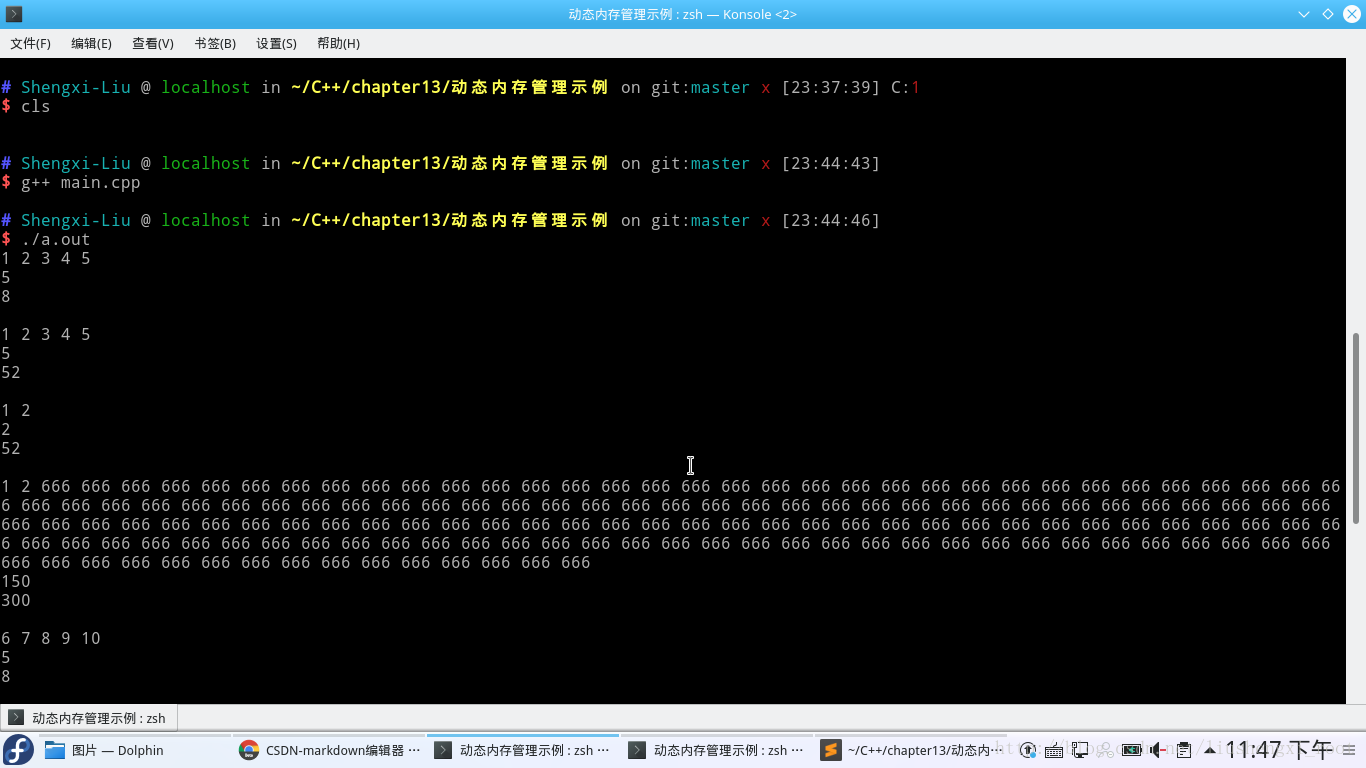
return 0 ;
}实现效果:
几个知识点的总结:
1.pair 模板 and uninitialized_copy和copy 的区别
std::pair<std::string * ,std::string *> StrVec::alloc_n_copy(const std::string *b,const std::string *e){
auto data = alloc.allocate( e - b ) ;
return { data ,uninitialized_copy(b,e,data)  } ;
}

copy 是依次调用重载的运算符=
uninitialized_copy是依次调用拷贝构造函数
如果目标区间是未初始化的,应该用uninitialized_copy, 否则用copy
2.lambda 表达式 and for_each
// for_each  and lambda Method
void StrVec::free(){
    if( elements ){
        for_each( elements , frist_free ,  [this]( std::string &p){
            alloc.destroy( &p ) ; // need you to look out !!!!!!
        } );
        alloc.deallocate( elements ,cap - elements ) ;
    }
}
这样写要比写成循环要好一点,它不需要担心顺序和递减,所以更直接和方便。而且比个也要高一点。使用这种方法唯一要做的就是添加“&”来构建指向字符串指针的指针。
3.移动构造函数和 std::move
for(size_t i= 0 ;i != size() ;i++){
        alloc.construct(dest++,std::move(*elem++)) ;
    }
std::move函数可以以非常简单的方式将左值引用转换为右值引用。
通过std::move,可以避免不必要的拷贝操作。
std::move是为性能而生。
std::move是将对象的状态或者所有权从一个对象转移到另一个对象,只是转移,没有内存的搬迁或者内存拷贝。
4. reserve and resize
1、resize(n)
调整容器的长度大小,使其能容纳n个元素。
如果n小于容器的当前的size,则删除多出来的元素。
否则,添加采用值初始化的元素。
2、 resize(n,t)
多一个参数t,将所有新添加的元素初始化为t。
而reserver()的用法只有一种
reserve(n)
预分配n个元素的存储空间。
了解这两个函数的区别,首先要搞清楚容器的capacity(容量)与size(长度)的区别。
size指容器当前拥有的元素个数;
而capacity则指容器在必须分配新存储空间之前可以存储的元素总数。也可以说是预分配存储空间的大小。
resize()函数和容器的size息息相关。调用resize(n)后,容器的size即为n。
至于是否影响capacity,取决于调整后的容器的size是否大于capacity。
reserve()函数和容器的capacity息息相关。
调用reserve(n)后,若容器的capacity小于 n,则重新分配内存空间,从而使得capacity等于n。
如果capacity>=n呢?capacity无变化。
从两个函数的用途可以发现,容器调用resize()函数后,所有的空间都已经初始化了,所以可以直接访问。
而reserve()函数预分配出的空间没有被初始化,所以不可访问。