ASP.NET MVC通过Model验证帮助我们很容易的实现对数据的验证,在默认的情况下,基于ValidationAttribute的声明是验证被使用,我们只需 要将相应的ValidationAttribute应用到Model的类型或者属性上即可。对于自定义验证,我们也只需要定义相应的Validation 就可以了,不过服务端验证比较简单,而客户端验证就要稍微复杂一些,本文提供一个简单的实例说明在ASP.NET MVC中实现自定义验证的基本步骤。[源代码从这里下载]
一、AgeRangeAttribute
用 于验证出生日期字段以确保年龄在制定的范围之内的AgeRangeAttribute定义如下,简单起见,我们直接让它直接继承自 RangeAttribute。服务端验证逻辑定义在重写的IsValid方法中,并且重写了FormatErrorMessage方法以便生成针对年龄 的验证消息。AgeRangeAttribute实现了IClientValidatable接口,并在实现的 GetClientValidationRules方法中生成客户端验证规则。在生成的类型为“agerange”的 ModelClientValidationRule 对象中包含三个参数(currentdate、minage和maxage),分别表示当前日期(用于计算年龄)、允许年龄的范围。
1: public class AgeRangeAttribute : RangeAttribute, IClientValidatable
2: {
3: public AgeRangeAttribute(int minimum, int maximum)
4: : base(minimum, maximum)
5: { }
6:
7: public override bool IsValid(object value)
8: {
9: DateTime birthDate = (DateTime)value;
10: DateTime age = new DateTime(DateTime.Now.Ticks - birthDate.Ticks);
11: return age.Year >= (int)this.Minimum && age.Year <= (int)this.Maximum;
12: }
13:
14: public override string FormatErrorMessage(string name)
15: {
16: return base.FormatErrorMessage("年龄");
17: }
18:
19: public IEnumerable<ModelClientValidationRule> GetClientValidationRules(ModelMetadata metadata, ControllerContext context)
20: {
21: ModelClientValidationRule validationRule = new ModelClientValidationRule(){ ValidationType = "agerange", ErrorMessage= FormatErrorMessage(metadata.DisplayName)};
22: validationRule.ValidationParameters.Add("currentdate",DateTime.Today.ToString("dd-MM-yyyy"));
23: validationRule.ValidationParameters.Add("minage",this.Minimum);
24: validationRule.ValidationParameters.Add("maxage",this.Maximum);
25: yield return validationRule;
26: }
27: }
二、注册客户端验证方法
由于ASP.NET MVC采用JQuery Validation进行客户端验证,我们可以通过如下的这段javascript来注册用于实现客户端验证的function和添加相应的 adapter。添加到jQuery.validator的用于进行年龄范围验证的function具有三个参数(value、element、 params)分别表示被验证的值、元素和传入的参数。验证逻辑必须的三个数值(当前日期、年龄范围最小和最大值)通过参数params获得。而该参数实 际上是在添加adapter时从通过上面定义的GetClientValidationRules方法生成的验证规则中获取的。
1: jQuery.validator.addMethod("agerange",
2: function (value, element, params) {
3:
4: var minAge = params.minage;
5: var maxAge = params.maxage;
6:
7: var literalCurrentDate = params.currentdate;
8: var literalBirthDate = value;
9: var literalCurrentDates = literalCurrentDate.split('-');
10: var literalBirthDates = literalBirthDate.split('-');
11:
12: var birthDate = new Date(literalBirthDates[2], literalBirthDates[1], literalBirthDates[0]);
13: var currentDate = new Date(literalCurrentDates[2], literalCurrentDates[1], literalCurrentDates[0]);
14: var age = currentDate.getFullYear() - birthDate.getFullYear();
15: return age >= minAge && age <= maxAge
16: });
17:
18: jQuery.validator.unobtrusive.adapters.add("agerange", ["currentdate", "minage", "maxage"], function (options) {
19: options.rules["agerange"] = {
20: currentdate: options.params.currentdate,
21: minage: options.params.minage,
22: maxage: options.params.maxage
23: };
24: options.messages["agerange"] = options.message;
25: });
三、AgeRangeAttribute的应用
现在我们将AgeRangeAttribute 应用到一个简单的ASP.NET MVC应用中。在通过VS的ASP.NET MVC项目模板创建的空Web应用中,我们定义了如下一个简单的Person类型,我们定义的AgeRangeAttribute 应用到了表示出生日期的BirthDate上,并将允许的年龄上、下限设置为18和30。
1: public class Person
2: {
3: [DisplayName("姓名")]
4: public string Name { get; set; }
5:
6: [AgeRange(18, 30, ErrorMessage = "{0}必须在{1}和{2}之间!")]
7: [DisplayName("出生日期")]
8: [DisplayFormat(ApplyFormatInEditMode = true, DataFormatString = "{0:dd-MM-yyyy}")]
9: public DateTime? BirthDate { get; set; }
10: }
然后我们添加如下一个HomeController,在默认的Action方法Index中我们将创建的Person对象呈现在默认的View中。
1: public class HomeController : Controller
2: {
3: public ActionResult Index()
4: {
5: return View(new Person{ BirthDate = DateTime.Today, Name = "Foo"});
6: }
7: [HttpPost]
8: public ActionResult Index(Person person)
9: {
10: return View(person);
11: }
12: }
如下所示的代码片断代表了View的定义,我们直接调用HtmlHelper<TModel>的扩展方法EditorModel将作为 Model的Person对象以编辑模式呈现在一个表单中。最后一点不要忘了在Layout文件中讲包含上述javascript片断的js文件包含进 来。
1: @model Person
2: @using (Html.BeginForm())
3: {
4: @Html.EditorForModel()
5: <input type="submit" value="Save" />
6: }
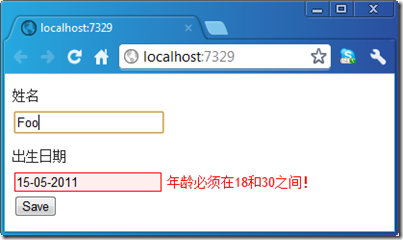
运行我们的程序,输入不合法出生日期并点击”Save”按钮提交表单(针对第一次客户端验证),客户端验证将会生效,具体效果如下图所示。
