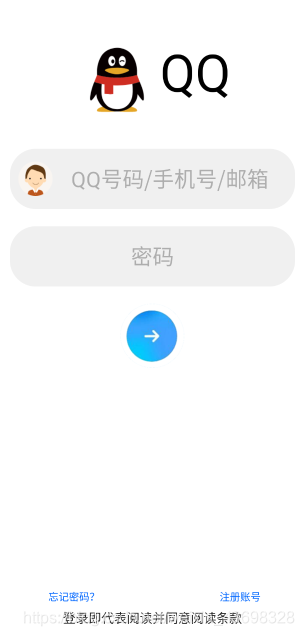
Android开发_1、QQ登陆界面
Preview

代码展示
<?xml version="1.0" encoding="utf-8"?>
<RelativeLayout
    xmlns:android="http://schemas.android.com/apk/res/android"
    xmlns:app="http://schemas.android.com/apk/res-auto"
    android:layout_width="match_parent"
    android:layout_height="match_parent"
    android:background="#ffffff">

    <LinearLayout
        android:layout_width="match_parent"
        android:layout_height="wrap_content"
        android:layout_marginTop="30dp"
        android:orientation="vertical"
        android:padding="30dp">

        <TextView
            android:id="@+id/QQ"
            android:layout_width="wrap_content"
            android:layout_height="wrap_content"
            android:layout_gravity="center"
            android:drawableLeft="@mipmap/qq"
            android:text="QQ"
            android:textColor="#000000"
            android:textSize="60sp" />

        <EditText
            android:id="@+id/Login_text"
            android:layout_width="match_parent"
            android:layout_height="match_parent"
            android:layout_marginTop="30dp"
            android:background="@drawable/textview_style"
            android:drawableLeft="@mipmap/head"
            android:gravity="center"
            android:hint="QQ号码/手机号/邮箱"
            android:textColorHint="#ADADAD"
            android:textSize="25dp" />

        <EditText
            android:id="@+id/Paasword"
            android:layout_width="match_parent"
            android:layout_height="match_parent"
            android:layout_marginTop="20dp"
            android:background="@drawable/textview_style"
            android:gravity="center"
            android:hint="密码"
            android:inputType="textPassword"
            android:textColorHint="#ADADAD"
            android:textSize="25dp" />

        <ImageButton
            android:id="@+id/enter_button"
            android:layout_width="match_parent"
            android:layout_height="wrap_content"
            android:layout_marginTop="20dp"
            android:background="#ffffff"
            app:srcCompat="@mipmap/circle" />
    </LinearLayout>
    <TextView
        android:layout_width="wrap_content"
        android:layout_height="23dp"
        android:layout_marginLeft="75dp"
        android:layout_above="@id/text_1"
        android:background="#ffffff"
        android:text="忘记密码?"
        android:textColor="#0066FF"
        android:textSize="12sp"
        android:typeface="normal" />
    <TextView
        android:id="@+id/button2"
        android:layout_width="wrap_content"
        android:layout_height="23dp"
        android:layout_alignParentRight="true"
        android:layout_marginRight="70dp"
        android:layout_above="@id/text_1"
        android:background="#ffffff"
        android:text="注册账号"
        android:textColor="#0066FF"
        android:textSize="12sp"
        android:typeface="normal" />


    <!--android:layout_alignParentBottom="true"-->
        <!--android:layout_marginBottom="56dp"-->


    <TextView
        android:id="@+id/text_1"
        android:layout_width="wrap_content"
        android:layout_height="23dp"
        android:layout_centerHorizontal="true"
        android:layout_alignParentBottom="true"
        android:layout_marginBottom="36dp"
        android:background="#ffffff"
        android:text="登录即代表阅读并同意阅读条款"
        android:textColor="#222222"
        android:textSize="15sp" />
</RelativeLayout>
相对布局(RelativeLayout)和线性布局(LinearLayout)
RelativeLayout详解传送门
LinearLayout详解传送门
首先外部是相对布局扩展全屏,然后是线性布局将几个widget框在里面
<RelativeLayout
    xmlns:android="http://schemas.android.com/apk/res/android"
    xmlns:app="http://schemas.android.com/apk/res-auto"
    android:layout_width="match_parent"
    android:layout_height="match_parent"
    android:background="#ffffff">
    <LinearLayout
        android:layout_width="match_parent"
        android:layout_height="wrap_content"
        android:layout_marginTop="30dp"
        android:orientation="vertical"
        android:padding="30dp">
     </LinearLayout>
</RelativeLayout>
加入widget
<TextView
            android:id="@+id/QQ"
            android:layout_width="wrap_content"
            android:layout_height="wrap_content"
            android:layout_gravity="center"
            android:drawableLeft="@mipmap/qq"
            android:text="QQ"
            android:textColor="#000000"
            android:textSize="60sp" />

        <EditText
            android:id="@+id/Login_text"
            android:layout_width="match_parent"
            android:layout_height="match_parent"
            android:layout_marginTop="30dp"
            android:background="@drawable/textview_style"
            android:drawableLeft="@mipmap/head"
            android:gravity="center"
            android:hint="QQ号码/手机号/邮箱"
            android:textColorHint="#ADADAD"
            android:textSize="25dp" />

        <EditText
            android:id="@+id/Paasword"
            android:layout_width="match_parent"
            android:layout_height="match_parent"
            android:layout_marginTop="20dp"
            android:background="@drawable/textview_style"
            android:gravity="center"
            android:hint="密码"
            android:inputType="textPassword"
            android:textColorHint="#ADADAD"
            android:textSize="25dp" />

        <ImageButton
            android:id="@+id/enter_button"
            android:layout_width="match_parent"
            android:layout_height="wrap_content"
            android:layout_marginTop="20dp"
            android:background="#ffffff"
            app:srcCompat="@mipmap/circle" />
线性布局后面加上其他的几个widget
	<TextView
        android:layout_width="wrap_content"
        android:layout_height="23dp"
        android:layout_marginLeft="75dp"
        android:layout_above="@id/text_1"
        android:background="#ffffff"
        android:text="忘记密码?"
        android:textColor="#0066FF"
        android:textSize="12sp"
        android:typeface="normal" />
    <TextView
        android:id="@+id/button2"
        android:layout_width="wrap_content"
        android:layout_height="23dp"
        android:layout_alignParentRight="true"
        android:layout_marginRight="70dp"
        android:layout_above="@id/text_1"
        android:background="#ffffff"
        android:text="注册账号"
        android:textColor="#0066FF"
        android:textSize="12sp"
        android:typeface="normal" />
    <TextView
        android:id="@+id/text_1"
        android:layout_width="wrap_content"
        android:layout_height="23dp"
        android:layout_centerHorizontal="true"
        android:layout_alignParentBottom="true"
        android:layout_marginBottom="36dp"
        android:background="#ffffff"
        android:text="登录即代表阅读并同意阅读条款"
        android:textColor="#222222"
        android:textSize="15sp" />
widget属性解释
密码框
		android:gravity="center"
        android:hint="密码"
        android:inputType="textPassword"
        android:textColorHint="#ADADAD"
- 文本隐藏:android:hint=“密码”
- 密码隐藏成 " · ":android:inputType=“textPassword”
底部TextView
预览如下

实现方式:就近原则(这里从下到上)
定义最下面的TextView
<TextView
        android:id="@+id/text_1"
        android:layout_width="wrap_content"
        android:layout_height="23dp"
        android:layout_centerHorizontal="true"
        android:layout_alignParentBottom="true"
        android:layout_marginBottom="36dp"
        android:background="#ffffff"
        android:text="登录即代表阅读并同意阅读条款"
        android:textColor="#222222"
        android:textSize="15sp" />
- 对齐在底部的请求 android:layout_alignParentBottom=“true”
- 相对于底部的距离 android:layout_marginBottom=“36dp”
定义 “忘记密码?”&“注册账号”
<TextView
        android:layout_width="wrap_content"
        android:layout_height="23dp"
        android:layout_marginLeft="75dp"
        android:layout_above="@id/text_1"
        android:background="#ffffff"
        android:text="忘记密码?"
        android:textColor="#0066FF"
        android:textSize="12sp"
        android:typeface="normal" />
    <TextView
        android:id="@+id/button2"
        android:layout_width="wrap_content"
        android:layout_height="23dp"
        android:layout_alignParentRight="true"
        android:layout_marginRight="70dp"
        android:layout_above="@id/text_1"
        android:background="#ffffff"
        android:text="注册账号"
        android:textColor="#0066FF"
        android:textSize="12sp"
        android:typeface="normal" />
以注册账号为对齐
- 忘记密码的左下对齐
		android:layout_marginLeft="75dp"
        android:layout_above="@id/text_1"
- 注册账号的右下对齐(默认为左上对齐,右对齐需要请求)
		android:layout_alignParentRight="true"
        android:layout_marginRight="70dp"
        android:layout_above="@id/text_1"
shape标签
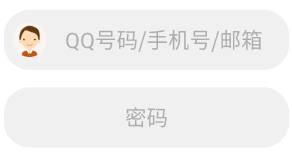
实现如下文本框为椭圆效果

- 在drawable里定义一个xml文件
<?xml version="1.0" encoding="utf-8"?>
<shape xmlns:android="http://schemas.android.com/apk/res/android">
    <solid android:color="#F0F0F0" />
    <corners android:radius="30dp" />
    <padding
        android:left="10dp"
        android:top="10dp"
        android:right="10dp"
        android:bottom="10dp" />
    <size
        android:height="70dp"
        />
</shape>
- 实现圆边效果
<corners android:radius="30dp" />