学习要打好基础,这里用一个项目来学习一下Android的组件,参考网址为这个但不限于这个。有些东西的学习,理解三遍理论还不如一遍操作,所谓理论来自实践,实践是检验真理的唯一标准。所以,虽然看懂了那篇文章,还是自己做一遍来加深理解。
1,cmd下面生成项目
mvn archetype:generate -DarchetypeArtifactId=android-quickstart -DarchetypeGroupId=de.akquinet.android.archetypes -DarchetypeVersion=1.0.11 -DgroupId=com.vanceinfo.android -DartifactId=CAIO
2, 导入项目至Kepler,新建一个类,然后Alt+Shift+S,选择Override/Implement Method, override onCreate(Bundle savedInstanceState),方法内容先不管它,去到项目的AndroidManifest.xml文件中,将<activity android:name=".HelloAndroidActivity" >改为<activity android:name=".SpinnerActivity" >,等下启动时就来到这个组件来显示,接着来到layout的文件夹中,新建一个叫spinner.xml文件,使用Graphic layout,先拖入linearLayout,然后拖一个label,一个spinner,还有一个button共四个组件进来,由eclipse自动为我们生成的xml如下:

<?xml version="1.0" encoding="utf-8"?>
<LinearLayout xmlns:android="http://schemas.android.com/apk/res/android"
    android:layout_width="fill_parent"
    android:layout_height="fill_parent"
    android:orientation="vertical" >

    <TextView
        android:id="@+id/label"
        android:layout_width="fill_parent"
        android:layout_height="wrap_content"
        android:text="下拉框1:"
    />

    <Spinner
        android:id="@+id/spinner1"
        android:layout_width="150dip"
        android:layout_height="wrap_content"
        android:drawSelectorOnTop="false"
    />

    <TextView
        android:id="@+id/label"
        android:layout_width="fill_parent"
        android:layout_height="wrap_content"
        android:text="下拉框2:"
    />

    <Spinner
        android:id="@+id/spinner2"
        android:layout_width="150dip"
        android:layout_height="wrap_content"
        android:drawSelectorOnTop="false"
    />

    <Button
        android:id="@+id/ok"
        android:layout_width="wrap_content"
        android:layout_height="wrap_content"
        android:text="@string/ok"
    />

</LinearLayout>
保存之后,重新回到刚刚的onCreate方法里,base下一行输入setContentView(R.layout.spinner);告诉程序我们要显示的是spinner这个组件。整个的程序源码应该是这样子:

package com.vanceinfo.android;

import java.util.ArrayList;
import java.util.List;

import android.app.Activity;
import android.os.Bundle;
import android.view.View;
import android.widget.AdapterView;
import android.widget.ArrayAdapter;
import android.widget.Button;
import android.widget.Spinner;

public class SpinnerActivity extends Activity {

    private Spinner spinner1;
    private Spinner spinner2;
    private Button ok;
    private ArrayAdapter countiesAdapter;
    private String[] mCounties={"beijing","guangdong","guangxi","hunan"};
    private List<String> allCounties=new ArrayList<String>();
    private String result="你选择的是:";


    @Override
    protected void onCreate(Bundle savedInstanceState) {
        super.onCreate(savedInstanceState);
        setContentView(R.layout.spinner);

        spinner1=(Spinner)findViewById(R.id.spinner1);
        spinner2=(Spinner)findViewById(R.id.spinner2);
        ok=(Button)findViewById(R.id.ok);

        for(int i=0;i<mCounties.length;i++){
            allCounties.add(mCounties[i]);
        }

        countiesAdapter=new ArrayAdapter<String>(SpinnerActivity.this,android.R.layout.simple_spinner_item,allCounties);
        countiesAdapter.setDropDownViewResource(android.R.layout.simple_spinner_dropdown_item);
        spinner1.setAdapter(countiesAdapter);

        ArrayAdapter adapter=ArrayAdapter.createFromResource(SpinnerActivity.this,R.array.counties,android.R.layout.simple_spinner_item);
        adapter.setDropDownViewResource(android.R.layout.simple_spinner_dropdown_item);
        spinner2.setAdapter(adapter);

        //单击第一个下拉按钮时,显示选择的值。
        spinner1.setOnItemSelectedListener(new AdapterView.OnItemSelectedListener() {

            /* (non-Javadoc)
             * @see android.widget.AdapterView.OnItemSelectedListener#onItemSelected(android.widget.AdapterView, android.view.View, int, long)
             */
            public void onItemSelected(AdapterView<?> adapter, View view,
                    int position, long id) {
                String str=(String)spinner1.getAdapter().getItem((int)id);
                setTitle(result+str);

            }

            /* (non-Javadoc)
             * @see android.widget.AdapterView.OnItemSelectedListener#onNothingSelected(android.widget.AdapterView)
             */
            public void onNothingSelected(AdapterView<?> arg0) {

            }


        });

        //单击第二个下拉按钮时,显示选择的值。
        spinner2.setOnItemSelectedListener(new AdapterView.OnItemSelectedListener() {

            /* (non-Javadoc)
             * @see android.widget.AdapterView.OnItemSelectedListener#onItemSelected(android.widget.AdapterView, android.view.View, int, long)
             */
            public void onItemSelected(AdapterView<?> adapter, View view,
                    int position, long id) {
                String str=(String)spinner2.getAdapter().getItem(position);
                setTitle(result+str);
            }

            /* (non-Javadoc)
             * @see android.widget.AdapterView.OnItemSelectedListener#onNothingSelected(android.widget.AdapterView)
             */
            public void onNothingSelected(AdapterView<?> arg0) {
                // TODO Auto-generated method stub

            }
        });


        //单击确定按钮,提取选择的值.
        ok.setOnClickListener(new View.OnClickListener() {
            public void onClick(View v) {
                setTitle(result+spinner1.getSelectedItem()+"  - >>  "+spinner2.getSelectedItem());
            }
        });

    }

}
因为我们演示的第二个下拉框的值是在外部定义的,所以,在values文件夹下加入arrays.xml,内容如下:

<?xml version="1.0" encoding="utf-8"?>
<resources>
    <string-array name="counties">
        <item>AAA</item>
        <item>BBB</item>
        <item>CCC</item>
        <item>DDD</item>
        <item>EEE</item>
    </string-array>
</resources>
在string.xml中加入一条
<string name="ok">确定</string>
最后编译,即可将apk放入模拟器运行了。不过很让我伤心纠结的是Run as Android Application是运行不起来的,Debug as Android Application也是运行不起来,从logCat看到错误是Maven将我的apk名字变了,变成了好象groupId -1....apk. 整了一个下午都没有找到解决方法。实在无奈,先暂时用模拟器运行着吧。

09-14 11:17:17.993: E/AndroidRuntime(436): java.lang.RuntimeException: Unable to instantiate activity ComponentInfo{com.vanceinfo.android/com.vanceinfo.android.SpinnerActivity}: java.lang.ClassNotFoundException: com.vanceinfo.android.SpinnerActivity in loader dalvik.system.PathClassLoader[/data/app/com.vanceinfo.android-1.apk]
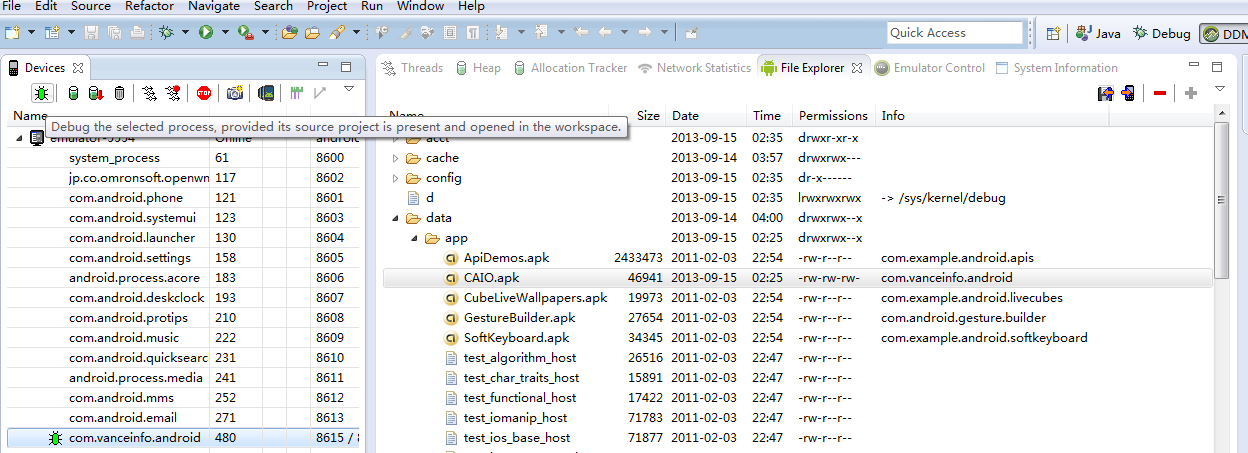
不过,作为开发人员,不能调试,终究是件不太能放心的事情,好吧,我就用DDMS来调吧,方法是启动模拟器,来到Kepler中打上断点,切换至DDMS,选择要调试的进程,然后你在模拟器中的操作,就会绿条到代码的断点处了。我还是截个图示吧

上图的绿虫说明就是我将要调试的进程了。
以上说了这么多,就是为了将这个下拉框展示出来 ,其实我个人的理解是如果对Java的Swing很了解的话,对于Android组件开发就很简单了。单单就这个下拉框 来说注意android.widget.ArrayAdapter的实例化就是关键,我们这里使用的一个是常见的直接new,另一个就是使用其静态方法createFromResource,另外android.R.layout.下面还有一些自动生成的属性,要根据情况善于利用,需要注意的是一定要打全android.R.layout,如果你为省事而少打前面那个android,估计你就等着郁闷为什么会没有吧。
3,创建4种类型的对话框,新建一个AlertDialogActivity,并去到AndroidMainifest.xml中更改启动的组件为这个,而不是2中的spinner. 接着新建一个alertdialog.xml和alertdialog_text_entry.xml。最后去到string.xml里添加

    <string name="alert_button1">有两个button的对话框1</string>
    <string name="alert_button2">有三个button的对话框2</string>
    <string name="alert_button3">能进行输入的对话框3</string>
    <string name="alert_button4">进度框</string>
如果使用Eclipse创建xml的话是有好处的,有很多可视化的操作,单击那个带+号的a按钮即可
写对话框的API,主要是android.app.AlertDialog.Builder,他有setPositiveButton针对于确定,setNeutralButton可针对于详情,还有setNegativeButton针对于当用户按取消时对应的按钮。注册他们的单击事件即可完成功能。
还有android.app.ProgressDialog也可用于对话框,主要用在当一些需长时间运行,给用户一个提示:正在处理中,请稍后。。。
全部源码:

package com.vanceinfo.android;

import android.app.Activity;
import android.app.AlertDialog;
import android.app.AlertDialog.Builder;
import android.app.ProgressDialog;
import android.content.DialogInterface;
import android.os.Bundle;
import android.view.LayoutInflater;
import android.view.View;
import android.widget.Button;
import android.widget.EditText;
import android.widget.Toast;

public class AlertDialogActivity extends Activity {

    private Button button1;
    private Button button2;
    private Button button3;
    private Button button4;

    /* (non-Javadoc)
     * @see android.app.Activity#onCreate(android.os.Bundle)
     */
    @Override
    protected void onCreate(Bundle savedInstanceState) {
        super.onCreate(savedInstanceState);
        setContentView(R.layout.alertdialog);
        setTitle("4种对话框");

        button1=(Button)findViewById(R.id.button1);
        button2=(Button)findViewById(R.id.button2);
        button3=(Button)findViewById(R.id.button3);
        button4=(Button)findViewById(R.id.button4);

        button1.setOnClickListener(new View.OnClickListener() {

            public void onClick(View v) {
                Builder builder= new AlertDialog.Builder(AlertDialogActivity.this);
                builder.setIcon(R.drawable.ic_launcher);
                builder.setTitle("哇哈哈!");
                builder.setMessage("去不去?");
                builder.setPositiveButton("确定", new DialogInterface.OnClickListener() {

                    public void onClick(DialogInterface dialog, int which) {
                        Toast.makeText(AlertDialogActivity.this, "你选择了确定按钮!", Toast.LENGTH_SHORT).show();
                    }
                });
                builder.setNegativeButton("取消", new DialogInterface.OnClickListener() {
                    public void onClick(DialogInterface dialog, int which) {
                        Toast.makeText(AlertDialogActivity.this, "你选择了取消按钮!", Toast.LENGTH_SHORT).show();
                    }
                });
                builder.show();
            }
        });

        button2.setOnClickListener(new View.OnClickListener() {
            public void onClick(View v) {
                new AlertDialog.Builder(AlertDialogActivity.this)
                .setIcon(R.drawable.ic_launcher)
                .setTitle("温馨提示")
                .setMessage("提示内容:三个按钮")
                .setPositiveButton("确定", new DialogInterface.OnClickListener() {
                    public void onClick(DialogInterface dialog, int which) {
                        Toast.makeText(AlertDialogActivity.this, "你选择了确定按钮!", Toast.LENGTH_SHORT).show();
                    }
                })
                .setNeutralButton("详情", new DialogInterface.OnClickListener() {
                    public void onClick(DialogInterface dialog, int which) {
                        Toast.makeText(AlertDialogActivity.this, "你选择了详情按钮!", Toast.LENGTH_SHORT).show();
                    }
                })
                .setNegativeButton("取消", new DialogInterface.OnClickListener() {
                    public void onClick(DialogInterface dialog, int which) {
                        Toast.makeText(AlertDialogActivity.this, "你选择了取消按钮!", Toast.LENGTH_SHORT).show();
                    }
                })
                .show();
            }
        });

        button3.setOnClickListener(new View.OnClickListener() {
            public void onClick(View v) {
                LayoutInflater inflater=LayoutInflater.from(AlertDialogActivity.this);
                final View textEntryView=inflater.inflate(R.layout.alertdialog_text_entry, null);

                final EditText usernameET=(EditText)textEntryView.findViewById(R.id.username_value);
                final EditText passwordET=(EditText)textEntryView.findViewById(R.id.password_value);
                //final String username=usernameET.getText().toString();

                new AlertDialog.Builder(AlertDialogActivity.this)
                .setIcon(R.drawable.ic_launcher)
                .setTitle("温馨提醒")
                .setView(textEntryView)
                .setPositiveButton("确定", new DialogInterface.OnClickListener() {
                    public void onClick(DialogInterface dialog, int which) {
                        Toast.makeText(AlertDialogActivity.this, "用户名="+usernameET.getText().toString()+"
密码="+passwordET.getText().toString(), Toast.LENGTH_LONG).show();
                    }
                })
                .setNegativeButton("取消", new DialogInterface.OnClickListener() {
                    public void onClick(DialogInterface dialog, int which) {
                        Toast.makeText(AlertDialogActivity.this, "你选择了确定取消!", Toast.LENGTH_SHORT).show();
                    }
                })
                .show();
            }
        });

        button4.setOnClickListener(new View.OnClickListener() {
            public void onClick(View v) {
                ProgressDialog dialog=new ProgressDialog(AlertDialogActivity.this);
                dialog.setTitle("处理中。。。");
                dialog.setMessage("请稍后。。。");
                dialog.show();
            }
        });
    }

}

<?xml version="1.0" encoding="utf-8"?>
<LinearLayout xmlns:android="http://schemas.android.com/apk/res/android"
    xmlns:tools="http://schemas.android.com/tools"
    android:layout_width="match_parent"
    android:layout_height="match_parent"
    android:orientation="vertical"
    tools:context=".AlertDialogActivity" >

    <Button
        android:id="@+id/button1"
        android:layout_width="wrap_content"
        android:layout_height="wrap_content"
        android:text="@string/alert_button1" />

    <Button
        android:id="@+id/button2"
        android:layout_width="wrap_content"
        android:layout_height="wrap_content"
        android:text="@string/alert_button2" />

    <Button
        android:id="@+id/button3"
        android:layout_width="wrap_content"
        android:layout_height="wrap_content"
        android:text="@string/alert_button3" />

    <Button
        android:id="@+id/button4"
        android:layout_width="wrap_content"
        android:layout_height="wrap_content"
        android:text="@string/alert_button4" />

</LinearLayout>

<?xml version="1.0" encoding="utf-8"?>

<LinearLayout
    xmlns:android="http://schemas.android.com/apk/res/android"
    android:layout_width="fill_parent"
    android:layout_height="fill_parent"
    android:orientation="vertical"
    >

    <TextView
        android:id="@+id/username_text"
        android:layout_width="wrap_content"
        android:layout_height="wrap_content"
        android:layout_marginLeft="20dip"
        android:layout_marginRight="20dip"
        android:text="输 入 用 户 名"
        android:textAppearance="?android:attr/textAppearanceMedium"/>

    <EditText
        android:id="@+id/username_value"
        android:layout_width="fill_parent"
        android:layout_height="wrap_content"
        android:text=""
        android:capitalize="none"
        android:layout_marginLeft="20dip"
        android:layout_marginRight="20dip"
        android:textAppearance="?android:attr/textAppearanceMedium"/>

    <TextView
        android:id="@+id/password_text"
        android:layout_width="wrap_content"
        android:layout_height="wrap_content"
        android:text="输 入 你 密 码"
        android:layout_marginLeft="20dip"
        android:layout_marginRight="20dip"
        android:textAppearance="?android:attr/textAppearanceMedium"/>

    <EditText
        android:id="@+id/password_value"
        android:layout_width="fill_parent"
        android:layout_height="wrap_content"
        android:text=""
        android:password="true"
        android:layout_marginLeft="20dip"
        android:layout_marginRight="20dip"
        android:textAppearance="?android:attr/textAppearanceMedium"/>

</LinearLayout>
4,看到了吧,我每新加一个activity就要去更改一下androidmainifest.xml。为什么不创建一个主界面了,然后由主界面去到各个小界面?所以,我们就创建一个叫MainActivity的组,该组件就两个button按钮,两个Activity之间的通讯靠的就是android.content.Intent,所以,当单击的时候,我们新建这个Intent,举个例子

spinner.setOnClickListener(new View.OnClickListener() {
                public void onClick(View v) {
                    Intent intent=new Intent();
                    intent.setClass(MainActivity.this, SpinnerActivity.class);
                    startActivity(intent);
                }
            });
新建main.xml至res/layout下面

<?xml version="1.0" encoding="utf-8"?>
<LinearLayout xmlns:android="http://schemas.android.com/apk/res/android"
    android:layout_width="match_parent"
    android:layout_height="match_parent"
    android:orientation="vertical" >

    <ScrollView
        android:id="@+id/scrollView1"
        android:layout_width="match_parent"
        android:layout_height="match_parent" >

        <LinearLayout
            android:layout_width="match_parent"
            android:layout_height="match_parent"
            android:orientation="vertical" >

            <LinearLayout
                android:layout_width="match_parent"
                android:layout_height="wrap_content"
                android:layout_weight="17.10"
                android:orientation="vertical" >

                <Button
                    android:id="@+id/spinner"
                    android:layout_width="wrap_content"
                    android:layout_height="wrap_content"
                    android:text="@string/spinner" />

                <Button
                    android:id="@+id/alertDialog"
                    android:layout_width="wrap_content"
                    android:layout_height="wrap_content"
                    android:text="@string/alertDialog" />
            </LinearLayout>
        </LinearLayout>
    </ScrollView>

</LinearLayout>
由于在main.xml中使用了两个变量,所以在string.xml又加上两个变量:

<string name="spinner">Spinner下拉框</string>
<string name="alertDialog">4种AlertDialog</string>
最后就是更改AndroidManifest.xml,将首次更改为.MainActivity,并且还将原来的那两个加上去
        <activity android:name=".SpinnerActivity"/>
        <activity android:name=".AlertDialogActivity"></activity>
如此一来,再附上完整的MainActivity源码,就可以运行了。

package com.vanceinfo.android;

import android.app.Activity;
import android.content.Intent;
import android.os.Bundle;
import android.view.View;
import android.widget.Button;

public class MainActivity extends Activity {
    private Button spinner;
    private Button alertDialog;
    /* (non-Javadoc)
     * @see android.app.Activity#onCreate(android.os.Bundle)
     */
    @Override
    protected void onCreate(Bundle savedInstanceState) {
        super.onCreate(savedInstanceState);
        setContentView(R.layout.main);
        spinner=(Button)findViewById(R.id.spinner);
        alertDialog=(Button)findViewById(R.id.alertDialog);

         spinner.setOnClickListener(new View.OnClickListener() {
                public void onClick(View v) {
                    Intent intent=new Intent();
                    intent.setClass(MainActivity.this, SpinnerActivity.class);
                    startActivity(intent);
                }
            });

         alertDialog.setOnClickListener(new View.OnClickListener() {
                public void onClick(View v) {
                    Intent intent=new Intent();
                    intent.setClass(MainActivity.this, AlertDialogActivity.class);
                    startActivity(intent);
                }
            });
    }
}
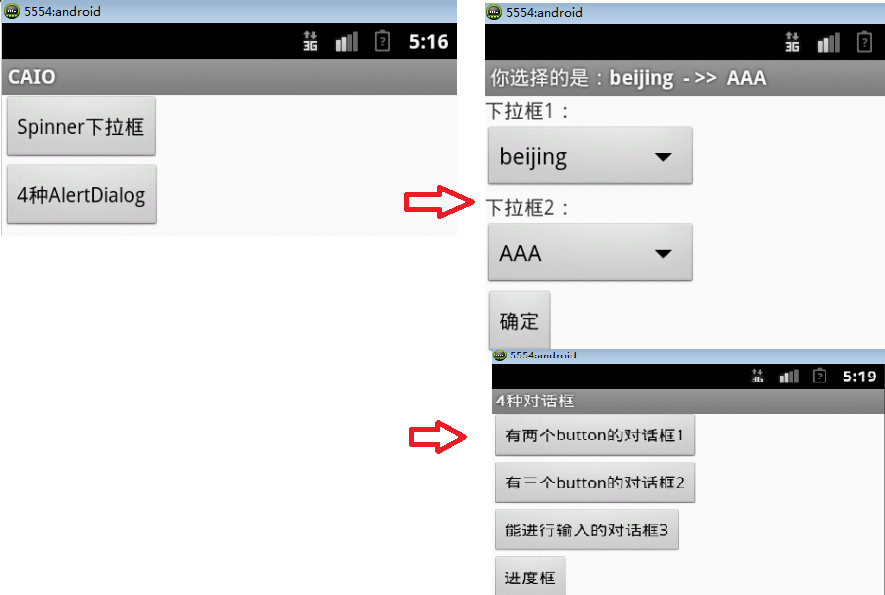
最终运行图应该像下面这样子

5,以上,关于如何实现这个项目,大部分就是按照这个套路来完成的。再写也是一些复制粘贴源码,还不如直接上传我的源码在这里。由于源码里面注释都很多,推荐下载这份源码以学习Android组件开发。
