什么是注解
注解是代码特殊标记, 用于简化xml配置, 格式为: @注解名称(属性1=值1, 属性2=值2...), 注解作用在类, 方法或属性上面.
Spring针对Bean管理中创建对象提供以下4个注解:
- @Component
- @Service
- @Controller
- @Repository
*上面四个注解的功能是一样的, 都可以用来创建bean实例
使用实例:
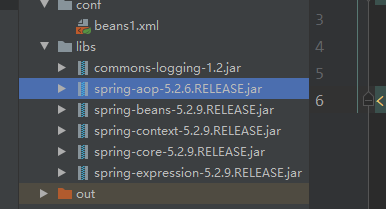
1.导入spring-aop-5.2.6.RELEASE.jar并引入:

2.开启组件扫描(选择需要使用注解的包) 分两步: 引入context名称空间 -> 设置要扫描的包
<?xml version="1.0" encoding="UTF-8"?>
<beans xmlns="http://www.springframework.org/schema/beans"
       xmlns:xsi="http://www.w3.org/2001/XMLSchema-instance"
       xmlns:context="http://www.springframework.org/schema/context"
       xsi:schemaLocation="http://www.springframework.org/schema/beans http://www.springframework.org/schema/beans/spring-beans.xsd
                           http://www.springframework.org/schema/context http://www.springframework.org/schema/context/spring-context.xsd">

    <!--开启组件扫描, 要扫描多个包则用逗号隔开-->
    <context:component-scan base-package="com.ryan.spring5.annotation"></context:component-scan>
</beans>
3.创建类, 在类上面添加创建对象注解
@Component(value = "user")
public class User {
    public void sayhi(){
        System.out.println("Hello~~~ from User");
    }
}
*可以在注解后面的括号中通过value的值指定创建的对象的对象名, 若不写则默认对象名为类名小写
4.测试

关于细节的一些说明:
一. 自主设置扫描对象: 上例中, 我们在xml文件通过<context:component-scan base-package="com.ryan.spring5.annotation"></context:component-scan>来设置扫描annotation包下的所有文件, 若要设置具体扫描包下的哪些文件, 可以通过设置 use-default-filters="false", 并指定注解名来设置只扫描该包下添加了此注解的文件, 实例:
    <!--设置只监听特定注解的内容-->
    <context:component-scan base-package="com.ryan.spring5.annotation" use-default-filters="false">
        <context:include-filter type="annotation" expression="org.springframework.stereotype.Component"/>
    </context:component-scan>
同样的, 也可以通过exclude-filter来设置不扫描该包下的哪些注解, 例如:
    <!--设置不监听特定注解的内容-->
    <context:component-scan base-package="com.ryan.spring5.annotation">
        <context:exclude-filter type="annotation" expression="org.springframework.stereotype.Controller"/>
    </context:component-scan>
*注意不设置use-default-filters="false", 说明还是要用默认方式来设置监听内容
二. 使用注解注入属性: 有四种方式:
- @Autowired: 根据属性类型进行自动装配
- @Qualifier: 根据属性名称进行注入
- @Resource: 可以根据类型注入, 可以根据名称注入
- @Value: 注入普通类型属性
接上例演示@Autowired使用:
新建Dao类:
@Component
public class Dao {
    public void sayhi(){
        System.out.println("Hello~~~ from Dao");
    }
}
在User中使用@Autowired注入Dao类型的属性:
@Component(value = "user")
public class User {

    //定义Dao类型属性, 不需要添加set方法, 然后添加注入属性的注解
    @Autowired
    private Dao dao;

    public void sayhi(){
        System.out.println("Hello~~~ from User");
        dao.sayhi();
    }
}
测试:

@Qualifier需要与@Autowired一起使用, 用于有多个相同类型的类时(比如多个类实现了同一个接口)指定特定的类:
@Component(value = "user")
public class User {

    //定义Dao类型属性, 不需要添加set方法, 然后添加注入属性的注解
    @Autowired //根据类型进行注入
    @Qualifier(value = "dao") //有多个相同类型的对象时, 通过名称指定
    private Dao dao;

    public void sayhi(){
        System.out.println("Hello~~~ from User");
        dao.sayhi();
    }
}
@Resource既可以按属性注入, 也可以按名称注入:
@Component(value = "user")
public class User {
//   @Resource //@Resource按属性注入
      @Resource(name = "dao") //@Resource按名称注入, 两个@Resource不能同时存在
    private Dao dao;

    public void sayhi(){
        System.out.println("Hello~~~ from User");
        dao.sayhi();
    }
}
@Value用于注入普通类型属性:

三. 完全注解开发:可以使用配置类代替配置文件, 从而使用纯注解来写代码(一般使用在SpringBoot中):
新建SpringConfig类并添加注解, 以代替原来的xml文件:
package com.ryan.spring5.annotation;

import org.springframework.context.annotation.ComponentScan;
import org.springframework.context.annotation.Configuration;

@Configuration //作为配置类, 代替xml配置文件
@ComponentScan(basePackages = "com.ryan.spring5.annotation")
public class SpringConfig{

}
改写测试程序:
public class Test2 {
    public static void main(String[] args) {
        ApplicationContext context = new AnnotationConfigApplicationContext(SpringConfig.class);
        User user = context.getBean("user", User.class);

        user.sayhi();
    }
}
测试:
