1、系统要求
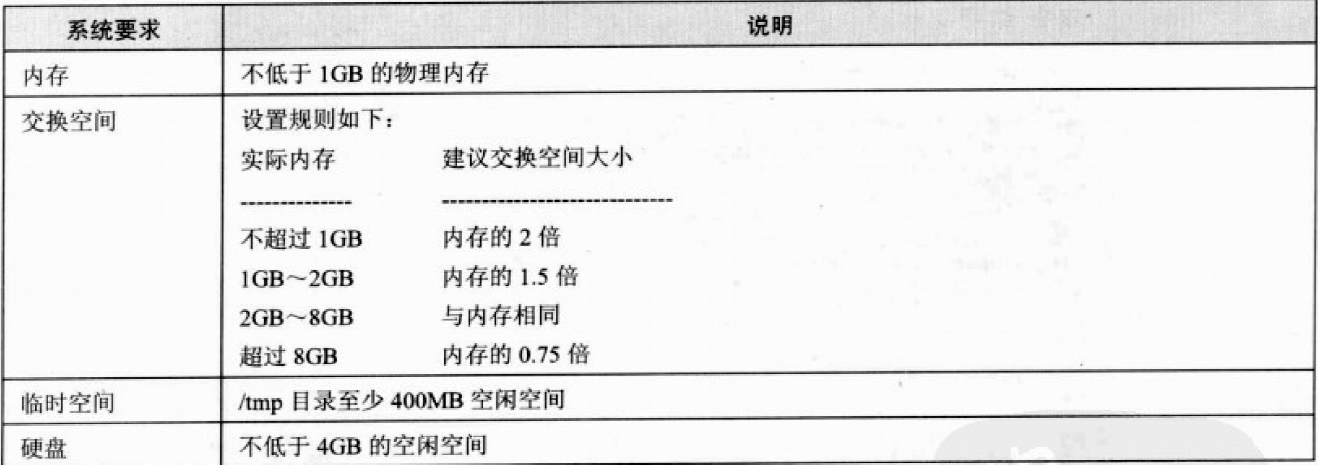
2、检查环境
2.1、检查物理内存:
[root@kindo-dev-03 ~]# grep MemTotal /proc/meminfo
MemTotal:       16267584 kB
2.2、检查交换空间:
[root@kindo-dev-03 ~]# grep SwapTotal /proc/meminfo
SwapTotal:       8257532 kB
2.3、检查/tmp目录:
[root@kindo-dev-03 ~]# df -k /tmp
文件系统                   1K-块     已用     可用 已用% 挂载点
/dev/mapper/centos-root 52403200 19115248 33287952   37% /
2.4、检查磁盘空闲空间:
[root@kindo-dev3 ~]# df -k
Filesystem     1K-blocks      Used Available Use% Mounted on
/dev/sda2      738582560 524725152 176332928  75% /
tmpfs            8233208   4316304   3916904  53% /dev/shm
/dev/sda1        1998672     72568   1821248   4% /boot
/dev/sda3       51513972     76940  48813544   1% /home
2.5、查看linux内核的版本:
[root@kindo-dev-03 ~]# uname -i
x86_64
[root@kindo-dev-03 ~]# uname -r
3.10.0-693.el7.x86_64
[root@kindo-dev-03 ~]# uname -a
Linux kindo-dev-03 3.10.0-693.el7.x86_64 #1 SMP Tue Aug 22 21:09:27 UTC 2017 x86_64 x86_64 x86_64 GNU/Linux
[root@kindo-dev-03 ~]# cat /proc/version
Linux version 3.10.0-693.el7.x86_64 (builder@kbuilder.dev.centos.org) (gcc version 4.8.5 20150623 (Red Hat 4.8.5-16) (GCC) ) #1 SMP Tue Aug 22 21:09:27 UTC 2017
2.6、查看linux系统版本:
lsb_release -a适用于所有的linux版本,包括Centos、RedHat、SUSE、Debian...等
先安装redhat-lsb:
[root@kindo-dev-03 ~]# yum install -y redhat-lsb

[root@kindo-dev-03 ~]# lsb_release -a
LSB Version:    :core-4.1-amd64:core-4.1-noarch:cxx-4.1-amd64:cxx-4.1-noarch:desktop-4.1-amd64:desktop-4.1-noarch:languages-4.1-amd64:languages-4.1-noarch:printing-4.1-amd64:printing-4.1-noarch
Distributor ID:    n/a
Description:    redhat-7
Release:    n/a
Codename:    n/a
cat /etc/redhat-release,这种方法只适合Redhat系的Linux:
[root@kindo-dev-03 ~]# cat /etc/redhat-release
redhat-7
cat /etc/issue:
[root@kindo-dev3 ~]# cat /etc/issue
CentOS release 6.10 (Final)
Kernel
 on an m
2.7、cat /proc/cpuinfo(Linux查看cpu相关信息,包括型号、主频、内核信息等):


[root@kindo-dev-03 ~]# cat /proc/cpuinfo
processor    : 0
vendor_id    : GenuineIntel
cpu family    : 6
model        : 85
model name    : Intel(R) Xeon(R) Silver 4216 CPU @ 2.10GHz
stepping    : 7
microcode    : 0x5002f01
cpu MHz        : 2094.023
cache size    : 22528 KB
physical id    : 0
siblings    : 4
core id        : 0
cpu cores    : 4
apicid        : 0
initial apicid    : 0
fpu        : yes
fpu_exception    : yes
cpuid level    : 22
wp        : yes
flags        : fpu vme de pse tsc msr pae mce cx8 apic sep mtrr pge mca cmov pat pse36 clflush dts mmx fxsr sse sse2 ss ht syscall nx pdpe1gb rdtscp lm constant_tsc arch_perfmon pebs bts nopl xtopology tsc_reliable nonstop_tsc eagerfpu pni pclmulqdq ssse3 fma cx16 pcid sse4_1 sse4_2 x2apic movbe popcnt tsc_deadline_timer aes xsave avx f16c rdrand hypervisor lahf_lm abm 3dnowprefetch fsgsbase tsc_adjust bmi1 hle avx2 smep bmi2 invpcid rtm rdseed adx smap xsaveopt arat
bogomips    : 4190.15
clflush size    : 64
cache_alignment    : 64
address sizes    : 42 bits physical, 48 bits virtual
power management:
3、配置安装环境
3.1、各种oracle版本需要的linux依赖包(来源于oracle11g官方文档)
3.1.1、Operating System Requirements
The following operating system versions (or later) are required for Oracle Database 11g Release 2 (11.2):
On Linux x86:
    Asianux Server 3 SP2
    Asianux Server 4 SP3
    Oracle Linux 4 Update 7
    Oracle Linux 5 Update 2
    Oracle Linux 6
    Red Hat Enterprise Linux 4 Update 7
    Red Hat Enterprise Linux 5 Update 2
    Red Hat Enterprise Linux 6
    SUSE Linux Enterprise Server 10 SP2
    SUSE Linux Enterprise Server 11

On Linux x86-64:
    Asianux Server 3 SP2
    Asianux Server 4 SP3
    Oracle Linux 4 Update 7
    Oracle Linux 5 Update 2 (with Red Hat Compatible Kernel)
    Oracle Linux 5 Update 5
    Oracle Linux 6
    Oracle Linux 6 (with Red Hat Compatible Kernel)
    Oracle Linux 7
    Oracle Linux 7 (with Red Hat Compatible Kernel)
    Red Hat Enterprise Linux 4 Update 7
    Red Hat Enterprise Linux 5 Update 2
    Red Hat Enterprise Linux 6
    Red Hat Enterprise Linux 7
    SUSE Linux Enterprise Server 10 SP2
    SUSE Linux Enterprise Server 11
    SUSE Linux Enterprise Server 12 SP1
    NeoKylin Linux Advanced Server 6
    NeoKylin Linux Advanced Server 7

On IBM: Linux on System z:
    Red Hat Enterprise Linux 7 Update 1
    Red Hat Enterprise Linux 6 Update 2
    Red Hat Enterprise Linux 4 Update 8
    Red Hat Enterprise Linux 5 Update 4
    SUSE Linux Enterprise Server 10 SP3
    SUSE Linux Enterprise Server 11 SP1
3.1.2、Kernel Requirements
The following are the kernel requirements for Oracle Database 11g Release 2 (11.2):
For Linux x86:
   On  Oracle Linux 4 and Red Hat Enterprise Linux 4
      2.6.9 or later
   On  Asianux Server 3, Oracle Linux 5, and Red Hat Enterprise Linux 5
      2.6.18 or later
   On  Oracle Linux 6
      2.6.32.100 or later
   On  Asianux Server 4 and Red Hat Enterprise Linux 6
      2.6.32-71 or later
   On  SUSE Linux Enterprise Server 10
      2.6.16.21 or later
   On  SUSE Linux Enterprise Server 11
      2.6.27.19 or later

For Linux x86-64:
   On  Oracle Linux 4 and Red Hat Enterprise Linux 4
      2.6.9 or later
   On  Oracle Linux 5 Update 2 with Red Hat Compatible Kernel
      2.6.18 or later
   On  Oracle Linux 5 Update 5 with Red Hat Compatible Kernel
      2.6.18 or later
   On  Oracle Linux 5 Update 5 with Unbreakable Enterprise Kernel
      2.6.32-100.0.19 or later
   On  Oracle Linux 6
      2.6.32-100.28.5.el6.x86_64 or later
   On  Oracle Linux 6 with Red Hat Compatible Kernel
      2.6.32-71.el6.x86_64 or later
   On  Oracle Linux 7
      3.8.13-33.el7uek.x86_64 or later
   On  Oracle Linux 7 with Red Hat Compatible Kernel
      3.10.0-54.0.1.el7.x86_64 or later
   On  Red Hat Enterprise Linux 5 Update 2
      2.6.18 or later
   On  Red Hat Enterprise Linux 5 Update 5
      2.6.18 or later
   On  Red Hat Enterprise Linux 6
      2.6.32-71.el6.x86_64 or later
   On  Red Hat Enterprise Linux 7
      3.10.0-54.0.1.el7.x86_64 or later
   On  Asianux Server 3
      2.6.18 or later
   On  Asianux Server 4
      2.6.32-71.el6.x86_64 or later
   On  SUSE Linux Enterprise Server 10
      2.6.16.21 or later
   On  SUSE Linux Enterprise Server 11
      2.6.27.19 or later
   On  SUSE Linux Enterprise Server 12
      3.12.49-11 or later
   On  NeoKylin Linux Advanced Server 6
      2.6.32-431.el6.x86_64 or later
   On  NeoKylin Linux Advanced Server 7
      3.10.0-327.el7.x86_64 or later

For IBM: Linux On System z:
   On  Red Hat Enterprise Linux 7
      3.10.0-229.el7 or later
   On  Red Hat Enterprise Linux 6
      2.6.32-200 or later
   On  Red Hat Enterprise Linux 4
      2.6.9 or later
   On  Red Hat Enterprise Linux 5
      2.6.18 or later
   On  SUSE Linux Enterprise Server 10
      2.6.16.60 or later
   On  SUSE Linux Enterprise Server 11
      2.6.32.12 or later
3.1.3、Package Requirements
The following are the list of packages required for Oracle Database 11g Release 2 (11.2):
3.1.3.1、Oracle Database Package Requirements for Linux x86
The following packages (or later versions) must be installed。
3.1.3.1.1、Oracle Linux 4 and Red Hat Enterprise Linux 4
binutils-2.15.92.0.2
compat-libstdc++-33-3.2.3
elfutils-libelf-0.97
elfutils-libelf-devel-0.97
gcc-3.4.6
gcc-c++-3.4.6
glibc-2.3.4-2.41
glibc-common-2.3.4
glibc-devel-2.3.4
glibc-headers-2.3.4
libaio-devel-0.3.105
libaio-0.3.105
libgcc-3.4.6
libstdc++-3.4.6
libstdc++-devel-3.4.6
make-3.80
numactl-0.6.4.i386
pdksh-5.2.14
sysstat-5.0.5
3.1.3.1.2、Asianux Server 3, Oracle Linux 5, and Red Hat Enterprise Linux 5
binutils-2.17.50.0.6
compat-libstdc++-33-3.2.3
elfutils-libelf-0.125
elfutils-libelf-devel-0.125
elfutils-libelf-devel-static-0.125
gcc-4.1.2
gcc-c++-4.1.2
glibc-2.5-24
glibc-common-2.5
glibc-devel-2.5
glibc-headers-2.5
kernel-headers-2.6.18
ksh-20060214
libaio-0.3.106
libaio-devel-0.3.106
libgcc-4.1.2
libgomp-4.1.2
libstdc++-4.1.2
libstdc++-devel-4.1.2
make-3.81
sysstat-7.0.2
3.1.3.1.3、Oracle Linux 6, Red Hat Enterprise Linux 6 and Asianux Server 4
binutils-2.20.51.0.2-5.11.el6.i686
compat-libcap1-1.10-1.i686
compat-libstdc++-33-3.2.3-69.el6.i686
gcc-4.4.4-13.el6.i686
gcc-c++-4.4.4-13.el6.i686
glibc-2.12-1.7.el6.i686
glibc-devel-2.12-1.7.el6.i686
ksh
libgcc-4.4.4-13.el6.i686
libstdc++-4.4.4-13.el6.i686
libstdc++-devel-4.4.4-13.el6.i686
libaio-0.3.107-10.el6.i686
libaio-devel-0.3.107-10.el6.i686
make-3.81-19.el6.i686
sysstat-9.0.4-11.el6.i686
链接:https://pan.baidu.com/s/1lXKjrAHtAbIa-yJBs5P8OA 提取码:ta2v
3.1.3.1.4、SUSE Linux Enterprise Server 10
binutils-2.16.91.0.5
compat-libstdc++-5.0.7
gcc-4.1.2
gcc-c++-4.1.2
glibc-2.4-31.63
glibc-devel-2.4-31.63
ksh-93r-12.9
libaio-0.3.104
libaio-devel-0.3.104
libelf-0.8.5
libgcc-4.1.2
libstdc++-4.1.2
libstdc++-devel-4.1.2
make-3.80
sysstat-8.0.4
3.1.3.1.5、SUSE Linux Enterprise Server 11
binutils-2.19
gcc-4.3
gcc-c++-4.3
glibc-2.9
glibc-devel-2.9
ksh-93t
libstdc++33-3.3.3
libstdc++43-4.3.3_20081022
libstdc++43-devel-4.3.3_20081022
libaio-0.3.104
libaio-devel-0.3.104
libgcc43-4.3.3_20081022
libstdc++-devel-4.3
make-3.81
sysstat-8.1.5
3.1.3.2、Oracle Database Package Requirements for Linux x86-64
The following packages (or later versions) must be installed。
3.1.3.2.1、Oracle Linux 4 and Red Hat Enterprise Linux 4
binutils-2.15.92.0.2
compat-libstdc++-33-3.2.3
compat-libstdc++-33-3.2.3 (32 bit)
elfutils-libelf-0.97
elfutils-libelf-devel-0.97
expat-1.95.7
gcc-3.4.6
gcc-c++-3.4.6
glibc-2.3.4-2.41
glibc-2.3.4-2.41 (32 bit)
glibc-common-2.3.4
glibc-devel-2.3.4
glibc-headers-2.3.4
libaio-0.3.105
libaio-0.3.105 (32 bit)
libaio-devel-0.3.105
libaio-devel-0.3.105 (32 bit)
libgcc-3.4.6
libgcc-3.4.6 (32-bit)
libstdc++-3.4.6
libstdc++-3.4.6 (32 bit)
libstdc++-devel 3.4.6
make-3.80
numactl-0.6.4.x86_64
pdksh-5.2.14
sysstat-5.0.5
3.1.3.2.2、Oracle Linux 5, Red Hat Enterprise Linux 5, and Asianux Server 3
binutils-2.17.50.0.6
compat-libstdc++-33-3.2.3
compat-libstdc++-33-3.2.3 (32 bit)
coreutils-5.97-23.el5_4.1
elfutils-libelf-0.125
elfutils-libelf-devel-0.125
gcc-4.1.2
gcc-c++-4.1.2
glibc-2.5-24
glibc-2.5-24 (32 bit)
glibc-common-2.5
glibc-devel-2.5
glibc-devel-2.5 (32 bit)
glibc-headers-2.5
ksh-20060214
libaio-0.3.106
libaio-0.3.106 (32 bit)
libaio-devel-0.3.106
libaio-devel-0.3.106 (32 bit)
libgcc-4.1.2
libgcc-4.1.2 (32 bit)
libstdc++-4.1.2
libstdc++-4.1.2 (32 bit)
libstdc++-devel-4.1.2
make-3.81
sysstat-7.0.2
3.1.3.2.3、Oracle Linux 6, Red Hat Enterprise Linux 6, and Asianux Server 4
binutils-2.20.51.0.2-5.11.el6 (x86_64)
compat-libcap1-1.10-1 (x86_64)
compat-libstdc++-33-3.2.3-69.el6 (x86_64)
compat-libstdc++-33-3.2.3-69.el6.i686
gcc-4.4.4-13.el6 (x86_64)
gcc-c++-4.4.4-13.el6 (x86_64)
glibc-2.12-1.7.el6 (i686)
glibc-2.12-1.7.el6 (x86_64)
glibc-devel-2.12-1.7.el6 (x86_64)
glibc-devel-2.12-1.7.el6.i686
ksh
libgcc-4.4.4-13.el6 (i686)
libgcc-4.4.4-13.el6 (x86_64)
libstdc++-4.4.4-13.el6 (x86_64)
libstdc++-4.4.4-13.el6.i686
libstdc++-devel-4.4.4-13.el6 (x86_64)
libstdc++-devel-4.4.4-13.el6.i686
libaio-0.3.107-10.el6 (x86_64)
libaio-0.3.107-10.el6.i686
libaio-devel-0.3.107-10.el6 (x86_64)
libaio-devel-0.3.107-10.el6.i686
make-3.81-19.el6
sysstat-9.0.4-11.el6 (x86_64)
链接:https://pan.baidu.com/s/1tc4BEUiNb2315JQZTKKJqQ 提取码:ew3p
3.1.3.2.4、Oracle Linux 7 and Red Hat Enterprise Linux 7
binutils-2.23.52.0.1-12.el7.x86_64
compat-libcap1-1.10-3.el7.x86_64
compat-libstdc++-33-3.2.3-71.el7.i686
compat-libstdc++-33-3.2.3-71.el7.x86_64
gcc-4.8.2-3.el7.x86_64
gcc-c++-4.8.2-3.el7.x86_64
glibc-2.17-36.el7.i686
glibc-2.17-36.el7.x86_64
glibc-devel-2.17-36.el7.i686
glibc-devel-2.17-36.el7.x86_64
ksh
libaio-0.3.109-9.el7.i686
libaio-0.3.109-9.el7.x86_64
libaio-devel-0.3.109-9.el7.i686
libaio-devel-0.3.109-9.el7.x86_64
libgcc-4.8.2-3.el7.i686
libgcc-4.8.2-3.el7.x86_64
libstdc++-4.8.2-3.el7.i686
libstdc++-4.8.2-3.el7.x86_64
libstdc++-devel-4.8.2-3.el7.i686
libstdc++-devel-4.8.2-3.el7.x86_64
libXi-1.7.2-1.el7.i686
libXi-1.7.2-1.el7.x86_64
libXtst-1.2.2-1.el7.i686
libXtst-1.2.2-1.el7.x86_64
make-3.82-19.el7.x86_64
sysstat-10.1.5-1.el7.x86_64
3.1.3.2.5、SUSE Linux Enterprise Server 10
binutils-2.16.91.0.5
compat-libstdc++-5.0.7
gcc-4.1.0
gcc-c++-4.1.2
glibc-2.4-31.63
glibc-devel-2.4-31.63
glibc-devel-32bit-2.4-31.63
ksh-93r-12.9
libaio-0.3.104
libaio-32bit-0.3.104
libaio-devel-0.3.104
libaio-devel-32bit-0.3.104
libelf-0.8.5
libgcc-4.1.2
libstdc++-4.1.2
libstdc++-devel-4.1.2
make-3.80
numactl-0.9.6.x86_64
sysstat-8.0.4
3.1.3.2.6、SUSE Linux Enterprise Server 11
binutils-2.19
gcc-4.3
gcc-32bit-4.3
gcc-c++-4.3
glibc-2.9
glibc-32bit-2.9
glibc-devel-2.9
glibc-devel-32bit-2.9
ksh-93t
libaio-0.3.104
libaio-32bit-0.3.104
libaio-devel-0.3.104
libaio-devel-32bit-0.3.104
libstdc++33-3.3.3
libstdc++33-32bit-3.3.3
libstdc++43-4.3.3_20081022
libstdc++43-32bit-4.3.3_20081022
libstdc++43-devel-4.3.3_20081022
libstdc++43-devel-32bit-4.3.3_20081022
libgcc43-4.3.3_20081022
libstdc++-devel-4.3
make-3.81
sysstat-8.1.5
3.1.3.2.7、SUSE Linux Enterprise Server 12
You must download and install patch 18370031.
binutils-2.25.0-13.1
gcc-4.8-6.189
gcc48-4.8.5-24.1
glibc-2.19-31.9
glibc-32bit-2.19-31.9
glibc-devel-2.19-31.9.x86_64
glibc-devel-32bit-2.19-31.9.x86_64
libaio1-0.3.109-17.15
libaio-devel-0.3.109-17.15
libcap1-1.10-59.61
libstdc++48-devel-4.8.5-24.1.x86_64
libstdc++48-devel-32bit-4.8.5-24.1.x86_64
libstdc++6-5.2.1+r226025-4.1.x86_64
libstdc++6-32bit-5.2.1+r226025-4.1.x86_64
libstdc++-devel-4.8-6.189.x86_64
libstdc++-devel-32bit-4.8-6.189.x86_64
libgcc_s1-5.2.1+r226025-4.1.x86_64
libgcc_s1-32bit-5.2.1+r226025-4.1.x86_64
mksh-50-2.13
make-4.0-4.1.x86_64
sysstat-10.2.1-3.1.x86_64
xorg-x11-driver-video-7.6_1-14.30.x86_64
xorg-x11-server-7.6_1.15.2-36.21.x86_64
xorg-x11-essentials-7.6_1-14.17.noarch
xorg-x11-Xvnc-1.4.3-7.2.x86_64
xorg-x11-fonts-core-7.6-29.45.noarch
xorg-x11-7.6_1-14.17.noarch
xorg-x11-server-extra-7.6_1.15.2-36.21.x86_64
xorg-x11-libs-7.6-45.14.noarch
xorg-x11-fonts-7.6-29.45.noarch
3.1.3.2.8、NeoKylin Linux Advanced Server 6
binutils-2.20.51.0.2-5.36.el6 (x86_64)
compat-libcap1-1.10-1 (x86_64)
compat-libstdc++-33-3.2.3-69.el6 (x86_64)
compat-libstdc++-33-3.2.3-69.el6 (i686)
gcc-4.4.7-4.el6 (x86_64)
gcc-c++-4.4.7-4.el6 (x86_64)
glibc-2.12-1.132.el6 (i686)
glibc-2.12-1.132.el6 (x86_64)
glibc-devel-2.12-1.132.el6 (x86_64)
glibc-devel-2.12-1.132.el6 (i686)
ksh
libgcc-4.4.7-4.el6 (i686)
libgcc-4.4.7-4.el6 (x86_64)
libstdc++-4.4.7-4.el6 (x86_64)
libstdc++-4.4.7-4.el6 (i686)
libstdc++-devel-4.4.7-4.el6 (x86_64)
libstdc++-devel-4.4.7-4.el6 (i686)
libaio-0.3.107-10.el6 (x86_64)
libaio-0.3.107-10.el6 (i686)
libaio-devel-0.3.107-10.el6 (x86_64)
libaio-devel-0.3.107-10.el6 (i686)
make-3.81-20.el6
sysstat-9.0.4-22.el6 (x86_64)
3.1.3.2.9、NeoKylin Linux Advanced Server 7
binutils-2.23.52.0.1-55.el7.x86_64
compat-libcap1-1.10-7.el7.x86_64
gcc-4.8.5-4.el7.ns7.01.x86_64
gcc-c++-4.8.5-4.el7.ns7.01.x86_64
glibc-2.17-105.el7.ns7.01.i686
glibc-2.17-105.el7.ns7.01.x86_64
glibc-devel-2.17-105.el7.ns7.01.i686
glibc-devel-2.17-105.el7.ns7.01.x86_64
ksh-20120801-22.el7_1.2.x86_64
libaio-0.3.109-13.el7.i686
libaio-0.3.109-13.el7.x86_64
libaio-devel-0.3.109-13.el7.i686
libaio-devel-0.3.109-13.el7.x86_64
libgcc-4.8.5-4.el7.ns7.01.i686
libgcc-4.8.5-4.el7.ns7.01.x86_64
libstdc++-4.8.5-4.el7.ns7.01.i686
libstdc++-4.8.5-4.el7.ns7.01.x86_64
libstdc++-devel-4.8.5-4.el7.ns7.01.i686
libstdc++-devel-4.8.5-4.el7.ns7.01.x86_64
libXi-1.7.4-2.el7.i686
libXi-1.7.4-2.el7.x86_64
libXtst-1.2.2-2.1.el7.i686
libXtst-1.2.2-2.1.el7.x86_64
make-3.82-21.el7.x86_64
sysstat-10.1.5-7.el7.x86_64
3.2、安装依赖包
3.2.1、参考3.1中oracle各个版本需要的依赖包,适用如下命令安装:
[root@kindo-dev-03 ~]# yum -y install binutils* compat-libcap1* compat-libstdc++* gcc* gcc-c++* glibc* glibc-devel* ksh* libaio* libaio-devel* libgcc* libstdc++* libstdc++-devel* libXi* libXtst* make* sysstat* elfutils* unixODBC*
有时候使用yum安装的时候,会提示another app is currently holding the yum lock,这个时候打开另外一个terminal,在root用户下输入
#rm -f /var/run/yum.pid
强制关掉yum进程
3,2,2、也可以使用如下命令检查依赖包是否已安装,如果未安装,则需从iso中逐个安装依赖包
未安装:
[root@localhost Packages]# rpm -qa|grep compat-libcap1-
[root@localhost Packages]#

已安装:
[root@localhost Packages]# rpm -qa|grep compat-libcap1-
compat-libcap1-1.10-7.el7.x86_64
[root@localhost Packages]#
3,2,3、如果有些包在iso中未找到,可以直接从网上下载后安装
以安装compat-libstdc++-33-3.2.3-71.el7.x86_64包为例:
[root@radhat7 Packages]# ls -al|grep compat-lib
-r--r--r--. 1641 root root    19428 4月   1 2014 compat-libcap1-1.10-7.el7.i686.rpm
-r--r--r--. 1641 root root    19164 4月   1 2014 compat-libcap1-1.10-7.el7.x86_64.rpm
-r--r--r--. 1610 root root   290948 10月  6 2015 compat-libcogl12-1.14.0-3.el7.i686.rpm
-r--r--r--. 1610 root root   288408 10月  6 2015 compat-libcogl12-1.14.0-3.el7.x86_64.rpm
...略
[root@radhat7 ~]# wget http://mirrors.163.com/centos/7/os/x86_64/Packages/compat-libstdc%2b%2b-33-3.2.3-72.el7.x86_64.rpm
--2020-08-27 11:04:01--  http://mirrors.163.com/centos/7/os/x86_64/Packages/compat-libstdc%2b%2b-33-3.2.3-72.el7.x86_64.rpm
正在解析主机 mirrors.163.com (mirrors.163.com)... 59.111.0.251
正在连接 mirrors.163.com (mirrors.163.com)|59.111.0.251|:80... 已连接。
已发出 HTTP 请求,正在等待回应... 200 OK
长度:195388 (191K) [application/x-redhat-package-manager]
正在保存至: “compat-libstdc++-33-3.2.3-72.el7.x86_64.rpm”

100%[=======================================================================================================>] 195,388     --.-K/s 用时 0.1s

2020-08-27 11:04:01 (1.52 MB/s) - 已保存 “compat-libstdc++-33-3.2.3-72.el7.x86_64.rpm” [195388/195388])

[root@radhat7 ~]# rpm -ivh compat-libstdc++-33-3.2.3-72.el7.x86_64.rpm
警告:compat-libstdc++-33-3.2.3-72.el7.x86_64.rpm: 头V3 RSA/SHA256 Signature, 密钥 ID f4a80eb5: NOKEY
准备中...                          ################################# [100%]
正在升级/安装...
   1:compat-libstdc++-33-3.2.3-72.el7 ################################# [100%]
[root@radhat7 ~]# rm compat-libstdc++-33-3.2.3-72.el7.x86_64.rpm
rm:是否删除普通文件 "compat-libstdc++-33-3.2.3-72.el7.x86_64.rpm"?yes
[root@radhat7 ~]# ls
下载依赖包命令:
[root@kindo-dev-03 packages]# yum reinstall  ksh* --downloadonly --downloaddir=/tmp/  --指定下载到/tmp目录
3.2.4、使用rpm安装缺少的依赖包
[root@localhost Packages]# rpm -ivh ksh-20120801-19.el7.x86_64.rpm
警告:ksh-20120801-19.el7.x86_64.rpm: 头V3 RSA/SHA256 Signature, 密钥 ID fd431d51: NOKEY
准备中...                          ################################# [100%]
正在升级/安装...
   1:ksh-20120801-19.el7              ################################# [100%]
[root@localhost Packages]#
3.2.5、卸载已安装的依赖包(以卸载yum为例)
先检查yum是否已安装:
[root@redhat7 ~]# rpm -qa |grep yum
yum-3.4.3-154.el7.noarch
PackageKit-yum-1.1.5-1.el7.x86_64
yum-utils-1.1.31-42.el7.noarch
yum-metadata-parser-1.1.4-10.el7.x86_64
yum-rhn-plugin-2.0.1-9.el7.noarch
yum-langpacks-0.4.2-7.el7.noarch

删除相应的yum包:
[root@redhat7 ~]# rpm -qa|grep yum|xargs rpm -e --nodeps
警告:/etc/yum/pluginconf.d/langpacks.conf 已另存为 /etc/yum/pluginconf.d/langpacks.conf.rpmsave
[root@redhat7 ~]# rpm -qa |grep yum
[root@redhat7 ~]#
3.2.6、从iso镜像文件中安装
在vmware中设置虚拟机加载iso文件(右键菜单=>选中“Settings”=>弹出“Virtual Machine Settings”对话框):
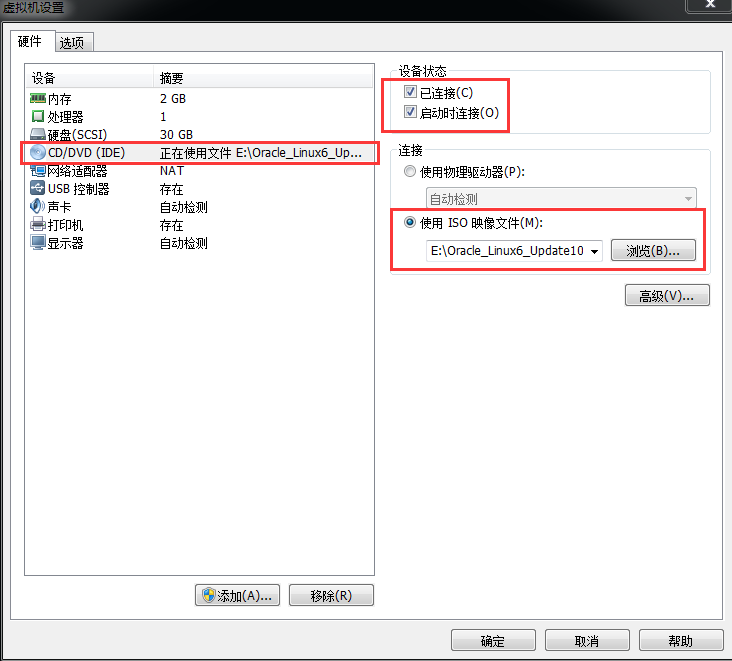
操作步骤:
--创建一个目录
[root@feiht mnt]# mkdir -p /mnt/cdrom
--挂在,/dev/cdrom要根据实际情况来决定
[root@feiht mnt]# mount -t auto /dev/cdrom  /mnt/cdrom
mount: block device /dev/sr0 is write-protected, mounting read-only
--检查是否挂在成功
[root@feiht mnt]# ll /mnt/cdrom
--查找需要安装的依赖包
[root@feiht cdrom]# cd /mnt/cdrom/Packages
[root@feiht Packages]# ls |grep bind
bind-9.8.2-0.68.rc1.el6.x86_64.rpm
bind-chroot-9.8.2-0.68.rc1.el6.x86_64.rpm
bind-dyndb-ldap-2.3-8.el6.x86_64.rpm
bind-libs-9.8.2-0.68.rc1.el6.i686.rpm
bind-libs-9.8.2-0.68.rc1.el6.x86_64.rpm
bind-utils-9.8.2-0.68.rc1.el6.x86_64.rpm
PackageKit-device-rebind-0.5.8-26.0.1.el6.x86_64.rpm
rpcbind-0.2.0-16.el6.x86_64.rpm
samba4-winbind-4.2.10-15.el6.x86_64.rpm
samba4-winbind-clients-4.2.10-15.el6.x86_64.rpm
samba4-winbind-krb5-locator-4.2.10-15.el6.x86_64.rpm
samba-winbind-3.6.23-51.0.1.el6.x86_64.rpm
samba-winbind-clients-3.6.23-51.0.1.el6.i686.rpm
samba-winbind-clients-3.6.23-51.0.1.el6.x86_64.rpm
ypbind-1.20.4-33.el6.x86_64.rpm
--安装相应的依赖包
[root@feiht Packages]# rpm -ivh bind-9.8.2-0.68.rc1.el6.x86_64.rpm
warning: bind-9.8.2-0.68.rc1.el6.x86_64.rpm: Header V3 RSA/SHA256 Signature, key ID ec551f03: NOKEY
Preparing...                ########################################### [100%]
   1:bind                   ########################################### [100%]
--卸载挂载
[root@feiht dev]# umount /mnt/cdrom
4、关闭防火墙
--查看防火墙状态
[root@oradb ~]# service iptables status
表格:filter
Chain INPUT (policy ACCEPT)
num  target     prot opt source               destination
1    ACCEPT     all  --  0.0.0.0/0            0.0.0.0/0           state RELATED,ESTABLISHED
2    ACCEPT     icmp --  0.0.0.0/0            0.0.0.0/0
3    ACCEPT     all  --  0.0.0.0/0            0.0.0.0/0
4    ACCEPT     tcp  --  0.0.0.0/0            0.0.0.0/0           state NEW tcp dpt:22
5    REJECT     all  --  0.0.0.0/0            0.0.0.0/0           reject-with icmp-host-prohibited

Chain FORWARD (policy ACCEPT)
num  target     prot opt source               destination
1    REJECT     all  --  0.0.0.0/0            0.0.0.0/0           reject-with icmp-host-prohibited

Chain OUTPUT (policy ACCEPT)
num  target     prot opt source               destination

--关闭防火墙,stop只能临时关闭防火墙,系统重启后还是会打开
[root@oradb ~]# service iptables stop
iptables:将链设置为政策 ACCEPT:filter                    [确定]
iptables:清除防火墙规则:                                 [确定]
iptables:正在卸载模块:                                   [确定]

--使用如下命令可以永久关闭防火墙
[root@oradb ~]# chkconfig iptables off
[root@oradb ~]# chkconfig iptables --list
iptables           0:关闭    1:关闭    2:关闭    3:关闭    4:关闭    5:关闭    6:关闭

--如果不想关闭防火墙,可以编辑iptables,只开放1521端口
vi /etc/sysconfig/iptables
A INPUT -p tcp -m state --state NEW -m tcp --dport 1521 -j ACCEPT
--保存配置,以便重启后仍然生效
service iptables save
--查看防火墙规则
iptables -L -n
CENTOS 7关闭防火墙
 1 [root@localhost data]# systemctl status firewalld.service    #查看防火墙状态(运行中)
 2 ● firewalld.service - firewalld - dynamic firewall daemon
 3    Loaded: loaded (/usr/lib/systemd/system/firewalld.service; enabled; vendor preset: enabled)
 4    Active: active (running) since Wed 2017-09-13 09:23:08 CST; 25min ago
 5      Docs: man:firewalld(1)
 6  Main PID: 641 (firewalld)
 7    CGroup: /system.slice/firewalld.service
 8            └─641 /usr/bin/python -Es /usr/sbin/firewalld --nofork --nopid
 9
10 Sep 13 09:22:58 localhost.localdomain systemd[1]: Starting firewalld - dynami...
11 Sep 13 09:23:08 localhost.localdomain systemd[1]: Started firewalld - dynamic...
12 Hint: Some lines were ellipsized, use -l to show in full.
13 [root@localhost data]# systemctl stop firewalld.service    #关闭防火墙
14 [root@localhost data]# systemctl status firewalld.service    #查看防火墙状态(已关闭)
15 ● firewalld.service - firewalld - dynamic firewall daemon
16    Loaded: loaded (/usr/lib/systemd/system/firewalld.service; enabled; vendor preset: enabled)
17    Active: inactive (dead) since Wed 2017-09-13 09:48:55 CST; 10s ago
18      Docs: man:firewalld(1)
19   Process: 641 ExecStart=/usr/sbin/firewalld --nofork --nopid $FIREWALLD_ARGS (code=exited, status=0/SUCCESS)
20  Main PID: 641 (code=exited, status=0/SUCCESS)
21
22 Sep 13 09:22:58 localhost.localdomain systemd[1]: Starting firewalld - dynami...
23 Sep 13 09:23:08 localhost.localdomain systemd[1]: Started firewalld - dynamic...
24 Sep 13 09:48:54 localhost.localdomain systemd[1]: Stopping firewalld - dynami...
25 Sep 13 09:48:55 localhost.localdomain systemd[1]: Stopped firewalld - dynamic...
26 Hint: Some lines were ellipsized, use -l to show in full.
27 [root@localhost data]# systemctl disable firewalld.service   #禁止使用防火墙(重启也是禁止的)
28 Removed symlink /etc/systemd/system/dbus-org.fedoraproject.FirewallD1.service.
29 Removed symlink /etc/systemd/system/basic.target.wants/firewalld.service.
5、如果是Centos,需要修改OS系统标识为redhat
(oracle默认不支持CentOS系统安装,但是centos其实就是redhat)
1 [root@localhost data]# cat /proc/version
2 Linux version 3.10.0-514.26.2.el7.x86_64 (builder@kbuilder.dev.centos.org) (gcc version 4.8.5 20150623 (Red Hat 4.8.5-11) (GCC) ) #1 SMP Tue Jul 4 15:04:05 UTC 2017
3 [root@localhost data]# cat /etc/redhat-release
4 CentOS Linux release 7.3.1611 (Core)
5 [root@localhost data]# vi /etc/redhat-release #将CentOS Linux release 7.3.1611 (Core)改成redhat-7
6 [root@localhost data]# cat /etc/redhat-release
7 redhat-7
6、关闭selinux(需重启生效)
[oracle@kindo-dev-03 ~]$ vi /etc/selinux/config
修改后的结果:

也可以直接用下面的命令修改:
1 [root@radhat7 etc]# cp /etc/selinux/config /etc/selinux/config.bak
2 [root@radhat7 selinux]# sed -i "s/SELINUX=enforcing/SELINUX=disabled/" /etc/selinux/config
3 [root@radhat7 selinux]# setenforce 0
7、修改hostname和hosts
[root@oradb ~]# cat /etc/hosts
#127.0.0.1   localhost localhost.localdomain localhost4 localhost4.localdomain4
#::1         localhost localhost.localdomain localhost6 localhost6.localdomain6
127.0.0.1    localhost
192.168.88.111   oradb

[root@oradb ~]# cat /etc/sysconfig/network
NETWORKING=yes
HOSTNAME=oradb
CENTOS 7修改hostname和hosts
[oracle@kindo-dev-03 ~]$ cat /etc/hostname
kindo-dev-03
[oracle@kindo-dev-03 ~]$ cat /etc/hosts
127.0.0.1   localhost localhost.localdomain localhost4 localhost4.localdomain4
::1         localhost localhost.localdomain localhost6 localhost6.localdomain6
192.168.1.181     kindo-dev-03
8、开始安装ORACLE前的配置
8.1、创建运行oracle数据库的系统用户和用户组
 1 [root@localhost]# groupadd oinstall  #创建用户组oinstall
 2 [root@localhost]# groupadd dba  #创建用户组dba
 3 [root@localhost]# useradd -g oinstall -G dba -m oracle  #创建oracle用户,并加入到oinstall和dba用户组
 4 [root@localhost]# passwd oracle  #设置用户oracle的登陆密码,不设置密码,在CentOS的图形登陆界面没法登陆
 5 Changing password for user oracle.
 6 New password:   # 密码
 7 BAD PASSWORD: The password is shorter than 8 characters
 8 Retype new password:   # 确认密码
 9 passwd: all authentication tokens updated successfully.
10 [root@localhost]# id oracle # 查看新建的oracle用户
11 uid=1001(oracle) gid=1002(dba) groups=1002(dba)
8.2、创建oracle数据库安装目录
[root@kindo-dev-03]# cd /.        #进入根目录
[root@kindo-dev-03]# mkdir -p /u01/app/oracle  #oracle数据库安装目录
[root@kindo-dev-03]# mkdir -p /u01/app/oraInventory  #oracle数据库配置文件目录
[root@kindo-dev-03]# mkdir -p /u01/app/database  #oracle数据库软件包解压目录
[root@kindo-dev-03]# mkdir -p /u01/app/oradata  #oracle数据库文件目录
[root@kindo-dev-03]# mkdir -p /u01/app/flash_recovery_area  #oracle数据库闪回目录
[root@kindo-dev-03]# cd /u01
[root@kindo-dev-03 u01]# ls  #创建完毕检查一下
database oracle oraInventory
[root@kindo-dev-03 u01]# chown -R oracle:oinstall /u01  #设置目录所有者为oinstall用户组的oracle用户
8.3、配置用户的环境变量
添加如下环境变量(注意要把原来的PATH变量注释掉):
1 export ORACLE_BASE=/u01/app/oracle                    #oracle数据库安装目录
2 export ORACLE_HOME=$ORACLE_BASE/product/11.2.0/db_1   #oracle数据库路径
3 export PATH=$PATH:$HOME/bin:$ORACLE_HOME/bin          #添加系统环境变量
4 export ORACLE_SID=orcl                                #oracle启动数据库实例名
5 export ORACLE_PID=orcl
6 #export ORACLE_TERM=xterm                             #xterm窗口模式安装
7 #export LANG=C                                        #防止安装过程出现乱码
8 export NLS_LANG=AMERICAN_AMERICA.AL32UTF8             #设置Oracle客户端字符集,必须与Oracle安装时设置的字符集保持一致
9 export LD_LIBRARY_PATH=$ORACLE_HOME/lib:/usr/lib      #添加系统环境变量
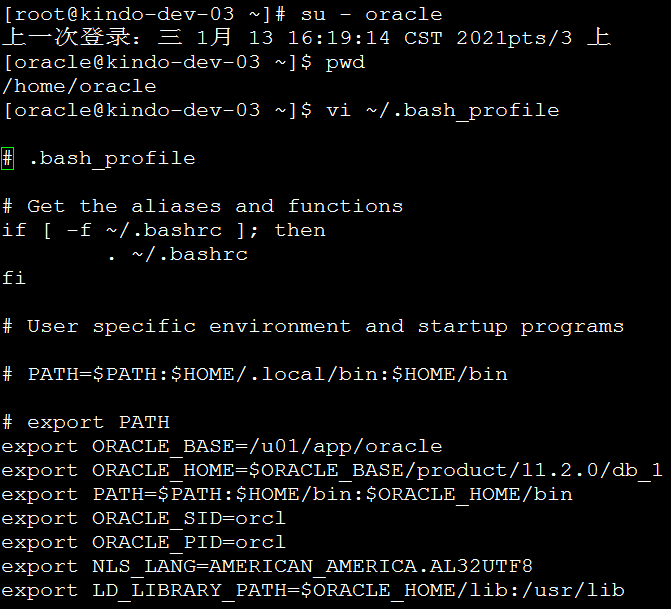
1 [oracle@kindo-dev-03 ~]$ env | grep ORA   #查看环境变量是否完成
2 ORACLE_SID=orcl
3 ORACLE_BASE=/u01/app/oracle
4 ORACLE_PID=orcl
5 ORACLE_HOME=/u01/app/oracle/product/11.2.0/db_1
使用如下命令是环境变量生效:
[root@localhost data]# source /home/oracle/.bash_profile
8.4、修改内核参数/etc/sysctl.conf
#修改参数后可以允许linux读取大文件,比如oracle文件很大,有可能收到linux参数限制无法安装,此时就可以按照下列参数修改
修改完成后可以使用如下命令使参数生效:
[root@localhost data]# sysctl -p
一般添加如下参数即可:
 1 fs.aio-max-nr = 1048576
 2 fs.file-max = 6815744
 3 kernel.shmall = 2097152
 4 kernel.shmmax = 4294967295   #物理内存的一半以上即可
 5 kernel.shmmni = 4096
 6 kernel.sem = 250 32000 100 128
 7 net.ipv4.ip_local_port_range = 9000 65500
 8 net.core.rmem_default = 262144
 9 net.core.rmem_max = 4194304
10 net.core.wmem_default = 262144
11 net.core.wmem_max = 1048576
更多设置内容如下:
小技能:使用 grep -Ev "^$|[#;]" /u01/database/response/db_install.rsp 可以查看配置文件内容,且去掉了注释行和空行
  1 # sysctl settings are defined through files in
  2 # /usr/lib/sysctl.d/, /run/sysctl.d/, and /etc/sysctl.d/.
  3 #
  4 # Vendors settings live in /usr/lib/sysctl.d/.
  5 # To override a whole file, create a new file with the same in
  6 # /etc/sysctl.d/ and put new settings there. To override
  7 # only specific settings, add a file with a lexically later
  8 # name in /etc/sysctl.d/ and put new settings there.
  9 #
 10 # For more information, see sysctl.conf(5) and sysctl.d(5).
 11
 12
 13 # 禁用包过滤功能
 14 net.ipv4.ip_forward = 0
 15
 16 # 启用源路由核查功能
 17 net.ipv4.conf.default.rp_filter = 1
 18
 19 # 禁用所有IP源路由
 20 net.ipv4.conf.default.accept_source_route = 0
 21
 22 # 使用sysrq组合键是了解系统目前运行情况,为安全起见设为0关闭
 23 kernel.sysrq = 0
 24
 25 # 控制core文件的文件名是否添加pid作为扩展
 26 kernel.core_uses_pid = 1
 27
 28 # 开启SYN Cookies,当出现SYN等待队列溢出时,启用cookies来处理
 29 net.ipv4.tcp_syncookies = 1
 30
 31 # 每个消息队列的大小(单位:字节)限制
 32 kernel.msgmnb = 65536
 33
 34 # 整个系统最大消息队列数量限制
 35 kernel.msgmax = 65536
 36
 37 # 单个共享内存段的大小(单位:字节)限制,计算公式64G*1024*1024*1024(字节)
 38 kernel.shmmax = 17179869183
 39
 40 # 所有内存大小(单位:页,1页 = 4Kb),计算公式16G*1024*1024*1024/4KB(页)
 41 kernel.shmall = 4194304
 42
 43 # timewait的数量,默认是180000
 44 net.ipv4.tcp_max_tw_buckets = 6000
 45
 46 # 开启有选择的应答
 47 net.ipv4.tcp_sack = 1
 48
 49 # 支持更大的TCP窗口. 如果TCP窗口最大超过65535(64K), 必须设置该数值为1
 50 net.ipv4.tcp_window_scaling = 1
 51
 52 # TCP读buffer
 53 net.ipv4.tcp_rmem = 4096 131072 1048576
 54
 55 # TCP写buffer
 56 net.ipv4.tcp_wmem = 4096 131072 1048576
 57
 58 # 为TCP socket预留用于发送缓冲的内存默认值(单位:字节)
 59 net.core.wmem_default = 8388608
 60
 61 # 为TCP socket预留用于发送缓冲的内存最大值(单位:字节)
 62 net.core.wmem_max = 16777216
 63
 64 # 为TCP socket预留用于接收缓冲的内存默认值(单位:字节)
 65 net.core.rmem_default = 8388608
 66
 67 # 为TCP socket预留用于接收缓冲的内存最大值(单位:字节)
 68 net.core.rmem_max = 16777216
 69
 70 # 每个网络接口接收数据包的速率比内核处理这些包的速率快时,允许送到队列的数据包的最大数目
 71 net.core.netdev_max_backlog = 262144
 72
 73 # web应用中listen函数的backlog默认会给我们内核参数的net.core.somaxconn限制到128,而nginx定义的NGX_LISTEN_BACKLOG默认为511,所以有必要调整这个值
 74 net.core.somaxconn = 262144
 75
 76 # 系统中最多有多少个TCP套接字不被关联到任何一个用户文件句柄上。这个限制仅仅是为了防止简单的DoS攻击,不能过分依靠它或者人为地减小这个值,更应该增加这个值(如果增加了内存之后)
 77 net.ipv4.tcp_max_orphans = 3276800
 78
 79 # 记录的那些尚未收到客户端确认信息的连接请求的最大值。对于有128M内存的系统而言,缺省值是1024,小内存的系统则是128
 80 net.ipv4.tcp_max_syn_backlog = 262144
 81
 82 # 时间戳可以避免序列号的卷绕。一个1Gbps的链路肯定会遇到以前用过的序列号。时间戳能够让内核接受这种“异常”的数据包。这里需要将其关掉
 83 net.ipv4.tcp_timestamps = 0
 84
 85 # 为了打开对端的连接,内核需要发送一个SYN并附带一个回应前面一个SYN的ACK。也就是所谓三次握手中的第二次握手。这个设置决定了内核放弃连接之前发送SYN+ACK包的数量
 86 net.ipv4.tcp_synack_retries = 1
 87
 88 # 在内核放弃建立连接之前发送SYN包的数量
 89 net.ipv4.tcp_syn_retries = 1
 90
 91 # 开启TCP连接中time_wait sockets的快速回收
 92 net.ipv4.tcp_tw_recycle = 1
 93
 94 # 开启TCP连接复用功能,允许将time_wait sockets重新用于新的TCP连接(主要针对time_wait连接)
 95 net.ipv4.tcp_tw_reuse = 1
 96
 97 # 1st低于此值,TCP没有内存压力,2nd进入内存压力阶段,3rdTCP拒绝分配socket(单位:内存页)
 98 net.ipv4.tcp_mem = 94500000 915000000 927000000
 99
100 # 如果套接字由本端要求关闭,这个参数决定了它保持在FIN-WAIT-2状态的时间。对端可以出错并永远不关闭连接,甚至意外当机。缺省值是60 秒。2.2 内核的通常值是180秒,你可以按这个设置,但要记住的是,即使你的机器是一个轻载的WEB服务器,也有因为大量的死套接字而内存溢出的风险,FIN- WAIT-2的危险性比FIN-WAIT-1要小,因为它最多只能吃掉1.5K内存,但是它们的生存期长些。
101 net.ipv4.tcp_fin_timeout = 15
102
103 # 表示当keepalive起用的时候,TCP发送keepalive消息的频度(单位:秒)
104 net.ipv4.tcp_keepalive_time = 30
105
106 # 对外连接端口范围
107 net.ipv4.ip_local_port_range = 2048 65000
108
109 # 表示文件句柄的最大数量
110 fs.file-max = 102400
111
112 # 避免放大攻击
113 net.ipv4.icmp_echo_ignore_broadcasts = 1
114
115 # 开启恶意icmp错误消息保护
116 net.ipv4.icmp_ignore_bogus_error_responses = 1
117
118 # 开启SYN洪水攻击保护
119 net.ipv4.tcp_syncookies = 1
120
121 # 开启并记录欺骗,源路由和重定向包
122 net.ipv4.conf.all.log_martians = 1
123 net.ipv4.conf.default.log_martians = 1
124
125 # 处理无源路由的包
126 net.ipv4.conf.all.accept_source_route = 0
127 net.ipv4.conf.default.accept_source_route = 0
128
129 # 开启反向路径过滤
130 net.ipv4.conf.all.rp_filter = 1
131 net.ipv4.conf.default.rp_filter = 1
132
133 # 确保无人能修改路由表
134 net.ipv4.conf.all.accept_redirects = 0
135 net.ipv4.conf.default.accept_redirects = 0
136 net.ipv4.conf.all.secure_redirects = 0
137 net.ipv4.conf.default.secure_redirects = 0
138
139 # 不充当路由器
140 net.ipv4.ip_forward = 0
141 net.ipv4.conf.all.send_redirects = 0
142 net.ipv4.conf.default.send_redirects = 0
143
144 # 开启execshild
145 kernel.exec-shield = 1
146 kernel.randomize_va_space = 1
147
148 # IPv6设置
149 net.ipv6.conf.default.router_solicitations = 0
150 net.ipv6.conf.default.accept_ra_rtr_pref = 0
151 net.ipv6.conf.default.accept_ra_pinfo = 0
152 net.ipv6.conf.default.accept_ra_defrtr = 0
153 net.ipv6.conf.default.autoconf = 0
154 net.ipv6.conf.default.dad_transmits = 0
155 net.ipv6.conf.default.max_addresses = 1
156
157 # 优化LB使用的端口
158
159 # 增加系统文件描述符限制
160 fs.file-max = 65535
161
162 # 允许更多的PIDs (减少滚动翻转问题); may break some programs 32768
163 kernel.pid_max = 65536
164
165 # 增加系统IP端口限制
166 net.ipv4.ip_local_port_range = 2000 65000
167
168 # 增加TCP最大缓冲区大小
169 net.ipv4.tcp_rmem = 4096 87380 8388608
170 net.ipv4.tcp_wmem = 4096 87380 8388608
171
172 # 增加Linux自动调整TCP缓冲区限制
173 # 最小,默认和最大可使用的字节数
174 # 最大值不低于4MB,如果你使用非常高的BDP路径可以设置得更高
175
176 # Tcp窗口等
177 net.core.rmem_max = 8388608
178 net.core.wmem_max = 8388608
179 net.core.netdev_max_backlog = 5000
180 net.ipv4.tcp_window_scaling = 1
8.5、修改/etc/security/limits.conf(系统资源限制),在文件最后添加下列参数
1 oracle soft nproc 2047
2 oracle hard nproc 16348
3 oracle soft nofile 1024
4 oracle hard nofile 65536
8.6、修改/etc/pam.d/login(用户验证选项),在文件最后添加下列参数
session required pam_limits.so
9、为了保证所有配置参数都生效,最好是重新下服务器
[root@localhost Desktop]# reboot
10、静默安装oracle数据库
10.1、从oracle官网下载64位oracle 11g,上传/u01/app/database目录下并解压,解压后生成一个database目录。
进入 database 目录,该目录下有三个 .rsp 文件,用来作为静默安装时的应答文件的模板(db_install.rsp、dbca.rsp可以找我要):
db_install.rsp:安装应答文件
dbca.rsp:创建数据库应答文件
netca.rsp:建立监听、本地服务名等网络设置的应答文件
yum -y install unzip # 安装unzip,如已安装请忽略

一起解压:
ls *.zip | xargs -n1 unzip -o

或者分开解压:
unzip linux.x64_11gR2_database_1of2.zip
unzip linux.x64_11gR2_database_2of2.zip
10.2、修改静默安装的配置文件db_install.rsp
修改前最好将response文件夹备份一下,以防修改配置文件失败。
配置文件下载地址:
链接:https://pan.baidu.com/s/1gqe5XkIedzUdgda8zqkveQ
提取码:f3db
配置文件说明请参考:https://www.cnblogs.com/snaid/p/3598234.html
小技能:使用 grep -Ev "^$|[#;]" /u01/database/response/db_install.rsp 可以查看配置文件内容,且去掉了注释行和空行
以下是我的配置文件:
 1 oracle.install.responseFileVersion=/oracle/install/rspfmt_dbinstall_response_schema_v11_2_0
 2 oracle.install.option=INSTALL_DB_SWONLY
 3 ORACLE_HOSTNAME=kindo-dev-03
 4 UNIX_GROUP_NAME=oinstall
 5 INVENTORY_LOCATION=/u01/app/oracle/oraInventory
 6 SELECTED_LANGUAGES=en,zh_CN
 7 ORACLE_HOME=/u01/app/oracle/product/11.2.0/db_1
 8 ORACLE_BASE=/u01/app/oracle
 9 oracle.install.db.InstallEdition=EE
10 oracle.install.db.isCustomInstall=false
11 oracle.install.db.customComponents=oracle.server:11.2.0.1.0,oracle.sysman.ccr:10.2.7.0.0,oracle.xdk:11.2.0.1.0,oracle.rdbms.oci:11.2.0.1.0,oracle.network:11.2.0.1.0,oracle.network.listener:11.2.0.1.0,oracle.rdbms:11.2.0.1.0,oracle.options:11.2.0.1.0,oracle.rdbms.partitioning:11.2.0.1.0,oracle.oraolap:11.2.0.1.0,oracle.rdbms.dm:11.2.0.1.0,oracle.rdbms.dv:11.2.0.1.0,orcle.rdbms.lbac:11.2.0.1.0,oracle.rdbms.rat:11.2.0.1.0
12 oracle.install.db.DBA_GROUP=dba
13 oracle.install.db.OPER_GROUP=oinstall
14 oracle.install.db.CLUSTER_NODES=
15 oracle.install.db.config.starterdb.type=GENERAL_PURPOSE
16 oracle.install.db.config.starterdb.globalDBName=orcl
17 oracle.install.db.config.starterdb.SID=orcl
18 oracle.install.db.config.starterdb.characterSet=AL32UTF8
19 oracle.install.db.config.starterdb.memoryOption=true
20 oracle.install.db.config.starterdb.memoryLimit=
21 oracle.install.db.config.starterdb.installExampleSchemas=false
22 oracle.install.db.config.starterdb.enableSecuritySettings=true
23 oracle.install.db.config.starterdb.password.ALL=Kindo1234a
24 oracle.install.db.config.starterdb.password.SYS=
25 oracle.install.db.config.starterdb.password.SYSTEM=
26 oracle.install.db.config.starterdb.password.SYSMAN=
27 oracle.install.db.config.starterdb.password.DBSNMP=
28 oracle.install.db.config.starterdb.control=DB_CONTROL
29 oracle.install.db.config.starterdb.gridcontrol.gridControlServiceURL=
30 oracle.install.db.config.starterdb.dbcontrol.enableEmailNotification=false
31 oracle.install.db.config.starterdb.dbcontrol.emailAddress=
32 oracle.install.db.config.starterdb.dbcontrol.SMTPServer=
33 oracle.install.db.config.starterdb.automatedBackup.enable=false
34 oracle.install.db.config.starterdb.automatedBackup.osuid=
35 oracle.install.db.config.starterdb.automatedBackup.ospwd=
36 oracle.install.db.config.starterdb.storageType=
37 oracle.install.db.config.starterdb.fileSystemStorage.dataLocation=
38 oracle.install.db.config.starterdb.fileSystemStorage.recoveryLocation=
39 oracle.install.db.config.asm.diskGroup=
40 oracle.install.db.config.asm.ASMSNMPPassword=
41 MYORACLESUPPORT_USERNAME=
42 MYORACLESUPPORT_PASSWORD=
43 SECURITY_UPDATES_VIA_MYORACLESUPPORT=
44 DECLINE_SECURITY_UPDATES=true
45 PROXY_HOST=
46 PROXY_PORT=
47 PROXY_USER=
48 PROXY_PWD=
10.3、开始静默安装
[oracle@radhat7 database]$ ./runInstaller -silent -force -responseFile /u01/app/database/response/db_install.rsp -ignorePrereq
 1 [oracle@radhat7 database]$ ./runInstaller -silent -force -responseFile /opt/database/response/db_install.rsp -ignorePrereq
 2 正在启动 Oracle Universal Installer...
 3
 4 检查临时空间: 必须大于 120 MB。   实际为 19009 MB    通过
 5 检查交换空间: 必须大于 150 MB。   实际为 4094 MB    通过
 6 准备从以下地址启动 Oracle Universal Installer /tmp/OraInstall2020-08-27_04-44-51PM. 请稍候...[oracle@radhat7 database]$ [WARNING] [INS-32055] 主产品清单位于 Oracle 基目录中。
 7    原因: 主产品清单位于 Oracle 基目录中。
 8    操作: Oracle 建议将此主产品清单放置在 Oracle 基目录之外的位置中。
 9 [WARNING] [INS-32055] 主产品清单位于 Oracle 基目录中。
10    原因: 主产品清单位于 Oracle 基目录中。
11    操作: Oracle 建议将此主产品清单放置在 Oracle 基目录之外的位置中。
12 可以在以下位置找到本次安装会话的日志:
13  /u01/app/oracle/oraInventory/logs/installActions2020-08-27_04-44-51PM.log
14 以下配置脚本需要以 "root" 用户的身份执行。
15  #!/bin/sh
16  #要运行的 Root 脚本
17
18 /u01/app/oracle/oraInventory/orainstRoot.sh
19 /u01/app/oracle/product/11.2.0/db_1/root.sh
20 要执行配置脚本, 请执行以下操作:
21      1. 打开一个终端窗口
22      2. 以 "root" 身份登录
23      3. 运行脚本
24      4. 返回此窗口并按 "Enter" 键继续
25
26 Successfully Setup Software.
在开始安装之前检测的时候,可能会报错,具体错误不记得,只记得需要执行命令即可:unset DISPLAY
10.4、安装完成,根据提示以root身份运行root.sh、orainstRoot.sh文件
[root@kindo-dev-03 ~]# sh /u01/app/oracle/oraInventory/orainstRoot.sh

[root@kindo-dev-03 ~]# sh /u01/app/oracle/product/11.2.0/db_1/root.sh
10.5、配置监听
[root@kindo-dev-03 ~]# su - oracle   #切换到oracle用户
[oracle@kindo-dev-03 ~]$ $ORACLE_HOME/bin/netca /silent /responseFile /u01/app/database/response/netca.rsp
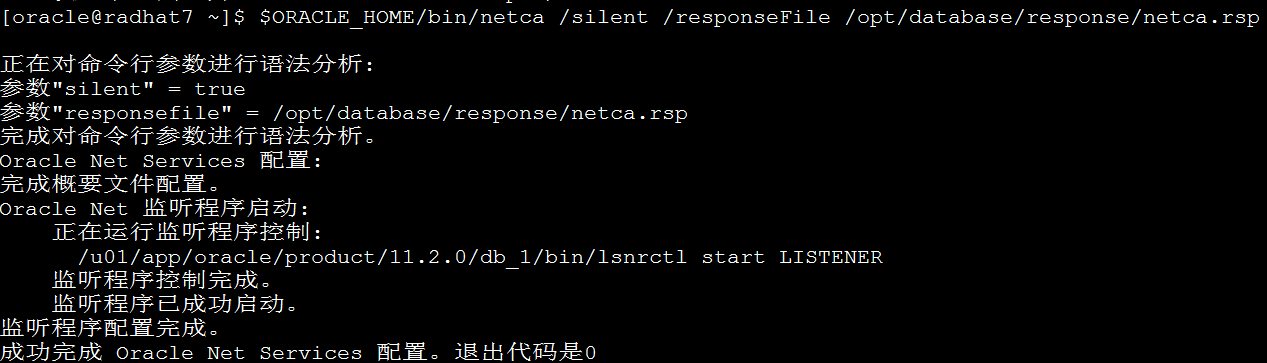
查看监听状态:
启动监听:lsnrctl start
停止监听:lsnrctl stop
重启监听:lsnrctl reload
查看监听:lsnrctl status
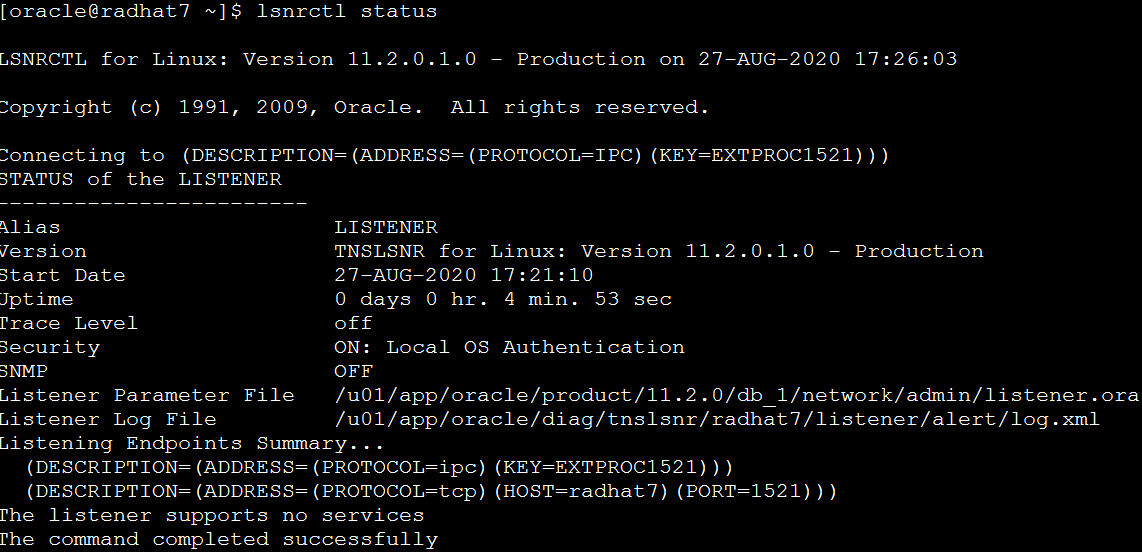
如果出现上图中The listener supports no services的提示,说明监听的配置是有问题的,会导致plsql连接不上等问题:
ORA-12514: TNS:linstener does not currently know of service requested in connect descriptor
百度后,说需要强制注册监听,这种方式可以解决,但是监听重启后再试报The listener supports no services。
强制注册命令:
SQL> select instance_name from v$instance;
SQL> show parameter name
SQL> alter system register;
最后终于找到一个解决办法:
在LISTENER里添加内容:
SID_LIST_LISTENER=
  (SID_LIST=
      (SID_DESC=
         (GLOBAL_DBNAME=orcl)
         (SID_NAME=orcl)
         (ORACLE_HOME=/u01/app/oracle/product/11.2.0/db_1)
         (PRESPAWN_MAX=20)
         (PRESPAWN_LIST=
         (PRESPAWN_DESC=(PROTOCOL=tcp)(POOL_SIZE=2)(TIMEOUT=1))
        )
       )
      )
另外,再启动监听时如果报如下图的错误TNS_00525提示:
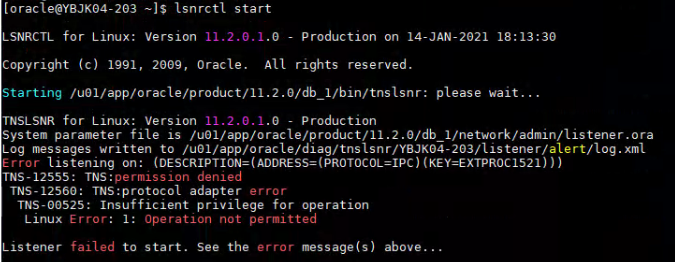
观察发现,提示没有权限,查看.oracle文件的权限:
[root@localhost ~]# ls -lrtd /var/tmp/.oracle
drwxrwxrwt. 2 root root 4096 8u6708   5 21:48 /var/tmp/.oracle
[root@localhost ~]# ls -lrtd /tmp/.oracle
drwxrwxrwt. 2 root root 4096 8u6708   5 20:33 /tmp/.oracle
发现权限虽然是777,但是用户组和所有者不对,改成oracle:dba后再次启动就成功了:
[root@localhost ~]# chown -R oracle:dba /var/tmp/.oracle
[root@localhost ~]# chown -R oracle:dba /tmp/.oracle
[root@localhost ~]# ls -lrtd /tmp/.oracle
drwxrwxrwt. 2 oracle dba 4096 8u6708   5 20:33 /tmp/.oracle
[root@localhost ~]# ls -lrtd /var/tmp/.oracle
drwxrwxrwt. 2 oracle dba 4096 8u6708   5 21:48 /var/tmp/.oracle
10.6、静默DBCA建数据库
修改dbcs.rsp配置文件
以下是我的配置文件,共参考:
 1 [root@kindo-dev-03 ~]# grep -Ev "^$|[#;]" dbca.rsp
 2 [GENERAL]
 3 RESPONSEFILE_VERSION = "11.2.0"
 4 OPERATION_TYPE = "createDatabase"
 5 [CREATEDATABASE]
 6 GDBNAME = "orcl"
 7 SID = "orcl"
 8 TEMPLATENAME = "General_Purpose.dbc"
 9 SYSPASSWORD = "Kindo1234a"
10 SYSTEMPASSWORD = "Kindo1234a"
11 DATAFILEDESTINATION =/u01/app/oracle/oradata
12 RECOVERYAREADESTINATION=/u01/app/oracle/flash_recovery_area
13 CHARACTERSET = "AL32UTF8"
14 NATIONALCHARACTERSET= "UTF8"
开始创建数据库:
[oracle@radhat7 ~]$ $ORACLE_HOME/bin/dbca -silent -responseFile /u01/app/database/response/dbca.rsp
(上述语句执行之后会清屏,如果清屏后没有反应。此时需输入sys/system 密码(可以在响应文件中直接修改)即可开始安装。好像要输入两次。)
检查是否安装成功,是否能连上数据库:
[oracle@radhat7 ~]$ sqlplus / as sysdba
SQL>show parameter;
SQL>select table_name from dba_tables where rownum<5;
删除日志组:
删除默认安装的redo:
切换日志组,待日志变为INACTIVE 状态之后删除:

SQL> alter system switch logfile;
System altered.
SQL> select GROUP#,BYTES/1024/1024 M,MEMBERS,ARCHIVED,STATUS from v$log;
GROUP# M MEMBERS ARC STATUS
---------- ---------- ---------- --- ----------------
3 50 1 NO INACTIVE
4 1024 1 NO INACTIVE
5 1024 1 NO INACTIVE
6 1024 1 NO CURRENT

删除group3:
SQL>alter database drop logfile group 3
Database altered.
11、配置开机自动启动监听、启动Oracle
11.1、修改/etc/oratab
[root@radhat7 oracle]# vi /etc/oratab

11.2、修改/etc/rc.local,在最后添加下列语句
su - oracle -c 'dbstart'
su - oracle -c 'lsnrctl start'
11.3、修改配置文件权限
[root@radhat7 oracle]# chmod +x /etc/rc.local # 配置文件权限
12、开放1521端口(远程连接Oracle所需)
查看端口是否开放:firewall-cmd --query-port=1521/tcp

永久开放1521端口号:firewall-cmd --permanent --zone=public --add-port=1521/tcp

重启防火墙: systemctl restart firewalld.service


查看防火墙状态

systemctl status firewalld.service


备注:启动 | 关闭 | 重启 防火墙

systemctl [start | stop | restart] firewalld.service
ORACLE LINUX防火墙关闭
--查看防火墙状态
[root@oradb ~]# service iptables status
表格:filter
Chain INPUT (policy ACCEPT)
num  target     prot opt source               destination
1    ACCEPT     all  --  0.0.0.0/0            0.0.0.0/0           state RELATED,ESTABLISHED
2    ACCEPT     icmp --  0.0.0.0/0            0.0.0.0/0
3    ACCEPT     all  --  0.0.0.0/0            0.0.0.0/0
4    ACCEPT     tcp  --  0.0.0.0/0            0.0.0.0/0           state NEW tcp dpt:22
5    REJECT     all  --  0.0.0.0/0            0.0.0.0/0           reject-with icmp-host-prohibited

Chain FORWARD (policy ACCEPT)
num  target     prot opt source               destination
1    REJECT     all  --  0.0.0.0/0            0.0.0.0/0           reject-with icmp-host-prohibited

Chain OUTPUT (policy ACCEPT)
num  target     prot opt source               destination

--关闭防火墙,stop只能临时关闭防火墙,系统重启后还是会打开
[root@oradb ~]# service iptables stop
iptables:将链设置为政策 ACCEPT:filter                    [确定]
iptables:清除防火墙规则:                                 [确定]
iptables:正在卸载模块:                                   [确定]

--使用如下命令可以永久关闭防火墙
[root@oradb ~]# chkconfig iptables off
[root@oradb ~]# chkconfig iptables --list
iptables           0:关闭    1:关闭    2:关闭    3:关闭    4:关闭    5:关闭    6:关闭

--如果不想关闭防火墙,可以编辑iptables,只开放1521端口
vi /etc/sysconfig/iptables
A INPUT -p tcp -m state --state NEW -m tcp --dport 1521 -j ACCEPT
--保存配置,以便重启后仍然生效
service iptables save
--查看防火墙规则
iptables -L -n
13、在linux下静默安装oracle常见的那些坑
13.1、静默安装中缺少某些包
解决方法:在静默安装前,先运行下列命令检查是否所有的依赖包都安装了,没有安装的必须先安装好再进行接下来的步骤。
rpm -q binutils compat-libcap1 compat-libstdc++-33 gcc gcc-c++ glibc glibc-devel ksh libaio libaio-devel libgcc libstdc++ libstdc++-devel libXi libXtst make sysstat unixODBC unixODBC-devel
13.2、开始静默安装后,报错“SEVERE: [FATAL] oracle10: oracle10”
这个是静默安装最常见的坑,原因是在etc/hosts 文件中没有添加hostname与ip地址的对应内容。
解决方法:vim /etc/hosts,在最下方加入你的ip地址与hostname(例如192.168.1.1 oracle10),保存退出后重新运行runInstaller静默安装命令即可。
13.3、静默安装后,报错“[INS-08109] Unexpected error occurred while validating inputs at state 'inventoryPage'”
[oracle@L4433 database]$ ./runInstaller -ignoreSysPrereqs -force -silent -responseFile /home/oracle/database/response/db_install_jerry.rsp
Starting Oracle Universal Installer...

Checking Temp space: must be greater than 120 MB.   Actual 10438 MB    Passed
Checking swap space: must be greater than 150 MB.   Actual 2047 MB    Passed
Preparing to launch Oracle Universal Installer from /tmp/OraInstall2015-11-22_03-45-03AM. Please wait ...[oracle@L4433 database]$ [WARNING] - My Oracle Support Username/Email Address Not Specified
[SEVERE] - The product will be registered anonymously using the specified email address.
[WARNING] [INS-08109] Unexpected error occurred while validating inputs at state 'inventoryPage'.
   CAUSE: No additional information available.
   ACTION: Contact Oracle Support Services or refer to the software manual.
   SUMMARY:
       - java.lang.NullPointerException
A log of this session is currently saved as: /tmp/OraInstall2015-11-22_03-45-03AM/installActions2015-11-22_03-45-03AM.log. Oracle recommends that if you want to keep this log, you should move it from the temporary location to a more permanent location.
解决办法:用root修改/etc/oraInst.loc,如下
[root@L4433 oraInventory]# vi /etc/oraInst.loc
inventory_loc=/u01/app/oracle/oraInventory
inst_group=oinstall
有时候可能是oraInventory的设置出现了问题,oraInventory存放的是Oracle软件安装的目录信息,Oralce的安装升级都需要用到这个目录。
检查响应文件db_install.rsp,看看INVENTORY_LOCATION是否有设定(最好是空目录)。一般在db_install.rsp中设置了目录后即可解决,如果还是不能解决,在用root修改/etc/oraInst.loc吧。
13.4、安装success后,运行sqlplus报找不到指令
先尝试下到oracle的bin下运行sqlplus,如果有报缺少包去安装缺少的包即可,能直接运行则说明环境变量配置有问题(要么没配对,要么没有使其永久生效)。
解决办法:vim ~/.bash_profile,配置正确的环境变量后source ~/.bash_profile使其生效。
13.5、监听启动不了
解决方法(不一定管用,最头痛的问题,看具体的错误提示而定):
先配置监听程序:netca /silent /responsefile /home/oracle/etc/netca.rsp
然后修改监控的ip地址:vi /data/app/oracle/product/11.2.0/db_1/network/admin/listener.ora
重新启动:lsnrctl start
13.6、运行sqlplus后,运行报错ERROR:ORA-01034: ORACLE not available
解决办法:用 sys as sysdba进入空闲例程,运行startup启动oracle
13.7、运行startup,报错LRM-00109: could not open parameter file '/data/app/oracle/product/11.1.0/db_1/dbs/initORCL.ora(文件名是init+sid)'
解决办法:$ORACLE_BASE/admin/(dbname)/pfile目录下的init.ora(.01200923383)文件复制到$ORACLE_HOME/dbs目录下即可。
(参考资料:https://www.cnblogs.com/linyfeng/p/7231603.html)。
如果进到$ORACLE_BASE后发现没有admin怎么办?静默建库就好,建好以后会自动生成admin目录。
13.8、静默建库语句运行后出现一直清屏的现象
解决方法:仔细检查应答文件etc/dbca.rsp是否设置正确,特别是SYSPASSWORD= "PASSWARD",SYSTEMPASSWORD= "PASSWARD",SYSMANPASSWORD= "PASSWARD",DBSNMPPASSWORD= "PASSWARD"这几个被注释的行是否有关闭注释,密码是否有输入正确。修改后保存退出etc/dbca.rsp,重新静默建库
13.9、LINUX下卸载ORACLE
1、关掉后台进程
2、关闭监听:lsnrctl stop
3、删除$ORACLE_HOME下的所有文件
4、删除/usr/local/bin目录下的几个文件:dbhome、oraenv、coraenv
5、删除/etc目录下的几个文件:oratab、oraInst.loc
6、删除/opt目录下的文件夹:orclLfmap