• Web Services Software Factory tutorial (5 of 5)


    We have landed. This is tutorial part 5 of 5. In parts 1-4 (part 1 starts here) we created a web service that does some simple encryption, decryption, and hashing. Before beginning this part of the tutorial, please create a virtual directory in IIS pointing to the Web Service project that you set up in part 4 and make it a .Net application. I named the virtual directory CryptService and as such I can browse to http://localhost/CryptService/CryptService.svc and see the service.

    Create a new C# Console Application. I named my application TestCryptService. Right click on your project in solution explorer and select “Add Service Reference”. Put your URL to your service in and click Go. After a few moments, you should see what was discovered about your service. Change the namespace to CryptService and click Ok.
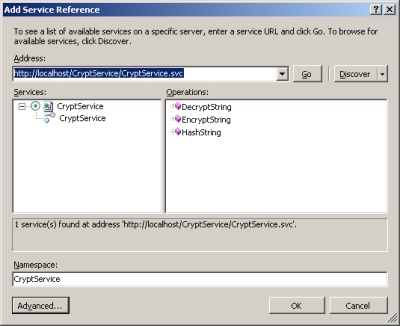
    Add Service Reference to Project

    Notice that all of the binding information has been added to your app.config. If you look at the endpoint section, you will see that /basic was added to the end of the CryptService.svc. I mentioned last time that that allows you to create multiple endpoints to the same point, and just use different bindings, etc.

    <?xml version="1.0" encoding="utf-8" ?>
    <CONFIGURATION>
        
    <SYSTEM.SERVICEMODEL>
            
    <BINDINGS>
                
    <BASICHTTPBINDING>
                    
    <BINDING name="Crypt" useDefaultWebProxy="true" transferMode="Buffered" textEncoding="utf-8" messageEncoding="Text" maxReceivedMessageSize="65536" maxBufferPoolSize="524288" maxBufferSize="65536" hostNameComparisonMode="StrongWildcard" bypassProxyOnLocal="false" allowCookies="false" sendTimeout="00:01:00" receiveTimeout="00:10:00" openTimeout="00:01:00" closeTimeout="00:01:00">
                        
    <READERQUOTAS maxNameTableCharCount="16384" maxBytesPerRead="4096" maxArrayLength="16384" maxStringContentLength="8192" maxDepth="32" />
                        
    <SECURITY mode="None">
    <TRANSPORT realm="" proxyCredentialType="None" clientCredentialType="None" />
                            
    <MESSAGE clientCredentialType="UserName" algorithmSuite="Default" />
                        
    </SECURITY>
                    
    </BINDING>
                
    </BASICHTTPBINDING>
            
    </BINDINGS>
            
    <CLIENT>
                
    <ENDPOINT name="Crypt" contract="CryptService.CryptService" bindingConfiguration="Crypt" binding="basicHttpBinding" address="http://localhost/CryptService/CryptService.svc/basic" />
            
    </CLIENT>
        
    </SYSTEM.SERVICEMODEL>
    </CONFIGURATION>
    Now, within the Program.cs file that was created for you, enter in this code:

    When I run this code, I see this output:
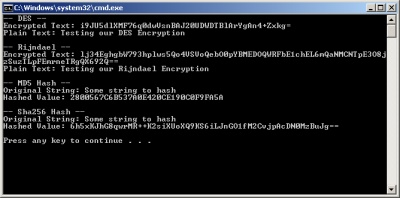
    Test Console Output

    That is IT! If you’ve made it this far and see that output, you are done. You are now ready to use the Web Services Software Factory to make web services yourself. As always, if you didn’t get these results, double check your steps and if you are still having problems, leave me a comment and I will try to help you.

    All code was written as throwaway code, so I realize that it could use some refactoring and some optimization. The point of this tutorial was to expose you to using the WSSF in more than a “Hello World” kind of way and to at least mimic the real world with something a little bit fun.

    reprint [Pete on Software]

  • 相关阅读:
    mybatis中的动态语句中多条件or如何书写
    安装kibana的docker版
    安装elasticsearch的docker版
    git回滚push过的代码
    java中支付宝支付
    05 docker镜像删除
    远程仓库的搭建
    本地git工作流
    创建本地仓库
    git安装
  • 原文地址:https://www.cnblogs.com/RuiLei/p/1371623.html
Copyright © 2020-2023  润新知