本文编写一个计算两个数组和的程序,用CPU和GPU分别运算,计算运算时间,并且校验最后的运算结果。文中代码偏多,原理建议阅读下面文章,文中介绍了OpenCL相关名词概念。
http://opencl.codeplex.com/wikipage?title=OpenCL%20Tutorials%20-%201 (英文版)
http://www.cnblogs.com/leiben/archive/2012/06/05/2536508.html (博友翻译的中文版)
一、创建工程
按照OpenCL入门:(一:Intel核心显卡OpenCL环境搭建)的创建一个名为OpenCLSum的工程,并且添加一个OpenCLSum.cpp文件,一个OpenCLSum.cl文件(添加时选择添加OpenCL文件)。
二、CPU计算代码
用CPU求两个数组和的代码如下:
void RunAsCpu(
    const float *nums1,
    const float *nums2,
    float* sum,
    const int num)
{
    for (int i = 0; i < num; i++)
    {
        sum[i] = nums1[i] + nums2[i];
    }
}
三、GPU计算代码
在cl文件中添加如下代码,//因为运行这个kernel时需要设置一个线程数目, //所以每个线程都会调用一次这个函数,只需要使 //用get_global_id获取它的线程id就可以求和了 __kernel void RunAsGpu( __global const float *nums1, __global const float *nums2, __global float* sum) { int id = get_global_id(0); sum[id] = nums1[id] + nums2[id]; }
四、主函数流程
流程请参考本文开始推荐的文章,有详细说明,下面只在注释中简单说明
//计时函数 double time_stamp() { LARGE_INTEGER curclock; LARGE_INTEGER freq; if ( !QueryPerformanceCounter(&curclock) || !QueryPerformanceFrequency(&freq) ) { return -1; } return double(curclock.QuadPart) / freq.QuadPart; } #define OPENCL_CHECK_ERRORS(ERR) if(ERR != CL_SUCCESS) { cerr << "OpenCL error with code " << ERR << " happened in file " << __FILE__ << " at line " << __LINE__ << ". Exiting... "; exit(1); } int main(int argc, const char** argv) { cl_int error = 0; // Used to handle error codes cl_context context; cl_command_queue queue; cl_device_id device; // 遍历系统中所有OpenCL平台 cl_uint num_of_platforms = 0; // 得到平台数目 error = clGetPlatformIDs(0, 0, &num_of_platforms); OPENCL_CHECK_ERRORS(error); cout << "可用平台数: " << num_of_platforms << endl; cl_platform_id* platforms = new cl_platform_id[num_of_platforms]; // 得到所有平台的ID error = clGetPlatformIDs(num_of_platforms, platforms, 0); OPENCL_CHECK_ERRORS(error); //遍历平台,选择一个Intel平台的 cl_uint selected_platform_index = num_of_platforms; for (cl_uint i = 0; i < num_of_platforms; ++i) { size_t platform_name_length = 0; error = clGetPlatformInfo( platforms[i], CL_PLATFORM_NAME, 0, 0, &platform_name_length ); OPENCL_CHECK_ERRORS(error); // 调用两次,第一次是得到名称的长度 char* platform_name = new char[platform_name_length]; error = clGetPlatformInfo( platforms[i], CL_PLATFORM_NAME, platform_name_length, platform_name, 0 ); OPENCL_CHECK_ERRORS(error); cout << " [" << i << "] " << platform_name; if ( strstr(platform_name, "Intel") && selected_platform_index == num_of_platforms // have not selected yet ) { cout << " [Selected]"; selected_platform_index = i; } cout << endl; delete[] platform_name; } if (selected_platform_index == num_of_platforms) { cerr << "没有找到Intel平台 "; return 1; } // Device cl_platform_id platform = platforms[selected_platform_index]; error = clGetDeviceIDs(platform, CL_DEVICE_TYPE_GPU, 1, &device, NULL); OPENCL_CHECK_ERRORS(error) // Context context = clCreateContext(0, 1, &device, NULL, NULL, &error); OPENCL_CHECK_ERRORS(error) // Command-queue queue = clCreateCommandQueue(context, device, 0, &error); OPENCL_CHECK_ERRORS(error) //下面初始化测试数据(主机数据) const int size = 38888888;//大小和内存有关,仅作示例 float* nums1_h = new float[size]; float* nums2_h = new float[size]; float* sum_h = new float[size]; // Initialize both vectors for (int i = 0; i < size; i++) { nums1_h[i] = nums2_h[i] = (float)i; } //初始化设备数据 const int mem_size = sizeof(float)*size; // 标志位表示数据只读,并且从nums1_h和nums2_h复制数据 cl_mem nums1_d = clCreateBuffer(context, CL_MEM_READ_ONLY | CL_MEM_COPY_HOST_PTR, mem_size, nums1_h, &error); OPENCL_CHECK_ERRORS(error) cl_mem nums2_d = clCreateBuffer(context, CL_MEM_READ_ONLY | CL_MEM_COPY_HOST_PTR, mem_size, nums2_h, &error); OPENCL_CHECK_ERRORS(error) cl_mem sum_d = clCreateBuffer(context, CL_MEM_WRITE_ONLY, mem_size, NULL, &error); OPENCL_CHECK_ERRORS(error) //读取OpenCLSum.cl文件内容 FILE* fp = fopen("OpenCLSum.cl", "rb"); fseek(fp, 0, SEEK_END); size_t src_size = ftell(fp); fseek(fp, 0, SEEK_SET); const char* source = new char[src_size]; fread((void*)source, 1, src_size, fp); fclose(fp); //创建编译运行kernel函数 cl_program program = clCreateProgramWithSource(context, 1, &source, &src_size, &error); OPENCL_CHECK_ERRORS(error) delete[] source; // Builds the program error = clBuildProgram(program, 1, &device, NULL, NULL, NULL); OPENCL_CHECK_ERRORS(error) // Shows the log char* build_log; size_t log_size; // First call to know the proper size clGetProgramBuildInfo(program, device, CL_PROGRAM_BUILD_LOG, 0, NULL, &log_size); build_log = new char[log_size + 1]; // Second call to get the log clGetProgramBuildInfo(program, device, CL_PROGRAM_BUILD_LOG, log_size, build_log, NULL); build_log[log_size] = '�'; cout << build_log << endl; delete[] build_log; // Extracting the kernel cl_kernel run_as_gpu = clCreateKernel(program, "RunAsGpu", &error); OPENCL_CHECK_ERRORS(error) //运行kernel程序 // Enqueuing parameters // Note that we inform the size of the cl_mem object, not the size of the memory pointed by it error = clSetKernelArg(run_as_gpu, 0, sizeof(cl_mem), &nums1_d); error |= clSetKernelArg(run_as_gpu, 1, sizeof(cl_mem), &nums2_d); error |= clSetKernelArg(run_as_gpu, 2, sizeof(cl_mem), &sum_d); OPENCL_CHECK_ERRORS(error) // Launching kernel size_t global_work_size = size; cout << "GPU 运行开始:" << time_stamp() << endl; error = clEnqueueNDRangeKernel(queue, run_as_gpu, 1, NULL, &global_work_size, NULL, 0, NULL, NULL); cout << "GPU 运行结束:" << time_stamp() << endl; OPENCL_CHECK_ERRORS(error) //取得kernel返回值 float* gpu_sum = new float[size]; clEnqueueReadBuffer(queue, sum_d, CL_TRUE, 0, mem_size, gpu_sum, 0, NULL, NULL); cout << "CPU 运行开始:" << time_stamp() << endl; RunAsCpu(nums1_h, nums2_h, sum_h, size); cout << "CPU 运行结束:" << time_stamp() << endl; assert(memcmp(sum_h, gpu_sum, size * sizeof(float)) == 0); delete[] nums1_h; delete[] nums2_h; delete[] sum_h; delete[] gpu_sum; delete[] platforms; clReleaseKernel(run_as_gpu); clReleaseCommandQueue(queue); clReleaseContext(context); clReleaseMemObject(nums1_d); clReleaseMemObject(nums2_d); clReleaseMemObject(sum_d); return 0;
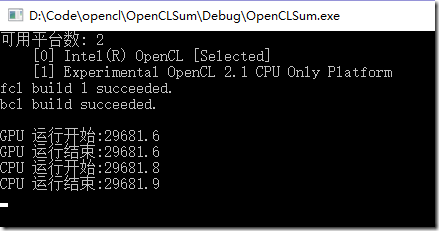
四、运行结果
由于运算比较简单,CPU和GPU几乎没差别,在后续复杂运算中应该是会有差别的。
五、相关下载
六、后续
看了几篇文章后似乎简单使用OpenCL还是不复杂的,OpenCL关键应该在于如何优化性能,如何调用kernel函数,可以将GPU效果最优化。以后的文章一部分涉及OpenCL原理,一部分涉及到更复杂的运算,当然了,博主也是学习阶段,没有练手项目,只能从官方demos中找找了。
