同类的文章网上有好多了,但是开发过程中依然会有很多坑,以及因为对概念的不清晰把自己坑了的情况。这篇文章会梳理我开发过程中遇到的坑以及填坑的方法,附加对Jersey和Webservice一些概念的梳理,附加一些简化开发流程的技巧,文末有相关引用。
所有开发都伴随着搭环境,而搭环境这个事情。。。有时可以很复杂,jar包可能冲突,jar包可能跟服务器发生冲突,不同版本的Jar包使用起来也可能不一样。。。
1. Jersey 1.x 和 2.x项目内的config不同,且jersey 2.x 把 com.sun.jersey的路径改成了org.glassfish.jersey,这是最大的坑。笔者一开始没注意,开着1.x的教程用了2.x的包,即使后来发现了这个问题,但由于1.x陷的太深而改不回来了。
同学们会说,那改用1.x的包不就好啦。事实并非那么简单,jersey1.1和1.9的配置也不同,且官方现在只提供1.9的下载,下载下来有N多jar包,好吧,按照教程做,结果tomcat蹦了。仔细查看教程的tomcat版本是6.0,我用的是8.0.
解决方案: 使用jersey-bundle,这就是等于把所有用得到的jersey包打包成了一个bundle,避免了冲突等问题,网上可以轻松下载到,我用的是jersey-bundle-1.17.1.jar
2. Browser address bar只能发送get请求,这是用浏览器进行测试时遇到的一个大坑。
这个坑参考http://www.cnblogs.com/Raymond-Yang/p/5412611.html,这里不再赘述
---------------------------------------------------------更新 2016.4.27---------------------------------------------------------
1. 添加了项目的github地址(文末)
2. 添加了学习和开发项目心得(文末)
3. 更新了jersey的配置xml
4. 更新了WebService的URI与类和方法的关系解释
-------------------------------------------------------------------------------------------------------------------------------------
1. 开发环境
1. Eclipse Mars 开发前需要下载Eclipse Web开发包,参考Eclipse配置Tomcat服务器和Dynamic Web Project的问题
2. Tomcat 8.0, 同学们可能遇到的坑,同见Eclipse配置Tomcat服务器和Dynamic Web Project的问题
3. Mysql 5.x 这个没什么问题
4. Jersey环境 jersey-bundle-1.17.1.jar google一搜就有,使用bundle能避免很多冲突和环境配置的坑。。推荐
5. 其他
1. gson-2.3.1.jar
2. mysql-connector-java-5.1.38-bin.jar
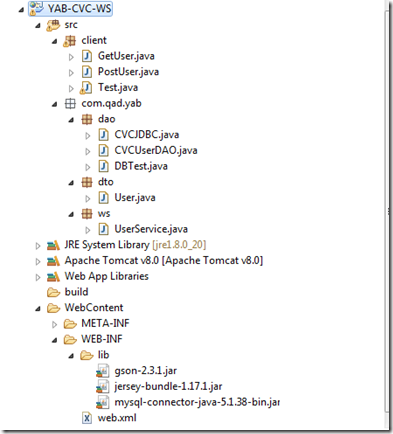
下载下来拷到Project->WebContent->WEB-INF->lib
项目结构
2. 测试环境
为什么在这里提测试环境呢。。。因为楼主之前遇到过一个大坑,通过browser去测试webservice,get还好,post就不行了,一直报405 Error。。我一直以为是我哪里写错了。。最后才发现。。其实是浏览器地址栏只能发送get请求。。。具体参见用浏览器测试Get与Post Webservice,Post一直报405错误,而Get能够成功的原因与解决方法
后期我就用client做测试了,轻松简介。。
3. 代码实施
1. DB连接
这个跟普通的mysql连接没什么区别,代码如下
package com.qad.yab.dao;

import java.sql.Connection;
import java.sql.DriverManager;
import java.sql.SQLException;

public class CVCJDBC {
	private Connection conn;

	public Connection getConn() throws ClassNotFoundException, SQLException {
		if (null != conn) {
			return conn;
		} else {
			Class.forName("com.mysql.jdbc.Driver");
			conn = DriverManager.getConnection("jdbc:mysql://localhost:3306/test1", "cvc", "");
			System.out.println("connect success");
			return conn;
		}
	}
}
2. DAO方法,有get和create两个方法,与基本的java DAO类同,简单的数据库操作
package com.qad.yab.dao;

import java.sql.Connection;
import java.sql.PreparedStatement;
import java.sql.ResultSet;
import java.util.ArrayList;

import com.qad.yab.dto.User;

public class CVCUserDAO {
	private Connection conn;

	public ArrayList<User> getUsers() throws Exception {
		conn = new CVCJDBC().getConn();
		String sql = "select * from user;";
		PreparedStatement stmt = conn.prepareStatement(sql);
		ResultSet result = stmt.executeQuery();
		ArrayList<User> datas = new ArrayList<User>();
		while (result.next()) {

			User data = new User();
			data.setId(result.getInt("id"));
			data.setLoginID(result.getString("LoginID"));
			data.setName(result.getString("name"));
			data.setEmail(result.getString("email"));
			datas.add(data);
		}
		stmt.close();
		return datas;
	}

	public ArrayList<User> getUsers(String loginID) throws Exception {
		conn = new CVCJDBC().getConn();
		String sql = "select * from user where LoginID = '" + loginID + "';";
		PreparedStatement stmt = conn.prepareStatement(sql);
		ResultSet result = stmt.executeQuery();
		ArrayList<User> datas = new ArrayList<User>();
		while (result.next()) {

			User data = new User();
			data.setId(result.getInt("id"));
			data.setLoginID(result.getString("LoginID"));
			data.setName(result.getString("name"));
			data.setEmail(result.getString("email"));
			datas.add(data);
		}
		stmt.close();
		return datas;
	}

	public void createUser(String loginId, String name, String email) {
		try {
			conn = new CVCJDBC().getConn();
			String sql = "insert into user (LoginID, name, email) values(?, ?, ?)";
			PreparedStatement stmt = conn.prepareStatement(sql);
			stmt.setString(1, loginId);
			stmt.setString(2, name);
			stmt.setString(3, email);
			stmt.execute();
			stmt.close();
		} catch (Exception e) {
			System.err.println("ERROR: Exception in create User");

		}
	}
}
3. DTO: 即数据结构类, Data Transaction Obejct
这里用了一个User的Object,里面有loginID, name, email和active,也没什么特别的。
package com.qad.yab.dto;

public class User {

	private int     id;

    private String  loginID;

    private String  name;

    private String  email;

    private boolean active;

    /**
     * Default constructor to create new user
     */
    public User() {
        super();
    }

    /**
     * Create new user with user name
     *
     * @param name
     *            the login ID
     */
    public User(String loginID) {
        super();
        this.loginID = loginID;
    }

    /**
     * @return the id
     */
    public int getId() {
        return id;
    }

    /**
     * @param id
     *            the id to set
     */
    public void setId(int id) {
        this.id = id;
    }

    /**
     * @return the loginID
     */
    public String getLoginID() {
        return loginID;
    }

    /**
     * @param loginID
     *            the loginID to set
     */
    public void setLoginID(String loginID) {
        this.loginID = loginID;
    }

    /**
     * @return the name
     */
    public String getName() {
        return name;
    }

    /**
     * @param name
     *            the name to set
     */
    public void setName(String name) {
        this.name = name;
    }

    /**
     * @return the email
     */
    public String getEmail() {
        return email;
    }

    /**
     * @param email
     *            the email to set
     */
    public void setEmail(String email) {
        this.email = email;
    }

    /**
     * @return the active
     */
    public boolean isActive() {
        return active;
    }

    /**
     * @param active
     *            the active to set
     */
    public void setActive(boolean active) {
        this.active = active;
    }
}
4. WebService (Server side)
好吧,这里才是本文的核心部分
先要理清几个概念
1. Get和Post
Get一般是读取数据,而Post一般是向服务器传递数据,具体可以参见用浏览器测试Get与Post Webservice,Post一直报405错误,而Get能够成功的原因与解决方法,里面解释的很详细了。这里用@GET和@POST来规范方法
2. @Path
这个就是Webservice的路径,比如第一个@Path(”/user”),就能找到这个类,之后@Path("/getUser"),就能具体找到这个方法,获取其返回值
3. @Produces & @Consumes
WebService最终返回何种类型的返回值?在@Produces中定义,一般使用于Get
相对的,WebService接受何种类型的参数?在@Consumes中定义,一般用于Post
4. @QueryParam & @FormParam
WebService的参数定义,@QueryParam 一般用在get方法中,@FormParam一般用在Post方法中
package com.qad.yab.ws;

import java.util.ArrayList;

import javax.ws.rs.Consumes;
import javax.ws.rs.FormParam;
import javax.ws.rs.GET;
import javax.ws.rs.POST;
import javax.ws.rs.Path;
import javax.ws.rs.Produces;
import javax.ws.rs.QueryParam;

import com.google.gson.Gson;
import com.qad.yab.dao.CVCUserDAO;
import com.qad.yab.dto.User;

@Path("/user")
public class UserService {

	@GET
	@Path("/getUser")
	@Produces("application/json")
	public String getUserById(@QueryParam("loginID") String loginID) throws Exception {
		String users = null;
		CVCUserDAO dao = new CVCUserDAO();
		ArrayList<User> datas = dao.getUsers(loginID);
		Gson gson = new Gson();
		users = gson.toJson(datas);

		return users;
	}

	@POST
	@Path("/createUser")
	@Consumes("application/x-www-form-urlencoded")
	public void createUser(@FormParam("loginID") String loginID, @FormParam("name") String name,
			@FormParam("email") String email) throws Exception {
		CVCUserDAO dao = new CVCUserDAO();
		dao.createUser(loginID, name, email);
	}

}
5. WebService Client Side
a. getUser
没什么好解释的。创建Client,绑定resource,指定QueryParam的参数。如果有多个Query,跟着写下去就行了,返回结果。
Http 200 code是请求成功的意思
package client;

import com.sun.jersey.api.client.Client;
import com.sun.jersey.api.client.ClientResponse;
import com.sun.jersey.api.client.WebResource;

public class GetUser {

	public void getUser(String user) {
		try {
			Client client = Client.create();

			WebResource webResource = client.resource("http://localhost:8080/YAB-CVC-WS/REST/user/getUser?");

			ClientResponse response = webResource.queryParam("loginID", user).get(ClientResponse.class);

			if (response.getStatus() != 200) {
				throw new RuntimeException("Failed: HTTP error code: " + response.getStatus());

			}

			String output = response.getEntity(String.class);

			System.out.println(output);
		}

		catch (Exception e) {
			e.printStackTrace();
		}
	}

}
b. postUser (Create User)
和getUser差不多,有两点值得一提
1. 参数传递
与Get不同,Post的参数传递以Json的数据格式传入,而通过string定义一个json数据格式显然太复杂了,这里用到了官方文档推荐的MultivaluedMap,具体可以参见3.5.4. Creating new WebResources from a WebResource
2. 如果post方法是void,Http会返回204错误,204错误是没有return content的意思,加个return值就好
package client;

import javax.ws.rs.core.MultivaluedMap;

import com.sun.jersey.api.client.Client;
import com.sun.jersey.api.client.ClientResponse;
import com.sun.jersey.api.client.WebResource;
import com.sun.jersey.core.util.MultivaluedMapImpl;

public class PostUser {

	public void createUser(String loginID, String name, String email) {
		try {
			Client client = Client.create();

			WebResource webResource = client.resource("http://localhost:8080/YAB-CVC-WS/REST/user/createUser?");
			MultivaluedMap<String, String> postBody = new MultivaluedMapImpl();
			postBody.add("loginID", loginID);
			postBody.add("name", name);
			postBody.add("email", email);

			ClientResponse response = webResource.type("application/x-www-form-urlencoded").post(ClientResponse.class,
					postBody);

			if (response.getStatus() != 200 && response.getEntity(String.class) == "Success") {
				throw new RuntimeException("Failed: HTTP error code: " + response.getStatus());

			}

			System.out.println("User created Successfully");
		} catch (Exception e) {
			e.printStackTrace();
		}

	}

}
6. web.xml
特别需要提醒的是servlet class,使用不同版本的jar包所用的class是不同的T_T,深受其害的飘过
http://localhost:8080/YAB-CVC-WS/REST/user/getUser
YAB-CVC-WS:项目名
REST:URL-PATTERN
user: 在WS类中有定义,索引到类
getUser: 在WS类中有定义,索引到方法
<?xml version="1.0" encoding="UTF-8"?>
<web-app xmlns:xsi="http://www.w3.org/2001/XMLSchema-instance"
    xmlns="http://xmlns.jcp.org/xml/ns/javaee"
    xsi:schemaLocation="http://xmlns.jcp.org/xml/ns/javaee http://xmlns.jcp.org/xml/ns/javaee/web-app_3_1.xsd"
    id="WebApp_ID" version="3.1">
    <display-name>YAB-CVC-WS</display-name>
    <welcome-file-list>
        <welcome-file>index.html</welcome-file>
        <welcome-file>index.htm</welcome-file>
        <welcome-file>index.jsp</welcome-file>
        <welcome-file>default.html</welcome-file>
        <welcome-file>default.htm</welcome-file>
        <welcome-file>default.jsp</welcome-file>
    </welcome-file-list>
    <servlet>
        <servlet-name>ServletService</servlet-name>
        <servlet-class>com.sun.jersey.spi.container.servlet.ServletContainer  </servlet-class>
        <load-on-startup>1</load-on-startup>
    </servlet>
    <servlet-mapping>
        <servlet-name>ServletService</servlet-name>
        <url-pattern>/REST/*</url-pattern>
    </servlet-mapping>

</web-app>
笔者是第一次利用Jersey开发WebService,也是第一次deploy一个项目到Tomcat,有一些体验值得记得
1. 环境的安装
无论是Tomcat,Mysql,都需要进行环境的配置,想寻求一键式的解决,可能有,但大多情况下还是得自己照着教程一步一步慢慢来,否则偷懒其实是浪费时间,因为根本无助于解决问题
2. 信心
第一次运行,意味着不知道结果会是怎么样的,意味着不知道错误是由于自己代码写错了,还是系统出错了(例如Tomcat的Deploy延迟,有时需要deploy两次war file),大量的时间会耗费在debug上,这些时间可能是低效率的,重复的,回头看如果有一个计划或者方法来执行试错,可能更有效率。
3. 可能的提高
Jersey目前已经发布了2.x版本,相比1.x其方法和结构都发生了变化,脑补它应该更加方便使用,但由于笔者当初先看了1.x的教程,也就没有再去用2.x,以后有机会尝试。
没有在linux上进行deploy和真实环境的测试是另一个遗憾,毕竟这是公司的research project,以后有时间再补上吧。
Github: https://github.com/Ray-Young/Jersey-WS
以上
引用:
1. Server的实现: http://www.dineshonjava.com/2013/06/restful-web-services-with-jersey-jax-rs.html#.VxCy7Pl96Ul
2. Client的实现:
a. http://stackoverflow.com/questions/13750010/jersey-client-how-to-add-a-list-as-query-parameter (主要用的是这篇)
b. http://www.mkyong.com/webservices/jax-rs/restful-java-client-with-jersey-client/ (这篇更系统)
