继续介绍IdentityServer4,我们上篇介绍了IdentityServer4实现OAuth2.0的授权方式之一的客户端凭证,接下来我们继续介绍OAuth2.0的另外一种授权方式密码式,Resource Owner Password Credentials。
- post请求
token?grant_type=password&username=USERNAME&password=PASSWORD&client_id=CLIENT_ID&client_secret=secret
从上面url的querystring参数就可以看出来,这里主要就是需要提供用户的用户名和密码,这个在传统的项目还是比较常见
- web后台管理系统
- C/S客户端
1.更新IdentityServer
由于上篇【One by One系列】IdentityServer4(二)使用客户端凭证(Client Credentials)保护API资源已经创建的IdentityServer项目,我们只需要IdentityServer4中注册用户和添加新的客户端。
1.1 注册用户
客户端凭证是没有用户参与的,但是密码式不同,需要用户输入用户名和密码,自然就需要用户数据。当然这块内容就属于OpenID Connect了,因为这跟身份认证相关。
我们在Config.cs里面增加用户数据
public static List<TestUser> TestUsers =>
            new List<TestUser>
            {
                new TestUser()
                {
                    SubjectId="1",
                    Username="admin",
                    Password="admin123456!",
                    Claims=
                    {
                        new Claim(JwtClaimTypes.Name,"RandyField"),
                        new Claim(JwtClaimTypes.GivenName,"Randy"),
                        new Claim(JwtClaimTypes.FamilyName,"Field"),
                        new Claim(JwtClaimTypes.Email,"xxx@qq.com"),
                        new Claim(JwtClaimTypes.EmailVerified,"true",ClaimValueTypes.Boolean),
                        new Claim(JwtClaimTypes.WebSite,"http://www.randyfield.cn"),
                        new Claim(JwtClaimTypes.FamilyName,"Randy"),
                        new Claim(JwtClaimTypes.Address,$@"四川省成都市高新区")
                    }
                }
            };
1.2 注册身份资源
代码如下:
public static IEnumerable<IdentityResource> IdentityResources =>
            new IdentityResource[]
            {
    			//必须要添加,否则报无效的scope错误
                new IdentityResources.OpenId(),
                new IdentityResources.Profile()
            };
1.3 注册新客户端
代码如下:
        public static IEnumerable<Client> Clients =>
            new Client[]
            {
                 new Client
                    {
                        ClientId = "client app",

                        // no interactive user, use the clientid/secret for authentication
                        AllowedGrantTypes = GrantTypes.ClientCredentials,

                        // secret for authentication
                        ClientSecrets =
                        {
                            new Secret("secret-123456".Sha256())
                        },

                        // scopes that client has access to
                        AllowedScopes = { "api1" }
                    },

            	//Resource Owner Password Credentials Client
                 new Client
                     {
                        ClientId="client pwd",
                        AllowedGrantTypes=GrantTypes.ResourceOwnerPassword,
                        ClientSecrets=
                         {
                            new Secret("secret-654321".Sha256())
                         },
                        AllowedScopes={ "api1",
                         IdentityServerConstants.StandardScopes.OpenId,
                         IdentityServerConstants.StandardScopes.Profile }
                     },
            };
这里客户端AllowedScopes除了api资源,还额外指定了用户Identity资源
2.创建客户端
这里我们依然使用上篇的中的客户端控制台程序,只是增加代码,模拟密码式授权
2.1 编码-请求Idisconvery endpoint
略,与上篇相同
2.2 编码-请求access token
            // request token
            var tokenResponse1 = await client.RequestPasswordTokenAsync(new PasswordTokenRequest
            {
                Address = disco.TokenEndpoint,

                ClientId = "client pwd",
                //ClientId = "client",
                ClientSecret = "secret-654321",
                Scope = "api1 openid profile",

                UserName= "admin",
                Password= "admin123456!"
            });

            if (tokenResponse1.IsError)
            {
                Console.WriteLine(tokenResponse1.Error);
                return;
            }
-
RequestClientCredentialsTokenAsync更换为RequestPasswordTokenAsync- 请求参数
ClientCredentialsTokenRequest更换为PasswordTokenRequest
- 请求参数
-
其中的用户名和密码,就是在
IdentityServer注册的用户 -
ClientId与ClientSecret就不赘述了
-
Scope指明了api资源和Identity资源
3.测试
- 启动IdentityServer
cd .IdentityServer
dotnet run
- 启动webapi
cd .webapi
dotnet run
- 用vs启动client
3.1 获取access-token

我们通过http://jwt.calebb.net/解析

3.2 调用api

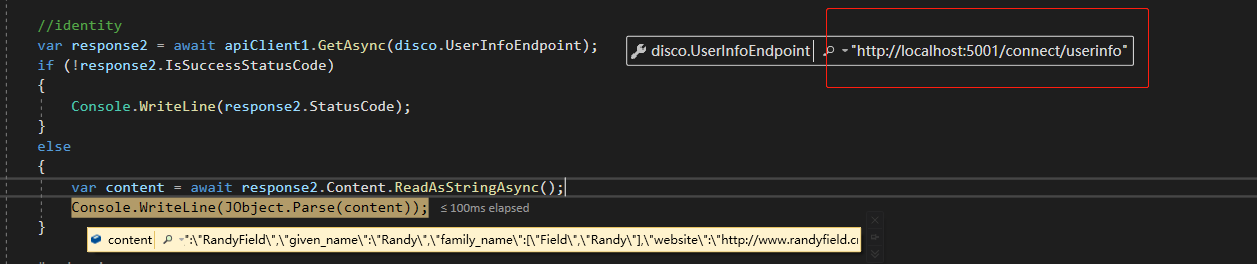
3.3 获取身份信息
调用userinfo端点,获取身份信息