前提:安装centos的时候,最好把系统的所有的安装包都安装上。以下命令需手动输入,不要复制粘贴。
1.以root用户登录centos5.5的操作系统;创建oracle用户组和用户。
groupadd oinstall
useradd –g oinstall –s /bin/bash –d /opt/oracle oracle
passwd oracle
2.以root用户登录系统,修改系统内核参数,添加以下内容:
vi /etc/sysctl.conf
fs.file-max = 6815744
fs.aio-max-nr = 1048576
kernel.shmall = 2097152
kernel.shmmax = 2147483648
kernel.shmmni = 4096
kernel.sem = 250 32000 100 128
net.ipv4.ip_local_port_range = 9000 65500
net.core.rmem_default = 4194304
net.core.rmem_max = 4194304
net.core.wmem_default = 262144
net.core.wmem_max = 1048576
3.要使 /etc/sysctl.conf 更改立即生效,执行以下命令。 输入:sysctl -p
4.编辑/etc/security/limits.conf,添加以下内容:
vi /etc/security/limits.conf
oracle soft nproc 2047
oracle hard nproc 16384
oracle soft nofile 1024
oracle hard nofile 65536
5.编辑/etc/pam.d/login,添加以下内容:
vi /etc/pam.d/login
session required pam_limits.so
6.编辑系统环境配置文件/etc/profile,在最后添加如下内容:
if [ $USER = "oracle" ]; then

    if [ $SHELL = "/bin/ksh" ]; then
           ulimit -p 16384
               ulimit -n 65536
    else
            ulimit -u 16384 -n 65536
    fi
fi
编辑完成后,执行source profile,使其生效。
7.编辑/etc/csh.login,在最后添加如下内容:
if ( $USER == "oracle") then
    limit maxproc 16384
    limit descriptors 65536
endif
8.以orcale用户登录系统,编辑/opt/oracle/.bash_profile,在最后添加如下内容,使用 source /opt/oracle/.bash_profile使之生效。
umask 022
export  ORACLE_BASE=/opt/oracle
export  ORACLE_HOME=$ORACLE_HOME/app/product/11.2.0
export  ORACLE_SID=orcl
export  PATH=$PATH:$HOME/bin:$ORACLE_HOME/bin
注:这里的ORACLE_SID的值,是需要用到的数据库的SID。
9.以oracle用户登录系统,将oracle11g客户端的包上传到/opt目录下解压;修改解压后包的文件权限。
unzip linux_11gR2_client.zip
chmod –R 755 client
10.进入安装目录,执行./runInstall;
cd client
./ runInstall
启动图形化界面,点击下一步;
11.语言默认的English,下一步;
12.选择”Administrator(1.38GB)”安装类型,点击下一步;
13.设置Oracle base目录和Oracle home目录,点击下一步;
14.安装程序自动读取oracle用户环境变量中设置的目录和用户组;
选择目录/opt/oracle/ oraInventory目录,用户组默认为oinstall,点击下一步
15.校验安装oracle的安装环境发现内核缺少部分参数,系统缺少某些安装包,如果缺少,请安装。
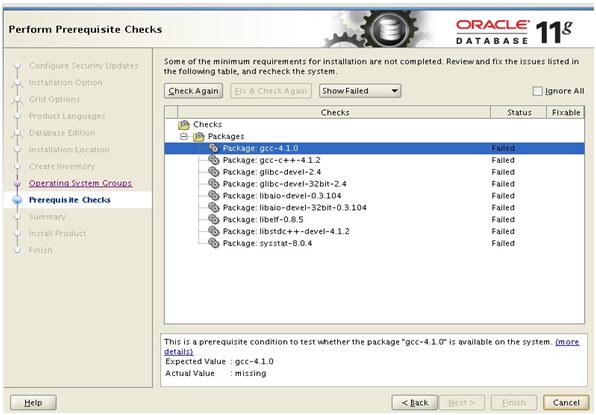
16.安装完成后,再次检查是否存在失败的情况,若无,执行下一步;
17.系统开始安装,到最后的时候,系统会先提示你需要用root权限执行2个shell脚本:
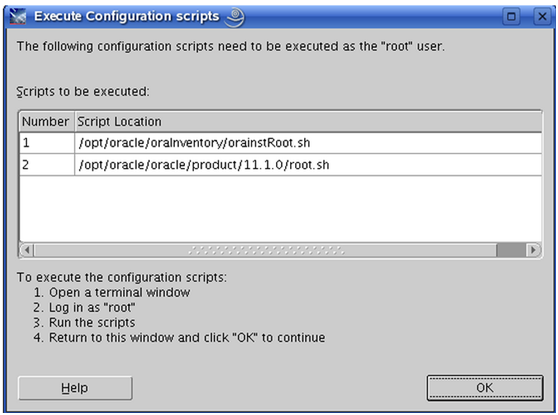
打开终端,切换到root用户,根据路径执行两个脚本;如下所示:
# /opt/oracle/oraInventory/orainstRoot.sh
Changing permissions of /opt/oracle/oraInventory to 770.
Changing groupname of /opt/oracle/oraInventory to dba.
The execution of the script is complete
# /opt/oracle/oracle/product/11.1.0/root.sh
Running Oracle 11g root.sh script...
The following environment variables are set as:
ORACLE_OWNER=oracle
ORACLE_HOME=/opt/oracle/oracle/product/11.1.0
Enter the full pathname of the local bin directory: [/usr/local/bin]: [直接回车即可]
Copying dbhome to /usr/local/bin ...
Copying oraenv to /usr/local/bin ...
Copying coraenv to /usr/local/bin ...
Creating /etc/oratab file...
Entries will be added to the /etc/oratab file as needed by Database Configuration Assistant when a database is created Finished running generic part of root.sh script. Now product-specific root actions will be performed.
18.点击finsh,完成安装。
19.重新打开一个新的终端,使用netca命令配置监听和本地的net服务.
20.本地net服务配置完成之后,用sqlplus连接测试是否成功。
2015-01-20 13:11:28