解决掉了最头疼的DirectoryWatcher内部实现,这一节可以结束NodeWatchFileSystem模块。
关于watch的应用场景,仔细思考了下,这不就是热重载的核心嘛。
首先是监视文件,触发文件change事件后收集变动文件信息,重新进行打包,更新JS后触发页面重新渲染,perfect!
首先重新回忆一下NodeWatchFileSystem模块:
"use strict";

const Watchpack = require("watchpack");

class NodeWatchFileSystem {
    constructor(inputFileSystem) {
        this.inputFileSystem = inputFileSystem;
        this.watcherOptions = {
            aggregateTimeout: 0
        };
        this.watcher = new Watchpack(this.watcherOptions);
    }
    watch(files, dirs, missing, startTime, options, callback, callbackUndelayed) {
        // ...
        const oldWatcher = this.watcher;
        this.watcher = new Watchpack(options);
        // 当新监视器生成时立即调用的函数
        if (callbackUndelayed)
            this.watcher.once("change", callbackUndelayed);
        // callback在这里调用
        this.watcher.once("aggregated", (changes, removals) => { /**/ });
        // 分别传入 文件目录数组 文件夹目录数组 时间标记
        this.watcher.watch(files.concat(missing), dirs.concat(missing), startTime);
        // 关闭旧监视器
        if (oldWatcher) {
            oldWatcher.close();
        }
        return {
            close: () => {
                if (this.watcher) {
                    this.watcher.close();
                    this.watcher = null;
                }
            },
            pause: () => {
                if (this.watcher) {
                    this.watcher.pause();
                }
            }
        };
    }
}

module.exports = NodeWatchFileSystem;
在构造函数中会初始化一个Watchpack实例赋给watcher,每一次调用watch方法会重新生成一个的watcher并同时关闭旧的watcher。
模块只有一个原型方法watch,参数解析如下:
1.files、dirs、missing为文件路径相关
2.options为初始化watchpack实例的参数
3.callback与callbackUndelayed为回调函数
这里有两个回调函数,一个在新监视器生成时立即调用,一个在监视器触发aggregated事件时调用。
返回的对象有两个方法,一个用来关闭监视器,一个用来暂停监视器。
下面看Watchpack模块源码,先从构造函数开始讲解:
class Watchpack {
    constructor(options) {
        EventEmitter.call(this);
        // 参数处理
        if (!options) options = {};
        // 设置定时器参数默认值
        if (!options.aggregateTimeout) options.aggregateTimeout = 200;
        this.options = options;
        this.watcherOptions = {
            ignored: options.ignored,
            poll: options.poll
        };
        // 文件监视器容器
        this.fileWatchers = [];
        // 文件夹监视器容器
        this.dirWatchers = [];
        // 指定文件修改时间容器
        this.mtimes = Object.create(null);
        // 暂停标记
        this.paused = false;
        // 定时器ID收集容器
        this.aggregatedChanges = [];
        this.aggregatedRemovals = [];
        // 本地定时器参数
        this.aggregateTimeout = 0;
        this._onTimeout = this._onTimeout.bind(this);
    };
    // prototype methods...
}
大体上可分为容器、标记、参数三部分。
容器包括文件与文件夹的监视器容器以及几个定时器ID相关的容器,标记只有一个暂停标记,参数为定时器的时间参数。
下面是核心方法watch,源码整理如下:
Watchpack.prototype.watch = function watch(files, directories, startTime) {
    // 暂停标记置false
    this.paused = false;
    // 取出旧的监视器
    var oldFileWatchers = this.fileWatchers;
    var oldDirWatchers = this.dirWatchers;
    // 分别调用watchFile与watchDirectory对文件与文件夹进行监视
    // 将监视器赋值给对应的容器
    this.fileWatchers = files.map(function(file) {
        return this._fileWatcher(file, watcherManager.watchFile(file, this.watcherOptions, startTime));
    }, this);
    this.dirWatchers = directories.map(function(dir) {
        return this._dirWatcher(dir, watcherManager.watchDirectory(dir, this.watcherOptions, startTime));
    }, this);
    // 关闭所有旧的监视器
    oldFileWatchers.forEach(function(w) {
        w.close();
    }, this);
    oldDirWatchers.forEach(function(w) {
        w.close();
    }, this);
};
过了watchManager模块后,这里就变得十分简单明了,分别取出数组的目录元素,分别进行监视操作,将返回的监视器数组赋值给容器。
同样,每一次调用watch会关闭所有旧的监视器。
接下里是关于file与dir的不同处理:
_fileWatcher
// 传入文件路径与watcher
Watchpack.prototype._fileWatcher = function _fileWatcher(file, watcher) {
    // 绑定change、remove事件的触发事件
    watcher.on("change", function(mtime, type) {
        this._onChange(file, mtime, file, type);
    }.bind(this));
    watcher.on("remove", function(type) {
        this._onRemove(file, file, type);
    }.bind(this));
    return watcher;
};
如果看了上一节会发现,DirectoryWatcher模块内部源码只有emit触发事件,并没有任何on来处理事件。
这里就是处理模块内部事件触发的地方,触发change调用本地的_onchange方法,触发remove调用本地的_onRemove方法,参数没有什么解释的。
_dirWatcher
Watchpack.prototype._dirWatcher = function _dirWatcher(item, watcher) {
    // 只是触发change事件
    watcher.on("change", function(file, mtime, type) {
        this._onChange(item, mtime, file, type);
    }.bind(this));
    return watcher;
};
文件夹只有增加和删除,一个change事件就足够了。
_onChange
// item、file都是文件路径
Watchpack.prototype._onChange = function _onChange(item, mtime, file) {
    file = file || item;
    // 新增或更新对应文件的修改时间
    this.mtimes[file] = mtime;
    // 暂停时不触发change事件
    if (this.paused) return;
    this.emit("change", file, mtime);
    // 清除本地定时器
    if (this.aggregateTimeout)
        clearTimeout(this.aggregateTimeout);
    // 变动文件
    if (this.aggregatedChanges.indexOf(item) < 0)
        this.aggregatedChanges.push(item);
    // 设置定时器
    this.aggregateTimeout = setTimeout(this._onTimeout, this.options.aggregateTimeout);
};
变动的文件信息会被加入到对应的容器,最后会调用一个定时器,定时器间隔为穿进来的参数。
_onRemove
Watchpack.prototype._onRemove = function _onRemove(item, file) {
    file = file || item;
    // 删除容器中对应的文件信息
    delete this.mtimes[item];
    if (this.paused) return;
    // 触发remove事件
    this.emit("remove", item);
    if (this.aggregateTimeout)
        clearTimeout(this.aggregateTimeout);
    // 删除文件的信息加入容器
    if (this.aggregatedRemovals.indexOf(item) < 0)
        this.aggregatedRemovals.push(item);
    // 触发aggregated事件
    this.aggregateTimeout = setTimeout(this._onTimeout, this.options.aggregateTimeout);
};
_onTimeout
Watchpack.prototype._onTimeout = function _onTimeout() {
    // 定时器ID置0
    this.aggregateTimeout = 0;
    // 变动与删除的文件信息数组
    var changes = this.aggregatedChanges;
    var removals = this.aggregatedRemovals;
    // 清空
    this.aggregatedChanges = [];
    this.aggregatedRemovals = [];
    // 触发aggregated事件
    this.emit("aggregated", changes, removals);
};
简单概括就是会在给定时间后调触发aggregated事件,将变动与删除的文件信息数组作为参数传递出去并清空数组。
总体来说,文件的增加与内容修改会触发change事件,删除会触发remove事件。文件夹只有change事件。无论是触发change还是remove,都会将对应的文件信息用aggregated事件传递出去。
调用pause方法时,所有的操作将不会触发任何事件,但是文件修改信息仍然会被收集。
值得注意的是,源码内部并没有任何继续监视的方法,虽然有一个resume函数,但是:
Watchpack.prototype.close = function resume() { /**/ }
看到没,假的,虽然名字叫resume,但是实际上关掉了监视。继续监视唯一的办法是重新调用watch方法,但是会清空所有watcher容器并重新生成一批新的。也就是说,pause相当于stop。
源码中还有个getTimes的原型方法,有兴趣自己去看,暂时不讲了。
最后来用小案例模拟这些模块的使用,目录如图:
测试代码如下:
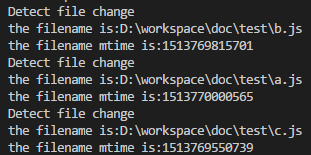
// 模块引入
// 我都复制过来了!
const Watchpack = require('./lib/watchpack');
const fs = require('fs');
const path = require('path');
// 实例化一个Watchpack类 不传参
const el = new Watchpack();
// 需要监视的文件夹
const rootPath = path.join(process.cwd(), 'test');
fs.readdir(rootPath, (err, items) => {
    // 文件夹中的文件全部做监视
    items = items.map((v) => path.join(rootPath, v));
    // 对所有文件做监视
    el.watch(items, [], 1);
});
// 监视change事件
el.on('change', (...args) => {
    console.log('Detect file change
the filename is:' + args[0] + '
the filename mtime is:' + args[1]);
});
// 监视remove事件
el.on('remove', (...args) => {
    console.log('Detect file remove
the filename is:' + args[0]);
});
这里暂时先不对文件夹进行监视,遍历test文件夹,将所有文件路径包装成数组传入watch方法(第三个参数真不懂啥意思,传1反正没错)。
在node指令执行的时候,就会打印出一连串的信息:
在初始化的时候,每一次生成一个监视器,就会先触发一次change事件,并初始化文件的mtime,触发的源码如下:
DirectoryWatcher.prototype.setFileTime = function setFileTime(filePath, mtime, initial, type) {
    // ...
    if (!old) {
        if (mtime) {
            //  watch方法会设置该属性
            if (this.watchers[withoutCase(filePath)]) {
                this.watchers[withoutCase(filePath)].forEach(function(w) {
                    if (!initial || w.checkStartTime(mtime, initial)) {
                        // 触发事件
                        w.emit("change", mtime, initial ? "initial" : type);
                    }
                });
            }
        }
    }
    // ...
}
这个地方的事件只会在初始化的时候被调用。
这里有一个小问题,在每一次初始化的时候会进行doInitScan扫描,扫描的文件信息会被填充到files容器中,即
// files
['D:\workspace\doc\test\a.js', 'D:\workspace\doc\test\b.js', 'D:\workspace\doc\test\c.js']
然后在watch方法有这么一段代码:
DirectoryWatcher.prototype.watch = function watch(filePath, startTime) {
    //...
    var data;
    if (filePath === this.path) { /**/ }
    // 获取文件
    else {
        data = this.files[filePath];
    }
    process.nextTick(function() {
        if (data) {
            var ts = data[0] === data[1] ? data[0] + FS_ACCURACY : data[0];
            // 这里的startTime为1 肯定能进去
            if (ts >= startTime)
                watcher.emit("change", data[1]);
        }
        // ...
    }.bind(this));
    return watcher;
};
watch方法会在后面会尝试获取容器中的文件信息并处罚change事件,理论上这里会触发两次change,然而实际上只有一次。
原因就在初始化扫描时候使用了async模块的方法,即:
fs.readdir(this.path, function(err, items) {
    // 扫描文件并将信息填入容器中
    async.forEach(items, function(item, callback) {
        // ...
    })
});
该模块的方法全是异步调用,所以在watch方法调用的第一时刻,此时初始化扫描还在进行中,files容器仍然为空,在watch与doInitScan方法中加log,可以发现:

在watch方法完成后,扫描才开始。
扫描开始后,进程挂起等待文件操作行为,这里分别对文件进行各种操作:
修改文件内容

触发了change事件。
删除文件


触发了remove事件。
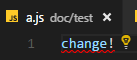
修改文件名
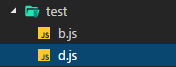

这里仅仅触发了remove事件。
原因在于,这个操作被系统认为是删除一个文件再增加一个文件,但是文件增加在监视文件时是不会触发任何事件的,也不会生成该文件的watcher,只会将该文件信息收集进files容器中,这个在之前讲过。
注意,顺序是先删后增,这里可以简单的log一下,因为在setFileTime中传了对应的事件类型,虽然没有用上,这里测试可以用用:

改名后,打印:
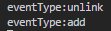
过程为,先触发了触发unlink事件,将文件删除,然后将新文件的信息加入到files容器中,然后触发文件的change事件。
接下来是文件夹监视操作,测试代码如下:
// 模块引入
// 我都复制过来了!
const Watchpack = require('./lib/watchpack');
const fs = require('fs');
const path = require('path');
// 实例化一个Watchpack类 不传参
const el = new Watchpack();
// 需要监视的文件夹
const directory = path.join(process.cwd(), 'test');
el.watch([], [directory], 1);
// 监视change事件
el.on('change', (...args) => {
    console.log('change: ' + args.join(','));
});
注意,文件夹无论怎样都只会触发change事件。这里搞两张图片特别累,所以直接展示传过来的参数。
新建文件

文件路径与修改时间。
删除文件

只有文件路径,因为文件被删了。
文件改名

这个地方事就多了,这三处触发全部来源于setFileTime方法中:
DirectoryWatcher.prototype.setFileTime = function setFileTime(filePath, mtime, initial, type) {
    // ...

    if (this.watchers[withoutCase(this.path)]) {
        this.watchers[withoutCase(this.path)].forEach(function(w) {
            if (!initial || w.checkStartTime(mtime, initial)) {
                w.emit("change", filePath, mtime, initial ? "initial" : type);
            }
        });
    }
};
DirectoryWatcher.prototype.watch = function watch(filePath, startTime) {
    this.watchers[withoutCase(filePath)] = this.watchers[withoutCase(filePath)] || [];
    var watcher = new Watcher(this, filePath, startTime);
    this.watchers[withoutCase(filePath)].push(watcher);
    // ...
}
因为watch的是一个文件夹,所以在watcher容器中会有对应的键,所以任何文件的变动都会触发文件夹的change事件。
这里改文件名会涉及:删除文件触发一次,增加文件触发一次,change事件触发一次。
至此,基本上该watch模块的内容基本处理完毕,撒花!