CentOS 8和kubernetes 1.20都是当前最新的版本,下面演示的是在 CentOS 8系统上部署k8s集群环境。
部署 k8s 集群环境步骤
1 系统准备
2 安装常用包 和 docker-ce
3 安装kubectl、kubelet、kubeadm
4 初始化 k8s 集群
5 安装calico网络
6 安装kubernetes-dashboard
7 node节点服务器配置以及加入集群
注意 注意 注意
1 系统准备
准备四台 centos8 服务器,主机名与静态IP地址如下表所示(参考下边 master 节点服务器的配置):
角色 主机名 ip地址
master master 192.168.1.25
node node1 192.168.1.26
node node2 192.168.1.27
nfs node3 192.168.1.28
下面以 master 服务器为例,进行相应的配置(node 节点也需要做同样的配置):
查看系统版本
[root@master ~]# cat /etc/centos-release
CentOS Linux release 8.3.2011
关闭防火墙
[root@master ~]# systemctl stop firewalld && systemctl disable firewalld
配置网络
[root@master ~]# cat /etc/sysconfig/network-scripts/ifcfg-ens33
TYPE="Ethernet"
PROXY_METHOD="none"
BROWSER_ONLY="no"
BOOTPROTO="static"
DEFROUTE="yes"
IPV4_FAILURE_FATAL="no"
IPV6INIT="yes"
IPV6_AUTOCONF="yes"
IPV6_DEFROUTE="yes"
IPV6_FAILURE_FATAL="no"
IPV6_ADDR_GEN_MODE="stable-privacy"
NAME="ens33"
UUID="f47b7ac6-e1e3-4ec5-a1b4-855dff9fa3cb"
DEVICE="ens33"
ONBOOT="yes"
IPADDR=192.168.1.25
NETMASK=255.255.255.0
GATEWAY=192.168.1.1
DNS1=223.5.5.5
添加阿里源
[root@master ~]# rm -rfv /etc/yum.repos.d/*
[root@master ~]# curl -o /etc/yum.repos.d/CentOS-Base.repo http://mirrors.aliyun.com/repo/Centos-8.repo
配置主机名
[root@master ~]# cat /etc/hosts
127.0.0.1 localhost localhost.localdomain localhost4 localhost4.localdomain4
::1 localhost localhost.localdomain localhost6 localhost6.localdomain6
192.168.1.25 master.sanchar.com master
192.168.1.26 node1.sanchar.com node1
192.168.1.27 node2.sanchar.com node2
192.168.1.28 node3.sanchar.com node3
关闭SElinux
[root@master ~]# sed -i 's/enforcing/disabled/' /etc/selinux/config && setenforce 0
关闭swap,注释swap分区
[root@master ~]# swapoff -a
[root@master ~]# cat /etc/fstab
#
# /etc/fstab
# Created by anaconda on Fri Dec 25 03:30:01 2020
#
# Accessible filesystems, by reference, are maintained under '/dev/disk/'.
# See man pages fstab(5), findfs(8), mount(8) and/or blkid(8) for more info.
#
# After editing this file, run 'systemctl daemon-reload' to update systemd
# units generated from this file.
#
/dev/mapper/cl-root / xfs defaults 0 0
UUID=75c36a78-fe92-49b4-a2ff-3a3a7c1aff76 /boot ext4 defaults 1 2
# /dev/mapper/cl-swap swap swap defaults 0 0
2 安装常用包和docker-ce
常用包安装
[root@master ~]# yum -y install vim bash-completion net-tools gcc
Docker-ce安装
这里可以参考我的另外一篇博客Centos 7安装docker & docker-compose
添加 aliyun docker仓库加速器
[root@master ~]# mkdir -p /etc/docker
[root@master ~]# tee /etc/docker/daemon.json <<-'EOF'
{
"registry-mirrors": ["https://l3go4y6y.mirror.aliyuncs.com"]
}
EOF
[root@master ~]# systemctl daemon-reload && systemctl restart docker
3 安装kubectl、kubelet、kubeadm
添加阿里kubernetes源
[root@master ~]# cat <<EOF > /etc/yum.repos.d/kubernetes.repo
[kubernetes]
name=Kubernetes
baseurl=https://mirrors.aliyun.com/kubernetes/yum/repos/kubernetes-el7-x86_64/
enabled=1
gpgcheck=1
repo_gpgcheck=1
gpgkey=https://mirrors.aliyun.com/kubernetes/yum/doc/yum-key.gpg https://mirrors.aliyun.com/kubernetes/yum/doc/rpm-package-key.gpg
EOF
安装
[root@master ~]# yum -y install kubectl kubelet kubeadm
[root@master ~]# systemctl enable kubelet
4 初始化 k8s 集群
由于kubeadm 默认从官网k8s.grc.io下载所需镜像,国内无法访问,因此需要通过–image-repository指定阿里云镜像仓库地址。
[root@master ~]# kubeadm init --kubernetes-version=1.20.1 --apiserver-advertise-address=192.168.1.25 --image-repository registry.aliyuncs.com/google_containers --service-cidr=10.10.0.0/16 --pod-network-cidr=10.122.0.0/16
POD的网段为: 10.122.0.0/16, api server地址就是master本机IP。
集群初始化成功后返回如下信息:
[init] Using Kubernetes version: v1.20.1
[preflight] Running pre-flight checks
[WARNING FileExisting-tc]: tc not found in system path
[WARNING SystemVerification]: this Docker version is not on the list of validated versions: 20.10.1. Latest validated version: 19.03
[preflight] Pulling images required for setting up a Kubernetes cluster
[preflight] This might take a minute or two, depending on the speed of your internet connection
[preflight] You can also perform this action in beforehand using 'kubeadm config images pull'
[certs] Using certificateDir folder "/etc/kubernetes/pki"
[certs] Generating "ca" certificate and key
[certs] Generating "apiserver" certificate and key
[certs] apiserver serving cert is signed for DNS names [kubernetes kubernetes.default kubernetes.default.svc kubernetes.default.svc.cluster.local master] and IPs [10.10.0.1 192.168.1.25]
[certs] Generating "apiserver-kubelet-client" certificate and key
[certs] Generating "front-proxy-ca" certificate and key
[certs] Generating "front-proxy-client" certificate and key
[certs] Generating "etcd/ca" certificate and key
[certs] Generating "etcd/server" certificate and key
[certs] etcd/server serving cert is signed for DNS names [localhost master] and IPs [192.168.1.25 127.0.0.1 ::1]
[certs] Generating "etcd/peer" certificate and key
[certs] etcd/peer serving cert is signed for DNS names [localhost master] and IPs [192.168.1.25 127.0.0.1 ::1]
[certs] Generating "etcd/healthcheck-client" certificate and key
[certs] Generating "apiserver-etcd-client" certificate and key
[certs] Generating "sa" key and public key
[kubeconfig] Using kubeconfig folder "/etc/kubernetes"
[kubeconfig] Writing "admin.conf" kubeconfig file
[kubeconfig] Writing "kubelet.conf" kubeconfig file
[kubeconfig] Writing "controller-manager.conf" kubeconfig file
[kubeconfig] Writing "scheduler.conf" kubeconfig file
[kubelet-start] Writing kubelet environment file with flags to file "/var/lib/kubelet/kubeadm-flags.env"
[kubelet-start] Writing kubelet configuration to file "/var/lib/kubelet/config.yaml"
[kubelet-start] Starting the kubelet
[control-plane] Using manifest folder "/etc/kubernetes/manifests"
[control-plane] Creating static Pod manifest for "kube-apiserver"
[control-plane] Creating static Pod manifest for "kube-controller-manager"
[control-plane] Creating static Pod manifest for "kube-scheduler"
[etcd] Creating static Pod manifest for local etcd in "/etc/kubernetes/manifests"
[wait-control-plane] Waiting for the kubelet to boot up the control plane as static Pods from directory "/etc/kubernetes/manifests". This can take up to 4m0s
[kubelet-check] Initial timeout of 40s passed.
[apiclient] All control plane components are healthy after 98.007042 seconds
[upload-config] Storing the configuration used in ConfigMap "kubeadm-config" in the "kube-system" Namespace
[kubelet] Creating a ConfigMap "kubelet-config-1.20" in namespace kube-system with the configuration for the kubelets in the cluster
[upload-certs] Skipping phase. Please see --upload-certs
[mark-control-plane] Marking the node master as control-plane by adding the labels "node-role.kubernetes.io/master=''" and "node-role.kubernetes.io/control-plane='' (deprecated)"
[mark-control-plane] Marking the node master as control-plane by adding the taints [node-role.kubernetes.io/master:NoSchedule]
[bootstrap-token] Using token: mwxojd.djyh86ktwwwyv0qp
[bootstrap-token] Configuring bootstrap tokens, cluster-info ConfigMap, RBAC Roles
[bootstrap-token] configured RBAC rules to allow Node Bootstrap tokens to get nodes
[bootstrap-token] configured RBAC rules to allow Node Bootstrap tokens to post CSRs in order for nodes to get long term certificate credentials
[bootstrap-token] configured RBAC rules to allow the csrapprover controller automatically approve CSRs from a Node Bootstrap Token
[bootstrap-token] configured RBAC rules to allow certificate rotation for all node client certificates in the cluster
[bootstrap-token] Creating the "cluster-info" ConfigMap in the "kube-public" namespace
[kubelet-finalize] Updating "/etc/kubernetes/kubelet.conf" to point to a rotatable kubelet client certificate and key
[addons] Applied essential addon: CoreDNS
[addons] Applied essential addon: kube-proxy
Your Kubernetes control-plane has initialized successfully!
To start using your cluster, you need to run the following as a regular user:
mkdir -p $HOME/.kube
sudo cp -i /etc/kubernetes/admin.conf $HOME/.kube/config
sudo chown $(id -u):$(id -g) $HOME/.kube/config
Alternatively, if you are the root user, you can run:
export KUBECONFIG=/etc/kubernetes/admin.conf
You should now deploy a pod network to the cluster.
Run "kubectl apply -f [podnetwork].yaml" with one of the options listed at:
https://kubernetes.io/docs/concepts/cluster-administration/addons/
Then you can join any number of worker nodes by running the following on each as root:
kubeadm join 192.168.1.25:6443 --token mwxojd.djyh86ktwwwyv0qp
--discovery-token-ca-cert-hash sha256:c90285666b8eae41a0a5dfaaa0f60fac279ffffa8378ba91e4dddf730b6c5367
记录生成的最后部分内容,此内容是在其它节点加入Kubernetes集群时执行。
根据提示创建kubectl
[root@master ~]# mkdir -p $HOME/.kube
[root@master ~]# sudo cp -i /etc/kubernetes/admin.conf $HOME/.kube/config
[root@master ~]# sudo chown $(id -u):$(id -g) $HOME/.kube/config
执行下面命令,使kubectl可以自动补充
[root@master ~]# source <(kubectl completion bash) && echo 'source <(kubectl completion bash)' >> ~/.bashrc
查看节点,pod
[root@master ~]# kubectl get node
NAME STATUS ROLES AGE VERSION
master NotReady control-plane,master 11m v1.20.1
[root@master ~]# kubectl get pod --all-namespaces
NAMESPACE NAME READY STATUS RESTARTS AGE
kube-system coredns-7f89b7bc75-6jzcr 0/1 Pending 0 11m
kube-system coredns-7f89b7bc75-fzq95 0/1 Pending 0 11m
kube-system etcd-master 1/1 Running 0 11m
kube-system kube-apiserver-master 1/1 Running 0 11m
kube-system kube-controller-manager-master 1/1 Running 0 11m
kube-system kube-proxy-t8jlr 1/1 Running 0 11m
kube-system kube-scheduler-master 1/1 Running 0 11m
5 安装calico网络
[root@master ~]# kubectl apply -f https://docs.projectcalico.org/manifests/calico.yaml
configmap/calico-config created
customresourcedefinition.apiextensions.k8s.io/bgpconfigurations.crd.projectcalico.org created
customresourcedefinition.apiextensions.k8s.io/bgppeers.crd.projectcalico.org created
customresourcedefinition.apiextensions.k8s.io/blockaffinities.crd.projectcalico.org created
customresourcedefinition.apiextensions.k8s.io/clusterinformations.crd.projectcalico.org created
customresourcedefinition.apiextensions.k8s.io/felixconfigurations.crd.projectcalico.org created
customresourcedefinition.apiextensions.k8s.io/globalnetworkpolicies.crd.projectcalico.org created
customresourcedefinition.apiextensions.k8s.io/globalnetworksets.crd.projectcalico.org created
customresourcedefinition.apiextensions.k8s.io/hostendpoints.crd.projectcalico.org created
customresourcedefinition.apiextensions.k8s.io/ipamblocks.crd.projectcalico.org created
customresourcedefinition.apiextensions.k8s.io/ipamconfigs.crd.projectcalico.org created
customresourcedefinition.apiextensions.k8s.io/ipamhandles.crd.projectcalico.org created
customresourcedefinition.apiextensions.k8s.io/ippools.crd.projectcalico.org created
customresourcedefinition.apiextensions.k8s.io/kubecontrollersconfigurations.crd.projectcalico.org created
customresourcedefinition.apiextensions.k8s.io/networkpolicies.crd.projectcalico.org created
customresourcedefinition.apiextensions.k8s.io/networksets.crd.projectcalico.org created
clusterrole.rbac.authorization.k8s.io/calico-kube-controllers created
clusterrolebinding.rbac.authorization.k8s.io/calico-kube-controllers created
clusterrole.rbac.authorization.k8s.io/calico-node created
clusterrolebinding.rbac.authorization.k8s.io/calico-node created
daemonset.apps/calico-node created
serviceaccount/calico-node created
deployment.apps/calico-kube-controllers created
serviceaccount/calico-kube-controllers created
poddisruptionbudget.policy/calico-kube-controllers created
查看pod和node
[root@master ~]# kubectl get pod --all-namespaces
NAMESPACE NAME READY STATUS RESTARTS AGE
kube-system calico-kube-controllers-744cfdf676-87n8d 0/1 ContainerCreating 0 45s
kube-system calico-node-kfnf5 0/1 PodInitializing 0 46s
kube-system coredns-7f89b7bc75-6jzcr 0/1 ContainerCreating 0 13m
kube-system coredns-7f89b7bc75-fzq95 0/1 ContainerCreating 0 13m
kube-system etcd-master 1/1 Running 0 13m
kube-system kube-apiserver-master 1/1 Running 0 13m
kube-system kube-controller-manager-master 1/1 Running 0 13m
kube-system kube-proxy-t8jlr 1/1 Running 0 13m
kube-system kube-scheduler-master 1/1 Running 0 13m
[root@master ~]# kubectl get node
NAME STATUS ROLES AGE VERSION
master Ready control-plane,master 13m v1.20.1
6 安装kubernetes-dashboard
官方部署dashboard的服务没使用nodeport,将yaml文件下载到本地,在service里添加nodeport,修改后的recommended.yaml文件如下
# Copyright 2017 The Kubernetes Authors.
#
# Licensed under the Apache License, Version 2.0 (the "License");
# you may not use this file except in compliance with the License.
# You may obtain a copy of the License at
#
# http://www.apache.org/licenses/LICENSE-2.0
#
# Unless required by applicable law or agreed to in writing, software
# distributed under the License is distributed on an "AS IS" BASIS,
# WITHOUT WARRANTIES OR CONDITIONS OF ANY KIND, either express or implied.
# See the License for the specific language governing permissions and
# limitations under the License.
apiVersion: v1
kind: Namespace
metadata:
name: kubernetes-dashboard
---
apiVersion: v1
kind: ServiceAccount
metadata:
labels:
k8s-app: kubernetes-dashboard
name: kubernetes-dashboard
namespace: kubernetes-dashboard
---
kind: Service
apiVersion: v1
metadata:
labels:
k8s-app: kubernetes-dashboard
name: kubernetes-dashboard
namespace: kubernetes-dashboard
spec:
type: NodePort
ports:
- port: 443
targetPort: 8443
nodePort: 30000
selector:
k8s-app: kubernetes-dashboard
---
apiVersion: v1
kind: Secret
metadata:
labels:
k8s-app: kubernetes-dashboard
name: kubernetes-dashboard-certs
namespace: kubernetes-dashboard
type: Opaque
---
apiVersion: v1
kind: Secret
metadata:
labels:
k8s-app: kubernetes-dashboard
name: kubernetes-dashboard-csrf
namespace: kubernetes-dashboard
type: Opaque
data:
csrf: ""
---
apiVersion: v1
kind: Secret
metadata:
labels:
k8s-app: kubernetes-dashboard
name: kubernetes-dashboard-key-holder
namespace: kubernetes-dashboard
type: Opaque
---
kind: ConfigMap
apiVersion: v1
metadata:
labels:
k8s-app: kubernetes-dashboard
name: kubernetes-dashboard-settings
namespace: kubernetes-dashboard
---
kind: Role
apiVersion: rbac.authorization.k8s.io/v1
metadata:
labels:
k8s-app: kubernetes-dashboard
name: kubernetes-dashboard
namespace: kubernetes-dashboard
rules:
# Allow Dashboard to get, update and delete Dashboard exclusive secrets.
- apiGroups: [""]
resources: ["secrets"]
resourceNames: ["kubernetes-dashboard-key-holder", "kubernetes-dashboard-certs", "kubernetes-dashboard-csrf"]
verbs: ["get", "update", "delete"]
# Allow Dashboard to get and update 'kubernetes-dashboard-settings' config map.
- apiGroups: [""]
resources: ["configmaps"]
resourceNames: ["kubernetes-dashboard-settings"]
verbs: ["get", "update"]
# Allow Dashboard to get metrics.
- apiGroups: [""]
resources: ["services"]
resourceNames: ["heapster", "dashboard-metrics-scraper"]
verbs: ["proxy"]
- apiGroups: [""]
resources: ["services/proxy"]
resourceNames: ["heapster", "http:heapster:", "https:heapster:", "dashboard-metrics-scraper", "http:dashboard-metrics-scraper"]
verbs: ["get"]
---
kind: ClusterRole
apiVersion: rbac.authorization.k8s.io/v1
metadata:
labels:
k8s-app: kubernetes-dashboard
name: kubernetes-dashboard
rules:
# Allow Metrics Scraper to get metrics from the Metrics server
- apiGroups: ["metrics.k8s.io"]
resources: ["pods", "nodes"]
verbs: ["get", "list", "watch"]
---
apiVersion: rbac.authorization.k8s.io/v1
kind: RoleBinding
metadata:
labels:
k8s-app: kubernetes-dashboard
name: kubernetes-dashboard
namespace: kubernetes-dashboard
roleRef:
apiGroup: rbac.authorization.k8s.io
kind: Role
name: kubernetes-dashboard
subjects:
- kind: ServiceAccount
name: kubernetes-dashboard
namespace: kubernetes-dashboard
---
apiVersion: rbac.authorization.k8s.io/v1
kind: ClusterRoleBinding
metadata:
name: kubernetes-dashboard
roleRef:
apiGroup: rbac.authorization.k8s.io
kind: ClusterRole
name: kubernetes-dashboard
subjects:
- kind: ServiceAccount
name: kubernetes-dashboard
namespace: kubernetes-dashboard
---
kind: Deployment
apiVersion: apps/v1
metadata:
labels:
k8s-app: kubernetes-dashboard
name: kubernetes-dashboard
namespace: kubernetes-dashboard
spec:
replicas: 1
revisionHistoryLimit: 10
selector:
matchLabels:
k8s-app: kubernetes-dashboard
template:
metadata:
labels:
k8s-app: kubernetes-dashboard
spec:
containers:
- name: kubernetes-dashboard
image: kubernetesui/dashboard:v2.1.0
imagePullPolicy: Always
ports:
- containerPort: 8443
protocol: TCP
args:
- --auto-generate-certificates
- --namespace=kubernetes-dashboard
# Uncomment the following line to manually specify Kubernetes API server Host
# If not specified, Dashboard will attempt to auto discover the API server and connect
# to it. Uncomment only if the default does not work.
# - --apiserver-host=http://my-address:port
volumeMounts:
- name: kubernetes-dashboard-certs
mountPath: /certs
# Create on-disk volume to store exec logs
- mountPath: /tmp
name: tmp-volume
livenessProbe:
httpGet:
scheme: HTTPS
path: /
port: 8443
initialDelaySeconds: 30
timeoutSeconds: 30
securityContext:
allowPrivilegeEscalation: false
readOnlyRootFilesystem: true
runAsUser: 1001
runAsGroup: 2001
volumes:
- name: kubernetes-dashboard-certs
secret:
secretName: kubernetes-dashboard-certs
- name: tmp-volume
emptyDir: {}
serviceAccountName: kubernetes-dashboard
nodeSelector:
"kubernetes.io/os": linux
# Comment the following tolerations if Dashboard must not be deployed on master
tolerations:
- key: node-role.kubernetes.io/master
effect: NoSchedule
---
kind: Service
apiVersion: v1
metadata:
labels:
k8s-app: dashboard-metrics-scraper
name: dashboard-metrics-scraper
namespace: kubernetes-dashboard
spec:
ports:
- port: 8000
targetPort: 8000
selector:
k8s-app: dashboard-metrics-scraper
---
kind: Deployment
apiVersion: apps/v1
metadata:
labels:
k8s-app: dashboard-metrics-scraper
name: dashboard-metrics-scraper
namespace: kubernetes-dashboard
spec:
replicas: 1
revisionHistoryLimit: 10
selector:
matchLabels:
k8s-app: dashboard-metrics-scraper
template:
metadata:
labels:
k8s-app: dashboard-metrics-scraper
annotations:
seccomp.security.alpha.kubernetes.io/pod: 'runtime/default'
spec:
containers:
- name: dashboard-metrics-scraper
image: kubernetesui/metrics-scraper:v1.0.6
ports:
- containerPort: 8000
protocol: TCP
livenessProbe:
httpGet:
scheme: HTTP
path: /
port: 8000
initialDelaySeconds: 30
timeoutSeconds: 30
volumeMounts:
- mountPath: /tmp
name: tmp-volume
securityContext:
allowPrivilegeEscalation: false
readOnlyRootFilesystem: true
runAsUser: 1001
runAsGroup: 2001
serviceAccountName: kubernetes-dashboard
nodeSelector:
"kubernetes.io/os": linux
# Comment the following tolerations if Dashboard must not be deployed on master
tolerations:
- key: node-role.kubernetes.io/master
effect: NoSchedule
volumes:
- name: tmp-volume
emptyDir: {}
[root@master ~]# kubectl create -f recommended.yaml
namespace/kubernetes-dashboard created
serviceaccount/kubernetes-dashboard created
service/kubernetes-dashboard created
secret/kubernetes-dashboard-certs created
secret/kubernetes-dashboard-csrf created
secret/kubernetes-dashboard-key-holder created
configmap/kubernetes-dashboard-settings created
role.rbac.authorization.k8s.io/kubernetes-dashboard created
clusterrole.rbac.authorization.k8s.io/kubernetes-dashboard created
rolebinding.rbac.authorization.k8s.io/kubernetes-dashboard created
clusterrolebinding.rbac.authorization.k8s.io/kubernetes-dashboard created
deployment.apps/kubernetes-dashboard created
service/dashboard-metrics-scraper created
deployment.apps/dashboard-metrics-scraper created
查看pod,service
[root@master ~]# kubectl get pod -n kubernetes-dashboard
NAME READY STATUS RESTARTS AGE
dashboard-metrics-scraper-79c5968bdc-28fff 1/1 Running 0 97s
kubernetes-dashboard-7448ffc97b-26n85 1/1 Running 0 97s
[root@master ~]# kubectl get svc -n kubernetes-dashboard
NAME TYPE CLUSTER-IP EXTERNAL-IP PORT(S) AGE
dashboard-metrics-scraper ClusterIP 10.10.157.181 <none> 8000/TCP 106s
kubernetes-dashboard NodePort 10.10.8.149 <none> 443:30000/TCP 106s
通过页面访问,推荐使用firefox浏览器(https 无证书 谷歌浏览器可能无法访问)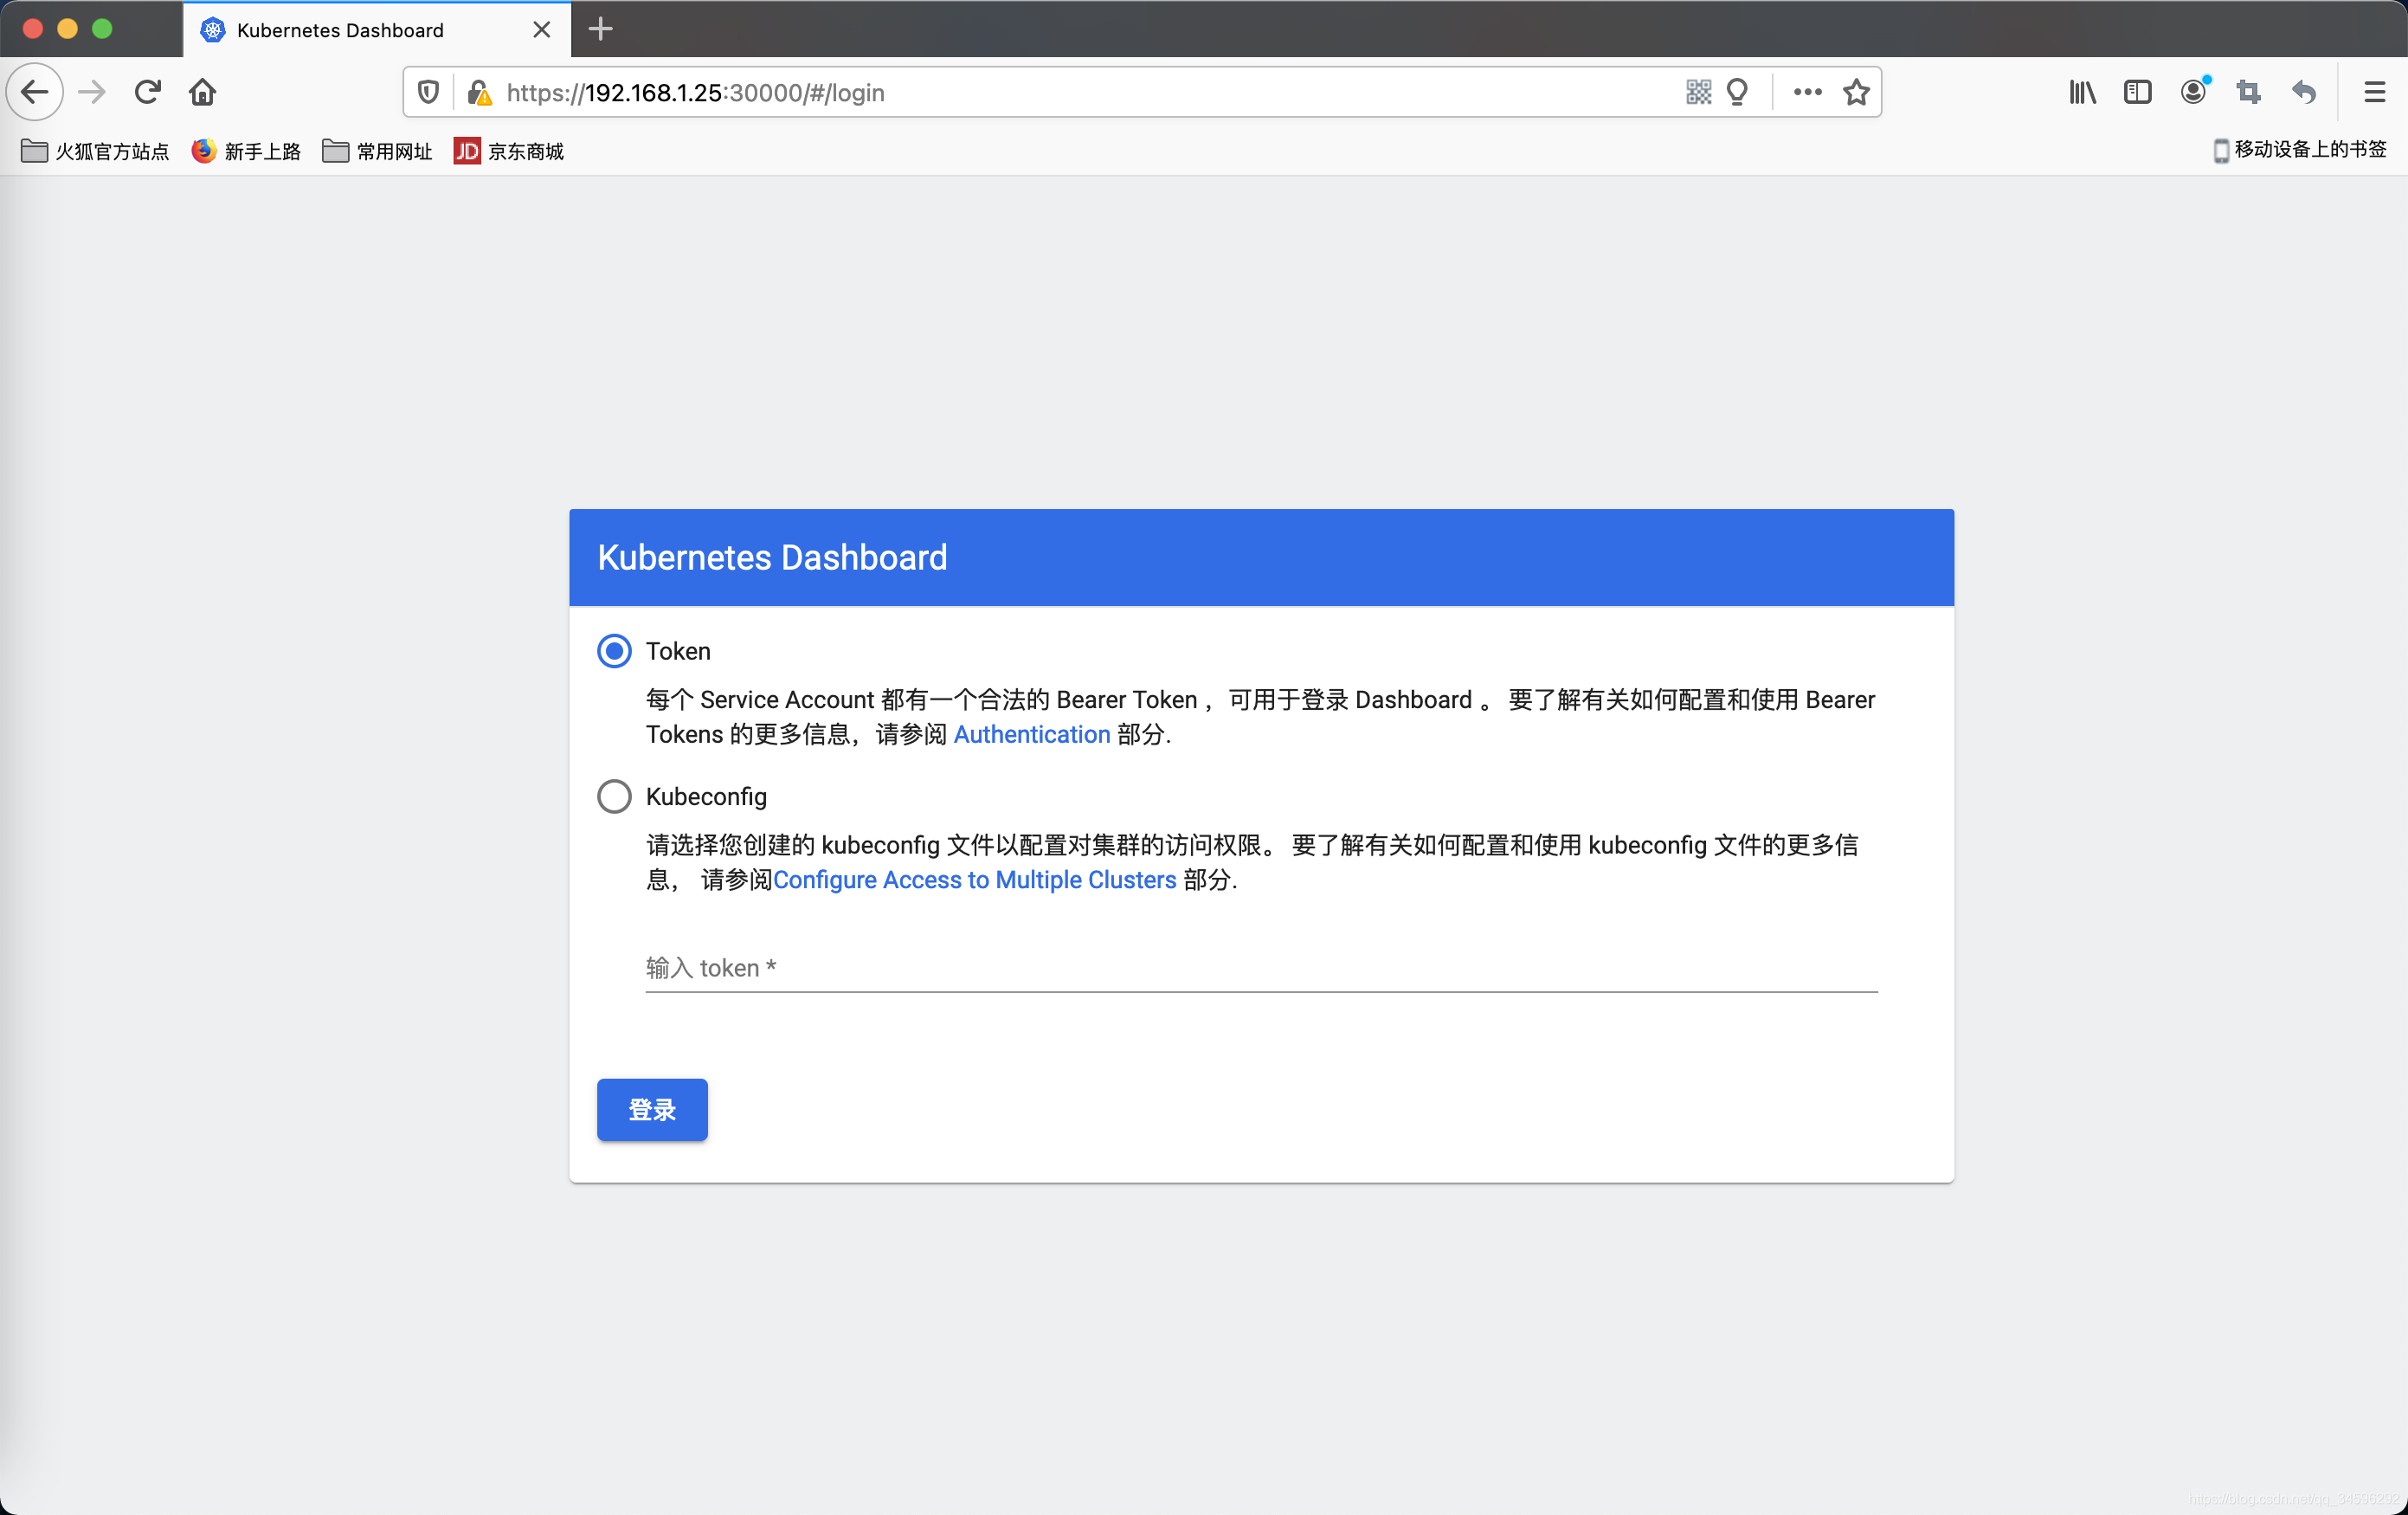
Dashboard支持Kubeconfig和Token两种认证方式,我们这里选择Token认证方式登录
有两种方式获取 token
方式一(方便快捷)
[root@master ~]# kubectl -n kubernetes-dashboard get secret
NAME TYPE DATA AGE
admin-user-token-mwr8p kubernetes.io/service-account-token 3 130m
default-token-9plz5 kubernetes.io/service-account-token 3 142m
kubernetes-dashboard-certs Opaque 0 142m
kubernetes-dashboard-csrf Opaque 1 142m
kubernetes-dashboard-key-holder Opaque 2 142m
kubernetes-dashboard-token-wnmmt kubernetes.io/service-account-token 3 142m
[root@master ~]# kubectl describe secrets -n kubernetes-dashboard kubernetes-dashboard-token-wnmmt | grep token | awk 'NR==3{print $2}'
eyJhbGciOiJSUzI1NiIsImtpZCI6ImxmV2ZXbWpza3NuUnJlQ0dERjM2Y1prNVZ2VU1JeWZmSTdocWtIR0pMbWMifQ.eyJpc3MiOiJrdWJlcm5ldGVzL3NlcnZpY2VhY2NvdW50Iiwia3ViZXJuZXRlcy5pby9zZXJ2aWNlYWNjb3VudC9uYW1lc3BhY2UiOiJrdWJlcm5ldGVzLWRhc2hib2FyZCIsImt1YmVybmV0ZXMuaW8vc2VydmljZWFjY291bnQvc2VjcmV0Lm5hbWUiOiJrdWJlcm5ldGVzLWRhc2hib2FyZC10b2tlbi13bm1tdCIsImt1YmVybmV0ZXMuaW8vc2VydmljZWFjY291bnQvc2VydmljZS1hY2NvdW50Lm5hbWUiOiJrdWJlcm5ldGVzLWRhc2hib2FyZCIsImt1YmVybmV0ZXMuaW8vc2VydmljZWFjY291bnQvc2VydmljZS1hY2NvdW50LnVpZCI6ImY2Mjg5OWIxLTU5OTgtNDIzNy1iY2MxLTdlMDlkZjQxOWEwYyIsInN1YiI6InN5c3RlbTpzZXJ2aWNlYWNjb3VudDprdWJlcm5ldGVzLWRhc2hib2FyZDprdWJlcm5ldGVzLWRhc2hib2FyZCJ9.V-XJbhj4KcelJlyjxdbkLRes-8MnjJZ6X9Im1j308T1Cq3vw2fbo2YuRWDmXwnkpRp_LPrDZmmsbkmgMZJZDGIYQkeekzAZN33wSLtwL79uLhN22p6Mwpo8SUAQCb9G6aLT8W_b5JAUXwwmgWDVSqFupSazCGY9G2uZKB8kFmttv2_EO6GCBJ5rr1ZQCEMjIlCXNCy1a_xI4xtHLSYNOfa35-Mc9y1uVfWA4zcdbcn3tzYWT0avWUjyysybaorApZjJ9q7S9MOYpetJHv4jrKFG043BTwB1iN2rhzvStaEmofvYOCQEMy1SQC3X-0eenNJYD2QYYLwvrCuj0Zoy4iQ
方式二(需要生成 admin-user,官方建议)
官方参考文档:
https://github.com/kubernetes/dashboard/blob/master/docs/user/access-control/creating-sample-user.md
[root@master ~]# cat <<EOF | kubectl apply -f -
apiVersion: v1
kind: ServiceAccount
metadata:
name: admin-user
namespace: kubernetes-dashboard
EOF
serviceaccount/admin-user created
[root@master ~]# cat <<EOF | kubectl apply -f -
apiVersion: rbac.authorization.k8s.io/v1
kind: ClusterRoleBinding
metadata:
name: admin-user
roleRef:
apiGroup: rbac.authorization.k8s.io
kind: ClusterRole
name: cluster-admin
subjects:
- kind: ServiceAccount
name: admin-user
namespace: kubernetes-dashboard
EOF
clusterrolebinding.rbac.authorization.k8s.io/admin-user created
[root@master ~]# kubectl -n kubernetes-dashboard describe secret $(kubectl -n kubernetes-dashboard get secret | grep admin-user | awk '{print $1}')
Name: admin-user-token-mwr8p
Namespace: kubernetes-dashboard
Labels: <none>
Annotations: kubernetes.io/service-account.name: admin-user
kubernetes.io/service-account.uid: 61b3d764-5bf2-431e-99db-d524a4d379a7
Type: kubernetes.io/service-account-token
Data
====
ca.crt: 1066 bytes
namespace: 20 bytes
token: eyJhbGciOiJSUzI1NiIsImtpZCI6ImxmV2ZXbWpza3NuUnJlQ0dERjM2Y1prNVZ2VU1JeWZmSTdocWtIR0pMbWMifQ.eyJpc3MiOiJrdWJlcm5ldGVzL3NlcnZpY2VhY2NvdW50Iiwia3ViZXJuZXRlcy5pby9zZXJ2aWNlYWNjb3VudC9uYW1lc3BhY2UiOiJrdWJlcm5ldGVzLWRhc2hib2FyZCIsImt1YmVybmV0ZXMuaW8vc2VydmljZWFjY291bnQvc2VjcmV0Lm5hbWUiOiJhZG1pbi11c2VyLXRva2VuLW13cjhwIiwia3ViZXJuZXRlcy5pby9zZXJ2aWNlYWNjb3VudC9zZXJ2aWNlLWFjY291bnQubmFtZSI6ImFkbWluLXVzZXIiLCJrdWJlcm5ldGVzLmlvL3NlcnZpY2VhY2NvdW50L3NlcnZpY2UtYWNjb3VudC51aWQiOiI2MWIzZDc2NC01YmYyLTQzMWUtOTlkYi1kNTI0YTRkMzc5YTciLCJzdWIiOiJzeXN0ZW06c2VydmljZWFjY291bnQ6a3ViZXJuZXRlcy1kYXNoYm9hcmQ6YWRtaW4tdXNlciJ9.nixHnB5iIUz4x6gzGKwxiUW9ehxVmHP7IR8akrMQ2STvFK0T_v0DCyIVE93tSZxAC6wuUW0NF1QHRYqzIm01xsj9i37NyCCL9ZF-WNw7fjGIKN3FG5ycYRLJ5bzV_rbvmbkm6uC5PYVidR2zw_3w4s2_kiai5Gtwee8BQU0CgbDeZqUKorZR_ZyLLymvjvPMvhMEBxRFgxE-iViAXSbE0xtF2Fq5JYduWlvCEscLAN193RE0GnzLdT7R_6DoiaL5QsU20U_XA1E-3ETUI4HD8zEj89Hok02y_LXB8mEXnU3VjsL2LDeAoIEylhXOfCH8j72kiUCEu7nv3X1NPZ809A
登录后如下展示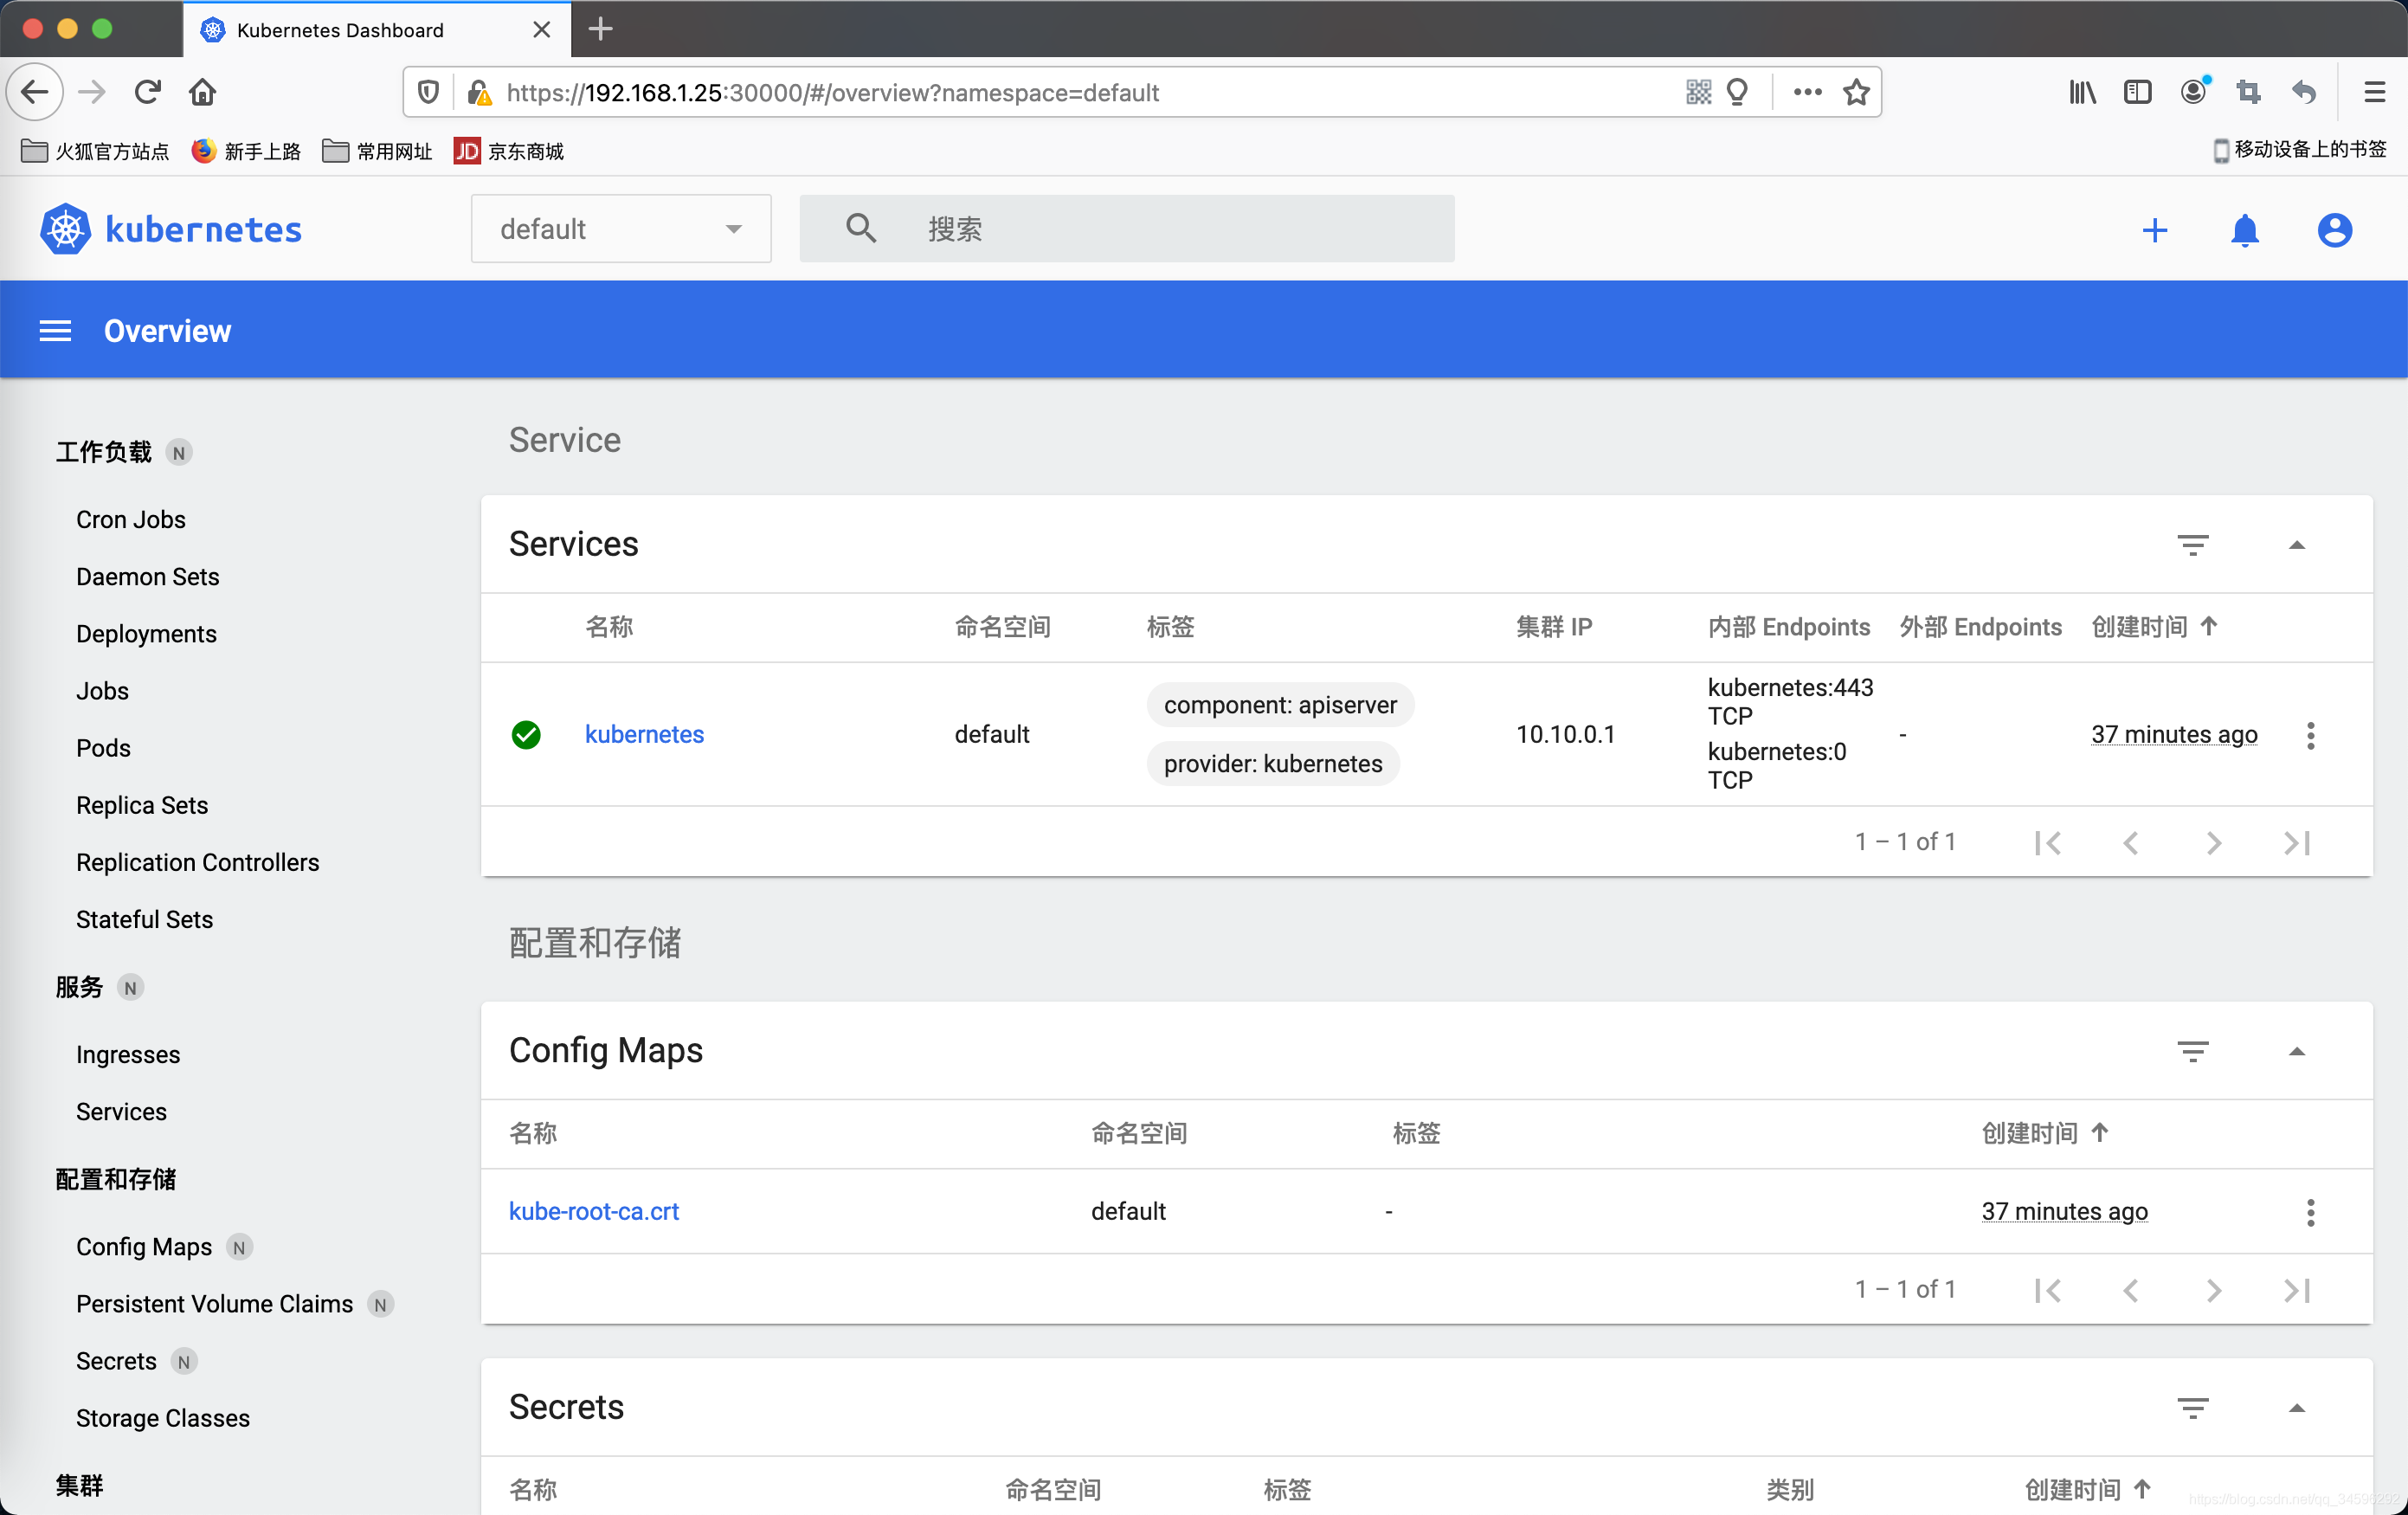
7 node节点服务器配置以及加入集群
重复 master 节点的 1、2 配置步骤
第 3 步骤只需安装 kubectl、kubeadm 即可
加入 node 节点到集群
[root@node2 ~]# kubeadm join 192.168.1.25:6443 --token mwxojd.djyh86ktwwwyv0qp --discovery-token-ca-cert-hash sha256:c90285666b8eae41a0a5dfaaa0f60fac279ffffa8378ba91e4dddf730b6c5367
在master上查看节点信息
[root@master ~]# kubectl get nodes
NAME STATUS ROLES AGE VERSION
master Ready control-plane,master 108m v1.20.1
node1 Ready <none> 14m v1.20.1
node2 Ready <none> 2m7s v1.20.1
node节点对kubernetes进行配置
拷贝 master 节点服务器的 /etc/kubernetes/admin.conf 到 node 节点服务器的 /etc/kubernetes/ 目录下
[root@node2 ~]# scp root@master:/etc/kubernetes/admin.conf /etc/kubernetes/
并执行如下命令
[root@node1 ~]# mkdir -p $HOME/.kube
[root@node1 ~]# sudo cp -i /etc/kubernetes/admin.conf $HOME/.kube/config
[root@node1 ~]# sudo chown $(id -u):$(id -g) $HOME/.kube/confi
如果是root账号,只需要执行如下命令即可
[root@node1 ~]# export KUBECONFIG=/etc/kubernetes/admin.conf
或
[root@node1 ~]# echo "export KUBECONFIG=/etc/kubernetes/admin.conf" >> ~/.bash_profile
[root@node1 ~]# source ~/.bash_profile
注意
node节点的docker配置文件/etc/docker/daemon.json尽量跟master节点保持一致
————————————————------------------------------------------------------------
原文链接:
https://blog.csdn.net/qq_34596292/article/details/112131042
https://blog.csdn.net/weixin_43177335/article/details/111502294
https://blog.csdn.net/tearofthemyth/article/details/112788012
https://blog.csdn.net/tongzidane/article/details/113942942
https://blog.csdn.net/weixin_46903045/article/details/115156875
https://blog.csdn.net/liuyunshengsir/article/details/89525458
CentOS 7使用kubeadm搭建kubernetes集群(极速篇)
https://blog.csdn.net/u012570862/article/details/80150997
CentOS 7使用kubeadm搭建kubernetes集群(踩坑篇)
https://blog.csdn.net/u012570862/article/details/80150988
使用kubeadm在CentOS 8部署kubernetes v1.20
https://blog.csdn.net/qq_34596292/article/details/112131042
K8s集群之使用NFS网络存储挂载外部目录和文件
https://blog.csdn.net/qq_34596292/article/details/112143203
K8s安装kubernetes Dashboard
https://blog.csdn.net/tearofthemyth/article/details/113279403
Docker构建kubectl镜像
https://blog.csdn.net/qq_34596292/article/details/112083776
Docker安装Gitlab-runner实现自动CI/CD (持续集成/持续部署) 配置
https://blog.csdn.net/qq_34596292/article/details/111349745
Springboot项目通过Gitlab CI/CD集成K8s自动部署
https://blog.csdn.net/qq_34596292/article/details/112146959
Spring Cloud+GitLab+Docker+K8S持续集成搭建笔记
https://blog.csdn.net/javaboy/article/details/81978183
基于k8s搭建MySQL 5.7主从复制集群
https://blog.csdn.net/qq_34596292/article/details/112254142