Android类加载机制
Dalvik虚拟机如同其他Java虚拟机一样,在运行程序时首先需要将对应的类加载到内存中。而在Java标准的虚拟机中,类加载可以从class文件中读取,也可以是其他形式的二进制流。因此,我们常常利用这一点,在程序运行时手动加载Class,从而达到代码动态加载执行的目的。
只不过Android平台上虚拟机运行的是Dex字节码,一种对class文件优化的产物,传统Class文件是一个Java源码文件会生成一个.class文件,而Android是把所有Class文件进行合并,优化,然后生成一个最终的class.dex,目的是把不同class文件重复的东西只需保留一份,如果我们的Android应用不进行分dex处理,最后一个应用的apk只会有一个dex文件。
首先看一下Android平台中几个常用的加载相关的类,以及他们的继承关系。
- PathClassLoader是用来加载Android系统类和应用的类。
- DexClassLoader支持加载APK、DEX和JAR,也可以从SD卡进行加载。

ClassLoader类的主要职责:根据一个指定的类的名称,找到或者生成其对应的字节代码,然后从这些字节代码中定义出一个 Java 类,即 java.lang.Class类的一个实例。 (还可以加载图片等,这里不讨论)
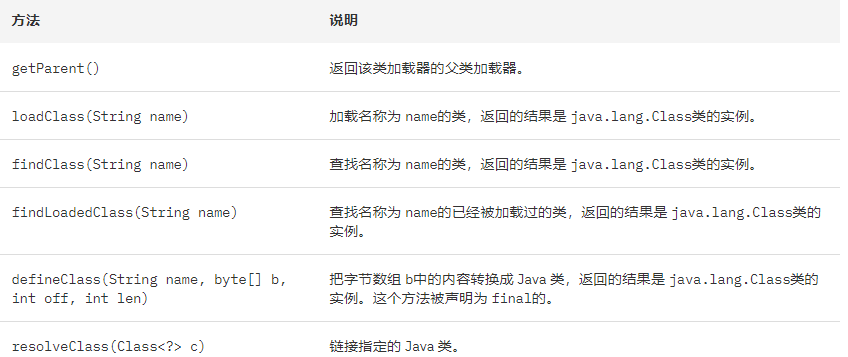
ClassLoader中的主要方法及含义
下面这段代码时loadClass的实现,可以看出首先会查找加载类是否已经被加载了,如果是直接返回。否则,通过findClass()查找
  1 protected Class<?> loadClass(String name, boolean resolve)
  2         throws ClassNotFoundException
  3     {
  4             // First, check if the class has already been loaded
  5             Class c = findLoadedClass(name);
  6             if (c == null) {
  7                  // If still not found, then invoke findClass in order
  8                  // to find the class.
  9                  c = findClass(name);
 10                  // this is the defining class loader; record the stats
 11             }
 12             return c;
 13     }
在BaseClassLoader中的findClass函数:实际是在一个pathList中去查找这个类。
  1 protected Class<?> findClass(String name) throws ClassNotFoundException {
  2         List<Throwable> suppressedExceptions = new ArrayList<Throwable>();
  3         Class c =
pathList.findClass
(name, suppressedExceptions);
  4         if (c == null) {
  5             ClassNotFoundException cnfe = new ClassNotFoundException("Didn't find class "" + name + "" on path: " + pathList);
  6             for (Throwable t : suppressedExceptions) {
  7                 cnfe.addSuppressed(t);
  8             }
  9             throw cnfe;
 10         }
 11         return c;
 12     }
DexPathList的源码可知,成员变量dexElements用来保存dex数组,而每个dex文件其实就是DexFile对象。遍历dexElements,然后通过DexFile去加载class文件,加载成功就返回,否则返回null,看到这里应该基本知道我们想干啥了,我打算在dexElements上面做手脚,可以通过反射来加载。

  1 /*package*/ final class DexPathList {
  2     private static final String DEX_SUFFIX = ".dex";
  3     private static final String JAR_SUFFIX = ".jar";
  4     private static final String ZIP_SUFFIX = ".zip";
  5     private static final String APK_SUFFIX = ".apk";
  6
  7     /** class definition context */
  8     private final ClassLoader definingContext;
  9
 10     /**
 11      * List of dex/resource (class path) elements.
 12      * Should be called pathElements, but the Facebook app uses reflection
 13      * to modify 'dexElements' (http://b/7726934).
 14      */
 15     private final Element[] dexElements;
 16
 17     /**
 18      * Finds the named class in one of the dex files pointed at by
 19      * this instance. This will find the one in the earliest listed
 20      * path element. If the class is found but has not yet been
 21      * defined, then this method will define it in the defining
 22      * context that this instance was constructed with.
 23      *
 24      * @param name of class to find
 25      * @param suppressed exceptions encountered whilst finding the class
 26      * @return the named class or {@code null} if the class is not
 27      * found in any of the dex files
 28      */
 29     public Class findClass(String name, List<Throwable> suppressed) {
 30         for (Element element : dexElements) {
 31             DexFile dex = element.dexFile;
 32
 33             if (dex != null) {
 34                 Class clazz = dex.loadClassBinaryName(name, definingContext, suppressed);
 35                 if (clazz != null) {
 36                     return clazz;
 37                 }
 38             }
 39         }
 40         if (dexElementsSuppressedExceptions != null) {
 41             suppressed.addAll(Arrays.asList(dexElementsSuppressedExceptions));
 42         }
 43         return null;
 44     }
 45 }
实际程序运行时我们只需要将本地加载的dex文件插入到DexPathList中的dexElements中,后续程序运行时就会自动到该变量中去查找新的类,这就是该篇讲的热修复的原理。
补丁包dex文件生成
如果某个APP远程出现bug,那么开发者如何生成一个新的dex文件,然后通过网络下发到客户端呢?
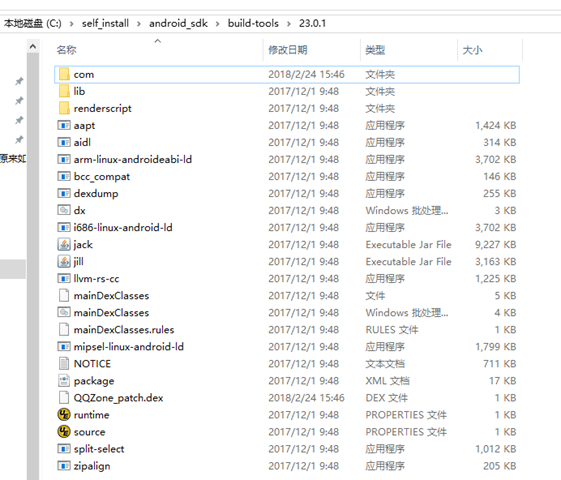
1.到该android sdk的该目录下:(不一定是23.0.1也可以是其它版本号)
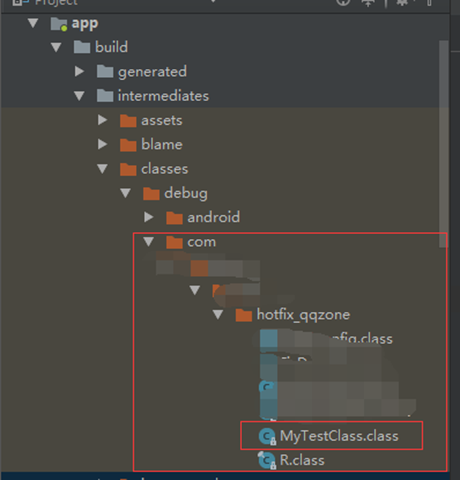
2. 将要生成的dex的class文件(全路径)放到该目录下(对应上图中的com文件夹)。class文件可以从Android Studio的该目录拷贝:
3. 运行如下命令即可根据MyTestClass.class文件本地生成补丁包: patch.dex
.dx.bat --dex --output=patch.dex .comxxxxxxhotfix_qqzoneMyTestClass.class
通过反射将本地dex注入
前面已经介绍了ClassLoader的一些接口和DexPathList。下面将介绍如何一步一步将本地(可能是通过网络从服务端获取的)dex文件动态加载到内存中。
1. 通过反射获取dexElements
  1 private static Object getDexElementByClassLoader(ClassLoader classLoader) throws Exception {
  2         Class<?> classLoaderClass = Class.forName("dalvik.system.BaseDexClassLoader");
  3         Field pathListField = classLoaderClass.getDeclaredField("pathList");
  4         pathListField.setAccessible(true);
  5         Object pathList = pathListField.get(classLoader);
  6
  7         Class<?> pathListClass = pathList.getClass();
  8         Field dexElementsField = pathListClass.getDeclaredField("dexElements");
  9         dexElementsField.setAccessible(true);
 10         Object dexElements = dexElementsField.get(pathList);
 11
 12         return dexElements;
 13     }
2. 获取本地dex补丁包,生成dexElement,并合并到已有的dexElements中(通过combineArray函数)
  1 public static void loadFixedDex(Context context,String path){
  2
  3 		String optimizeDir = context.getDir("odex",Context.MODE_PRIVATE)+File.separator+"opt_dex";
  4 		File fopt = new File(optimizeDir);
  5 		if(!fopt.exists()){
  6 			fopt.mkdirs();
  7 		}
  8 		//1.加载应用程序的dex
  9 		try {
 10 			PathClassLoader pathLoader = (PathClassLoader) context.getClassLoader();
 11 				//2.加载指定的修复的dex文件。
 12 				DexClassLoader classLoader = new DexClassLoader(
 13 						path,//String dexPath,
 14 						fopt.getAbsolutePath(),//String optimizedDirectory,
 15 						null,//String libraryPath,
 16 						pathLoader//ClassLoader parent
 17 				);
 18 				//3.合并
 19 				Object path_pathList = getPathList(pathLoader);
 20 				Object dex_pathList = getPathList(classLoader);
 21 				Object path_DexElements = getDexElements(path_pathList);
 22 				Object dex_DexElements = getDexElements(dex_pathList);
 23 				//合并完成
 24 				Object dexElements = combineArray(dex_DexElements,path_DexElements);
 25 				//重写给PathList里面的lement[] dexElements;赋值
 26 				Object pathList = getPathList(pathLoader);
 27 				setField(pathList,pathList.getClass(),"dexElements",dexElements);
 28
 29 		} catch (Exception e) {
 30 			e.printStackTrace();
 31 		}
 32 	}
 33
private static void setField(Object obj,Class<?> cl, String field, Object value) throws Exception {
   Field localField = cl.getDeclaredField(field);
   localField.setAccessible(true);
   localField.set(obj,value);
}
问题1:
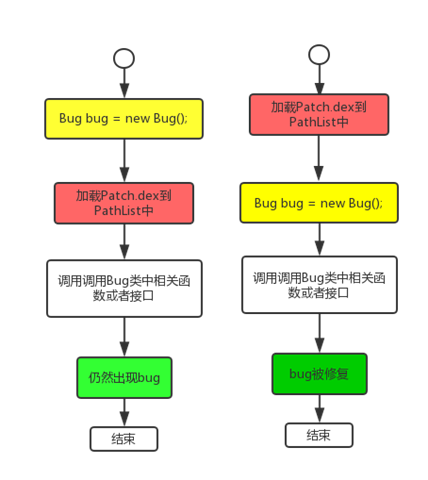
假设class.dex中有一个bug.class出现了bug,现在希望获通过一个fixbug.class生成了一个补丁包patch.dex。 如果我们APP初始化的时候就加载pathc.dex 不会出现问题,下次调用bug.class会优先使用patch.dex中的bug.class而不是.
总结: 当代码中已经调用了有问题的类,而没有加载patch.dex,后续加载将不会再起作用。
问题2: CLASS_ISPREVERIFIED标记问题
如果待修复的类bug.class中没有引用到class.dex中其它类,则bug.class不会被打上该标记,热修复不会出现问题。
如果bug.class中引用了class.dex 情况。 // 后续有时间再补充。
实际业务使用场景:
项目本地有一套代码逻辑,当本地代码执行失败后,会从服务端获取补丁包(.dex文件)。因为提前知道补丁包的类名和接口,所以通过DexClassLoader 将补丁信息加载成一个类,然后再通过反射构造一个该类的对象。同时可以通过反射调用类里面相关的接口了,这样就相当于对本地的代码进行了替换也是一种修复过程。
Class<?> clazz;
DexClassLoader dexClassLoader = new DexClassLoader(patchSaveDir + patchName,
dataDir, "", getClass().getClassLoader());
clazz = dexClassLoader.loadClass(className);
Constructor constructor = clazz.getDeclaredConstructor();
Object object = constructor.newInstance();
自此,简单的类加载机制和热修复就介绍完毕了!
参考:
https://www.ibm.com/developerworks/cn/java/j-lo-classloader/


