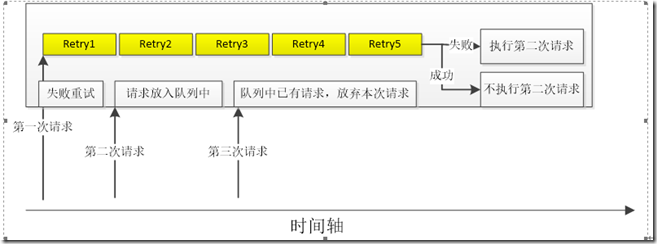
实际业务使用场景:
某业务场景需要将本地数据传递到服务端,服务端再返回传递成功或者失败的信息。
1、 失败时: 重传5次
2、设置客户端请求的最小时间间隔,这个间隔内最多请求1次
具体逻辑如下:(这里请求的最小时间间隔设置为:80s,防止客户端由于某种异常频繁的调用服务端,造成服务端异常)
实现:
handler 的实现:
public class BindHandler extends Handler {
    private final static String TAG = "BindHandler";
    private static final String DEFAULT_HANDLER_THREAD_NAME = "DeviceBindingHandlerThread";
    static final int MSG_DEVICE_BIND = 1;
    static final int MSG_DEVICE_BIND_RETRY = 2;
    private BindManager mManager;
    private HandlerThread mHandlerThread;

    BindHandler(BindManager manager){
        this(manager,createDefaultHandlerThread());
    }

    private BindHandler(BindManager manager,HandlerThread thread){
        super(thread.getLooper());
        mManager = manager;
        mHandlerThread = thread;
    }

    private static HandlerThread createDefaultHandlerThread() {
        HandlerThread handlerThread = new HandlerThread(DEFAULT_HANDLER_THREAD_NAME, Process.THREAD_PRIORITY_BACKGROUND);
        handlerThread.start();
        return handlerThread;
    }

    public void quitHandlerThread(){
        if(null != mHandlerThread){
            mHandlerThread.getLooper().quit();
        }
    }

    public void startHandlerThread(){
        if(null != mHandlerThread){
            mHandlerThread.getLooper().loop();
        }
    }

    public boolean isHandlerThreadAlive(){
        return mHandlerThread.isAlive();
    }
    @Override
    public void handleMessage(Message msg) {
        if(null == msg){
            return;
        }
        switch (msg.what){
            case MSG_DEVICE_BIND:
                mManager.handleBinding(true);
                break;
            case MSG_DEVICE_BIND_RETRY:
                mManager.handleBinding(false);
                break;
            default:
                break;
        }
    }
}
上述代码中 设置了一个HandlerThread 用于开启一个线程,请求的发送运行在该线程中(获取该HandlerThread的Looper,用该Looper初始化Handler,这样就可以将该Handler中handleMessage函数运行在开辟的线程中)。
通过Looper.quit函数结束该线程,否者该线程的Looper一直在循环等待消息的到来,占用资源(在HandlerThread已经失去价值的时候应该及时停掉它)。
方法1: mHandlerThread.getLooper().quit();//方法2: mHandlerThread.quit();方法3:mHandlerThread.getLooper().quitSafely();
//方法4:mHandlerThread.quitSafely();
1 和 2 结束的方法等同,不管消息队列中有没有消息都结束该线程。
3 和 4 中如果消息队列中有消息,则不会立刻结束,待处理完消息队列中的消息在结束该线程(处理过程中达到的消息不再处理)
请求管理类:
1、 请求管理类中定义自变量: mBindHandler,用于发送消息
2、设置重传策略
3、设置防止频繁调用的策略,(检查消息队列中是否有消息,如果有则丢弃该消息)
mBindHandler.hasMessages(BindHandler.MSG_DEVICE_BIND_RETRY)
具体代码不再详细分析
HandlerThread 使用详解
/**HandlerThread(String name)
* Handy class for starting a new thread that has a looper. The looper can then be
* used to create handler classes. Note that start() must still be called.
*/
public class HandlerThread extends Thread {
int mPriority;
int mTid = -1;
Looper mLooper;
private @Nullable Handler mHandler;
public{HandlerThread(String name, int priority)
super(name);
mPriority = Process.THREAD_PRIORITY_DEFAULT;
}
/**
* Constructs a HandlerThread.
* @param name
* @param priority The priority to run the thread at. The value supplied must be from
* {@link android.os.Process} and not from java.lang.Thread.
*/
public{public void run() {
super(name);
mPriority = priority;
}
/**
* Call back method that can be explicitly overridden if needed to execute some
* setup before Looper loops.
*/
protected void onLooperPrepared() {
}
@Override
Looper.prepare();
mTid = Process.myTid();
唤醒等待线程
        synchronized (this) {
            mLooper = Looper.myLooper();
notifyAll(); //Looper.loop();
        }
        Process.setThreadPriority(mPriority);
        onLooperPrepared();
getLooper()
        mTid = -1;
    }

    /**
     * This method returns the Looper associated with this thread. If this thread not been started
     * or for any reason isAlive() returns false, this method will return null. If this thread
     * has been started, this method will block until the looper has been initialized.
     * @return The looper.
     */
public Looper{ //如果该线程没有start 则处于等待状态,当调用start后,notifyHandler getThreadHandler()
if (!isAlive()) {
return null;
}
// If the thread has been started, wait until the looper has been created.
synchronized (this) {
while (isAlive() && mLooper == null) {
try {
wait(); //线程没有开启则处于等待状态
} catch (InterruptedException e) {
}
}
}
return mLooper;
}
/**
* @return a shared {@link Handler} associated with this thread
* @hide
*/
@NonNull
public{quit()
if (mHandler == null) {
mHandler = new Handler(getLooper());
}
return mHandler;
}
/**
* Quits the handler thread's looper.
* <p>
* Causes the handler thread's looper to terminate without processing any
* more messages in the message queue.
* </p><p>
* Any attempt to post messages to the queue after the looper is asked to quit will fail.
* For example, the {@link Handler#sendMessage(Message)} method will return false.
* </p><p class="note">
* Using this method may be unsafe because some messages may not be delivered
* before the looper terminates. Consider using {@link #quitSafely} instead to ensure
* that all pending work is completed in an orderly manner.
* </p>
*
* @return True if the looper looper has been asked to quit or false if the
* thread had not yet started running.
*
* @see #quitSafely
*/
public boolean{quitSafely()
Looper looper = getLooper();
if (looper != null) {
looper.quit();
return true;
}
return false;
}
/**
* Quits the handler thread's looper safely.
* <p>
* Causes the handler thread's looper to terminate as soon as all remaining messages
* in the message queue that are already due to be delivered have been handled.
* Pending delayed messages with due times in the future will not be delivered.
* </p><p>
* Any attempt to post messages to the queue after the looper is asked to quit will fail.
* For example, the {@link Handler#sendMessage(Message)} method will return false.
* </p><p>
* If the thread has not been started or has finished (that is if
* {@link #getLooper} returns null), then false is returned.
* Otherwise the looper is asked to quit and true is returned.
* </p>
*
* @return True if the looper looper has been asked to quit or false if the
* thread had not yet started running.
*/
public boolean{
Looper looper = getLooper();
if (looper != null) {
looper.quitSafely();
return true;
}
return false;
}
/**
* Returns the identifier of this thread. See Process.myTid().
*/
public int getThreadId() {
return mTid;
}
}
从源码可以看出HandlerThread继续自Thread,构造函数的传递参数有两个,一个是name指的是线程的名称,一个是priority指的是线程优先级,我们根据需要调用即可。其中成员变量mLooper就是HandlerThread自己持有的Looper对象。onLooperPrepared()该方法是一个空实现,是留给我们必要时可以去重写的,但是注意重写时机是在Looper循环启动前,再看看THread的run方法.
前面我们在HandlerThread的常规使用中分析过,在创建HandlerThread对象后必须调用其start()方法才能进行其他操作,而调用start()方法后相当于启动了线程,也就是run方法将会被调用,而我们从run源码中可以看出其执行了Looper.prepare()代码,这时Looper对象将被创建,当Looper对象被创建后将绑定在当前线程(也就是当前异步线程),这样我们才可以把Looper对象赋值给Handler对象,进而确保Handler对象中的handleMessage方法是在异步线程执行的。
synchronized (this) {
mLooper = Looper.myLooper();
notifyAll(); //唤醒等待线程
}
这里在Looper对象创建后将其赋值给HandlerThread的内部变量mLooper,并通过notifyAll()方法去唤醒等待线程,最后执行Looper.loop();代码,开启looper循环语句。那这里为什么要唤醒等待线程呢?我们来看看,getLooper方法
- HandlerThread本质上是一个线程类,它继承了Thread;
- HandlerThread有自己的内部Looper对象,可以进行looper循环;
- 通过获取HandlerThread的looper对象传递给Handler对象,可以在handleMessage方法中执行异步任务。
- 创建HandlerThread后必须先调用HandlerThread.start()方法,Thread会先调用run方法,创建Looper对象。
参考: http://blog.csdn.net/javazejian/article/details/52426353
Lopper.java 源码分析
Looper的核心代码:
public static void loop() {
Looper me = myLooper();
if (me == null) {
throw new RuntimeException("No Looper; Looper.prepare() wasn't called on this thread.");
}
MessageQueue queue = me.mQueue;
// Make sure the identity of this thread is that of the local process, and keep track of what that identity token actually is.
Binder.clearCallingIdentity();
final long ident = Binder.clearCallingIdentity();
while (true) {
Message msg = queue.next(); // might block
if (msg != null) {
if (msg.target == null) { // target为null,结束消息,结束循环
// No target is a magic identifier for the quit message.
return;
}
}
}
private Looper() {
mQueue = new MessageQueue();
mRun = true;
mThread = Thread.currentThread();
}
public void quit() {
Message msg = Message.obtain();
// NOTE: By enqueueing directly into the message queue, the message is left with a null target. This is how we know it is a quit message
// 发送一个target为null的消息,作为结束
mQueue.enqueueMessage(msg, 0);
}
我看到里面是一个无限循环,退出循环的条件是:msg.target == null;
也就是说,如果我们向此looper的MessageQueue发送一个target为null的message,就可以停止这个线程的远行。(查看Looper.quit代码可以验证这一点)。
使用Looper.prepare()、Looper.loop()为Thread添加消息队列后,该线程便开启了。
使用总结
1. Looper类用来为一个线程开启一个消息循环。
默认情况下android中新诞生的线程是没有开启消息循环的。(主线程除外,主线程系统会自动为其创建Looper对象,开启消息循环。)
Looper对象通过MessageQueue来存放消息和事件。一个线程只能有一个Looper,对应一个MessageQueue。(如果对一个已经quit的Looper重新start会出现异常)
2. 通常是通过Handler对象来与Looper进行交互的。Handler可看做是Looper的一个接口,用来向指定的Looper发送消息及定义处理方法。
默认情况下Handler会与其被定义时所在线程的Looper绑定,比如,Handler在主线程中定义,那么它是与主线程的Looper绑定。
mainHandler = new Handler() 等价于new Handler(Looper.myLooper()).
Looper.myLooper():获取当前进程的looper对象,类似的 Looper.getMainLooper() 用于获取主线程的Looper对象。
3. 在非主线程中直接new Handler() 会报如下的错误:
E/AndroidRuntime( 6173): Uncaught handler: thread Thread-8 exiting due to uncaught exception
E/AndroidRuntime( 6173): java.lang.RuntimeException: Can't create handler inside thread that has not called Looper.prepare()
原因是非主线程中默认没有创建Looper对象,需要先调用Looper.prepare()启用Looper。
4. Looper.loop(); 让Looper开始工作,从消息队列里取消息,处理消息。
注意:写在Looper.loop()之后的代码不会被执行,这个函数内部应该是一个循环,当调用mHandler.getLooper().quit()后,loop才会中止,其后的代码才能得以运行。
5. 基于以上知识,可实现主线程给子线程(非主线程)发送消息。
