1.知识准备
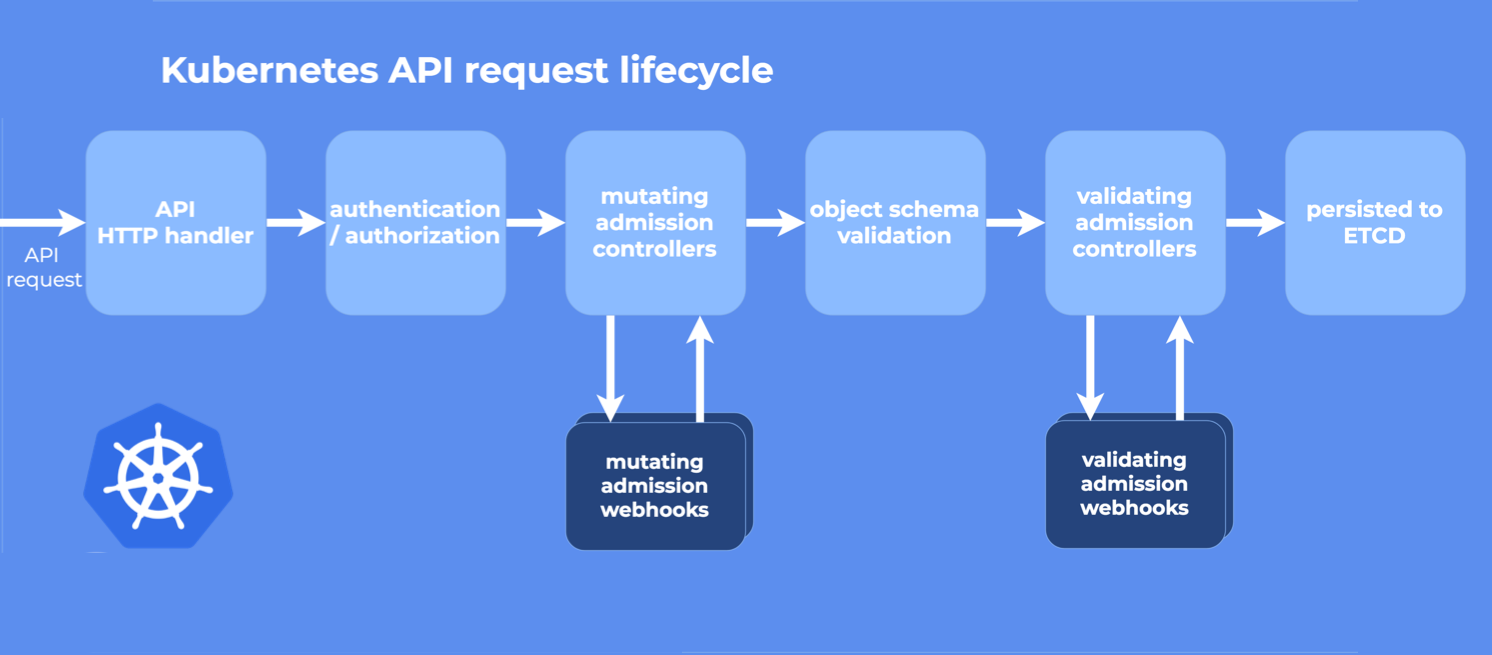
1.Webhook 是一种用于接收准入请求并对其进行处理的 HTTP 回调机制
2.Webhook 接收来自apiserver的回调,对回调资源做一些校验、注入、修改元数据等工作
3.来一张图片
2.环境准备
| 组件 | 版本 |
|---|---|
| OS | CentOS Linux release 7.6.1810 (Core) |
| docker | 18.09.7 |
| k8s | v1.15.2 |
| golang | go1.16.9 darwin/amd64 |
| ip | hostname |
|---|---|
| 10.248.33.220 | k8s-master |
3.部署
3.1 创建相关证书
|># sh webhook-create-signed-cert.sh
creating certs in tmpdir ./webhook-certs
Generating RSA private key, 2048 bit long modulus
..................................................+++
.................+++
e is 65537 (0x10001)
certificatesigningrequest.certificates.k8s.io/wilsonchai-webhook-svc.default created
NAME                             AGE   REQUESTOR          CONDITION
wilsonchai-webhook-svc.default   0s    kubernetes-admin   Pending
certificatesigningrequest.certificates.k8s.io/wilsonchai-webhook-svc.default approved
secret/wilsonchai-webhook-certs created
3.2 创建权限
|># kubectl apply -f yaml/rbac.yaml
serviceaccount/wilsonchai-webhook-sa changed
clusterrole.rbac.authorization.k8s.io/wilsonchai-webhook-cr changed
clusterrolebinding.rbac.authorization.k8s.io/wilsonchai-webhook-crb changed
3.3 创建 mutetingwebhookconfiguration
|># cat yaml/mutatingwebhookconfiguration.yaml | sh webhook-patch-ca-bundle.sh | kubectl apply -f -
mutatingwebhookconfiguration.admissionregistration.k8s.io/wilsonchai-webhook-example-cfg created
|># kubectl get mutatingwebhookconfiguration
NAME                             CREATED AT
wilsonchai-webhook-example-cfg   2021-11-08T03:34:39Z
3.4 namespace 打 label
kubectl label namespace default wilsonchai-webhook=enabled
3.5编译代码并且上传镜像
|># sh build.sh 0.0.1
go: downloading github.com/golang/glog v1.0.0
go: downloading k8s.io/apimachinery v0.22.3
go: downloading github.com/unrolled/secure v1.0.9
go: downloading k8s.io/api v0.22.3
go: downloading github.com/gin-gonic/gin v1.7.4
go: downloading golang.org/x/sys v0.0.0-20210616094352-59db8d763f22
go: downloading github.com/golang/protobuf v1.5.2
go: downloading github.com/go-playground/validator/v10 v10.4.1
go: downloading google.golang.org/protobuf v1.26.0
go: downloading github.com/gogo/protobuf v1.3.2
go: downloading k8s.io/klog/v2 v2.9.0
go: downloading github.com/google/gofuzz v1.1.0
go: downloading github.com/go-logr/logr v0.4.0
go: downloading sigs.k8s.io/structured-merge-diff/v4 v4.1.2
go: downloading github.com/json-iterator/go v1.1.11
go: downloading golang.org/x/net v0.0.0-20210520170846-37e1c6afe023
go: downloading github.com/google/go-cmp v0.5.5
Sending build context to Docker daemon  22.04MB
Step 1/3 : FROM alpine:latest
 ---> 389fef711851
Step 2/3 : Add wilsonchai-webhook /wilsonchai-webhook
 ---> 05381b24d25c
Step 3/3 : ENTRYPOINT ["./wilsonchai-webhook"]
 ---> Running in c36e1e7a0bfb
Removing intermediate container c36e1e7a0bfb
 ---> c4a4c7042625
Successfully built c4a4c7042625
Successfully tagged registry.cn-beijing.aliyuncs.com/wilsonchai/mutating-webhook:0.0.1
The push refers to repository [registry.cn-beijing.aliyuncs.com/wilsonchai/mutating-webhook]
85e0257311fe: Pushed
777b2c648970: Pushed
0.0.1: digest: sha256:6750fe64823810caa0ad7551a61ba4b4e6ee0ccd40ab93a76b6a1fb8bcdc5bee size: 740
3.6部署镜像
|># kubectl apply -f yaml/deploy.yaml
deployment.apps/wilsonchai-webhook-deployment created
service/wilsonchai-webhook-svc created
|># kubectl get pod | grep wilsonchai-webhook
wilsonchai-webhook-deployment-8444c7d8dd-89qwp   1/1     Running     0          19s
至此,整个部署完成,是不是非常简单,现在我们来测试一下是否能够正常工作
4.测试
4.1 先打开一个shell 1,监控wilsonchai-webhook的日志输出
|># kubectl logs -f wilsonchai-webhook-deployment-8444c7d8dd-89qwp
[GIN-debug] [WARNING] Creating an Engine instance with the Logger and Recovery middleware already attached.

[GIN-debug] [WARNING] Running in "debug" mode. Switch to "release" mode in production.
 - using env:	export GIN_MODE=release
 - using code:	gin.SetMode(gin.ReleaseMode)

[GIN-debug] POST   /mutate                   --> main.WebhookCallback (4 handlers)
[GIN-debug] Listening and serving HTTPS on :443
4.2 打开另一个shell 2,部署一个测试的deployment,busybox-test
|># kubectl apply -f yaml/busybox.yaml
deployment.apps/busybox-test created
4.3 回到shell 1,wilsonchai-webhook成功接收到来自api的回调
[GIN] 2021/11/08 - 03:53:59 | 200 | 176.172µs | 10.244.0.0 | POST "/mutate?timeout=30s"
4.4 回到shell 2,查看busybox-test是否部署成功
|># kubectl get pod | grep busybox
busybox-test-59c6487468-h4zx9                    1/1     Running     0          110s
至此,部署成功
5.调试模式
由于我们的开发环境在远端(相对于k8s集群),我们想要配置可以直接回调到远端的开发环境,方便我们调试代码,here we go!!
5.1 k8s master上操作
5.1.1 删除 k8s 集群中的 wilsonchai-webhook
|># kubectl delete -f yaml/deploy.yaml
deployment.apps "wilsonchai-webhook-deployment" deleted
service "wilsonchai-webhook-svc" deleted
5.1.2 部署调试模式
|># kubectl apply -f yaml/debug.yaml
service/wilsonchai-webhook-svc created
endpoints/wilsonchai-webhook-svc created
注意: 这里的10.248.33.220,是我的k8s master ip,请大家自行替换成k8s master ip
...
apiVersion: v1
kind: Endpoints
metadata:
  name: wilsonchai-webhook-svc
subsets:
- addresses:
  - ip: 10.248.33.220
  ports:
    - port: 443
5.1.3 修改k8s master 的ssh配置(如果没有,请添加),然后重启
|># grep GatewayPorts /etc/ssh/sshd_config
GatewayPorts yes
|># systemctl restart sshd
5.2 回到开发机器操作
5.2.1 打开一条ssh隧道
▶ ssh -N -R 10.248.33.220:443:127.0.0.1:443 root@10.248.33.220
root@10.248.33.220's password:
5.2.2 运行wilsonchai-webhook,这里需要手工指向证书位置(证书就在“创建相关证书”小节中创建出来的webhook-certs中)
▶ go run main.go webhook.go -tlsCertFile webhook-certs/server-cert.pem -tlsKeyFile webhook-certs/server-key.pem
[GIN-debug] [WARNING] Creating an Engine instance with the Logger and Recovery middleware already attached.

[GIN-debug] [WARNING] Running in "debug" mode. Switch to "release" mode in production.
 - using env:	export GIN_MODE=release
 - using code:	gin.SetMode(gin.ReleaseMode)

[GIN-debug] POST   /mutate                   --> main.WebhookCallback (4 handlers)
[GIN-debug] Listening and serving HTTPS on :443
至此,开发环境搭建完成,我们来测试一下
5.3 重建busybox-test
|># kubectl delete -f yaml/busybox.yaml
deployment.apps "busybox-test" deleted
|># kubectl apply -f yaml/busybox.yaml
deployment.apps/busybox-test created
5.4 查看开发环境
[GIN] 2021/11/08 - 12:08:59 | 200 | 3.812455ms | 127.0.0.1 | POST "/mutate?timeout=30s"
没错,apiserver已经回调到我们的开发环境了
6.原理浅析
6.1 mutate webhook
● 通过mutatingwebhookconfiguration,告诉apiserver哪一种资源需要回调
● 用一个wilsonchai-webhook来接收回调,并且进行适当的处理(本文只是打通流程,并没有处理回调内容)
● wilsonchai-webhook最后将回调内容经过处理之后,回写到apiserver去
● mutate webhook有30s的超时时间,超时之后apiserver将进入自己的流程,并在日志打印一行错误
6.2 调试
● 第一步,修改service 的endpoint,把请求流出k8s集群
● 第二步,修改k8s master 的sshd_config,这样做的目的是让隧道监听0.0.0.0,否则只能监听127.0.0.1
● 第三步,建立一条ssh隧道,将访问到k8s master的请求导入到开发环境来
● 总的来说:apiserver --> wilsonchai-webhook-svc --> k8s master ip --> 开发环境
注意:如果你的k8s集群能够直接访问开发环境,那就更加简单,只需要把endpoint的address指向你的开发环境ip即可
7.小结
● 需要注意的是,本文的k8s是1.15.2版本的,如果是高于 v1.16,mutatingwebhookconfiguration的apiversion有变化,具体请参考官网
● 本文只是打通了流程,并没有演示webhook的具体作用
● 本文中的代码:代码
8.参考
https://kubernetes.io/zh/docs/reference/access-authn-authz/extensible-admission-controllers/
https://www.qikqiak.com/post/k8s-admission-webhook/
至此,本文结束
在下才疏学浅,有撒汤漏水的,请各位不吝赐教...