详见可参考:https://www.cnblogs.com/tiger666/p/10239307.html?tdsourcetag=s_pctim_aiomsg
1. 常用的WEB框架有哪些:
django 重量级别的框架,功能大而全, form表单,ORM, 内置的模块非常多 600-2000req/s
flask 轻量级的框架, 从第三方引入过来的 2500req/s
tornado(没学过) 异步非阻塞 支持多用户并发访问3000req/s
sanic 是python3.5之后的一个框架, 20000req/s
我们的WEB框架是用来处理用户请求,获取数据并返回给用户查看
在上面开发应用程序用的
2. web服务器
是用来对外提供服务的, www服务
IIS
apache 非常普通的WEB服务器 对高并发没有太大的支持
nginx 开源的,支持高并发,高性能的服务器
tengine 淘宝自己的nginx服务器,其实它的配置和nginx一样
面试回答nginx技巧
支持高并发,能支持几万并发连接
资源消耗少,在3万并发连接下开启10个nginx线程消耗的内存不到200M
可以做http反向代理和负载均衡
支持异步网络i/o事件模型epoll
linux下测试访问网站命令
curl -i 域名   # 访问网站并返回网站内容(源代码)
curl -I 域名   # 返回网站的服务器信息
3. nginx编译安装
1 安装所需要的依赖库

yum install -y gcc patch libffi-devel python-devel zlib-devel bzip2-devel openssl openssl-devel ncurses-devel sqlite-devel readline-devel tk-devel gdbm-devel db4-devel libpcap-devel xz-devel
2 下载nginx安装源码包 wget -c https://nginx.org/download/nginx-1.12.0.tar.gz

3.解压缩源码 tar -zxvf nginx-1.12.0.tar.gz

4.配置,编译安装

./configure --prefix=/opt/nginx112

make && make install
5.启动nginx,进入sbin目录,找到nginx启动命令

cd /opt/nginx112/sbin
./nginx #启动
./nginx -s stop #关闭
./nginx -s reload # 平滑重启 ,修改了nginx.conf之后,可以不重启服务,加载新的配置
或者  /opt/nginx112/sbin/nginx -s reload  # 绝对路径平滑重启
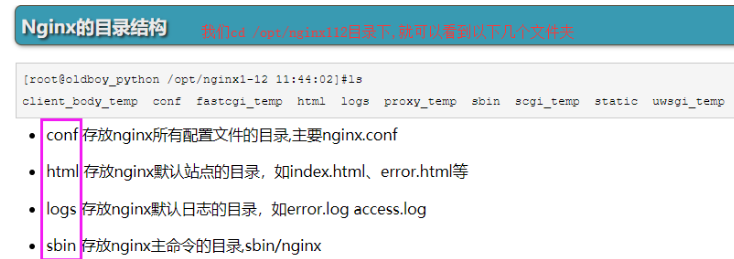
6 nginx的目录结构
7 nginx配置文件详解


#定义nginx工作进程数 worker_processes 5; #错误日志 #error_log logs/error.log; #http定义代码主区域 http { include mime.types; default_type application/octet-stream; #定义nginx的访问日志功能 #nginx会有一个accses.log功能,查看用户访问的记录 log_format main '$remote_addr - $remote_user [$time_local] "$request" ' '$status $body_bytes_sent "$http_referer" ' '"$http_user_agent" "$http_x_forwarded_for"'; #开启日志功能 access_log logs/access.log main; sendfile on; keepalive_timeout 65; #开启gzip压缩传输 gzip on; #虚拟主机1 定义一个 斗鱼网站 server { #定义nginx的访问入口端口,访问地址是 192.168.11.37:80 listen 80; #定义网站的域名www.woshidouyu.tv #如果没有域名,就填写服务器的ip地址 192.168.11.37 server_name www.woshidouyu.tv; #nginx的url域名匹配 #只要请求来自于www.woshidouyu.tv/111111111 #只要请求来自于www.woshidouyu.tv/qweqwewqe #最低级的匹配,只要来自于www.woshidouyu.tv这个域名,都会走到这个location location / { #这个root参数,也是关键字,定义网页的根目录 #以nginx安装的目录为相对路径 /opt/nginx112/html #可以自由修改这个root定义的网页根目录 root html; #index参数定义网站的首页文件名,默认的文件名 index index.html index.htm; } #错误页面的优化(只要是遇到前面4系列的错误,就会直接跳转到相对目录下的40x.html页面) error_page 400 401 402 403 404 /40x.html; } }
8 跑一个斗鱼网站出来
修改自己本地的host文件
路径如下:
        C:WindowsSystem32driversetc
server { listen 80; server_name www.qishi2douyu.com; #access_log logs/host.access.log main; location / { root /opt/qishi2douyu/; index index.html index.htm; } #error_page 404 /404.html; error_page 500 502 503 504 /50x.html; location = /50x.html { root html; } }
4. nginx多虚拟主机的配置
1 在192.168.12.56服务器上,跑3个网站出来(需要在本地文件host中添加相应的IP地址)
配置文件如下:
server { listen 80; server_name www.qishi2douyu.com; #access_log logs/host.access.log main; location / { root /opt/qishi2douyu/; index index.html index.htm; } #error_page 404 /404.html; error_page 500 502 503 504 /50x.html; location = /50x.html { root html; } } server { listen 80; server_name www.qishi2huya.com; location / { root /opt/qishi2huya/; index index.html index.htm; } } server { listen 80; server_name www.qishi2jd.com; location / { root /opt/qishi2jd/; index index.html index.htm; } }
2 分别在/opt目录下创建qishi2douyu、qishi2huya、qishi2jd这三个目录
分别在目录下创建index.html
3 平滑重启nginx
/opt/nginx112/sbin/nginx -s reload
nginx错误页面优化
1 修改配置文件
vim /opt/nginx112/conf/nginx.conf 在www.qishi2douyu.com虚拟主机下添加以下内容(server代码块下) error_page 400 401 402 403 404 /40x.html; location = /40x.html { root /opt/qishi2douyu/; }
2 在/opt/qishi2douyu/目录下创建40x.html, 把淘宝的错误页面源代码拷贝过来
vim 40x.html
3 平滑重启nginx
4 随便访问一个不存在的页面
http://www.qishi2douyu.com/sladfj243
5 就可以看到我们配置的错误页面
5. nginx访问日志功能
1 打开nginx配置文件nginx.conf
vim /opt/nginx112/conf/nginx.conf
2 修改配置文件, 启用日志功能
log_format main '$remote_addr - $remote_user [$time_local] "$request" ' '$status $body_bytes_sent "$http_referer" ' '"$http_user_agent" "$http_x_forwarded_for"'; access_log logs/access.log main;
3 平滑重启nginx
4 浏览器访问192.168.12.56
5.查看访问记录
tail -f /opt/nginx112/logs/access.log
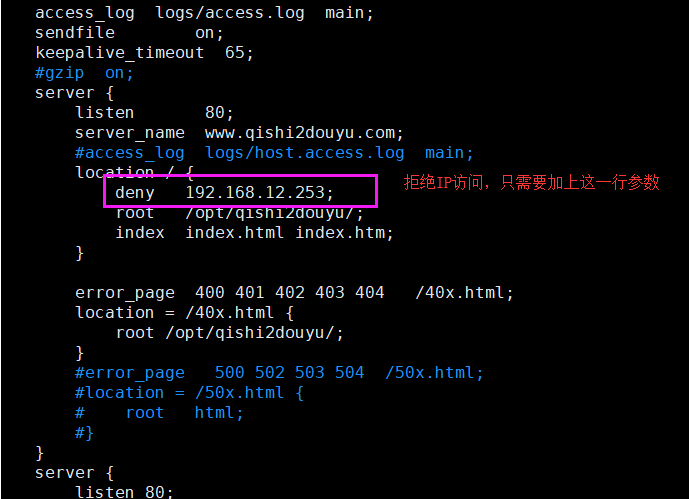
6. nginx限制IP访问
7. nginx代理功能
生活中的代理:
要想去租房:
租客 —> 中介 —>房东
代购, 海淘
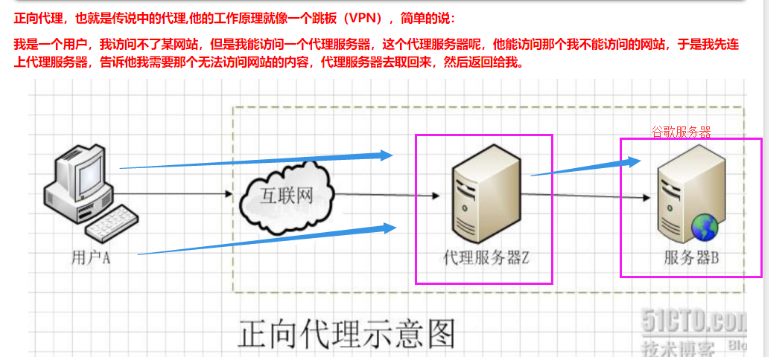
正向代理
反向代理
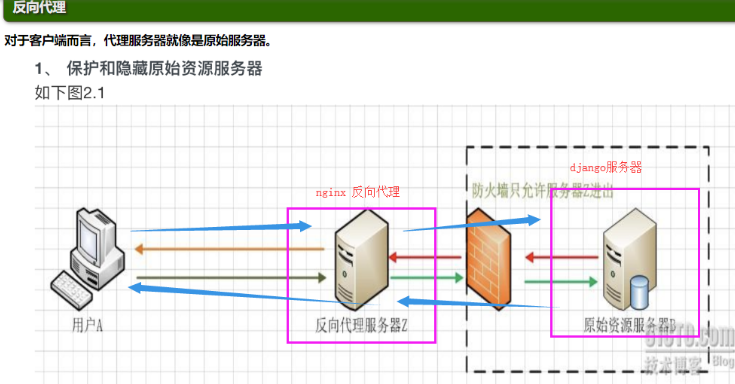
nginx反向代理
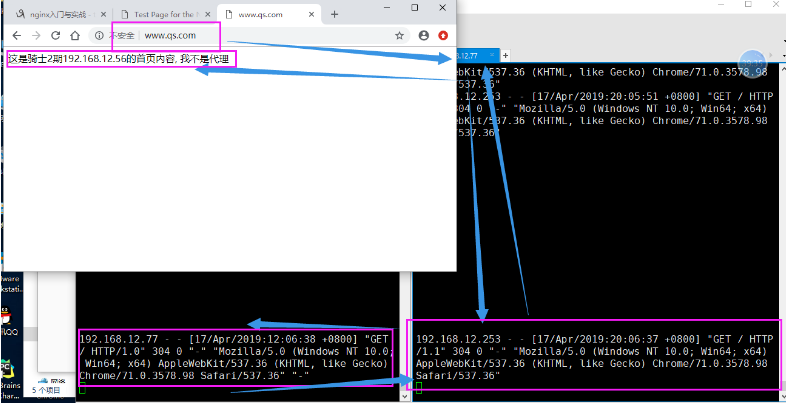
1 准备两台机器
192.168.12.56   # 内部的django服务器
192.168.12.77   # 代理服务器
请求数据: windows   ——>   192.168.12.77   ——>   192.168.12.56
返回数据: windows   <——   192.168.12.77   <——   192.168.12.56
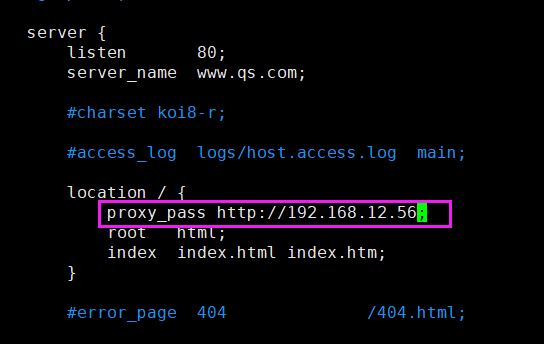
2 修改代理服务器192.168.12.77的配置文件
vim /opt/nginx112/conf/nginx.conf
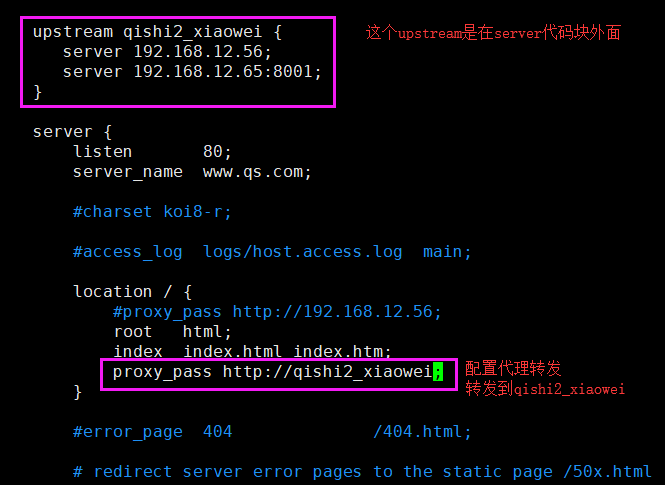
8. nginx负载均衡
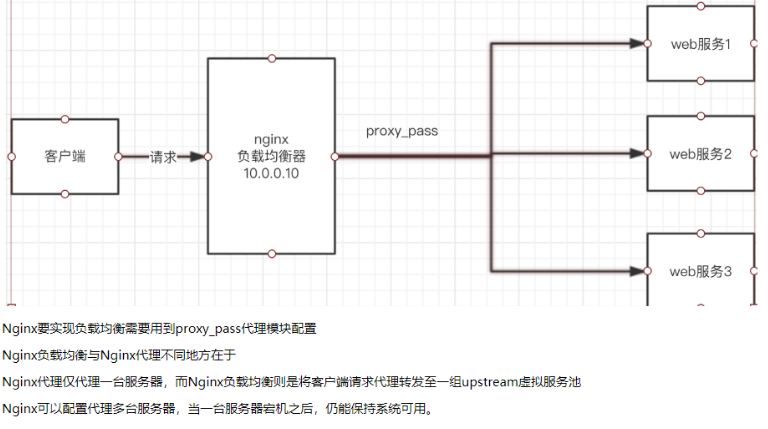
nginx负载均衡配置
1 准备三台机器
1. nginx负载均衡器(192.168.12.77)
2  另外两台应用服务器(192.168.12.56 +  192.168.12.65)
2 先确保两台应用服务器能够正常访问
http://192.168.12.56
http://192.168.12.65:8001
3 配置负载均衡器(192.168.12.77)
修改配置文件 vim /opt/nginx112/conf/nginx.conf worker_processes 1; #error_log logs/error.log; events { worker_connections 1024; } http { include mime.types; default_type application/octet-stream; #log_format main '$remote_addr - $remote_user [$time_local] "$request" ' # '$status $body_bytes_sent "$http_referer" ' # '"$http_user_agent" "$http_x_forwarded_for"'; #access_log logs/access.log main; sendfile on; keepalive_timeout 65; #gzip on; upstream qishi2_xiaowei { server 192.168.12.56; server 192.168.12.65 weight=5; } server { listen 80; server_name www.qs.com; location / { root html; index index.html index.htm; proxy_pass http://qishi2_xiaowei; } #error_page 404 /404.html; error_page 500 502 503 504 /50x.html; location = /50x.html { root html; } } }