1、Handler处理器和Opener的作用
# encoding=utf-8
import urllib2
# cookielib 模块主要的对象有CookieJar、FileCookieJar、MozillaCookieJar、LWPCookieJar。
import cookielib

a_url = 'http://www.baidu.com/'
header = {
    'user-Agent': 'Mozilla/5.0 (Windows NT 6.1; WOW64) AppleWebKit/537.36 (KHTML, like Gecko) Chrome/69.0.3497.81 Safari/537.36'}
# 1.1、创建一个密码管理者
password_Mgr = urllib2.HTTPPasswordMgrWithDefaultRealm()
# 1.2、添加用户名和密码
top_level_url = "http://example.com/foo/"
# 1.3、如果知道 realm, 我们可以使用他代替 'None'.
password_Mgr.add_password(None, top_level_url, 'why', '1223')


# 2.1、构建一个 CookieJer 对象实例来保存 cookie
cookiejar = cookielib.CookieJar()

# 2.2、声明一个MozillaCookieJar(filename,delayload=None,policy=None)对象实例来保存cookie
# 不同:save() —> 保存cookie到本地文件
mozillacookiejar = cookielib.MozillaCookieJar('cookie.txt')
mozillacookiejar.load('cookie.txt')  # 从文件中获取cookies,做为请求的一部分去访问


# 1.4、使用 HTTP基础用户名/密码验证的HTTPBasicAuthHandler处理器对象,参数是创建的密码管理对象
handler_Proxyauth = urllib2.HTTPBasicAuthHandler(password_Mgr)  # HTTPBasicAuthHandler处理器(Web客户端授权验证)
# 普通ProxyHandler类
handler_Proxy = urllib2.ProxyHandler({'http': '123.245.16.122:8118'})
# 2.3、使用HTTPCookieProcessor()来创建cookie处理器对象,参数为CookieJar()对象
handler_Cookie = urllib2.HTTPCookieProcessor(cookiejar)
handler_MozillaCookie = urllib2.HTTPCookieProcessor(mozillacookiejar)


# 创建 "opener" (OpenerDirector 实例)
opener = urllib2.build_opener(handler_Cookie)

# 1.使用 opener 获取一个URL
# response = opener.open(a_url)

# 2.构造 Request 请求
request = urllib2.Request(a_url, headers=header)
response = opener.open(request)

# 现在所有调用 urllib2.urlopen 将用我们的 opener.
# urllib2.install_opener(opener)


print response.read()
mozillacookiejar.save()  # 保存cookie到本地文件

print "*" * 60
for item in cookiejar:
    Str = item.name + " = " + item.value
    print Str
print "*" * 60

# 在一个列表proxy_list中随机选择一个代理IP  proxy = random.choice(proxy_list)
# 密码管理者的主要应用两个场景:
#    验证代理授权的用户名和密码 (ProxyBasicAuthHandler())
#    验证Web客户端的的用户名和密码 (HTTPBasicAuthHandler())
2、使用Requests库的爬取网页数据
- 使用response.text 时,Requests 会基于 HTTP 响应的文本编码自动解码响应内容,大多数 Unicode 字符集都能被无缝地解码。
- 使用response.content 时,返回的是服务器响应数据的原始二进制字节流,可以用来保存图片等二进制文件。
基本get方法:
如果想添加 headers,可以传入headers参数来增加请求头中的headers信息。如果要将参数放在url中传递,可以利用 params 参数。
# encoding=utf-8

import requests

kw = {'wd':'长城'}

headers = {"User-Agent": "Mozilla/5.0 (Windows NT 10.0; Win64; x64) AppleWebKit/537.36 (KHTML, like Gecko) Chrome/54.0.2840.99 Safari/537.36"}

# params 接收一个字典或者字符串的查询参数,字典类型自动转换为url编码,不需要urlencode()
response = requests.get("http://www.baidu.com/s?", params = kw, headers = headers)

# 查看响应内容,response.text 返回的是Unicode格式的数据  <type 'unicode'>
print response.text

# 查看响应内容,response.content返回的字节流数据 <type 'str'>
print response.content

# 查看完整url地址
print response.url

# 查看响应头部字符编码
print response.encoding

# 查看响应码
print response.status_code
http://www.baidu.com/s?wd=%E9%95%BF%E5%9F%8E
utf-8
200
3、cookie,Session,proxy


# encoding=utf-8

import requests
url="http://www.baidu.com"
response = requests.get(url=url)
cookiejar = response.cookies

print(cookiejar)

cookie_dict = requests.utils.dict_from_cookiejar(cookiejar)
print(cookie_dict)
# encoding=utf-8

import requests
import urllib3


session = requests.session()

wegserver = "https://security.kaixin001.com/login/login_auth.php"  # 登陆首页
url = "http://www.kaixin001.com/friend/search.php"  # 好友
header = {
    "User-Agent": "Mozilla/5.0 (Windows NT 6.1; WOW64) AppleWebKit/537.36 (KHTML, like Gecko) Chrome/69.0.3497.81 Safari/537.36",
    "Connection": "keep-alive",
    "Accept": "*/*",
    "Accept-Language": "zh-CN,zh;q=0.9",
    "Accept-Charset": "iso-8859-1,gb2312,utf-8",
    "Accept-Enconding": "gzip, deflate"
}
data = {"loginemail": "XXXXXXXXXXX@qq.com", "password": "XXXXXXX", "rcode": ""}
urllib3.disable_warnings()
session.post(url=wegserver, headers=header, data=data, verify=False)
response = session.get(url=url, headers=header, verify=False)
# print(response.text)
print(response.apparent_encoding) # 编码格式
print(response.content)
# encoding=utf-8
import requests

proxyes = {'http': '61.135.217.7:80', 'https': '175.10.180.255:80'}

url = 'http://www.baidu.com'
response = requests.get(url=url, proxies=proxyes)
print (response.content)

'''
私密代理

proxy = { "http": "mr_mao_hacker:sffqry9r@61.158.163.130:16816" }

response = requests.get("http://www.baidu.com", proxies = proxy)

print(response.text)
'''
'''
web 客户端验证

auth = ('test', '123456')

response = requests.get('http://192.168.63.161', auth=auth)

print(response.text)
'''
4、会使用正则表达式re模块解析数据
# encoding=utf-8
import re

'''
有一点需要特别注意的是,正则表达式使用 对特殊字符进行转义,所以如果我们要使用原始字符串,只需加一个 r 前缀,示例:
r'chuanzhiboke	.	python'
re 模块的一般使用步骤如下:
1.    使用 compile() 函数将正则表达式的字符串形式编译为一个 Pattern 对象
2.    通过 Pattern 对象提供的一系列方法对文本进行匹配查找,获得匹配结果,一个 Match 对象。
3.    最后使用 Match 对象提供的属性和方法获得信息,根据需要进行其他的操作
'''
str = 'one12twothree34four'
pattern = re.compile(r'd+')
print ('match 方法用于查找字符串的头部(也可以指定起始位置),它是一次匹配,只要找到了一个匹配的结果就返回,而不是查找所有匹配的结果。')
match_ret = pattern.match(str, 3, 10)
print (match_ret.group(), match_ret.span())


print ('search 方法:从任何位置开始查找,一次匹配')
search_ret = pattern.search(str)
print (search_ret.group(), search_ret.span())


print ('findall 方法:全部匹配,返回列表')
pattern = re.compile(r'd+')
findall_ret = pattern.findall(str, 0, len(str))
pattern = re.compile(r'd+.d*')
result = pattern.findall("123.141593, 'bigcat', 232312, 3.15")
print (findall_ret, "/", result)


print ('finditer 方法:全部匹配,返回迭代器')
pattern = re.compile(r'd+')
result_iter1 = pattern.finditer('hello 123456 789')
result_iter2 = pattern.finditer('one1two2three3four4', 0, 10)
print type(result_iter1)
print 'result1...'
for m1 in result_iter1:  # m1 是 Match 对象
    print 'matching string: {}, position: {}'.format(m1.group(), m1.span())
print 'result2...'
for m2 in result_iter2:
    print 'matching string: {}, position: {}'.format(m2.group(), m2.span())


print ('split 方法:分割字符串,返回列表')
p = re.compile(r'[s\,;]+')  # s ->空白
print p.split('a,b;; c   d')


print ('sub 方法:替换')
p = re.compile(r'(w+) (w+)')  # w = [A-Za-z0-9]
s = 'hello 123, hello 456'
print (p.findall(s))
print p.sub(r'hello world', s)  # 使用 'hello world' 替换 'hello 123' 和 'hello 456'
print p.sub(r'2 1', s)  # 引用分组


def func(m):
    m_1= m.group(1)
    m_2= m.group(2)
    return 'hi' + ' ' + m.group(2)


print p.sub(func, s)
print p.sub(func, s, 1)

print ('匹配中文')
title = u'你好,hello,世界'
pattern = re.compile(ur'[u4e00-u9fa5]+')  # ur,其中 r 表示使用原始字符串,u 表示是 unicode 字符串。
ret =  pattern.findall(title)
print ret
for i in ret:
    print i
match 方法用于查找字符串的头部(也可以指定起始位置),它是一次匹配,只要找到了一个匹配的结果就返回,而不是查找所有匹配的结果。
('12', (3, 5))
search 方法:从任何位置开始查找,一次匹配
('12', (3, 5))
findall 方法:全部匹配,返回列表
(['12', '34'], '/', ['123.141593', '3.15'])
finditer 方法:全部匹配,返回迭代器
<type 'callable-iterator'>
result1...
matching string: 123456, position: (6, 12)
matching string: 789, position: (13, 16)
result2...
matching string: 1, position: (3, 4)
matching string: 2, position: (7, 8)
split 方法:分割字符串,返回列表
['a', 'b', 'c', 'd']
sub 方法:替换
[('hello', '123'), ('hello', '456')]
hello world, hello world
123 hello, 456 hello
hi 123, hi 456
hi 123, hello 456
匹配中文
[u'u4f60u597d', u'u4e16u754c']
你好
世界
# encoding=utf-8

import urllib2
# import urllib.request
import re

'''
第一页url: http: //www.neihan8.com/article/list_5_1 .html
第二页url: http: //www.neihan8.com/article/list_5_2 .html
第三页url: http: //www.neihan8.com/article/list_5_3 .html
第四页url: http: //www.neihan8.com/article/list_5_4 .html
'''


class NeiHanSpider(object):
    '''
         内涵段子爬虫类
    '''
    def __init__(self):
        self.page = 1
        self.enable = True

    def loadPage(self):
        '''
            定义一个url请求网页的方法
            :param page: 需要请求的第几页
            :return: 返回的页面html
        '''
        print ('正在爬取第' + str(self.page) + '页')
        url = "http://www.neihan8.com/article/list_5_" + str(self.page) + ".html"
        hearder = {'user-Agent':'Mozilla/5.0 (Windows NT 6.1; WOW64) AppleWebKit/537.36 (KHTML, like Gecko) Chrome/69.0.3497.81 Safari/537.36'}
        # request = urllib.request.Request(url=url, headers=hearder)
        # response = urllib.request.urlopen(request)
        request = urllib2.Request(url=url, headers=hearder)
        response = urllib2.urlopen(request)
        html = response.read().decode('gb2312').encode('utf-8')
        self.parse_page(html)

    def parse_page(self,html):
        '''
        筛选数据
        :param html: 整个网页信息
        :return: 返回筛选后的数据
        '''
        pattern = re.compile(r'<div.*?class="f18 mb20">(.*?)</div>', re.S)
        result = pattern.findall(html)
        print('正在下载第' + str(self.page) + '页')

        for item in result:
            self.write_page(item)
        print('第' + str(self.page) + '下载完毕')

    def write_page(self, text):
        '''
        保存数据
        :param text: 文件内容
        '''
        with open('duanzi.txt', 'a') as f:
            f.write(text)

    def do_work(self):
        '''
        让爬虫开始工作
        '''
        while self.enable:
            try:
                self.loadPage()
            except Exception as e:
                print(e)

            command = raw_input('请输入你的选择:按回车继续,按quit退出:')
            # command = input('请输入你的选择:按回车继续,按quit退出:')
            self.page += 1
            if command == 'quit':
                self.enable = False
                break
        print('谢谢使用!')


if __name__ == '__main__':
    # 定义一个Spider对象
    mySpider = NeiHanSpider()
    mySpider.do_work()
5、会使用Xpath来解析html文件
XPath:我们可以先将 HTML文件 转换成 XML文档,然后用 XPath 查找 HTML 节点或元素。
HTML DOM: 定义了访问和操作 HTML 文档的标准方法,以树结构方式表达 HTML 文档。
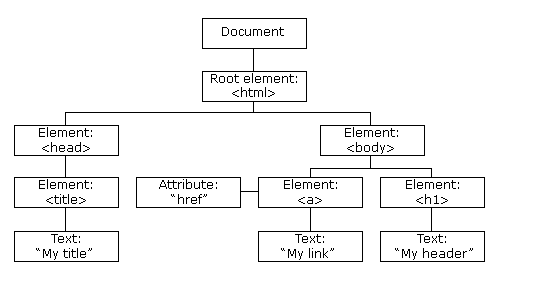
XML的节点关系
1. 父(Parent)
每个元素以及属性都有一个父。
下面是一个简单的XML例子中,book 元素是 title、author、year 以及 price 元素的父:
<?xml version="1.0" encoding="utf-8"?>

<book>
  <title>Harry Potter</title>
  <author>J K. Rowling</author>
  <year>2005</year>
  <price>29.99</price>
</book>
2. 子(Children)
元素节点可有零个、一个或多个子。
在下面的例子中,title、author、year 以及 price 元素都是 book 元素的子:
<?xml version="1.0" encoding="utf-8"?>

<book>
  <title>Harry Potter</title>
  <author>J K. Rowling</author>
  <year>2005</year>
  <price>29.99</price>
</book>
3. 同胞(Sibling)
拥有相同的父的节点
在下面的例子中,title、author、year 以及 price 元素都是同胞:
<?xml version="1.0" encoding="utf-8"?>

<book>
  <title>Harry Potter</title>
  <author>J K. Rowling</author>
  <year>2005</year>
  <price>29.99</price>
</book>
4. 先辈(Ancestor)
某节点的父、父的父,等等。
在下面的例子中,title 元素的先辈是 book 元素和 bookstore 元素:
<?xml version="1.0" encoding="utf-8"?>

<bookstore>

<book>
  <title>Harry Potter</title>
  <author>J K. Rowling</author>
  <year>2005</year>
  <price>29.99</price>
</book>

</bookstore>
5. 后代(Descendant)
某个节点的子,子的子,等等。
在下面的例子中,bookstore 的后代是 book、title、author、year 以及 price 元素:
<?xml version="1.0" encoding="utf-8"?>

<bookstore>

<book>
  <title>Harry Potter</title>
  <author>J K. Rowling</author>
  <year>2005</year>
  <price>29.99</price>
</book>

</bookstore>
XPath 开发工具
- 开源的XPath表达式编辑工具:XMLQuire(XML格式文件可用)
- Chrome插件 XPath Helper
- Firefox插件 XPath Checker
选取节点
XPath 使用路径表达式来选取 XML 文档中的节点或者节点集。这些路径表达式和我们在常规的电脑文件系统中看到的表达式非常相似。
下面列出了最常用的路径表达式:
|
表达式 |
描述 |
|
nodename |
选取此节点的所有子节点。 |
|
/ |
从根节点选取。 |
|
// |
从匹配选择的当前节点选择文档中的节点,而不考虑它们的位置。 |
|
. |
选取当前节点。 |
|
.. |
选取当前节点的父节点。 |
|
@ |
选取属性。 |
在下面的表格中,我们已列出了一些路径表达式以及表达式的结果:
|
路径表达式 |
结果 |
||
|
bookstore |
选取 bookstore 元素的所有子节点。 |
||
|
/bookstore |
选取根元素 bookstore。注释:假如路径起始于正斜杠( / ),则此路径始终代表到某元素的绝对路径! |
||
|
bookstore/book |
选取属于 bookstore 的子元素的所有 book 元素。 |
||
|
//book |
选取所有 book 子元素,而不管它们在文档中的位置。 |
||
|
bookstore//book |
选择属于 bookstore 元素的后代的所有 book 元素,而不管它们位于 bookstore 之下的什么位置。 |
||
|
//@lang |
选取名为 lang 的所有属性。 |
||
谓语(Predicates)
谓语用来查找某个特定的节点或者包含某个指定的值的节点,被嵌在方括号中。
在下面的表格中,我们列出了带有谓语的一些路径表达式,以及表达式的结果:
|
路径表达式 |
结果 |
|
/bookstore/book[1] |
选取属于 bookstore 子元素的第一个 book 元素。 |
|
/bookstore/book[last()] |
选取属于 bookstore 子元素的最后一个 book 元素。 |
|
/bookstore/book[last()-1] |
选取属于 bookstore 子元素的倒数第二个 book 元素。 |
|
/bookstore/book[position()<3] |
选取最前面的两个属于 bookstore 元素的子元素的 book 元素。 |
|
//title[@lang] |
选取所有拥有名为 lang 的属性的 title 元素。 |
|
//title[@lang=’eng’] |
选取所有 title 元素,且这些元素拥有值为 eng 的 lang 属性。 |
|
/bookstore/book[price>35.00] |
选取 bookstore 元素的所有 book 元素,且其中的 price 元素的值须大于 35.00。 |
|
/bookstore/book[price>35.00]/title |
选取 bookstore 元素中的 book 元素的所有 title 元素,且其中的 price 元素的值须大于 35.00。 |
选取未知节点
XPath 通配符可用来选取未知的 XML 元素。
|
通配符 |
描述 |
|
* |
匹配任何元素节点。 |
|
@* |
匹配任何属性节点。 |
|
node() |
匹配任何类型的节点。 |
在下面的表格中,我们列出了一些路径表达式,以及这些表达式的结果:
|
路径表达式 |
结果 |
|
/bookstore/* |
选取 bookstore 元素的所有子元素。 |
|
//* |
选取文档中的所有元素。 |
|
//title[@*] |
选取所有带有属性的 title 元素。 |
选取若干路径
通过在路径表达式中使用“|”运算符,您可以选取若干个路径。
实例
在下面的表格中,我们列出了一些路径表达式,以及这些表达式的结果:
|
路径表达式 |
结果 |
|
//book/title | //book/price |
选取 book 元素的所有 title 和 price 元素。 |
|
//title | //price |
选取文档中的所有 title 和 price 元素。 |
|
/bookstore/book/title | //price |
选取属于 bookstore 元素的 book 元素的所有 title 元素,以及文档中所有的 price 元素。 |
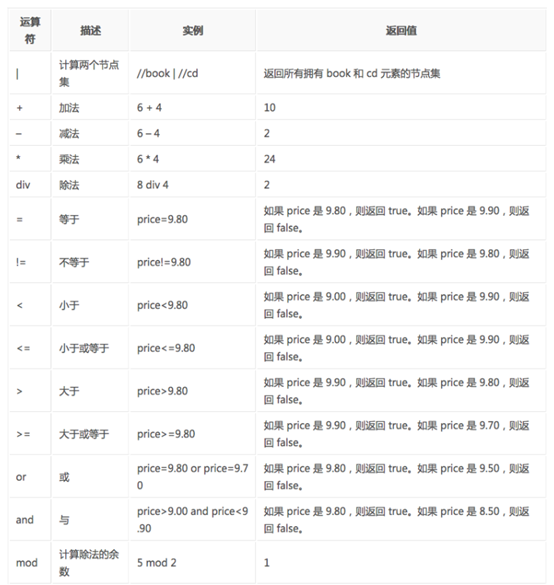
XPath的运算符
下面列出了可用在 XPath 表达式中的运算符:
lxml库
lxml 是 一个HTML/XML的解析器,主要的功能是如何解析和提取 HTML/XML 数据。
lxml和正则一样,也是用 C 实现的,是一款高性能的 Python HTML/XML 解析器,我们可以利用之前学习的XPath语法,来快速的定位特定元素以及节点信息。
lxml python 官方文档:http://lxml.de/index.html
需要安装C语言库,可使用 pip 安装:pip install lxml

# encoding=utf-8

import lxml
from lxml import etree


def lxmltest(filename):
    html = etree.parse(filename)
    print html, type(html)
    print ("*" * 50)
    results = html.xpath('//food')
    print results
    print ("*" * 50)
    foods = html.xpath('//food[1]/name/@class')
    print foods
    print ("*" * 50)
    foods = html.xpath('//food/name')
    print foods
    print foods[0].text


def readFile(filename):
    print "正在读取" + filename
    with open(filename, 'r') as f:
        data = f.read()
    return data


if __name__ == '__main__':
    fimename = "1.html"
    lxmltest(fimename)
<lxml.etree._ElementTree object at 0x000000000256B848> <type 'lxml.etree._ElementTree'>
**************************************************
[<Element food at 0x256b7c8>, <Element food at 0x256b788>, <Element food at 0x256b748>, <Element food at 0x256b3c8>, <Element food at 0x256b148>]
**************************************************
['blod']
**************************************************
[<Element name at 0x256b108>, <Element name at 0x256b0c8>, <Element name at 0x2569d08>, <Element name at 0x2569ac8>, <Element name at 0x2569a88>]
Belgian Waffles
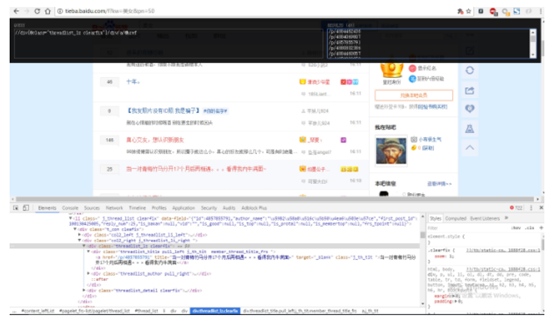
# -*- coding: utf-8 -*-

import urllib
import urllib2
from lxml import etree


"""
1. 爬取贴吧页,并获取贴吧里面的帖子的链接
2. 爬取每个帖子的链接,获取帖子里面的图片链接
3. 将图片保存到本地
4. 调度爬取哪一页
"""

def loadPage(url, page):
    """
    作用:根据url发送请求,获取服务器响应文件
    url:需要爬取的url地址
    filename: 下载的文件名
    """
    print "正在加载第%s页:" % page

    headers = {"User-Agent": "Mozilla/5.0 (compatible; MSIE 9.0; Windows NT 6.1; Trident/5.0;"}
    print url
    request = urllib2.Request(url, headers=headers)
    response = urllib2.urlopen(request)
    html = response.read()
    # 将HTML文档解析为HTML DOM模型
    selector = etree.HTML(html)

    link_list = selector.xpath('//div[@class="t_con cleafix"]/div/div/div/a/@href')

    for link in link_list:
        fullink = "http://tieba.baidu.com" + link
        loadImage(fullink)

def loadImage(link):
    print "正在加载帖子:"
    headers = {"User-Agent": "Mozilla/5.0 (compatible; MSIE 9.0; Windows NT 6.1; Trident/5.0;"}
    request = urllib2.Request(link, headers=headers)
    response = urllib2.urlopen(request)
    html = response.read()
    selector = etree.HTML(html)
    # 返回帖子里面所有图片的链接
    image_list = selector.xpath('//img[@class="BDE_Image"]/@src')
    for image_link in image_list:
        writeImage(image_link)
    print "-" * 20


def writeImage(link):
    """
    作用:将html内容写入到本地
    html:服务器响应文件内容
    filename: 存储的文件名
    """
    filename = link[-8:]
    print "正在保存图片%s:" % filename
    headers = {"User-Agent": "Mozilla/5.0 (compatible; MSIE 9.0; Windows NT 6.1; Trident/5.0;"}
    request = urllib2.Request(link, headers=headers)
    image = urllib2.urlopen(request).read()
    with open("./images/" + filename, 'wb') as f:
        f.write(image)


def tiebaSpider(kw, beginPage, endPage):
    """
    作用:负责处理url,分配每个url去发送请求
    :param url:负责处理的第一个
    :param benginPage:爬虫执行的起始页面
    :param endPage:爬虫执行的结束页面
    :return:
    """
    url = "https://tieba.baidu.com/f?"
    key = urllib.urlencode({"kw": kw})
    url = url + key
    for page in range(beginPage, endPage+1):
        pn = (page - 1) * 50
        fulurl = url + "&pn=" + str(pn)
        loadPage(fulurl, page)


if __name__ == "__main__":

    kw = raw_input("请输入需要爬取的贴吧名:")
    beginPage = int(raw_input("请输入起始页:"))
    endPage = int(raw_input("请输入结束页:"))

    tiebaSpider(kw, beginPage, endPage)
【重点总结】
- 常见的几种Handler处理器
- Requests库的Get请求、Post请求和Session方法
- 正则表达式re模块常用的方法
- 选取Xpath路径表达式