因为经常换服务器,每次下载的东西都没有了,于是想自己写一个一键化的脚本,帮忙安装各种环境,一键化部署环境.
简单语法
- 定义变量
1,变量名和等号之间不能有空格;

2,首个字符必须为字母(a-z,A-Z)。

3, 中间不能有空格,可以使用下划线(_)。

4, 不能使用标点符号。

5, 不能使用bash里的关键字(可用help命令查看保留关键字)
- 使用变量
$xxx 或者 ${xxx}  ,建议使用后者
只读变量设置为 readonly xxx
删除变量使用 unset xxx
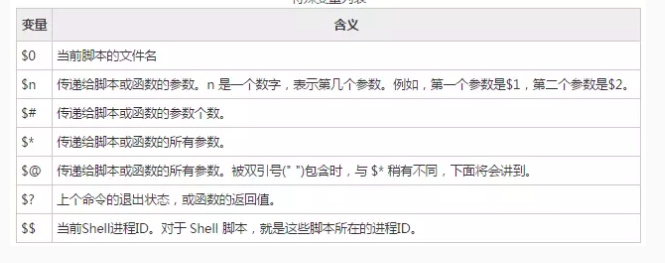
- 特殊变量

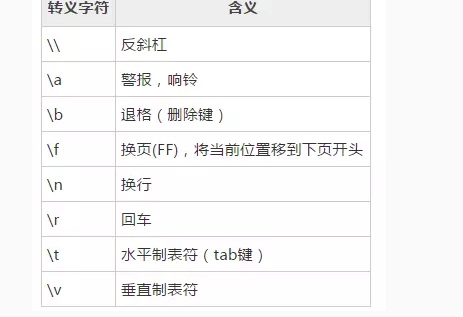
- 转义符号

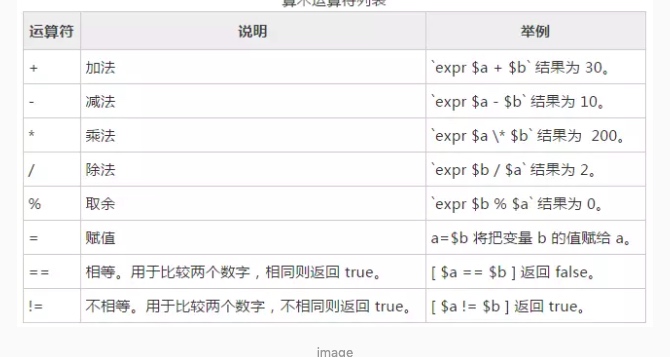
- 算数运算符

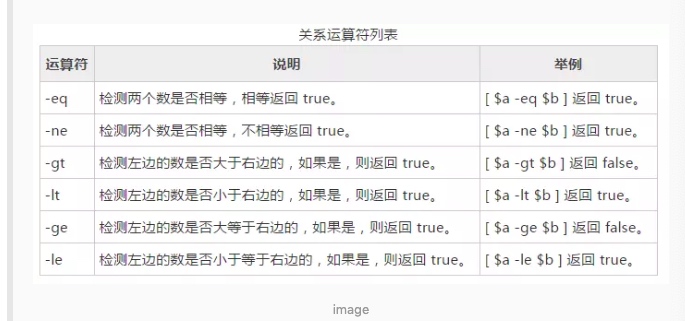
- 关系运算符(仅支持数字)

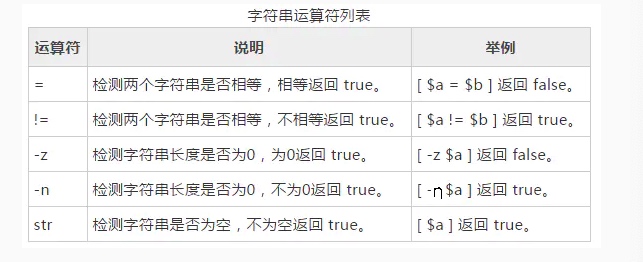
- 字符串运算符

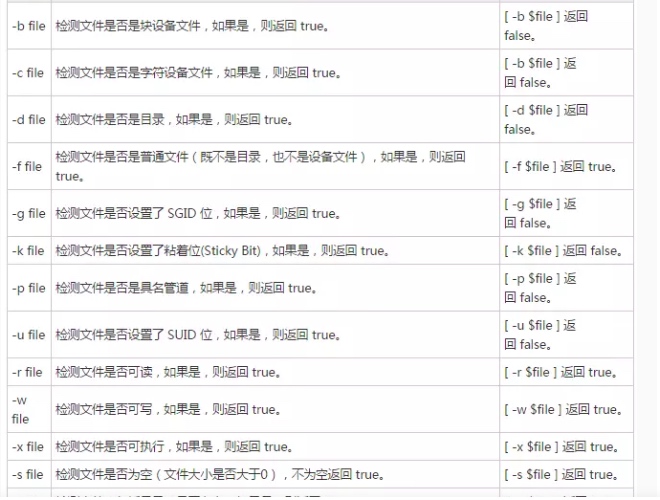
- 文件测试运算符

- 字符串相关操作
获取字符串长度
test="QAQ"
echo ${#test}
提取字符串
test="QAQ"
echo ${test:1:2}   //AQ
查找字符串
string="alibaba is a great company"
echo `expr index "$string" is`
- 处理路径字符串
basename   //获取文件名
dirname //获取路径名
- 数组
定义数组
test=(1 2 3 4)  //以空格间隔
test[0]=1  test[1]=2
读取数组
${test[1]}
读取所有元素
${test[@]}
获取数组长度
${#test[@]}  //  ${#test[*]}
获取单个元素长度
${#test[1]}
- 注释
单行用#
多行
:<<EOF
xxxx
xxxx
EOF
- 参数传递
使用脚本的时候我们可以向脚本传递参数
$0就是脚本名 $1 ... $n 就是我们传递的所有参数
$#  //传递参数的个数
$$ //脚本当前进程ID号
$*  //获取所有传递参数
$@  //同上,不过更好用
- Shell脚本流程控制
if
if condition
then
    command1
    command2
    ...
    commandN
fi
if else
if condition
then
    command1
    command2
    ...
    commandN
else
    command
fi
if else-if else
if condition1
then
    command1
elif condition2
then
    command2
else
    commandN
fi
for循环
for var in item1 item2 ... itemN
do
    command1
    command2
    ...
    commandN
done
while
while condition
do
    command
done
case
case 值 in
模式1)
    command1
    command2
    ...
    commandN
    ;;
模式2)
    command1
    command2
    ...
    commandN
    ;;
esac
还有break和continue命令用于跳出循环
- 函数
func_nmae(){
    //
}
func_name
传参
#!/bin/bash
# author:菜鸟教程
# url:www.runoob.com

funWithParam(){
    echo "第一个参数为 $1 !"
    echo "第二个参数为 $2 !"
    echo "第十个参数为 $10 !"
    echo "第十个参数为 ${10} !"
    echo "第十一个参数为 ${11} !"
    echo "参数总数有 $# 个!"
    echo "作为一个字符串输出所有参数 $* !"
}
funWithParam 1 2 3 4 5 6 7 8 9 34 73
自己写的一些垃圾脚本
用于安装一些基本环境,msf,empire,Vulhub,Docker等环境
#!/bin/bash

source_file_update(){

echo "更新系统源中...."
echo "deb http://mirrors.aliyun.com/ubuntu/ bionic main restricted universe multiverse" > /etc/apt/sources.list

echo "deb-src http://mirrors.aliyun.com/ubuntu/ bionic main restricted universe multiverse" >> /etc/apt/sources.list

echo "deb http://mirrors.aliyun.com/ubuntu/ bionic-security main restricted universe multiverse" >>  /etc/apt/sources.list

echo "deb-src http://mirrors.aliyun.com/ubuntu/ bionic-security main restricted universe multiverse" >> /etc/apt/sources.list

echo "deb http://mirrors.aliyun.com/ubuntu/ bionic-updates main restricted universe multiverse" >> /etc/apt/sources.list

echo "deb-src http://mirrors.aliyun.com/ubuntu/ bionic-updates main restricted universe multiverse" >> /etc/apt/sources.list

echo "deb http://mirrors.aliyun.com/ubuntu/ bionic-backports main restricted universe multiverse" >> /etc/apt/sources.list

echo "deb-src http://mirrors.aliyun.com/ubuntu/ bionic-backports main restricted universe multiverse" >>  /etc/apt/sources.list

echo "deb http://mirrors.aliyun.com/ubuntu/ bionic-proposed main restricted universe multiverse" >>  /etc/apt/sources.list

echo "deb-src http://mirrors.aliyun.com/ubuntu/ bionic-proposed main restricted universe multiverse" >>   /etc/apt/sources.list
apt-get update
}

check_install(){
    if [ `whoami` == "root" ];then
    echo "Ok."
else
    echo "因源文件普通用户不可写,请以root用户执行脚本. Example: sudo ./Linux_install.sh"
    exit
fi
}

Basic_environment(){
    echo "基础环境安装中...."
apt-get install net-tools -y

apt-get install wget -y

apt-get install curl -y

apt-get install vim -y

apt-get install openssh-server -y

apt-get install python3 -y

apt-get install curl -y

apt-get install python -y

apt-get install git -y

}

docker_install(){
    apt-get remove docker docker-engine docker.io

apt-get install
        apt-transport-https
        ca-certificates
        curl
        software-properties-common

#
curl -fsSL https://download.docker.com/linux/ubuntu/gpg | sudo apt-key add -

sudo apt-key fingerprint 0EBFCD88

add-apt-repository
       "deb [arch=amd64] https://download.docker.com/linux/ubuntu
       $(lsb_release -cs)
       stable"

#
apt-get update

echo "开始安装Docker"

apt-get install docker-ce  -y

apt-get install python3-pip  -y

apt-get install nmap -y

apt-get install sed -y

python3 -m pip install docker-compose

apt  install docker-compose  -y

service docker start
}


vulhub_install(){
    cd $HOME
    echo "安装vulnhub环境中..."

    git clone https://github.com/vulhub/vulhub

}

msf_install(){
    echo "msf安装中...."
curl https://raw.githubusercontent.com/rapid7/metasploit-omnibus/master/config/templates/metasploit-framework-wrappers/msfupdate.erb > msfinstall &&
  chmod 755 msfinstall &&
  ./msfinstall
}

powershell(){
    cd $HOME
    mkdir Powershell
    cd Powershell
    git clone https://github.com/PowerShellMafia/PowerSploit.git

}

empire_install(){
    cd $HOME
    echo "安装Empire.."
    git clone https://github.com/EmpireProject/Empire.git
    cd Empire
    ./setup/install.sh
}

neiwang(){
    cd $HOME
    mkdir 内网渗透
    cd 内网渗透
    git clone https://github.com/idlefire/ew.git
}

zsh_install(){
    cd $HOME
    apt-get install zsh -y
    chsh -s /bin/zsh
    sh -c "$(curl -fsSL https://raw.github.com/robbyrussell/oh-my-zsh/master/tools/install.sh)"
    git clone git://github.com/zsh-users/zsh-autosuggestions $ZSH_CUSTOM/plugins/zsh-autosuggestions
    sed 's/plugins=(git)/plugins=(git zsh-autosuggestions)/' ~/.zshrc  > test.QAQ
    cat test.QAQ > .zshrc
    rm test.QAQ
    source .zshrc
}

call_back(){
    if [ $1 = "help" ]
        then


            echo "举例子: ./xxx.sh zsh_install,或者全部安装 ./xxx.sh,目前支持有
                    source_file_update
                    Basic_environment
                    docker_install
                    vulhub_install
                    msf_install
                    powershell
                    empire_install
                    neiwang
                    zsh_install
                    sqlmap_install"
        else
            $1
        fi
}

sqlmap_install(){
    cd $HOME
    git clone https://github.com/sqlmapproject/sqlmap.git
}

main(){
    if [ $# == 0 ]
    then
        check_install
        cd $HOME
        source_file_update
        Basic_environment
        docker_install
        vulhub_install
        msf_install
        powershell
        empire_install
        neiwang
        zsh_install
        sqlmap_install
    else
        for Setup in $@;do
            call_back $Setup
        done
    fi
}

main $*
挺垃圾的,等以后有其他需求在整其他的吧.