参考博客地址:https://oldqiang.com/archives/287.html
地址规划:
| 主机名 | ip地址 | 软件环境 |
| zabbix-server01 | 10.0.0.61 | httpd+php+keepalived+sshpass zabbix-server+agent |
| zabbix-server02 | 10.0.0.62 | httpd+php+keepalived+shpass zabbix-server+agent |
| zabbix-agent | 10.0.0.7 | zabbix agent+mysql |
vip地址:172.16.1.66
zabbix-server01
更新源
rpm -ivh https://mirrors.tuna.tsinghua.edu.cn/zabbix/zabbix/4.0/rhel/7/x86_64/zabbix-release-4.0-1.el7.noarch.rpm

 #修改为清华园源
 vim /etc/yum.repos.d/zabbix.repo
 #底行模式
 %s#http://repo.zabbix.com#https://mirrors.tuna.tsinghua.edu.cn/zabbix#g
安装服务
yum install -y zabbix-server-mysql zabbix-web-mysql zabbix-agent httpd php mariadb-server sshpass
cp -R /usr/share/zabbix/ /var/www/html/
sed -i 's#^post_max_size = 8M#post_max_size = 16M#g' /etc/php.ini
sed -i 's#^max_execution_time = 30#max_execution_time = 300#g' /etc/php.ini
sed -i 's#^max_input_time = 60#max_input_time = 300#g' /etc/php.ini
sed -i '883a date.timezone = Asia/shanghai' /etc/php.ini
sed -i '276a ServerName 127.0.0.1:80' /etc/httpd/conf/httpd.conf
scp /usr/share/doc/zabbix-server-mysql-4.0.17/create.sql.gz root@10.0.0.7:/opt
systemctl start zabbix-server
systemctl enable zabbix-server
systemctl start mariadb
systemctl enable mariadb
zabbix-agent
安装服务
rpm -ivh https://mirrors.tuna.tsinghua.edu.cn/zabbix/zabbix/4.0/rhel/7/x86_64/zabbix-release-4.0-1.el7.noarch.rpm
yum install -y zabbix-agent.x86_64 mariadb-server
systemctl start mariadb
systemctl enable mariadb
systemctl start zabbix-agent
systemctl enable zabbix-agent
#创建数据库
mysql -e "create database zabbix character set utf8 collate utf8_bin;"
mysql -e "show databases;"
mysql -e "grant all on zabbix.* to zabbix@'localhost' identified by '123456';"
mysql -e "grant all on zabbix.* to zabbix@'10.0.0.%' identified by '123456';"
zcat /opt/create.sql.gz |mysql -uzabbix -p123456 zabbix
zabbix-server01
修改zabbix_server文件
#配置文件连接数据库
sed -i '81a DBHost=10.0.0.7' /etc/zabbix/zabbix_server.conf
sed -i '116a DBPassword=123456' /etc/zabbix/zabbix_server.conf
systemctl restart  httpd zabbix-server.service  zabbix-agent.service

登录名:Admin 密码:zabbix
scp /etc/zabbix/web/zabbix.conf.php root@10.0.0.62:/opt
zabbix-server02
更新源
rpm -ivh https://mirrors.tuna.tsinghua.edu.cn/zabbix/zabbix/4.0/rhel/7/x86_64/zabbix-release-4.0-1.el7.noarch.rpm

 #修改为清华园源
 vim /etc/yum.repos.d/zabbix.repo
 #底行模式
 %s#http://repo.zabbix.com#https://mirrors.tuna.tsinghua.edu.cn/zabbix#g
安装服务
yum install -y zabbix-server-mysql zabbix-web-mysql zabbix-agent httpd php mariadb-server sshpass
cp -R /usr/share/zabbix/ /var/www/html/
sed -i 's#^post_max_size = 8M#post_max_size = 16M#g' /etc/php.ini
sed -i 's#^max_execution_time = 30#max_execution_time = 300#g' /etc/php.ini
sed -i 's#^max_input_time = 60#max_input_time = 300#g' /etc/php.ini
sed -i '883a date.timezone = Asia/shanghai' /etc/php.ini
sed -i '276a ServerName 127.0.0.1:80' /etc/httpd/conf/httpd.conf
sed -i '81a DBHost=10.0.0.7' /etc/zabbix/zabbix_server.conf
sed -i '116a DBPassword=123456' /etc/zabbix/zabbix_server.conf
mv /opt/zabbix.conf.php /etc/zabbix/web/
systemctl start httpd
systemctl enable httpd
修改zabbix-agent配置文件
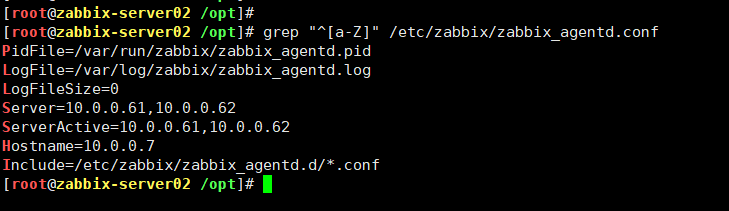
注:修该主机10.0.0.7的zabbix-agent配置文件
vim /etc/zabbix/zabbix_agentd.conf
修改如下三处:
Server=10.0.0.61,10.0.0.62
ServerActive=10.0.0.61,10.0.0.62
Hostname=10.0.0.7
systemctl start zabbix-agent
systemctl enable zabbix-agent
zabbix部署keepalived
zabbox01安装keepalived
yum install keepalived.x86_64 -y
systemctl start keepalived
systemctl enable  keepalived
keepalived配置文件01
cat /etc/keepalived/keepalived.conf ! Configuration File for keepalived global_defs { router_id LVS_DEVEL 29 } vrrp_instance VI_1 { state BACKUP interface eth0 virtual_router_id 51 priority 150 advert_int 1 authentication { auth_type PASS auth_pass 1111 } virtual_ipaddress { 172.16.1.66 } notify_master /opt/to_master.sh } systemctl restart keepalived
cat /opt/to_master.sh #!/bin/bash sshpass -p 123456 ssh -o StrictHostKeyChecking=no root@10.0.0.62 "/etc/init.d/zabbix-server stop" systemctl start zabbix-server
zabbix02安装keepalived
yum install keepalived.x86_64 -y
systemctl start keepalived
systemctl enable  keepalived
keepalived配置文件02
cat /etc/keepalived/keepalived.conf ! Configuration File for keepalived global_defs { router_id LVS_DEVEL 30 } vrrp_instance VI_1 { state BACKUP interface eth0 virtual_router_id 51 priority 100 advert_int 1 authentication { auth_type PASS auth_pass 1111 } virtual_ipaddress { 172.16.1.66 } notify_master /opt/to_master.sh }
cat /opt/to_master.sh #!/bin/bash sshpass -p 123456 ssh -o StrictHostKeyChecking=no root@110.0.0.61 "/etc/init.d/zabbix-server stop" systemctl start zabbix-server
测试
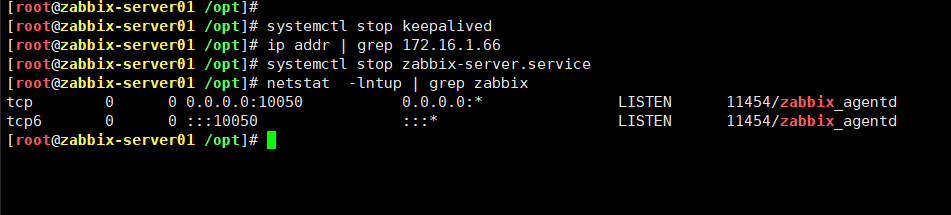
- 两台zabbix-server都启动keepalived
- zabbix-server01 启动zabbix server
- zabbix-server02 启动zabbix server
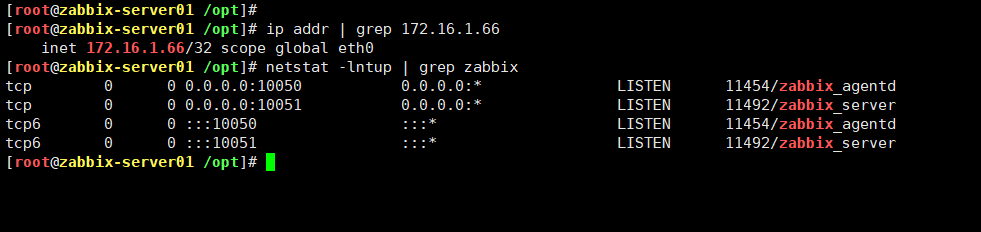
zabbix-server01状态如下
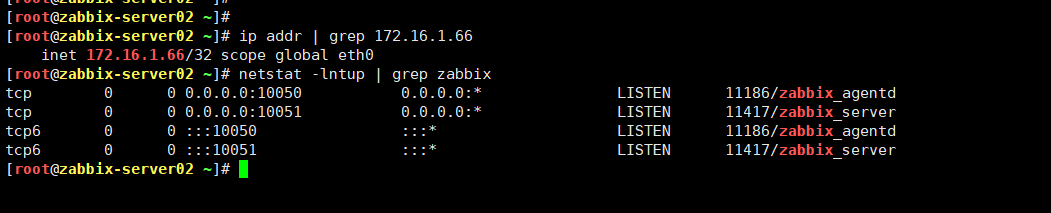
zabbix-server02状态如下

模拟zabbix-server01宕机,keepalived