Centos7安装Mysql
一 mysql下载
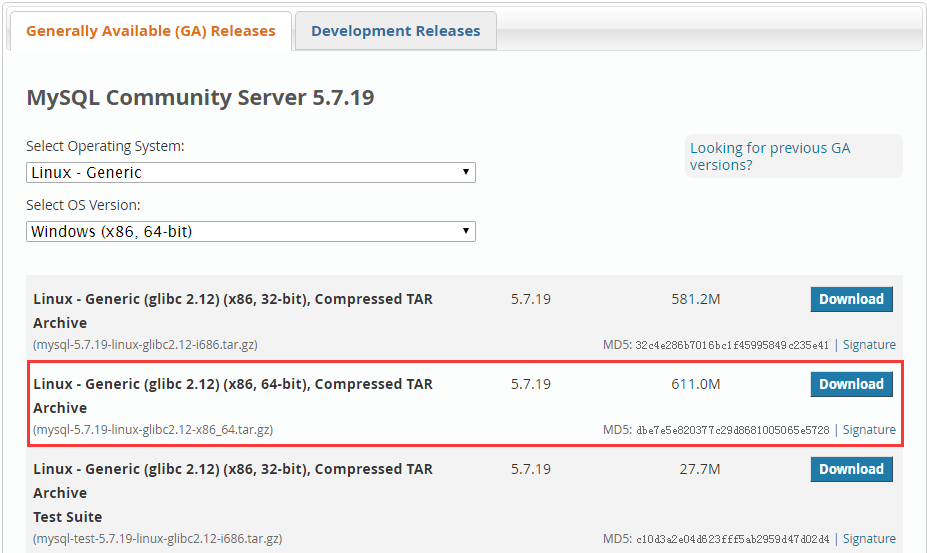
地址: https://dev.mysql.com/downloads/mysql/#downloads
二 在centos7上创建安装文件存放、解压目录,上传文件并解压
创建目录:mkdir /usr/local/mysql
上传文件:(使用Xftp)...
解压文件:tar -zxvf mysql-5.7.19-linux-glibc2.12-x86_64.tar.gz -C /usr/local/mysql/
修改文件名称:
cd /usr/local/mysql/
mv mysql-5.7.19-linux-glibc2.12-x86_64 mysql

三 在mysql目录下创建data目录
当前目录:/usr/local/mysql
命令:cd mysql
创建文件的目录:/usr/local/mysql/mysql
命令:mkdir data

四 创建用户及组
创建组:   groupadd mysql

创建用户: useradd -r -g mysql mysql
五 将mysql及其下所有的目录所有者和组均设为mysql
命令:chown mysql:mysql -R .
六 初始化数据库
/usr/local/mysql/mysql/bin/mysqld --initialize --user=mysql --datadir=/usr/local/mysql/mysql/data --basedir=/usr/local/mysql/mysql
初始化成功之后会出现默认的root用户密码,如下图

七 创建修改my.cnf文件
这个版本和别的版本安装最大的区别就是别的版本在mysql/support-files下有my-default.cnf文件,别的版本只需要将my-default.cnf文件拷贝到/etc目录下即可,而这个版本需要自己创建my.cnf文件.
因此我们
vi /etc/my.cnf
把下面内容粘进去即可,标红的地方是需要注意的。
(注):确保全部复制粘贴文件
# For advice on how to change settings please see
# http://dev.mysql.com/doc/refman/5.7/en/server-configuration-defaults.html
# *** DO NOT EDIT THIS FILE. It's a template which will be copied to the
# *** default location during install, and will be replaced if you
# *** upgrade to a newer version of MySQL.
# 组
[mysqld]
# Remove leading # and set to the amount of RAM for the most important data
# cache in MySQL. Start at 70% of total RAM for dedicated server, else 10%.
# innodb_buffer_pool_size = 128M
# Remove leading # to turn on a very important data integrity option: logging
# changes to the binary log between backups.
# log_bin
general_log_file = /var/log/mysql/mysql.log
general_log = 1
# These are commonly set, remove the # and set as required.
basedir =/usr/local/mysql/mysql
datadir =/usr/local/mysql/mysql/data
port = 3306
#server_id = .....
socket =/usr/local/mysql/mysql/tmp/mysql.sock
#kip-external-locking
skip-name-resolve
pid-file=/usr/local/mysql/mysql/data/mysql.pid
character_set_server=utf8
init_connect='SET NAMES utf8'
log-error=/usr/local/mysql/mysql/data/mysqld.err
slow_query_log = 1
slow_query_log_file =/usr/local/mysql/mysql/data/slow-query.log
long_query_time = 1
log-queries-not-using-indexes
max_connections = 1024
back_log = 128
wait_timeout = 100
interactive_timeout = 200
key_buffer_size=256M
query_cache_size = 256M
query_cache_type=1
query_cache_limit=50M
max_connect_errors=20
sort_buffer_size = 2M
max_allowed_packet=16M
join_buffer_size=2M
thread_cache_size=200
innodb_buffer_pool_size = 2048M
innodb_flush_log_at_trx_commit = 1
innodb_log_buffer_size=32M
innodb_log_file_size=128M
innodb_log_files_in_group=3
server_id=1
log-bin=mysql-bin
binlog_cache_size=2M
max_binlog_cache_size=8M
max_binlog_size=512M
expire_logs_days=7
read_buffer_size=1M
read_rnd_buffer_size=16M
bulk_insert_buffer_size=64M

# Remove leading # to set options mainly useful for reporting servers.
# The server defaults are faster for transactions and fast SELECTs.
# Adjust sizes as needed, experiment to find the optimal values.
# join_buffer_size = 128M
# sort_buffer_size = 2M
# read_rnd_buffer_size = 2M
sql_mode=NO_ENGINE_SUBSTITUTION,STRICT_TRANS_TABLES
八 创建tmp目录
mkdir /usr/local/mysql/mysql/tmp
九 启动mysql
命令:cd  /usr/local/mysql/mysql/bin
命令:./mysqld_safe &
十 登录数据库,密码为第六步生成的默认密码
./mysql -u root -p
十一 操作数据库时报错
mysql> use mysql
ERROR 1820 (HY000): You must reset your password using ALTER USER statement before executing this statement.
在没有进行修改默认密码之前,是不允许做任何事情的。
解决方案:
SET PASSWORD = PASSWORD('123456');
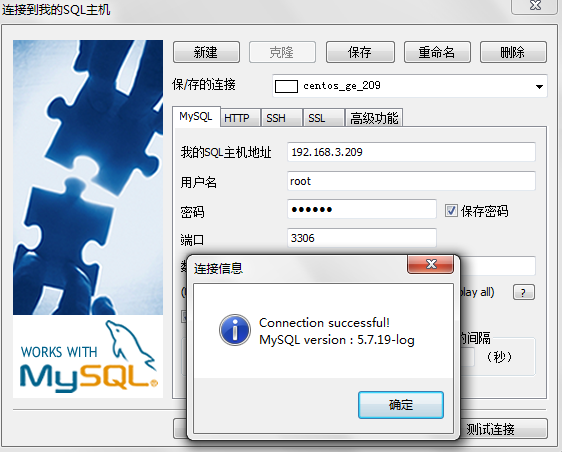
十二 错误处理以及使用SQLyog连接数据库
1 未关闭防火墙有可能造成数据库不能连接
(注):centos7
systemctl stop firewalld.service #停止firewall

systemctl disable firewalld.service #禁止firewall开机启动
2(日志data/mysqld.err) mysqld: File '/var/log/mysql/mysql.log' not found (Errcode: 2 - No such file or directory)
解决方案:
查看是否有/var/log/mysql这个目录,没有的话创建
mkdir /var/log/mysql
目录:/var/log下执行权限修改命令
chown mysql:mysql -R .
3(日志data/mysqld.err)Could not create unix socket lock file /usr/local/mysql/mysql/tmp/mysql.sock.lock.
解决方案:
cd /usr/local/mysql/mysql/tmp/
chown -R mysql:mysql /usr/local/mysql/mysql/tmp/
4 (日志data/mysqld.err)Can't connect to local MySQL server through socket '/tmp/mysql.sock' (2)
解决方案:(创建软连接)
ln -s /usr/local/mysql/mysql/tmp/mysql.sock /tmp/mysql.sock
5 host"***.***.*.***" is not allowed to connect mysql--------mysql"Access denied for user'root'@'IP地址'"
解决方案:(注*用户名密码)
登录mysql给root用户授权
GRANT ALL PRIVILEGES ON *.* TO 'ROOT'@'%' IDENTIFIED BY '123456' WITH GRANT OPTION;

十三 关闭mysql数据库
ps -A|grep mysql
kill -9 进程号
kill -9 进程号
