第1章 ElasticSearch概述
1.1 什么是搜索?
百度:我们比如说想找寻任何的信息的时候,就会上百度去搜索一下,比如说找一部自己喜欢的电影,或者说找一本喜欢的书,或者找一条感兴趣的新闻(提到搜索的第一印象)。百度 != 搜索
1)互联网的搜索:电商网站,招聘网站,新闻网站,各种app
2)IT系统的搜索:OA软件,办公自动化软件,会议管理,日程管理,项目管理。
搜索,就是在任何场景下,找寻你想要的信息,这个时候,会输入一段你要搜索的关键字,然后就期望找到这个关键字相关的一些信息。
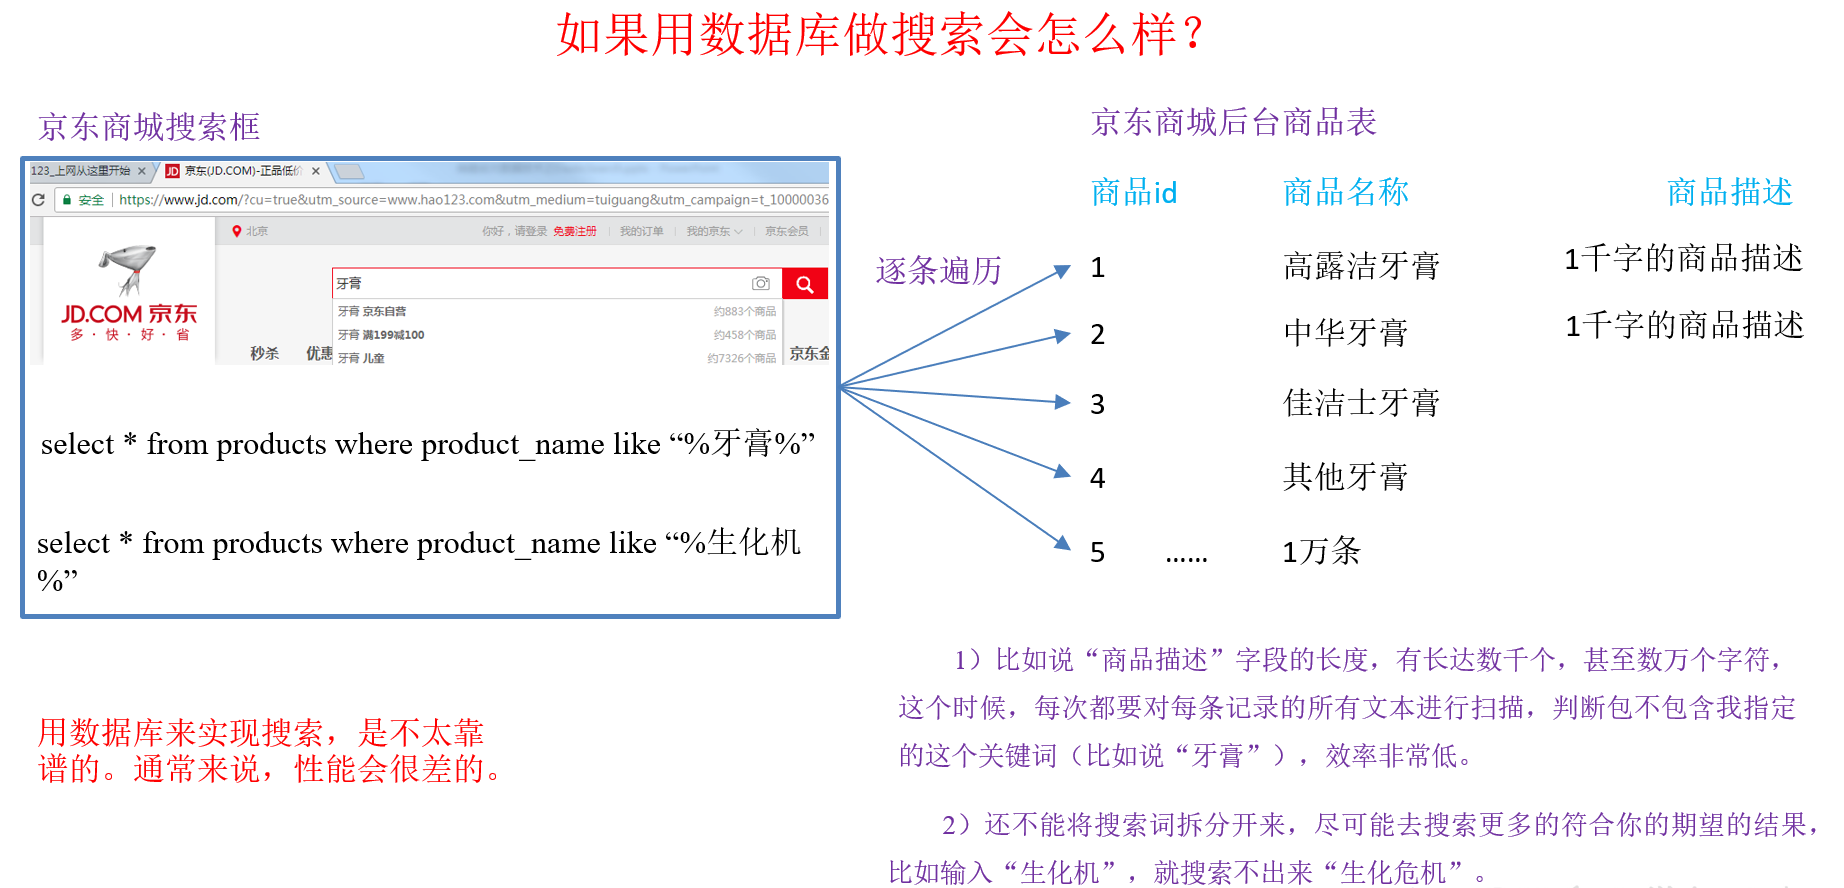
1.2 如果用数据库做搜索会怎么样?
用数据库来实现搜索,是不太靠谱的。通常来说,性能会很差
1.3 什么是全文检索和Lucene?
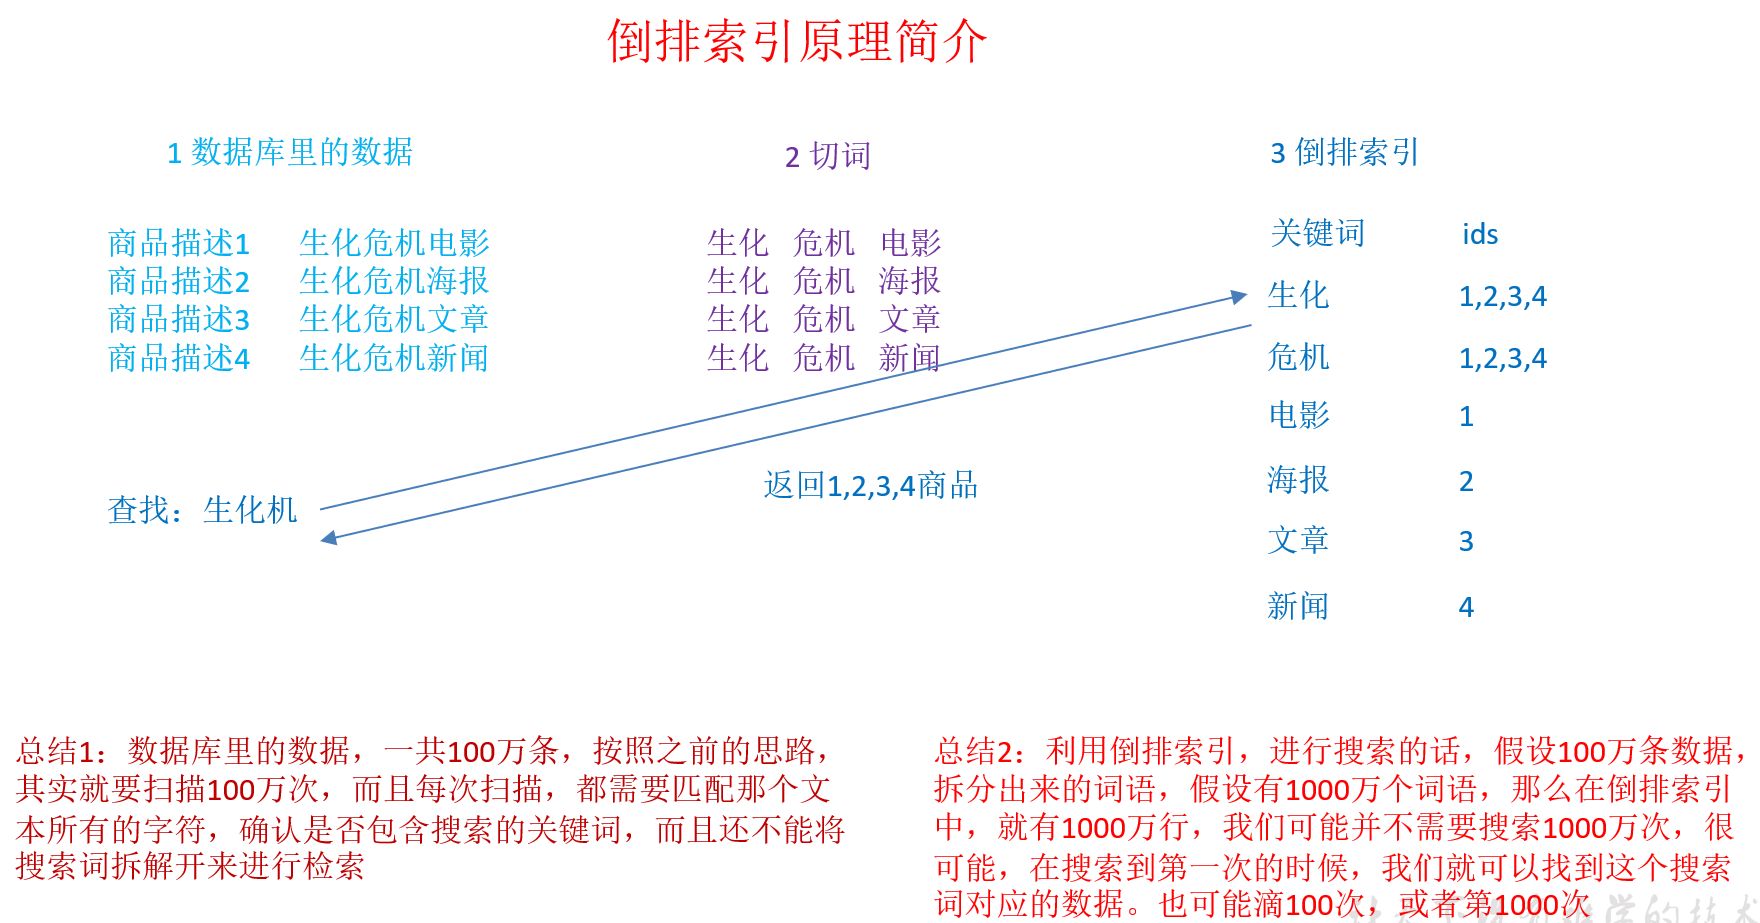
1)全文检索,倒排索引
全文检索是指计算机索引程序通过扫描文章中的每一个词,对每一个词建立一个索引,指明该词在文章中出现的次数和位置,当用户查询时,检索程序就根据事先建立的索引进行查找,并将查找的结果反馈给用户的检索方式。这个过程类似于通过字典中的检索字表查字的过程。全文搜索搜索引擎数据库中的数据。
2)lucene,就是一个jar包,里面包含了封装好的各种建立倒排索引,以及进行搜索的代码,包括各种算法。我们就用java开发的时候,引入lucene jar,然后基于lucene的api进行去进行开发就可以了
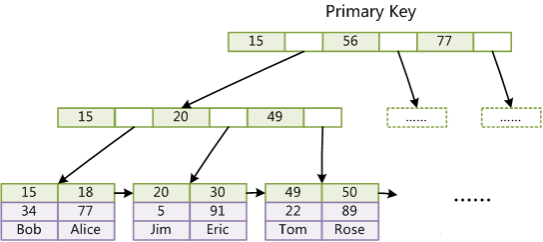
1.3.1 B+Tree
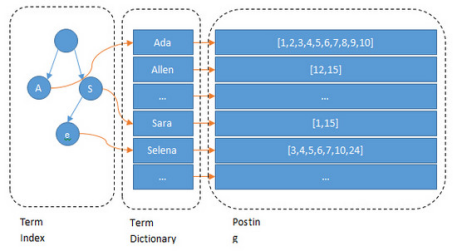
1.3.2 Lucene 倒排索引结构
可以看到 Lucene 为倒排索引(Term Dictionary)部分又增加一层Term Index结构,用于快速定位,而这Term Index是缓存在内存中的,但MySQL的B+tree不在内存中,所以整体来看ES速度更快,但同时也更消耗资源(内存、磁盘)
1.4 什么是ElasticSearch?
ElasticSearch,基于Lucene,隐藏复杂性,提供简单易用的RestfulAPI接口、JavaAPI接口(还有其他语言的API接口),ElasticSearch是一个实时分布式搜索和分析引擎。它用于全文搜索、结构化搜索、分析。
关于ElasticSearch的一个传说,有一个程序员失业了,陪着自己老婆去英国伦敦学习厨师课程。程序员在失业期间想给老婆写一个菜谱搜索引擎,觉得Lucene实在太复杂了,就开发了一个封装了Lucene的开源项目:Compass。后来程序员找到了工作,是做分布式的高性能项目的,觉得Compass不够,就写了ElasticSearch,让Lucene变成分布式的系统。
全文检索:将非结构化数据中的一部分信息提取出来,重新组织,使其变得有一定结构,然后对此有一定结构的数据进行搜索,从而达到搜索相对较快的目的。
结构化检索:我想搜索商品分类为日化用品的商品都有哪些,select * from products where category_id='日化用品'。
数据分析:电商网站,最近7天牙膏这种商品销量排名前10的商家有哪些;新闻网站,最近1个月访问量排名前3的新闻版块是哪些。
1.5 ElasticSearch的适用场景
1)维基百科,类似百度百科,牙膏,牙膏的维基百科,全文检索,高亮,搜索推荐。
2)The Guardian(国外新闻网站),类似搜狐新闻,用户行为日志(点击,浏览,收藏,评论)+ 社交网络数据(对某某新闻的相关看法),数据分析,给到每篇新闻文章的作者,让他知道他的文章的公众反馈(好,坏,热门,垃圾,鄙视,崇拜)。
3)Stack Overflow(国外的程序异常讨论论坛),IT问题,程序的报错,提交上去,有人会跟你讨论和回答,全文检索,搜索相关问题和答案,程序报错了,就会将报错信息粘贴到里面去,搜索有没有对应的答案。
4)GitHub(开源代码管理),搜索上千亿行代码。
5)国内:站内搜索(电商,招聘,门户,等等),IT系统搜索(OA,CRM,ERP,等等),数据分析(ES热门的一个使用场景)。
1.6 ElasticSearch的特点
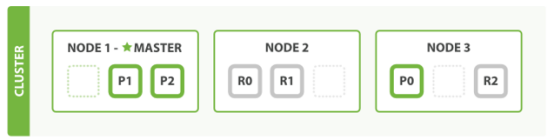
1)天然分片,天然集群,ES把数据分成多个shard,下图中的P0-P2,多个shard可以组成一份完整的数据,这些shard可以分布在集群中的各个机器节点中。随着数据的不断增加,集群可以增加多个分片,把多个分片放到多个机子上,已达到负载均衡,横向扩展。
2)ElasticSearch不是什么新技术,主要是将全文检索、数据分析以及分布式技术,合并在了一起,才形成了独一无二的ES;lucene(全文检索),商用的数据分析软件(也是有的),分布式数据库(mycat)
3)对用户而言,是开箱即用的,非常简单,作为中小型的应用,直接3分钟部署一下ES,就可以作为生产环境的系统来使用了,数据量不大,操作不是太复杂
4)数据库的功能面对很多领域是不够用的(事务,还有各种联机事务型的操作);特殊的功能,比如全文检索,同义词处理,相关度排名,复杂数据分析,海量数据的近实时处理;ElasticSearch作为传统数据库的一个补充,提供了数据库所不能提供的很多功能
1.7 ElasticSearch的核心概念
1.7.1 近实时
近实时,两个意思,从写入数据到数据可以被搜索到有一个小延迟(大概1秒);基于es执行搜索和分析可以达到秒级。
1.7.2 Cluster(集群)
集群包含多个节点,每个节点属于哪个集群是通过一个配置(集群名称,默认是elasticsearch)来决定的,对于中小型应用来说,刚开始一个集群就一个节点很正常
1.7.3 Node(节点)
集群中的一个节点,节点也有一个名称(默认是随机分配的),节点名称很重要(在执行运维管理操作的时候),默认节点会去加入一个名称为“elasticsearch”的集群,如果直接启动一堆节点,那么它们会自动组成一个elasticsearch集群,当然一个节点也可以组成一个elasticsearch集群。
1.7.4 Index(索引-数据库)
索引包含一堆有相似结构的文档数据,比如可以有一个客户索引,商品分类索引,订单索引,索引有一个名称。一个index包含很多document,一个index就代表了一类类似的或者相同的document。比如说建立一个product index,商品索引,里面可能就存放了所有的商品数据,所有的商品document。
1.7.5 Type(类型-表)
6.0版本之前每个索引里都可以有多个type,6.0版本之后每个索引里面只能有一个Type,一般使用_doc代替了。
商品index,里面存放了所有的商品数据,商品document
商品type:product_id,product_name,product_desc,category_id,category_name,service_period
每一个type里面,都会包含一堆document
{
  "product_id": "1",
  "product_name": "长虹电视机",
  "product_desc": "4k高清",
  "category_id": "3",
  "category_name": "电器",
  "service_period": "1年"
}

{
  "product_id": "2",
  "product_name": "基围虾",
  "product_desc": "纯天然,冰岛产",
  "category_id": "4",
  "category_name": "生鲜",
  "eat_period": "7天"
}
1.7.6 Document(文档-行)
文档是ES中的最小数据单元,一个document可以是一条客户数据,一条商品分类数据,一条订单数据,通常用JSON数据结构表示,每个index下的type中,都可以去存储多个document。
1.7.7 Field(字段-列)
一个document里面有多个field,每个field就是一个数据字段
product document
{
  "product_id": "1",
  "product_name": "高露洁牙膏",
  "product_desc": "高效美白",
  "category_id": "2",
  "category_name": "日化用品"
}
1.7.8 Mapping(映射-约束)
数据如何存放到索引对象上,需要有一个映射配置,包括:数据类型、是否存储、是否分词等。
Mapping用来定义Document中每个字段的类型,即所使用的分词器、是否索引等属性,非常关键等。创建Mapping 的代码示例如下:
PUT student(index_name->database)
{
  "mappings": {
    "_doc":{(type_name->table)
      "properties":{
        "stu_id":{(field_name->colume)
          "type":"keyword"
        },
        "name":{(field_name->colume)
          "type":"keyword"
        },
        "birth":{(field_name->colume)
          "type":"date"(yyyy-MM-dd HH:mm)
        }
      }
    }
  }
}
1.7.9 ElasticSearch与数据库的类比
|
关系型数据库(比如Mysql) |
非关系型数据库(ElasticSearch) |
|
数据库Database |
索引Index |
|
表Table |
类型Type(6.0版本之后在一个索引下面只能有一个,7.0版本之后取消了Type) |
|
数据行Row |
文档Document(JSON格式) |
|
数据列Column |
字段Field |
|
约束 Schema |
映射Mapping |
1.7.10 ElasticSearch存入数据和搜索数据机制
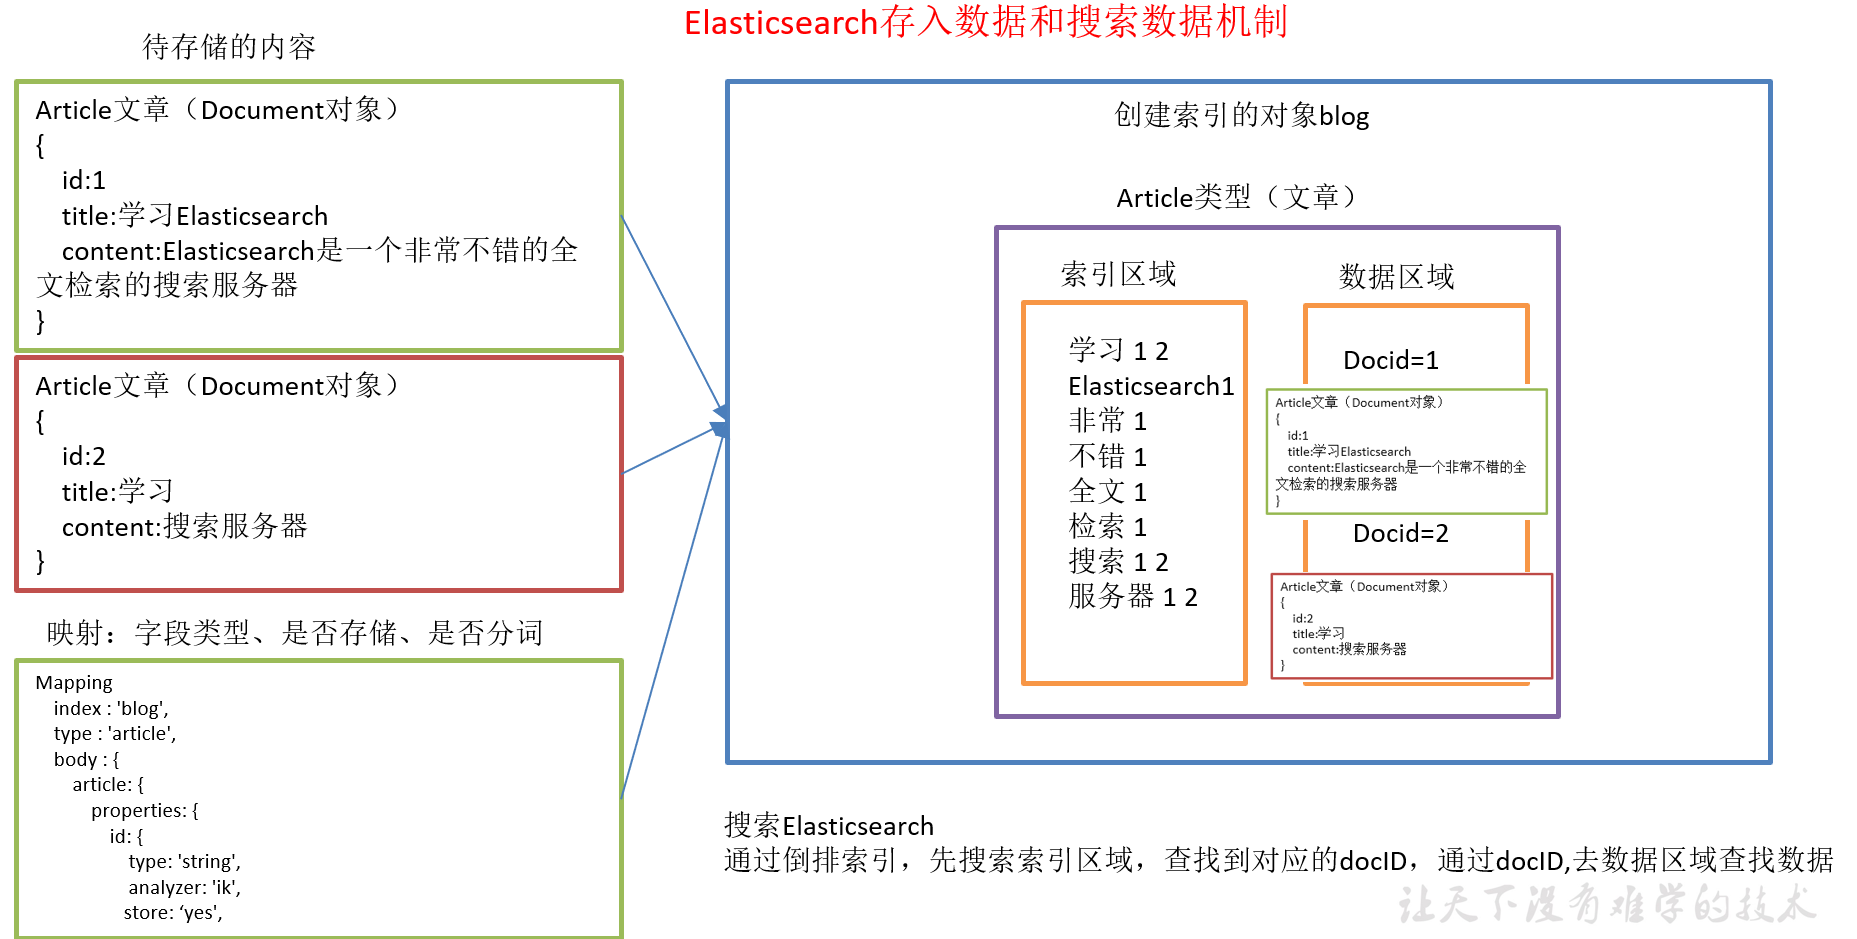
1)索引对象(blog):存储数据的表结构,任何搜索数据,存放在索引对象上 。
2)映射(mapping):数据如何存放到索引对象上,需要有一个映射配置, 包括:数据类型、是否存储、是否分词等。
3)文档(document):一条数据记录,存在索引对象上。
4)文档类型(type):一个索引对象,存放多种类型数据,数据用文档类型进行标识。
第2章 ElasticSearch快速入门
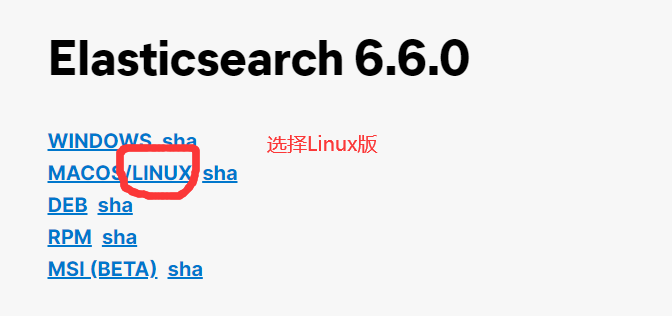
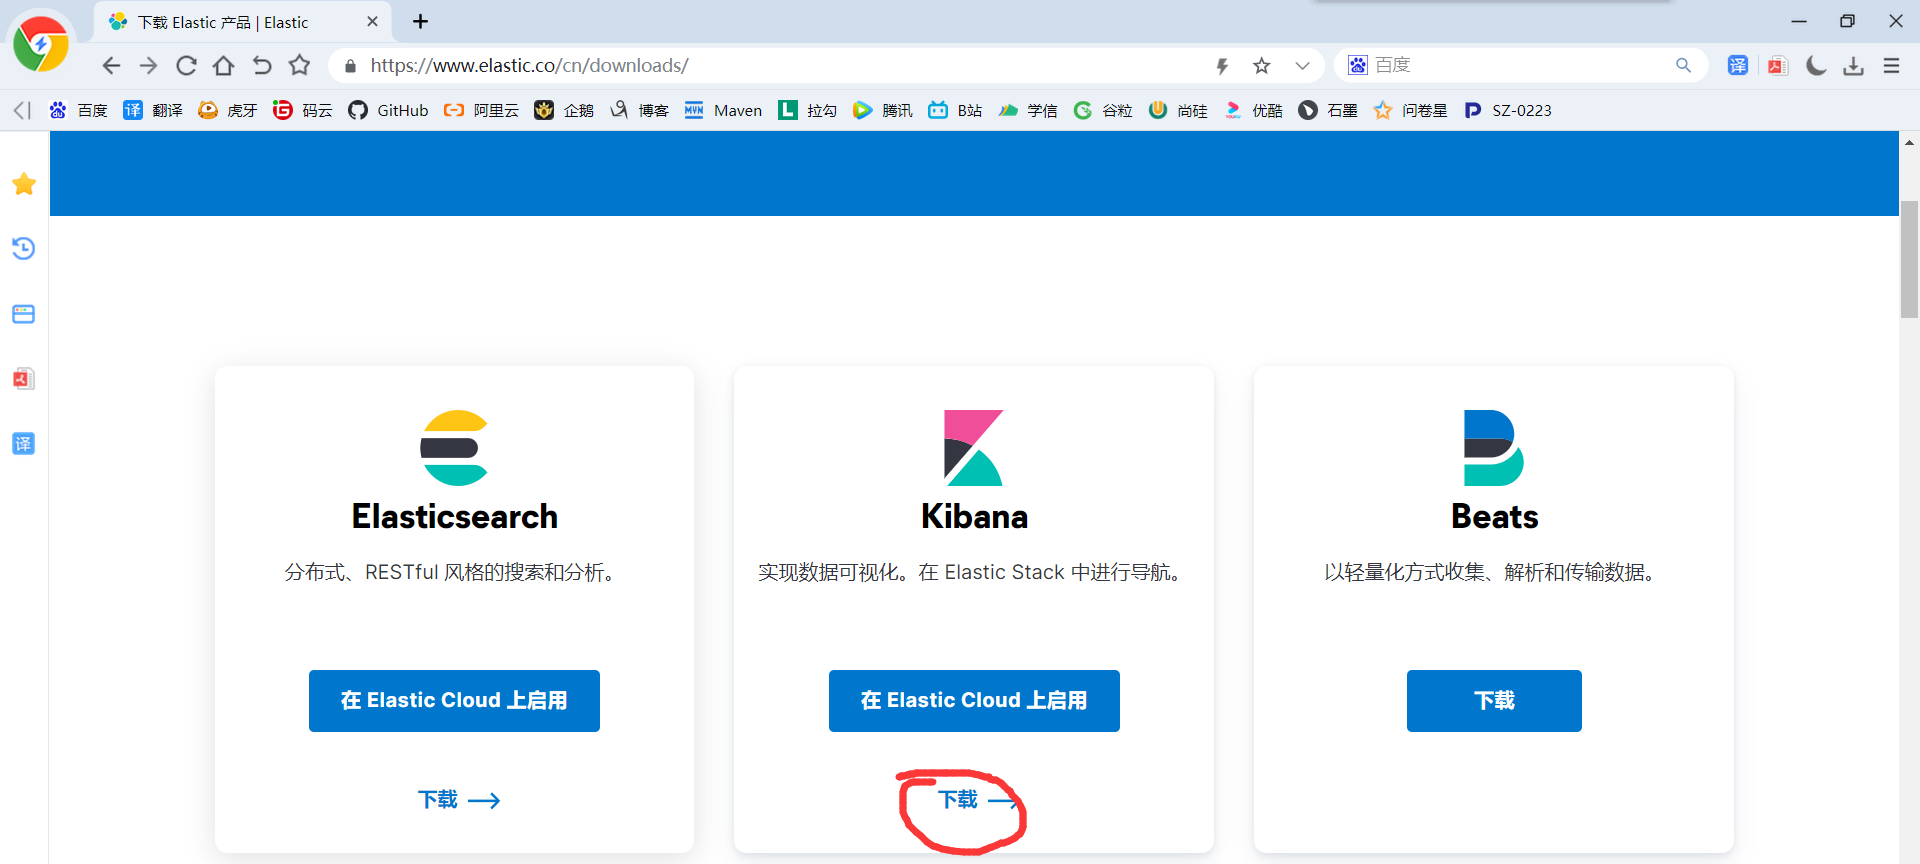
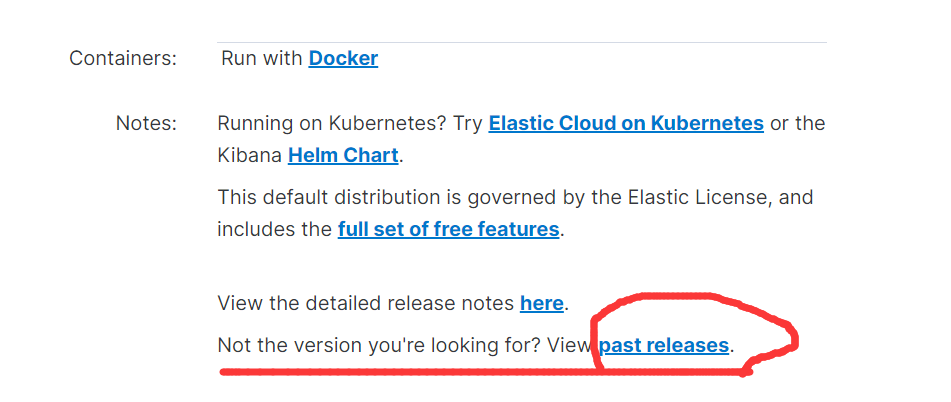
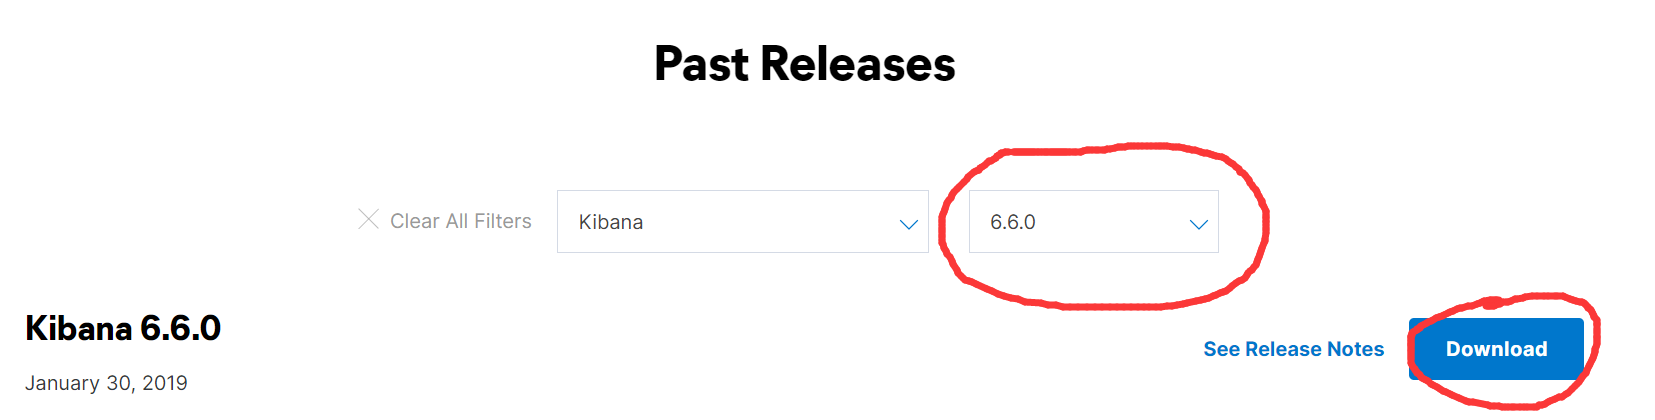
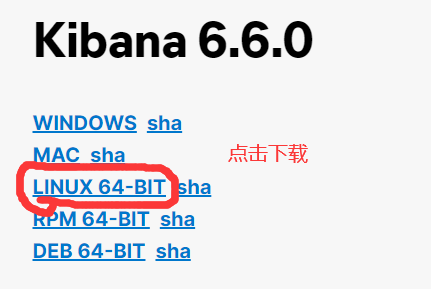
2.1 安装包下载
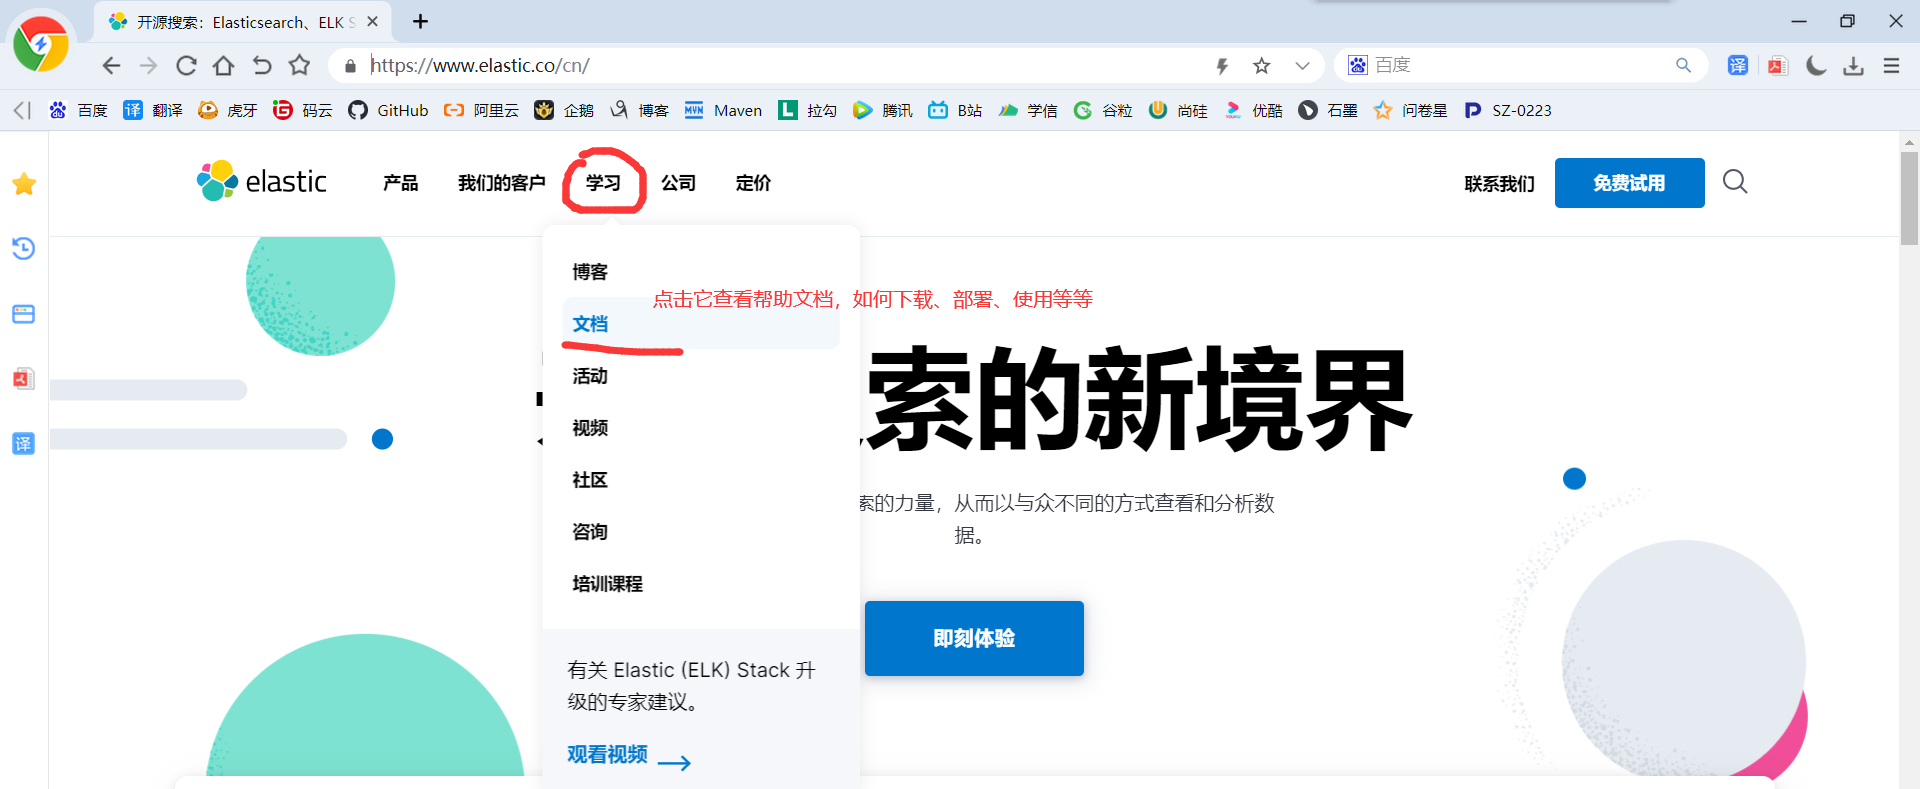
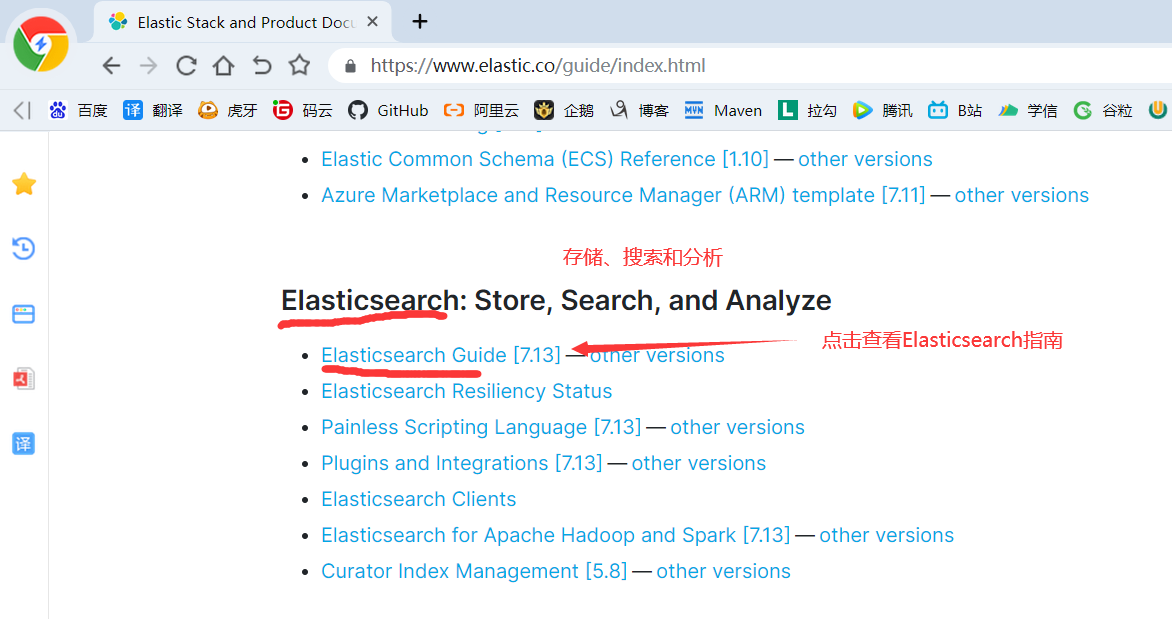
1)ElasticSearch官网: https://www.elastic.co/cn/
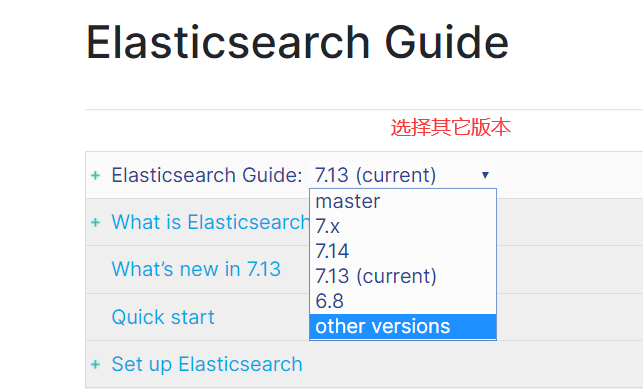
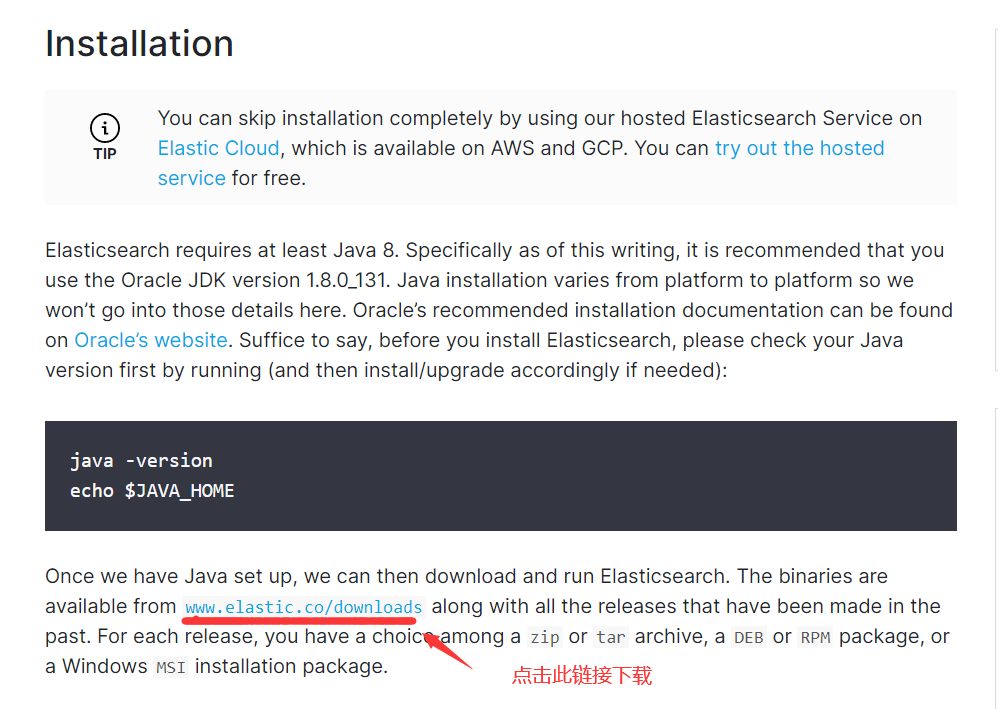
2)下载Elasticsearch


3)由于后面我们需要用到Kibana,所以我们继续下载Kibana
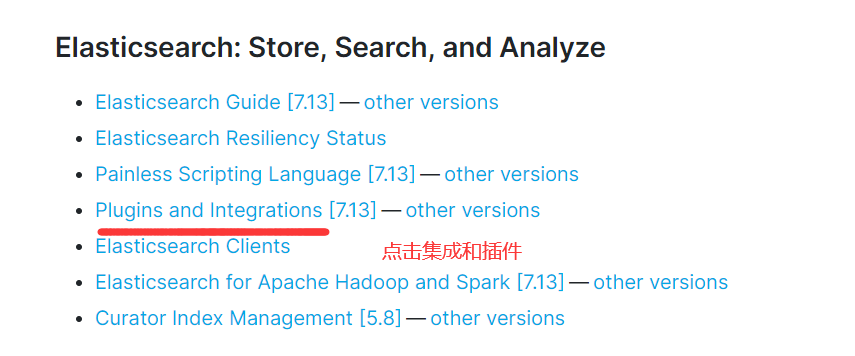
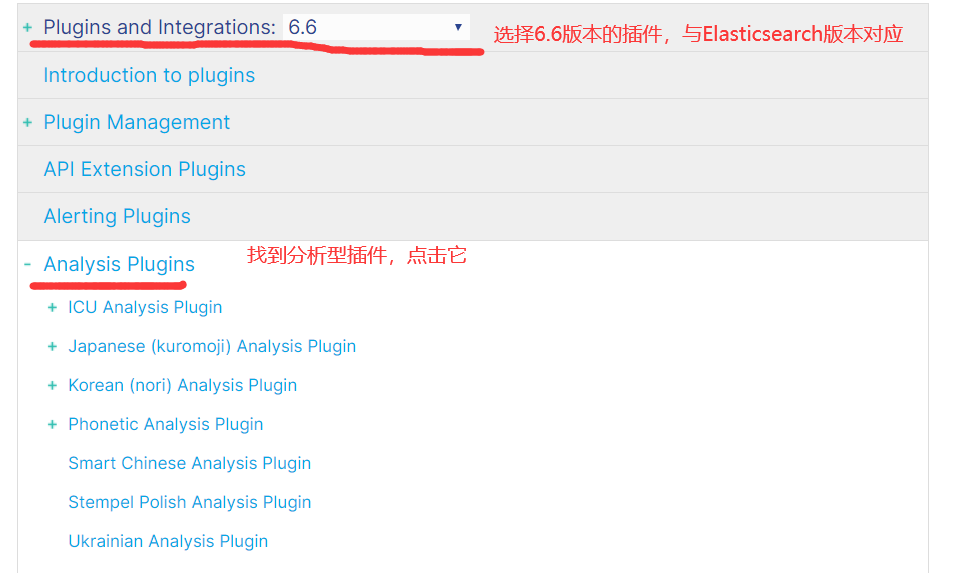
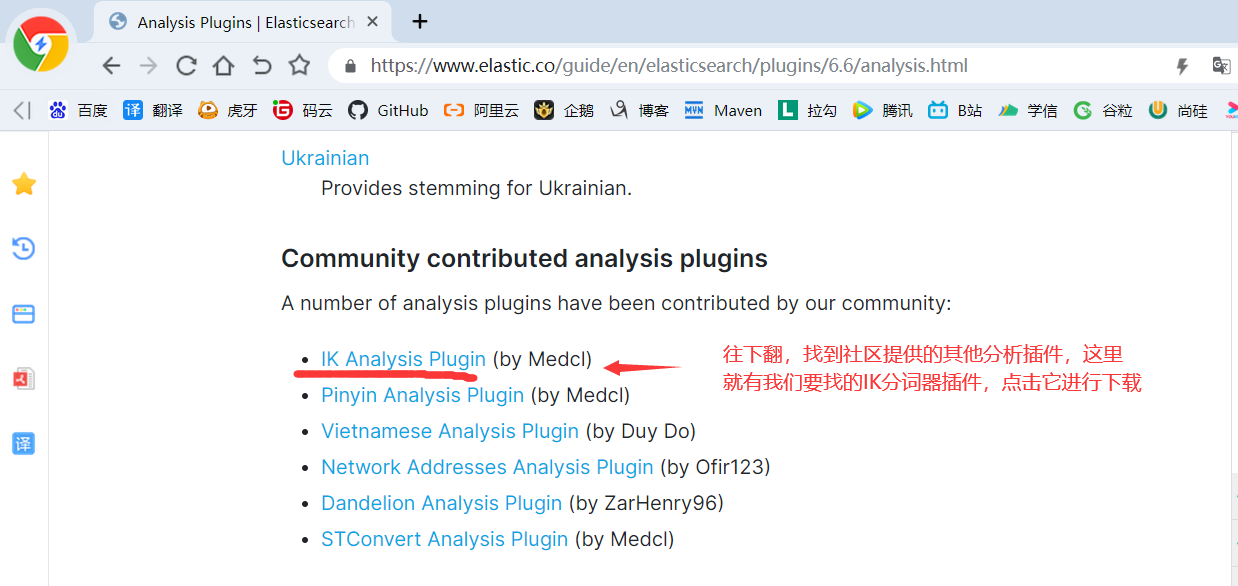
4)由于后面我们需要用到IK分词器,所以我们继续下载IK分词
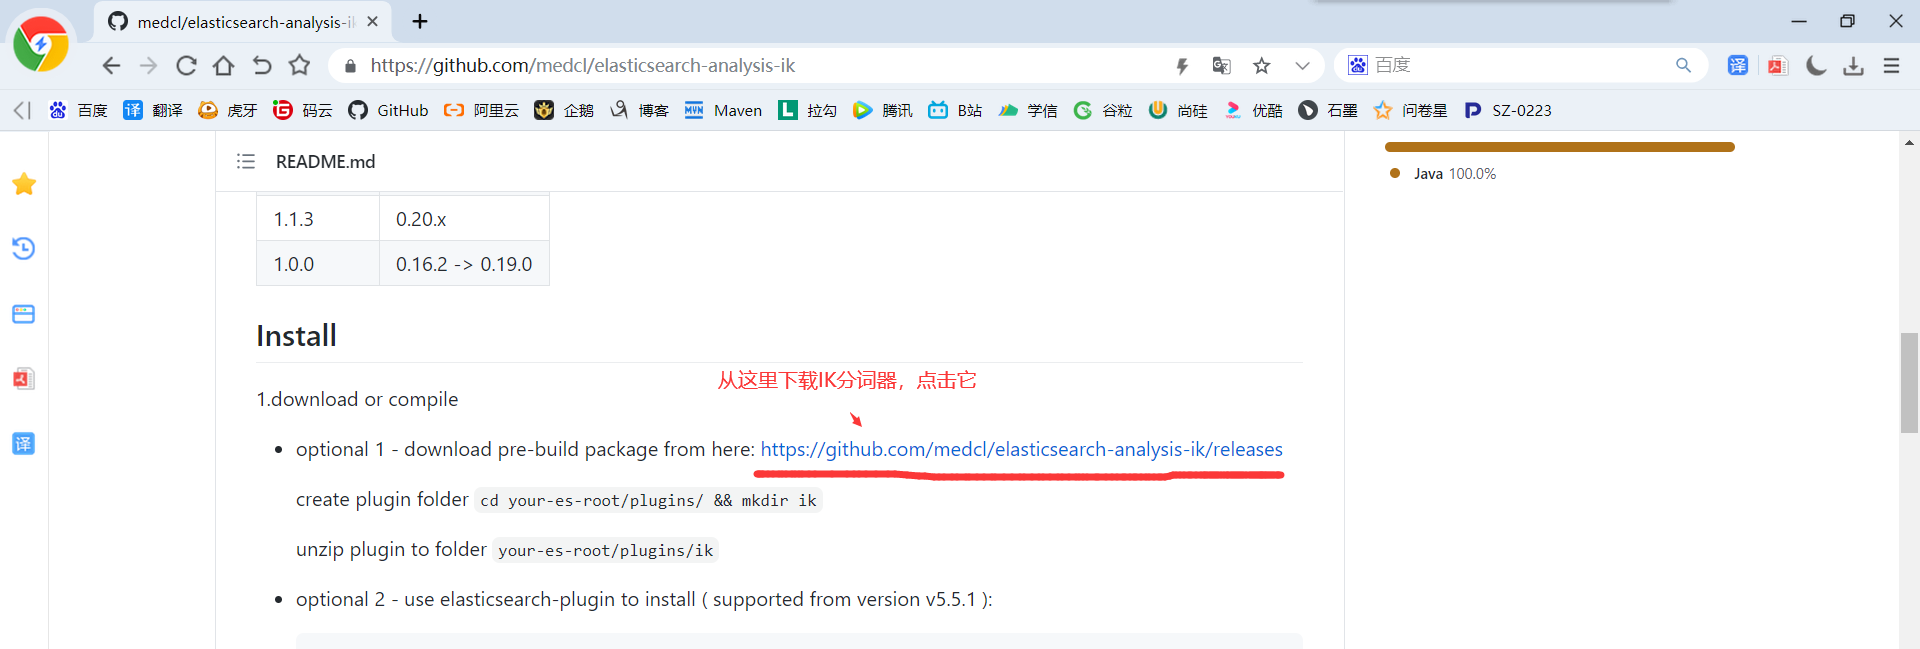
5)如果你网络不行或者嫌麻烦,那么可以从百度网盘下载:https://pan.baidu.com/s/14QOGow-aY_xXjh-9M8KYfQ 提取码:aaub
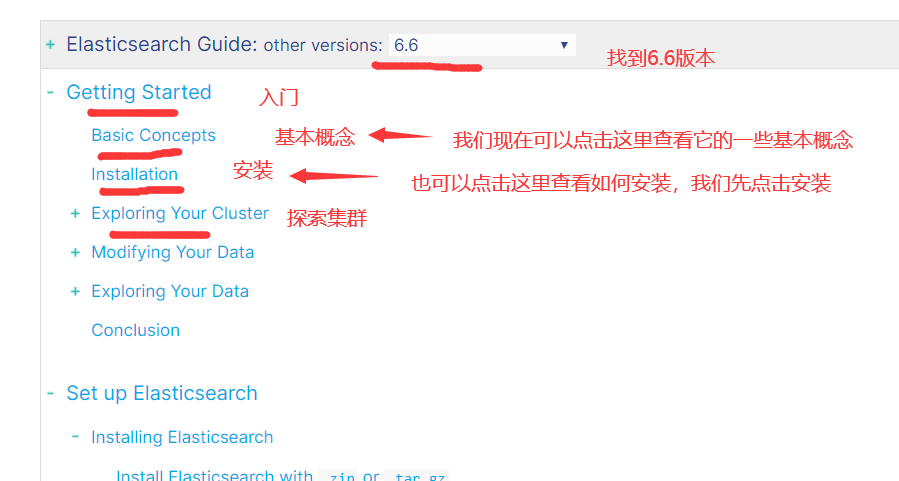
2.2 ElasticSearch安装
2.2.1 解压安装ElasticSearch
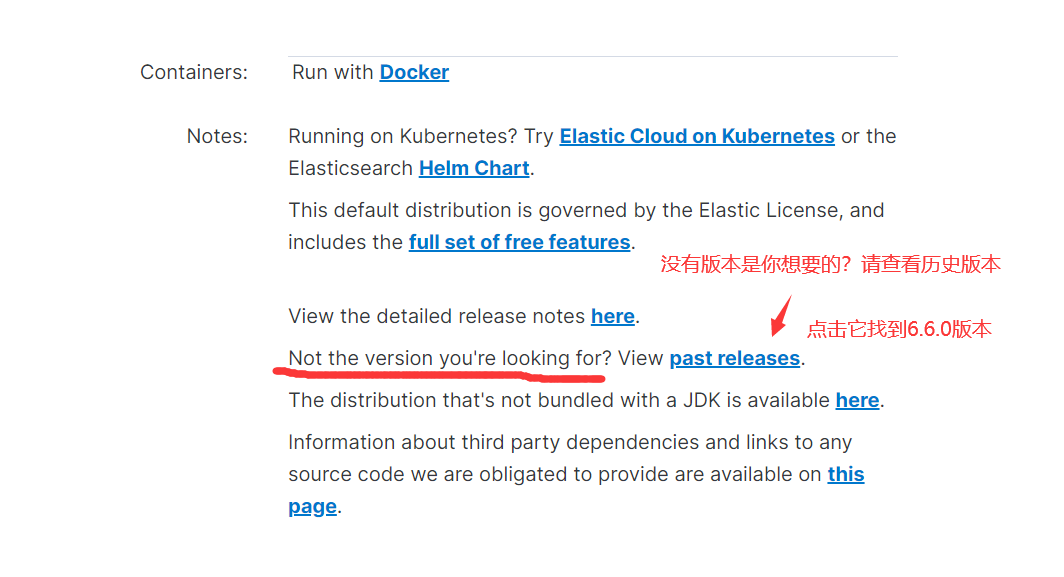
1)上传 elasticsearch-6.6.0.tar.gz 到 hadoop104机器上的 /opt/software 目录下
2)解压elasticsearch-6.6.0.tar.gz到/opt/module目录下
tar -zxvf /opt/software/elasticsearch-6.6.0.tar.gz -C /opt/module/
3)在/opt/module/elasticsearch-6.6.0目录下创建datas文件夹
cd /opt/module/elasticsearch-6.6.0
mkdir datas
4)修改配置文件elasticsearch.yml
vim /opt/module/elasticsearch-6.6.0/config/elasticsearch.yml
#集群名称
cluster.name: myes
#当前节点名称
node.name: node104
#数据和日志的存放目录
path.data: /opt/module/elasticsearch-6.6.0/datas
path.logs: /opt/module/elasticsearch-6.6.0/logs
#是否开启内存交换,当系统交换内存时,Elasticsearch的性能很差
bootstrap.memory_lock: false
bootstrap.system_call_filter: false
#绑定的主机名,默认端口是9200
network.host: hadoop104
#集群扩容相关,ES是天然集群,如果需要添加新的节点,只需要在新的节点上启动ES,启动后,ES进程会向要加入的那个集群发送请求,只要允许,自动加入集群
discovery.zen.ping.unicast.hosts: ["hadoop102", "hadoop103", "hadoop104"]
(1)cluster.name:如果要配置集群需要两个节点上的elasticsearch配置的cluster.name相同,都启动可以自动组成集群,这里如果不改cluster.name则默认是cluster.name=my-application,
(2)nodename随意取但是集群内的各节点不能相同
(3)修改后的每行前面不能有空格,修改后的“:”后面必须有一个空格
5)修改配置文件jvm.options
vim /opt/module/elasticsearch-6.6.0/config/jvm.options
#修改
-Xms1g
-Xmx1g
#为
-Xms256m
-Xmx256m
6)分发
xsync /opt/module/elasticsearch-6.6.0/
7)分发完成后修改hadoop102和hadoop103主机的elasticsearch.yml文件中的node.name和network.host属性
vim /opt/module/elasticsearch-6.6.0/config/elasticsearch.yml
#hadoop103中修改
#当前节点名称
node.name: node103
#绑定的主机名,默认端口是9200
network.host: hadoop103
#hadoop102中修改
#当前节点名称
node.name: node102
#绑定的主机名,默认端口是9200
network.host: hadoop102
2.2.2 配置linux系统环境(参考:http://blog.csdn.net/satiling/article/details/59697916)
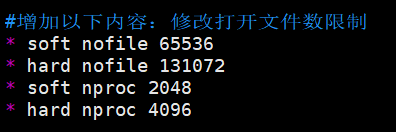
1)切换到root用户,编辑limits.conf 添加类似如下内容(我这里使用sudo):
sudo vim /etc/security/limits.conf
#添加如下内容,“*”不要省略掉
* soft nofile 65536
* hard nofile 131072
* soft nproc 2048
* hard nproc 4096
2)分发
sudo /home/atguigu/bin/xsync /etc/security/limits.conf
3)切换到root用户修改配置sysctl.conf,可以使用sudo
sudo vim /etc/sysctl.conf
#添加下面配置:
vm.max_map_count=655360
4)查看是否设置vm.max_map_count成功
sudo sysctl -p

5)分发
sudo /home/atguigu/bin/xsync /etc/sysctl.conf
6)重启Linux虚拟机
#关机
xcall.sh shutdown -h now
7)重启虚拟机之后我们开始启动Elasticsearch(hadoop104上执行该命令)
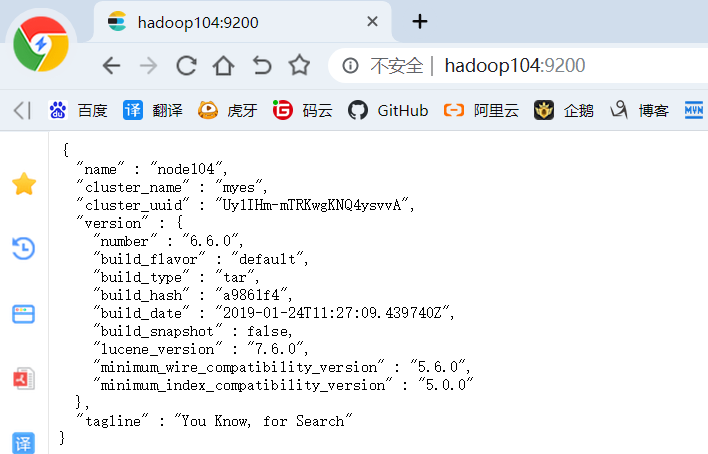
/opt/module/elasticsearch-6.6.0/bin/elasticsearch
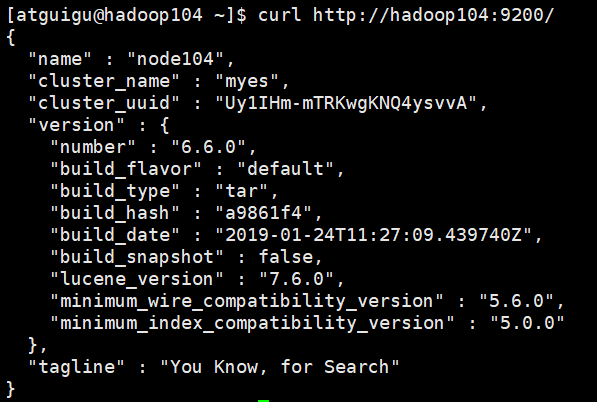
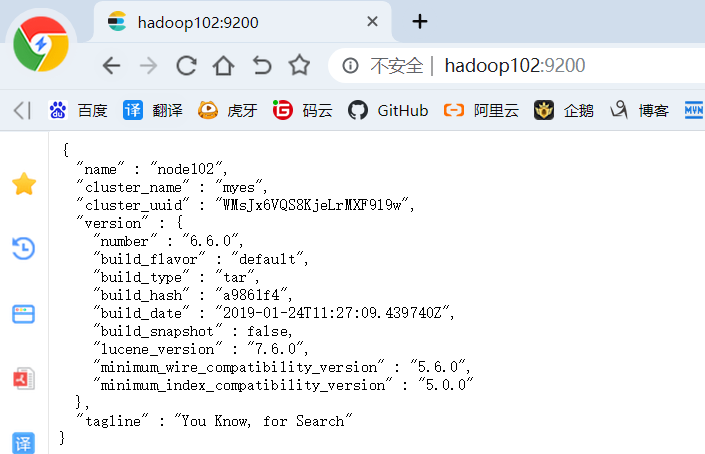
8)测试elasticsearch:http://hadoop104:9200/
9)新开一个hadoop104的shell窗口
curl http://hadoop104:9200/
10)停止Elasticsearch
jps
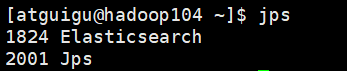
#kill -9 进程号
kill -9 1824
11)Elasticsearch集群启动/停止脚本
vim /home/atguigu/bin/elasticsearch.sh
#!/bin/bash
if(($#!=1))
then
        echo 请输入单个start或stop参数!
        exit
fi

#对传入的单个参数进行校验,在hadoop102和hadoop103且执行第一层采集通道的启动和停止命令
if [ $1 = start ]
then
        cmd="nohup /opt/module/elasticsearch-6.6.0/bin/elasticsearch > /dev/null  2>&1 &"
elif [ $1 = stop ]
        then
                cmd="ps -ef | grep Elasticsearch | grep -v grep | awk  '{print \$2}' | xargs kill "
else
        echo 请输入单个start或stop参数!
fi

#在hadoop102和hadoop103且执行第一层采集通道的启动和停止命令
for i in hadoop102 hadoop103 hadoop104
do
        echo "--------------$i-----------------"
        ssh $i $cmd
        sleep 8s
done
12)赋予可执行权限
chmod +x /home/atguigu/bin/elasticsearch.sh
13)分发脚本
xsync /home/atguigu/bin/elasticsearch.sh
14)启动Elasticsearch集群
elasticsearch.sh start
2.3 ElasticSearch操作工具
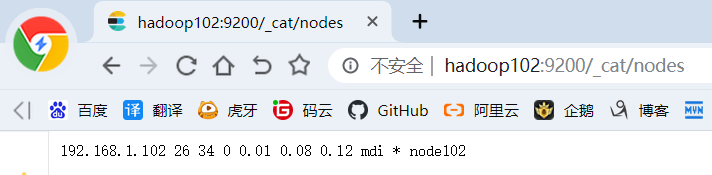
2.3.1 浏览器
查看集群节点:http://hadoop102:9200/_cat/nodes
2.3.2 Linux命令行
1)请求:
curl -XPOST 'http://hadoop102:9200/yuange/_doc' -i -H "Content-Type:application/json" -d '{"name":"haha","age":"10"}'
2)响应:

第3章 Kibana
1)Kibana的安装,将kibana-6.6.0-linux-x86_64.tar.gz上传到hadoop104集群上的/opt/software目录中
2)解压kibana-6.6.0-linux-x86_64.tar.gz至/opt/module/
tar -zxvf /opt/software/kibana-6.6.0-linux-x86_64.tar.gz -C /opt/module/
3)重命名
mv /opt/module/kibana-6.6.0-linux-x86_64/ /opt/module/kibana-6.6.0
4)修改kibana.yml,以连接Elasticsearch
vim /opt/module/kibana-6.6.0/config/kibana.yml
#修改端口号,不修改的话默认5601
server.port: 5601
#名称
server.name: "MyKibana"
#绑定的主机地址
server.host: "hadoop104"
#指定Kbana要连接的Elasticsearch地址
elasticsearch.hosts: ["http://hadoop104:9200"]
5)启动Kibana
/opt/module/kibana-6.6.0/bin/kibana
7)修改之前的ES启动脚本为:
vim /home/atguigu/bin/elasticsearch.sh
#!/bin/bash

if(($#!=1))
then
        echo 请输入单个start或stop参数!
        exit
fi

es_home=/opt/module/elasticsearch-6.6.0
kibana_home=/opt/module/kibana-6.6.0

case $1  in
 "start") {
  for i in hadoop102 hadoop103 hadoop104
  do
    echo "==============$i 启动Elasticsearch=============="
    ssh $i "source /etc/profile;${es_home}/bin/elasticsearch >/dev/null 2>&1 &"
    sleep 5s;
  done
    sleep 2s;
    echo "==============hadoop104 启动Kibana=============="
    ssh hadoop104 nohup ${kibana_home}/bin/kibana > kibana.log 2>&1 &
};;
"stop") {
  ssh hadoop104 ps -ef | grep ${kibana_home} | grep -v grep | awk '{print $2}'| xargs kill
  echo "==============hadoop104 停止Kibana=============="
  for i in hadoop102 hadoop103 hadoop104
  do
    ssh $i "ps -ef|grep $es_home |grep -v grep|awk '{print \$2}'|xargs kill" >/dev/null 2>&1
    echo "==============$i 停止Elasticsearch=============="
  done
};;
esac
8)分发脚本
xsync /home/atguigu/bin/elasticsearch.sh
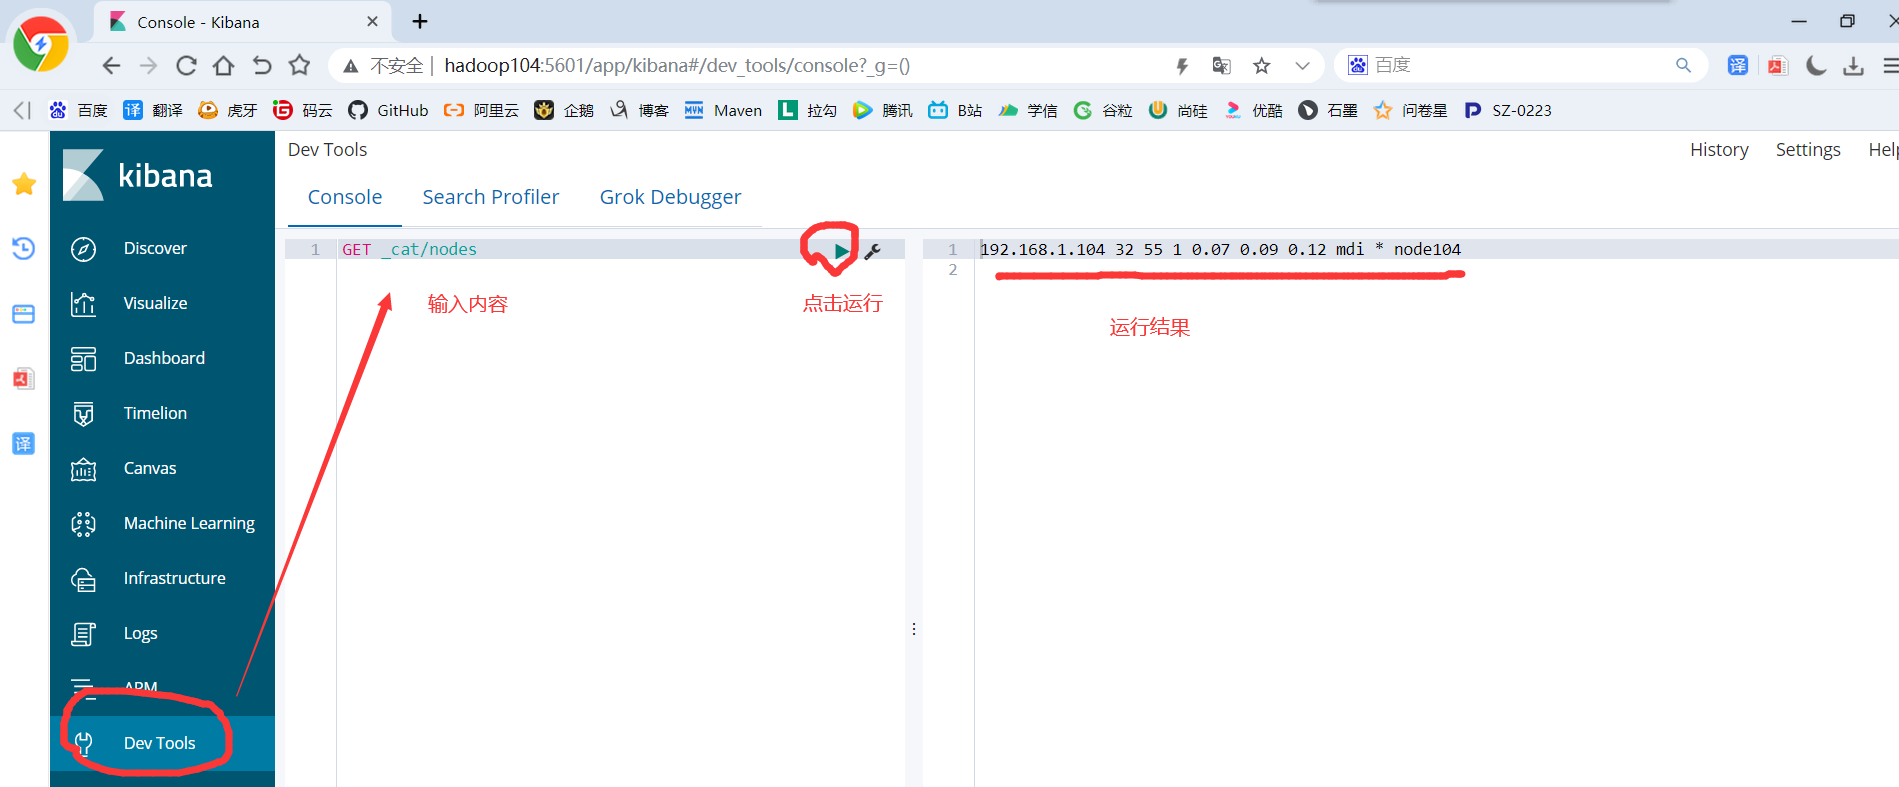
9)进入Kibana的Dev Tools,然后在操作窗口输入以下内容:
GET _cat/nodes
第4章 ElasticSearch使用
4.1 数据类型
4.1.1 核心数据类型
字符串型:text(分词)、keyword(不分词)
数值型:long、integer、short、byte、double、float、half_float、scaled_float
日期类型:date
布尔类型:boolean
二进制类型:binary
范围类型:integer_range、float_range、long_range、double_range、date_range
4.1.2 复杂数据类型
数组类型:array
对象类型:object
嵌套类型:nested object
4.1.3 地理位置数据类型
geo_point(点)、geo_shape(形状)
4.1.4 专用类型
记录IP地址:ip
实现自动补全:completion
记录分词数:token_count
记录字符串hash值:murmur3
多字段特性:multi-fields
4.2 Mapping
4.2.1 手动创建
1)创建操作
PUT stu
{
  "mappings": {
    "_doc": {
      "properties": {
        "id": {
          "type":"keyword"
        },
        "name": {
          "type":"text"
        },
        "sex": {
          "type":"integer"
        },
        "birth": {
          "type":"date"
        }
      }
    }
  }
}
2)创建文档
PUT stu/_doc/1001
{
  "id":"101",
  "name":"李逵",
  "sex":0,
  "birth":"1997-06-06"
}
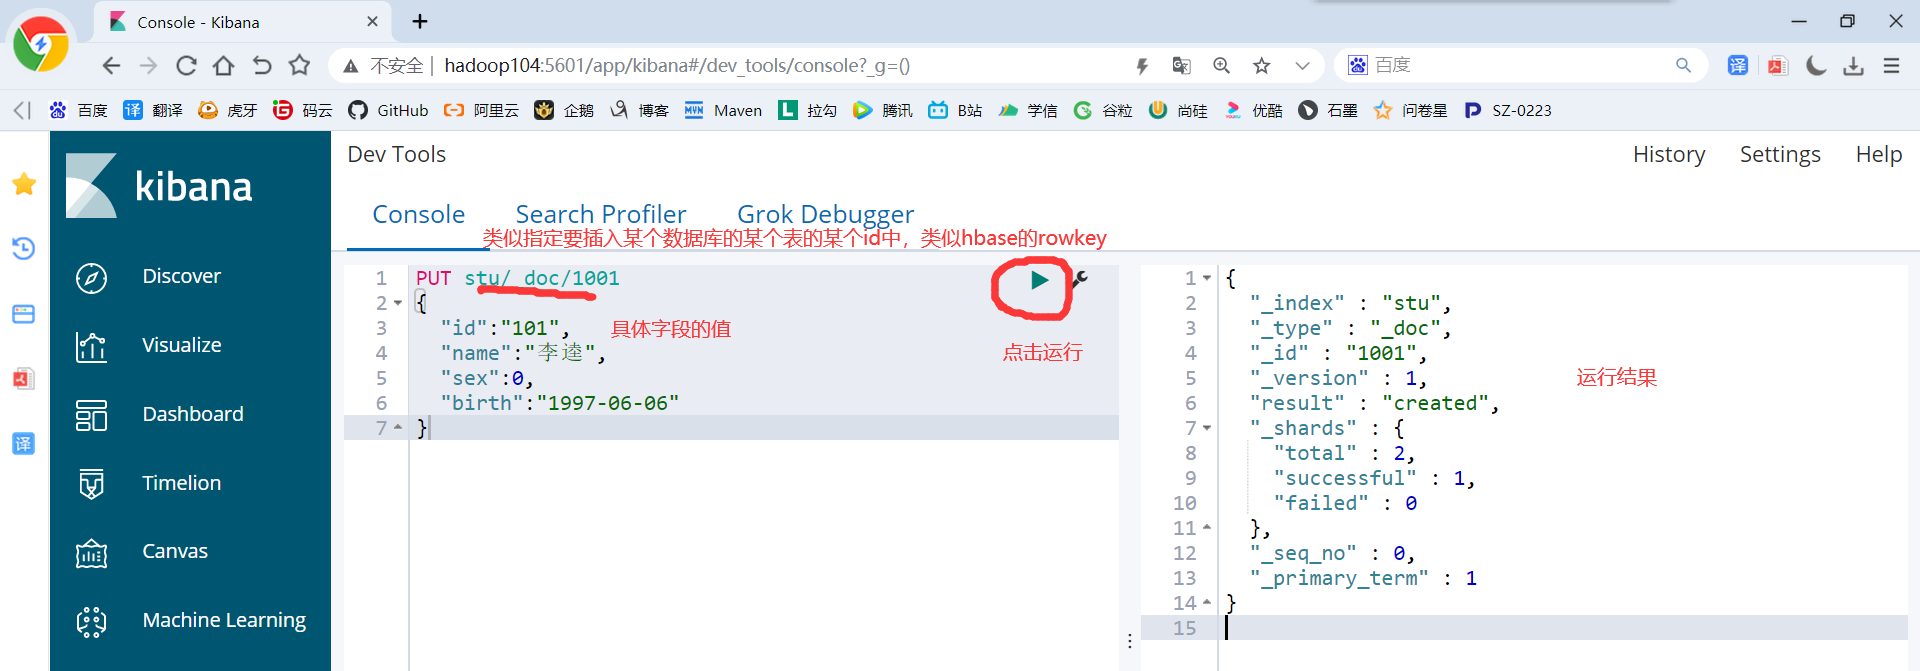
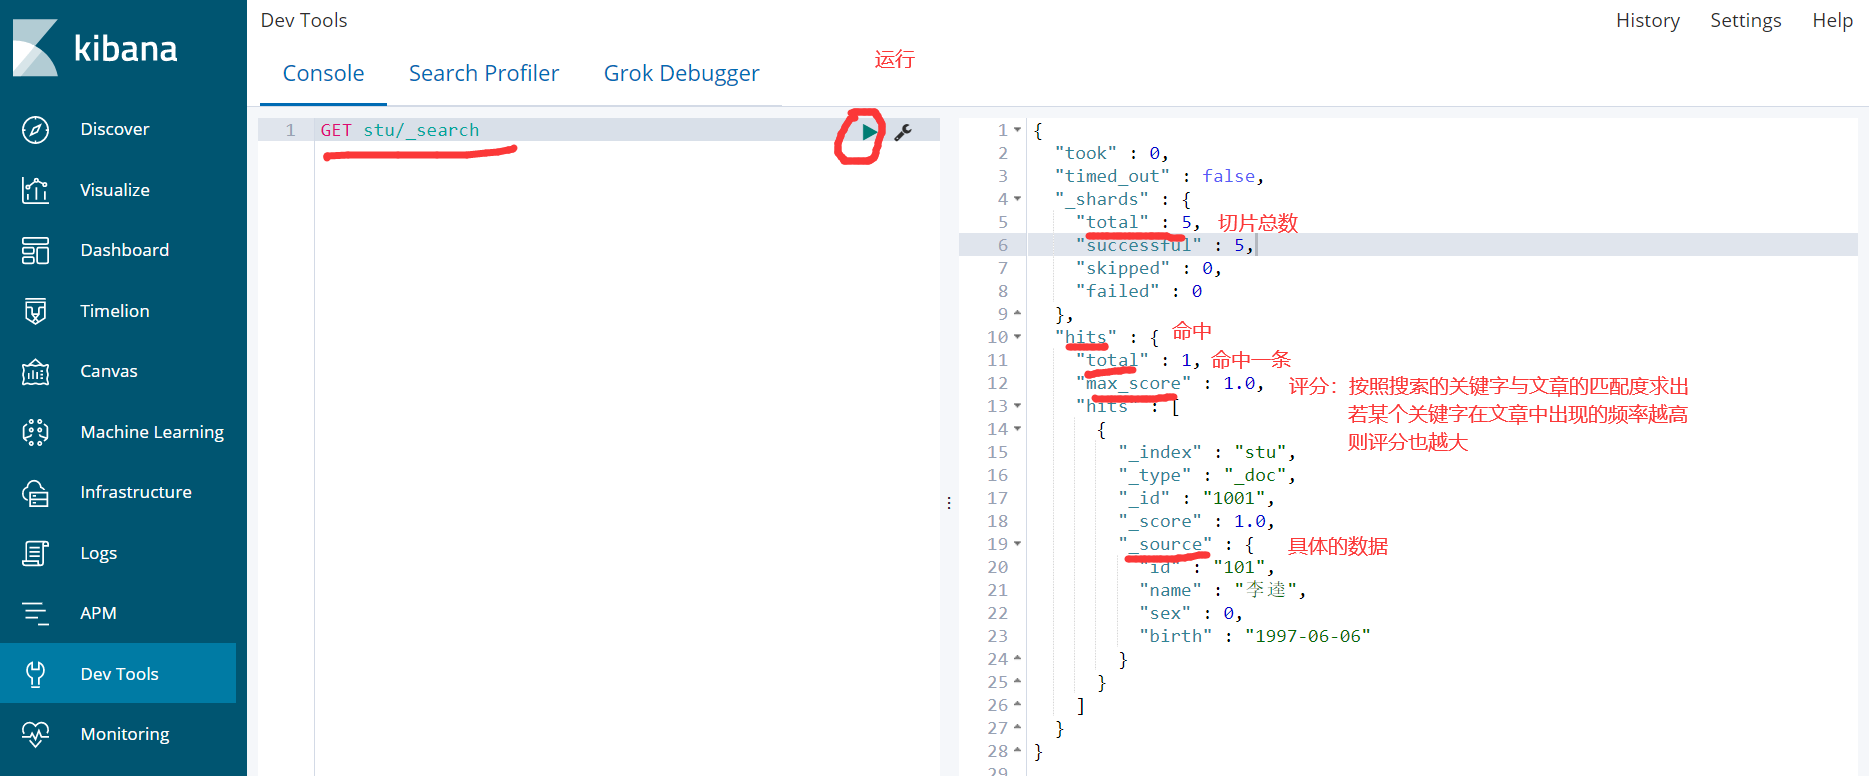
3)查询
GET stu/_search
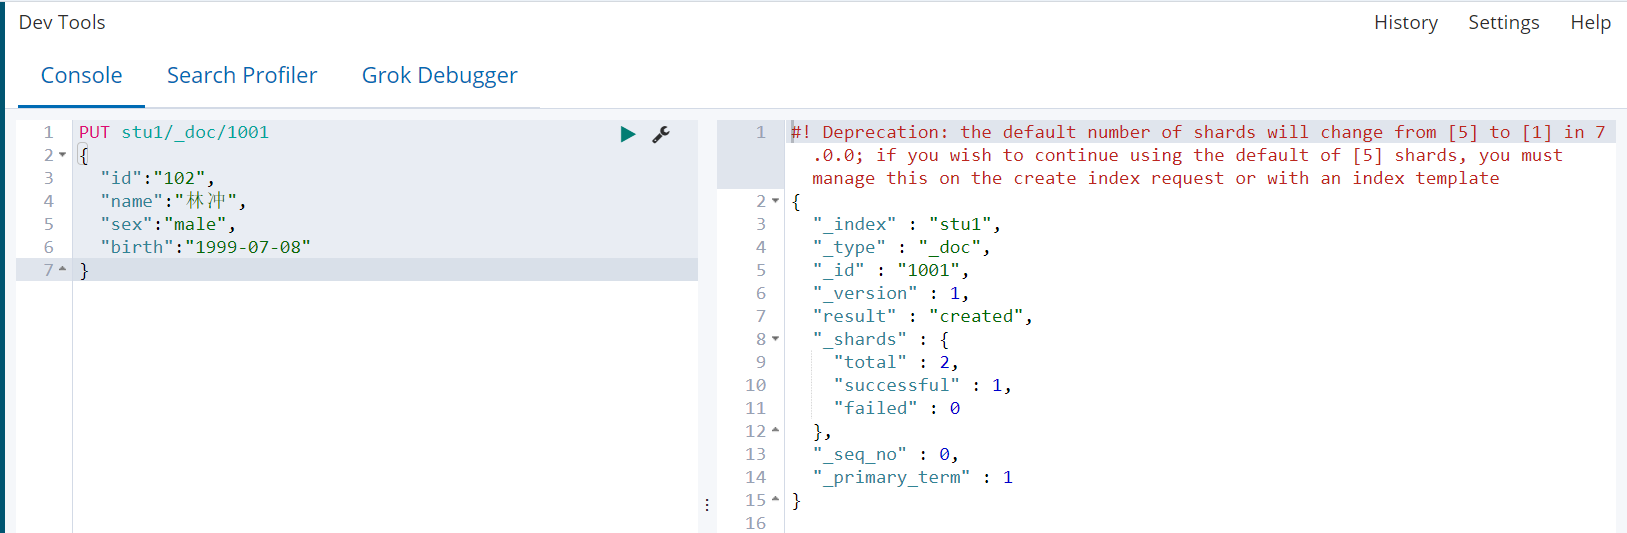
4.2.2 自动创建
ES可以自动识别文档字段类型,从而降低用户使用成本
1)直接插入文档
PUT stu1/_doc/1001
{
  "id":"102",
  "name":"林冲",
  "sex":"male",
  "birth":"1999-07-08"
}
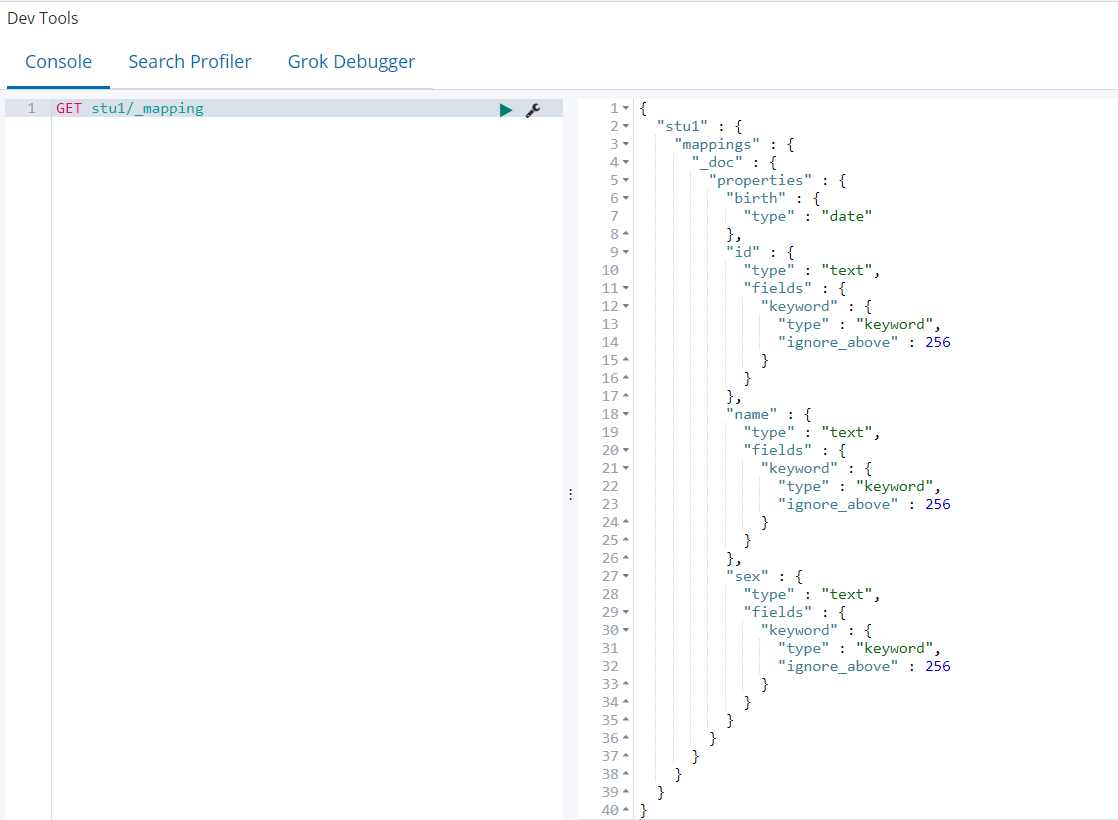
2)查看mapping(birth自动识别为date类型,name识别为text类型)
GET stu1/_mapping
3)日期类型的自动识别,可以自行配置日期格式,以满足各种需求
(1)自定义日期识别格式
PUT my_index
{
  "mappings": {
    "_doc": {
      "dynamic_date_formats": ["yyyy-MM-dd","yyyy/MM/dd"]
    }
  }
}
(2)关闭日期自动识别
PUT my_index2
{
  "mappings": {
    "_doc": {
      "date_detection":false
    }
  }
}
4)字符串是数字时,默认不会自动识别为整形,因为字符串中出现数字时完全合理的,Numeric_datection可以开启字符串中数字的自动识别
4.3 IK分词器
4.3.1 为什么使用分词器
分词器主要应用在中文上,在ES中字符串类型有keyword和text两种。keyword默认不进行分词,而text是将每一个汉字拆开称为独立的词,这两种都是不适用于生产环境,所以我们需要有其他的分词器帮助我们完成这些事情,其中IK分词器是应用最为广泛的一个分词器。
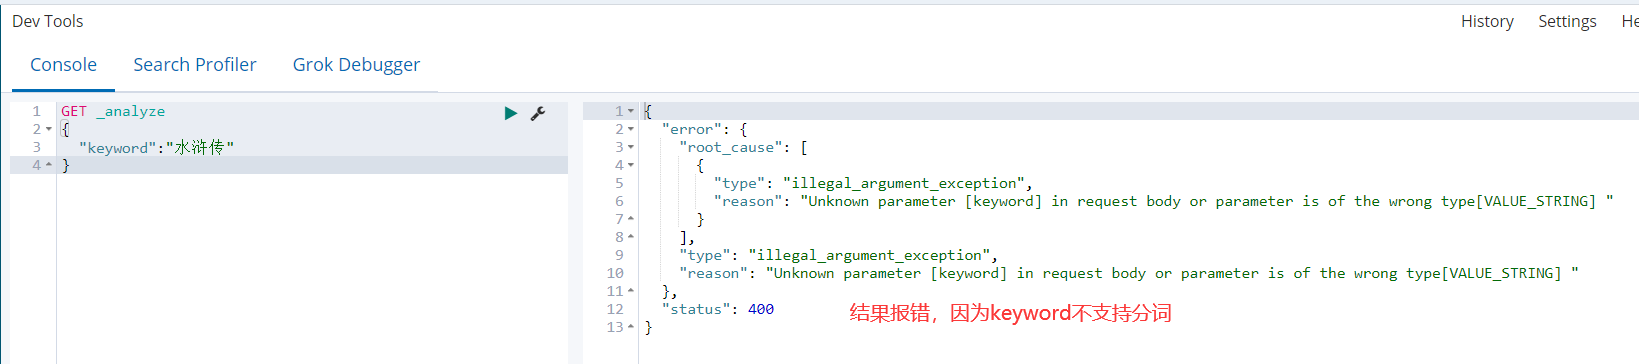
1)keyword类型的分词
GET _analyze
{
  "keyword":"水浒传"
}
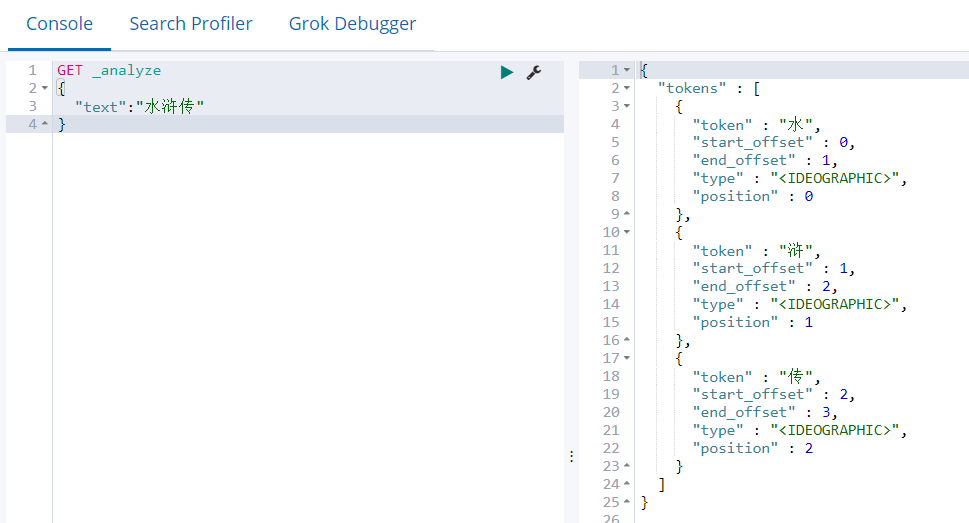
2)text类型的分词
GET _analyze
{
  "text":"水浒传"
}
4.3.2 IK分词器安装
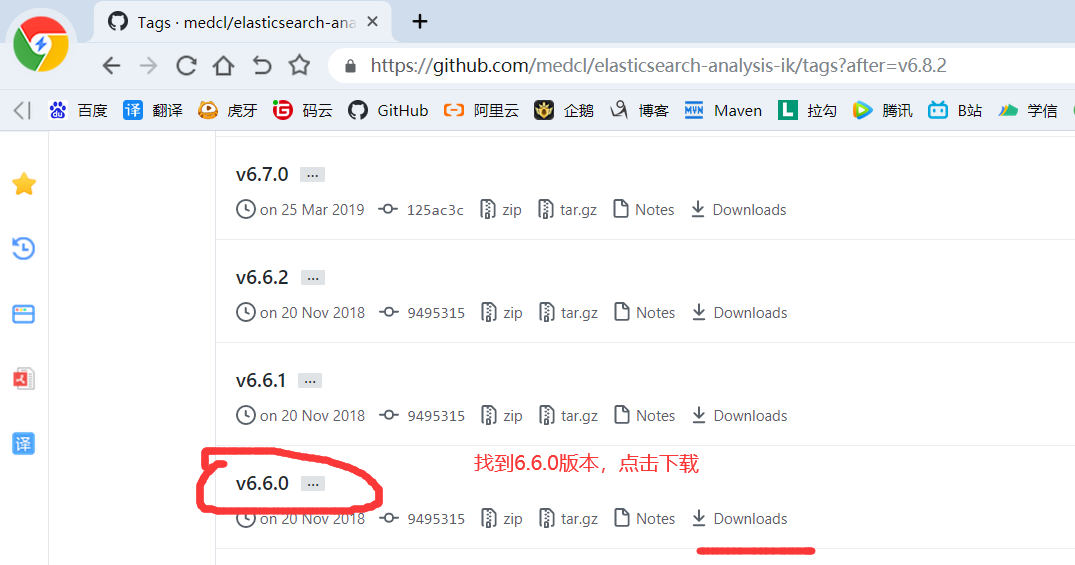
1)将下载好的elasticsearch-analysis-ik-6.6.0.zip上传至hadoop104机器的/opt/software目录
2)在/opt/module/elasticsearch-6.6.0/plugins目录下创建ik目录(名称随意起)
mkdir /opt/module/elasticsearch-6.6.0/plugins/ik
3)解压elasticsearch-analysis-ik-6.6.0.zip至ik目录(若出现未找到unzip命令,则先安装)
sudo yum install -y unzip
unzip /opt/software/elasticsearch-analysis-ik-6.6.0.zip -d /opt/module/elasticsearch-6.6.0/plugins/ik/
4)分发分词器目录
xsync /opt/module/elasticsearch-6.6.0/plugins
5)重新启动Elasticsearch,即可加载IK分词器
elasticsearch.sh stop
elasticsearch.sh start
4.3.3 IK分词器测试
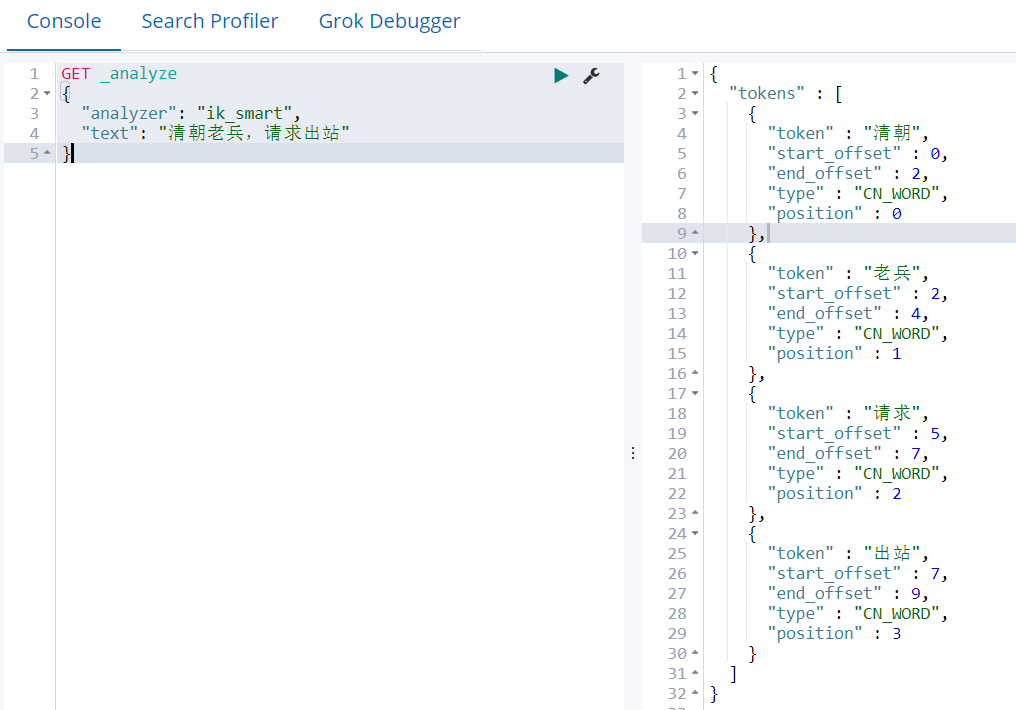
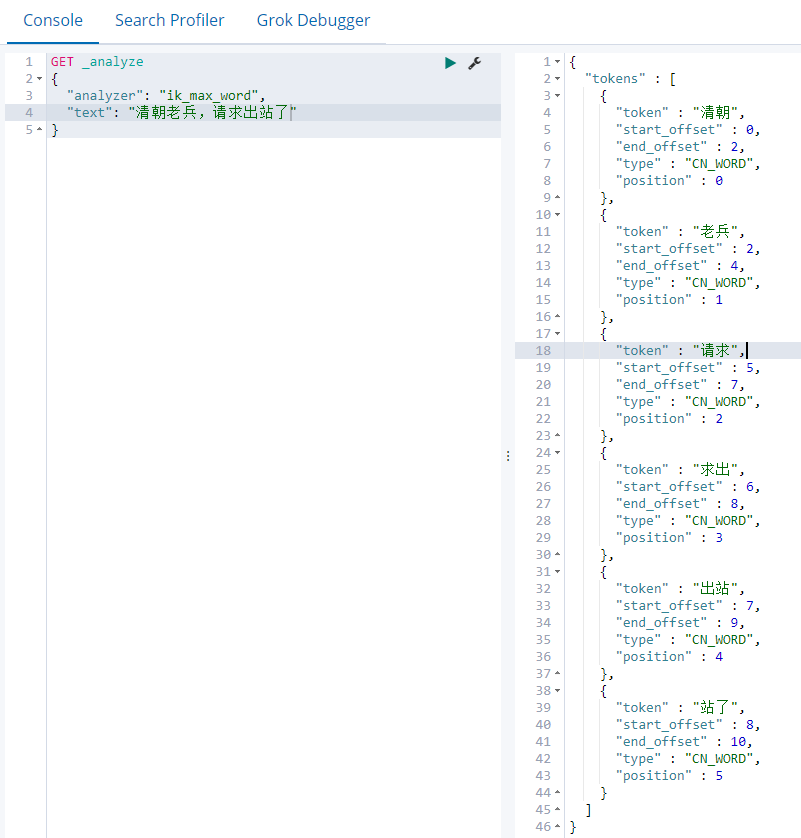
IK提供了两个分词算法ik_smart 和 ik_max_word,其中 ik_smart 为最少切分,ik_max_word为最细粒度划分。
1)最少划分ik_smart
GET _analyze
{
  "analyzer": "ik_smart",
  "text": "清朝老兵,请求出站"
}
2)最细切分ik_max_word
GET _analyze
{
  "analyzer": "ik_max_word",
  "text": "清朝老兵,请求出站了"
}
4.4 检索文档
向Elasticsearch增加数据
PUT student
{
  "mappings": {
    "_doc": {
      "properties": {
        "class_id":{
          "type":"keyword"
        },
        "stu_id":{
          "type":"keyword"
        },
        "name":{
          "type":"text"
        },
        "sex":{
          "type":"keyword"
        },
        "age":{
          "type":"integer"
        },
        "favo":{
          "type":"text",
          "analyzer":"ik_max_word"
        }
      }
    }
  }
}
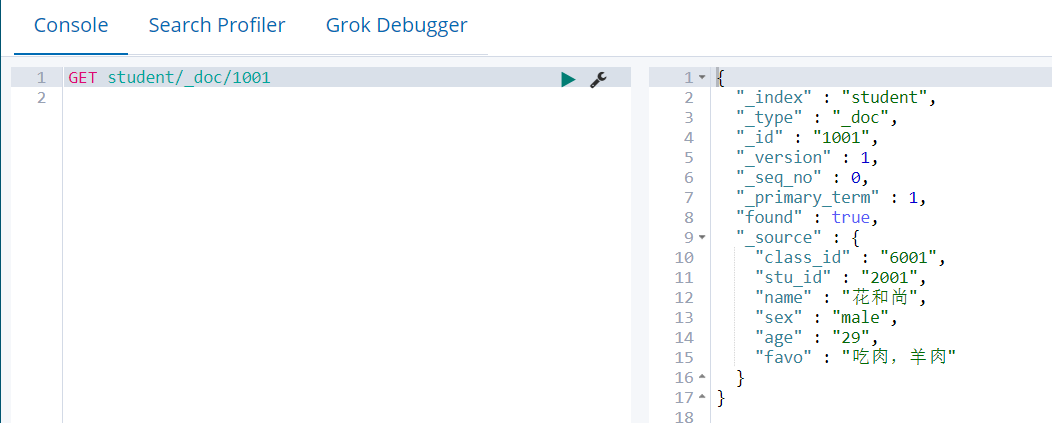
PUT student/_doc/1001
{
  "class_id":"6001",
  "stu_id":"2001",
  "name":"花和尚",
  "sex":"male",
  "age":"29",
  "favo":"吃肉,羊肉"
}
PUT student/_doc/1001
{
  "class_id":"0821",
  "stu_id":"001",
  "name":"小花",
  "sex":"female",
  "age":18,
  "favo":"洗脚,海狗人参丸"
}
如果在关系型数据库Mysql中主键查询数据一般会执行下面的SQL语句
select * from student where id = 1001;
但在Elasticsearch中需要采用特殊的方式
# 协议方法 索引/类型/文档编号
GET student/_doc/1001
我们通过HTTP方法GET来检索文档,同样的,我们可以使用DELETE方法删除文档,使用HEAD方法检查某文档是否存在。如果想更新已存在的文档,我们只需再PUT一次
4.4.1 元数据查询
GET _cat/indices
GET _cat/indices?v

|
health |
green(集群完整) yellow(单点正常、集群不完整) red(单点不正常) |
|
status |
是否能使用 |
|
index |
索引名 |
|
uuid |
索引统一编号 |
|
pri |
主节点几个 |
|
rep |
从节点几个 |
|
docs.count |
文档数 |
|
docs.deleted |
文档被删了多少 |
|
store.size |
整体占空间大小 |
|
pri.store.size |
主节点占空间大小 |
4.4.2 全文档检索
如果在关系型数据库Mysql中查询所有数据一般会执行下面的SQL语句
select * from stu;
但在Elasticsearch中需要采用特殊的方式
# 协议方法 索引/类型/_search
GET stu/_search
响应内容不仅会告诉我们哪些文档被匹配到,而且这些文档内容完整的被包含在其中—我们在给用户展示搜索结果时需要用到的所有信息都有了
4.4.3 字段全值匹配检索
如果在关系型数据库Mysql中查询多字段匹配数据(字段检索)
一般会执行下面的SQL语句
select * from student where sex= 'male';
但在Elasticsearch中需要采用特殊的方式,并且全值匹配会把查询条件当做一个整体来查。
GET student/_search
{
  "query": {
    "bool": {
      "filter": {
        "term": {
          "sex": "海狗人参丸"
        }
      }
    }
  }
}
Select *
From student.xxx
Where sex="海狗人参丸"
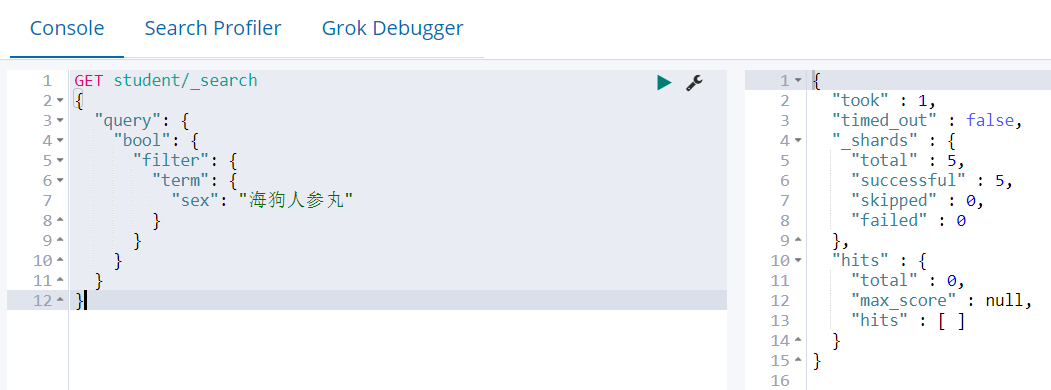
没有对应的查询条件,因为ik_max_word分词器会把“海狗人参丸”分成以下词组
{
  "tokens" : [
    {
      "token" : "海狗",
      "start_offset" : 0,
      "end_offset" : 2,
      "type" : "CN_WORD",
      "position" : 0
    },
    {
      "token" : "人参",
      "start_offset" : 2,
      "end_offset" : 4,
      "type" : "CN_WORD",
      "position" : 1
    },
    {
      "token" : "丸",
      "start_offset" : 4,
      "end_offset" : 5,
      "type" : "CN_CHAR",
      "position" : 2
    }
  ]
}
我们会发现并没有“海狗人参丸”这几个字组合起来的词,因此查不到。
4.4.4 字段分词匹配检索
分词匹配会按照检索条件将其分词后再去匹配
GET student/_search
{
  "query":{
    "match":{
      "favo":"海狗人参丸"
    }
  }
}
检索: ES的原理,从ES的倒排索引上检索指定分词对应的数据
切词: 海狗人参丸=海狗,人参,人参丸
Select *
From student.x
Where favo like ‘%海狗%’ or favo like ‘%人参%’ or favo like ‘%人参丸%’
4.4.5 全值匹配和分词匹配结合使用
GET student/_search
{
  "query":{
    "bool":{
      "filter":{
        "term":{
          "sex":"female"
        }
      },
      "must":[
        {
          "match": {
            "favo": "海狗人参丸"
          }
        }
      ]
    }
  }
}
4.4.6 字段模糊匹配检索
如果在关系型数据库Mysql中模糊查询多字段数据,一般会执行下面的SQL语句
select * from student where name like '%haha%'
但在Elasticsearch中需要采用特殊的方式,查询出所有文档字段值分词后包含"我是程序"的文档
GET student/_search
{
  "query":{
    "fuzzy": {
      "sex": "fmale"
    }
  }
}
4.4.7 聚合检索
4.4.7.1 单聚合条件
聚合查询相当于MySQL中的group by
GET student/_search
{
  "aggs":{
    "groupByClass":{
      "terms": {
        "field": "class_id.keyword",
        "size": 10
      }
    }
  }
}
4.4.7.2 多聚合条件
此时这两个聚合条件相互之间是没有关联的,比如同班级下的学生和年龄最大的学生
GET student/_search
{
  "aggs": {
    "groupByClass": {
      "terms": {
        "field": "class_id.keyword",
        "size": 10
      }
    },
    "groupByAge":{
      "max": {
        "field":"age.integer"
      }
    }
  }
}

4.4.7.3 聚合嵌套检索
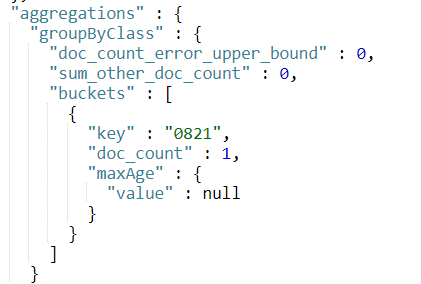
此时这两个聚合条件相互之间是有关联的,比如同班级下年龄最大的学生
GET student/_search
{
  "aggs": {
    "groupByClass": {
      "terms": {
        "field": "class_id.keyword",
        "size": 10
      },
      "aggs": {
        "maxAge": {
          "max": {
            "field": "age.integer"
          }
        }
      }
    }
  }
}
4.4.8 分页检索
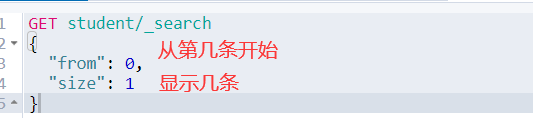
如果想实现看某一页的内容,或者跳转到某一页显示出其内容,可以将from的值设置为((页面数-1)*size)
GET student/_search
{
  "from": 0,
  "size": 1
}
4.5 索引别名 _aliases
索引别名就像一个快捷方式或软连接,可以指向一个或多个索引,也可以给任何一个需要索引名的API来使用。别名带给我们极大的灵活性,允许我们做下面这些:
1)给多个索引分组 (例如, last_three_months)
2)给索引的一个子集创建视图
3)在运行的集群中可以无缝的从一个索引切换到另一个索引
4.5.1 创建索引别名
1)建索引时直接声明
PUT movie_index
{
  "aliases":{
    "movie_chn_2021_query":{
    }
  },
  "mappings": {
    "movie_type":{
      "properties":{
        "id":{
          "type":"long"
        },
        "name":{
          "type":"text",
          "analyzer":"ik_smart"
        }
      }
    }
  }
}
2)为已存在的索引增加别名
POST _aliases
{
  "actions":[
    {
      "add":{
        "index":"student",
        "alias":"student_query"
      }
    }
  ]
}

也可以通过加过滤条件缩小查询范围,建立一个子集视图
POST _aliases
{
  "actions":[
    {
      "add":{
        "index":"student",
        "alias":"student_query",
        "filter":{
          "term":{
            "sex":"male"
          }
        }
      }
    }
  ]
}
4.5.2 查询别名
与使用普通索引没有区别
GET movie_chn_2021_query/_search
4.5.3 删除某个索引的别名
POST _aliases
{
  "actions": [
    {
      "remove": {
        "index": "test1",
        "alias": "alias1"
      }
    }
  ]
}
4.5.4 为某个别名进行无缝切换
POST _aliases
{
  "actions": [
    {
      "add": {
        "index": "test1",
        "alias": "alias1"
      },
      "remove": {
        "index": "test1",
        "alias": "alias2"
      }
    }
  ]
}
4.5.5 查询别名列表
GET _cat/aliases?v

4.6 索引模板
Index Template 索引模板,顾名思义,就是创建索引的模具,其中可以定义一系列规则来帮助我们构建符合特定业务需求的索引的mappings和 settings,通过使用 Index Template 可以让我们的索引具备可预知的一致性。
4.6.1 常见的场景: 分割索引
分割索引就是根据时间间隔把一个业务索引切分成多个索引。比如把order_info 变成 order_info_20200101,order_info_20200102 …..
这样做的好处有两个:
1)结构变化的灵活性:因为elasticsearch不允许对数据结构进行修改。但是实际使用中索引的结构和配置难免变化,那么只要对下一个间隔的索引进行修改,原来的索引位置原状。这样就有了一定的灵活性。
2)查询范围优化:因为一般情况并不会查询全部时间周期的数据,那么通过切分索引,物理上减少了扫描数据的范围,也是对性能的优化。
4.6.2 创建模板
PUT _template/template_movie2021
{
  "index_patterns":["movie_test"],
  "aliases":{
    "{index_query}":{},
    "movie_test_query":{}
  },
  "mappings":{
    "_doc":{
      "properties":{
        "id":{
          "type":"keyword"
        },
        "movie_name":{
          "type":"text",
          "analyzer":"ik_smart"
        }
      }
    }
  }
}
其中 "index_patterns": ["movie_test*"], 的含义就是凡是往movie_test开头的索引写入数据时,如果索引不存在,那么es会根据此模板自动建立索引。
在 "aliases" 中用{index}表示,获得真正的创建的索引名。
测试:
POST movie_test_2021xxxx/_doc
{
  "id":"1002",
  "name":"李白"
}
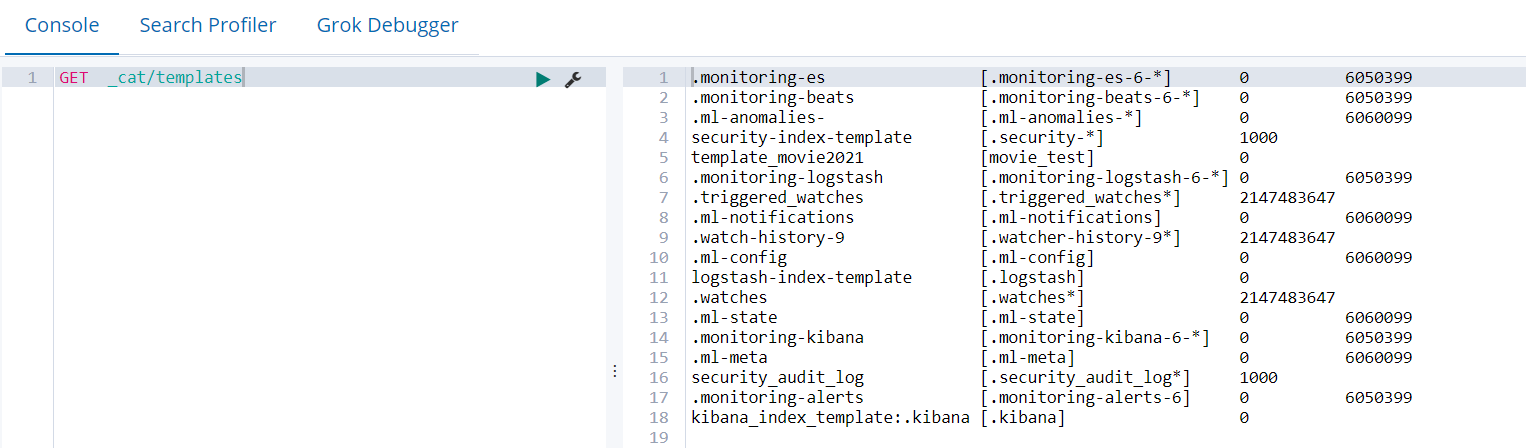
4.6.3 查看系统中已有的模板清单
GET _cat/templates
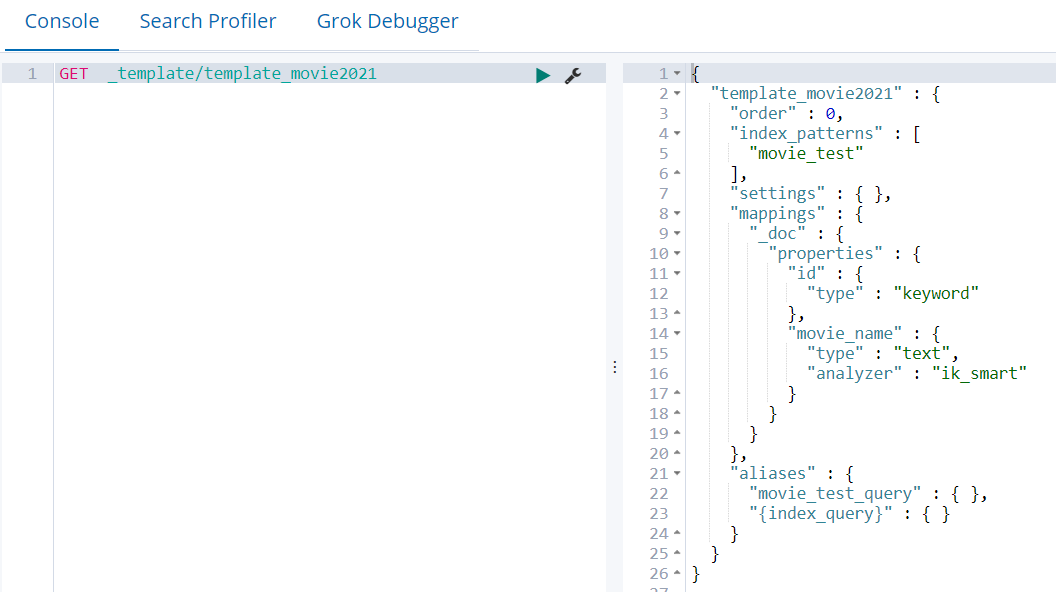
4.6.4 查看某个模板详情
GET  _template/template_movie2021
#或者
GET  _template/template_movie*
4.7 API操作
4.7.1 新建maven工程并导入依赖
<?xml version="1.0" encoding="UTF-8"?>
<project xmlns="http://maven.apache.org/POM/4.0.0"
         xmlns:xsi="http://www.w3.org/2001/XMLSchema-instance"
         xsi:schemaLocation="http://maven.apache.org/POM/4.0.0 http://maven.apache.org/xsd/maven-4.0.0.xsd">
    <modelVersion>4.0.0</modelVersion>

    <groupId>com.yuange.elasticsearch</groupId>
    <artifactId>TestElasticsearch</artifactId>
    <version>1.0-SNAPSHOT</version>

    <dependencies>
        <dependency>
            <groupId>org.apache.httpcomponents</groupId>
            <artifactId>httpclient</artifactId>
            <version>4.5.5</version>
        </dependency>

        <dependency>
            <groupId>org.apache.httpcomponents</groupId>
            <artifactId>httpmime</artifactId>
            <version>4.3.6</version>
        </dependency>

        <dependency>
            <groupId>io.searchbox</groupId>
            <artifactId>jest</artifactId>
            <version>5.3.3</version>
        </dependency>

        <dependency>
            <groupId>net.java.dev.jna</groupId>
            <artifactId>jna</artifactId>
            <version>4.5.2</version>
        </dependency>

        <dependency>
            <groupId>org.codehaus.janino</groupId>
            <artifactId>commons-compiler</artifactId>
            <version>2.7.8</version>
        </dependency>

        <dependency>
            <groupId>org.elasticsearch</groupId>
            <artifactId>elasticsearch</artifactId>
            <version>6.6.0</version>
        </dependency>

        <dependency>
            <groupId>org.projectlombok</groupId>
            <artifactId>lombok</artifactId>
            <version>1.18.12</version>
            <scope>provided</scope>
        </dependency>

        <dependency>
            <groupId>log4j</groupId>
            <artifactId>log4j</artifactId>
            <version>1.2.17</version>
        </dependency>
    </dependencies>

</project>
4.7.2 加入log4j.properties
#定义了一个ConsoleAppender 向控制台输出日志,红色打印,
log4j.appender.yuange.MyConsole=org.apache.log4j.ConsoleAppender
log4j.appender.yuange.MyConsole.target=System.err
log4j.appender.yuange.MyConsole.layout=org.apache.log4j.PatternLayout
# 年-月-日 时:分:秒  10个占位符  日志级别  (全类名:方法名) - 消息 换行
log4j.appender.yuange.MyConsole.layout.ConversionPattern=%d{yyyy-MM-dd HH:mm:ss} %10p (%c:%M) - %m%n

#代表指定哪个类的logger使用什么级别和appender进行日志输出  全类名可能需要修改
log4j.rootLogger=DEBUG,yuange.MyConsole
4.7.3 创建Bean层
1)新建Movie.java
package com.yuange.es.beans;

import lombok.AllArgsConstructor;
import lombok.Data;
import lombok.NoArgsConstructor;

/**
 * @作者:袁哥
 * @时间:2021/7/9 16:25
 */

@NoArgsConstructor
@AllArgsConstructor
@Data
public class Movie {

    private Integer id;
    private String name;

}
2)新建Emp.java
package com.yuange.es.beans;

import lombok.AllArgsConstructor;
import lombok.Data;
import lombok.NoArgsConstructor;

/**
 * @作者:袁哥
 * @时间:2021/7/9 16:29
 */
@AllArgsConstructor
@NoArgsConstructor
@Data
public class Emp {

    private String empid;
    private String gender;
    private String name;
    private String hobby;
    private Integer age;
    private Double balance;

}
4.7.4 写数据
(1)原始JSON格式
package com.yuange.es.test;

import io.searchbox.client.JestClient;
import io.searchbox.client.JestClientFactory;
import io.searchbox.client.config.HttpClientConfig;
import io.searchbox.core.DocumentResult;
import io.searchbox.core.Index;

import java.io.IOException;

/**
 * @作者:袁哥
 * @时间:2021/7/9 16:31
 */
public class WriteDemo1 {

    public static void main(String[] args) throws IOException {
        //创建一个 JestClientFactory
        JestClientFactory jestClientFactory = new JestClientFactory();

        HttpClientConfig build = new HttpClientConfig.Builder("http://hadoop102:9200").build();

        jestClientFactory.setHttpClientConfig(build);

        // 从工厂中获取一个 客户端对象
        JestClient object = jestClientFactory.getObject();

        String indexStr = "{\n" +
                "  \"empid\":2001,\n" +
                "  \"age\":30,\n" +
                "  \"balance\":5000,\n" +
                "  \"name\":\"高局\",\n" +
                "  \"gender\":\"男\",\n" +
                "  \"hobby\":\"飙车泡妹\"\n" +
                "}";

        Index index = new Index.Builder(indexStr).type("emps").index("test").id("1001").build();

        DocumentResult execute = object.execute(index);

        System.out.println(execute.getResponseCode());

        System.out.println(execute.getErrorMessage());

        //关闭客户端
        object.close();
    }
}
(2)封装为Bean格式
package com.yuange.es.test;

import com.yuange.es.beans.Emp;
import io.searchbox.client.JestClient;
import io.searchbox.client.JestClientFactory;
import io.searchbox.client.config.HttpClientConfig;
import io.searchbox.core.DocumentResult;
import io.searchbox.core.Index;

import java.io.IOException;

/**
 * @作者:袁哥
 * @时间:2021/7/9 16:43
 */
public class WriteDemo2 {

    public static void main(String[] args) throws IOException {
        //创建一个 JestClientFactory
        JestClientFactory jestClientFactory = new JestClientFactory();

        HttpClientConfig httpClientConfig = new HttpClientConfig.Builder("http://hadoop102:9200").build();

        jestClientFactory.setHttpClientConfig(httpClientConfig);

        // 从工厂中获取一个 客户端对象
        JestClient jestClient = jestClientFactory.getObject();

        Emp emp = new Emp("1002", "laohu", "男", "喝酒嫖娼", 40, 5600.32);

        Index index = new Index.Builder(emp).type("emps").index("test").id("13").build();

        DocumentResult execute = jestClient.execute(index);

        System.out.println(execute.getResponseCode());

        System.out.println(execute.getErrorMessage());

        jestClient.close();
    }
}
(3)执行删除和插入操作
package com.yuange.es.test;

import com.yuange.es.beans.Emp;
import com.yuange.es.beans.Movie;
import io.searchbox.client.JestClient;
import io.searchbox.client.JestClientFactory;
import io.searchbox.client.config.HttpClientConfig;
import io.searchbox.core.*;

import java.io.IOException;

/**
 * @作者:袁哥
 * @时间:2021/7/9 16:49
 */
public class WriteDemo3 {

    public static void main(String[] args) throws IOException {
        //创建一个 JestClientFactory
        JestClientFactory jestClientFactory = new JestClientFactory();

        HttpClientConfig httpClientConfig = new HttpClientConfig.Builder("http://hadoop102:9200").build();

        jestClientFactory.setHttpClientConfig(httpClientConfig);

        // 从工厂中获取一个 客户端对象
        JestClient jestClient = jestClientFactory.getObject();

        //执行删除 13号员工
        Delete delete = new Delete.Builder("13").type("emps").index("test").build();

        String str = "{\n" +
                "  \"id\":7,\n" +
                "  \"name\":\"《翠花洗酸菜》\"\n" +
                "}";

        Movie movie = new Movie(30, "《翠花洗酸菜2》");

        // 执行向  movie_index 插入
        Index index1 = new Index.Builder(str).type("movie_type").index("movie_index").id("88").build();

        // 执行向  movie_index 插入
        Index index2 = new Index.Builder(movie).type("movie_type").index("movie_index").id("11").build();
        Bulk build2 = new Bulk.Builder().addAction(index2).build();
        Bulk build3 = new Bulk.Builder().addAction(delete).build();

        DocumentResult execute = jestClient.execute(index1);
        BulkResult execute2 = jestClient.execute(build2);
        BulkResult execute3 = jestClient.execute(build3);

        System.out.println(execute.getResponseCode());
        System.out.println(execute.getErrorMessage());

        System.out.println(execute2.getItems().size());
        System.out.println(execute3.getItems().size());

        jestClient.close();
    }
}
4.7.3 读数据
(1)直接传入查询参数
package com.yuange.es.test;

import com.yuange.es.beans.Emp;
import io.searchbox.client.JestClient;
import io.searchbox.client.JestClientFactory;
import io.searchbox.client.config.HttpClientConfig;
import io.searchbox.core.Search;
import io.searchbox.core.SearchResult;

import java.io.IOException;
import java.util.List;

/**
 * @作者:袁哥
 * @时间:2021/7/9 17:03
 * ①创建一个客户端对象JestClient,使用了工厂模式和建筑者模式,创建一个对象的时候,尽量不要调用构造器
 * ②读: 准备读命令,写: 准备写的命令
 *      发送RESTFUL 请求,通过请求参数,表示对数据的操作类型,在javaAPI,使用方法,表达对不同数据的操作类型,把restful屏蔽
 *          GET : 查询
 *          POST :新增
 *          DELETE :删除
 *       Action:命令类型:
 *          读:  Search
 *          写:  删除Delete、增和改index、批量写Bulk
 * ③执行命令
 * ④读操作,接受返回的结果并遍历结果
 *
 */
public class READDemo1 {

    public static void main(String[] args) throws IOException {
        //创建一个 JestClientFactory
        JestClientFactory jestClientFactory = new JestClientFactory();

        HttpClientConfig httpClientConfig = new HttpClientConfig.Builder("http://hadoop102:9200").build();

        jestClientFactory.setHttpClientConfig(httpClientConfig);

        // 从工厂中获取一个 客户端对象
        JestClient jestClient = jestClientFactory.getObject();

        //将查询的DSL语句传入,只封装请求体
        String query = "{\n" +
                "  \"query\":{\n" +
                "    \"match\": {\n" +
                "      \"hobby\": \"喝酒\"\n" +
                "    }\n" +
                "  }\n" +
                "}";

        //GET /test/emps/_search
        Search search = new Search.Builder(query).addType("emps").addIndex("test").build();

        // 对应 hits
        SearchResult searchResult = jestClient.execute(search);

        System.out.println(searchResult.getTotal());

        System.out.println(searchResult.getMaxScore());

        // 对应  hits.hits
        List<SearchResult.Hit<Emp, Void>> hits = searchResult.getHits(Emp.class);

        for (SearchResult.Hit<Emp, Void> hit : hits) {
            System.out.println("_index:"+hit.index);
            System.out.println("_type:"+hit.type);
            System.out.println("_id:"+hit.id);
            System.out.println("_score:"+hit.score);

            System.out.println(hit.source);
        }

        //关闭客户端
        jestClient.close();
    }
}
(2)使用对象封装查询的参数
package com.yuange.es.test;

import com.yuange.es.beans.Emp;
import io.searchbox.client.JestClient;
import io.searchbox.client.JestClientFactory;
import io.searchbox.client.config.HttpClientConfig;
import io.searchbox.core.Search;
import io.searchbox.core.SearchResult;
import io.searchbox.core.search.aggregation.AvgAggregation;
import io.searchbox.core.search.aggregation.MetricAggregation;
import io.searchbox.core.search.aggregation.TermsAggregation;
import org.elasticsearch.index.query.MatchQueryBuilder;
import org.elasticsearch.index.search.MatchQuery;
import org.elasticsearch.search.aggregations.AggregationBuilders;
import org.elasticsearch.search.aggregations.bucket.terms.TermsAggregationBuilder;
import org.elasticsearch.search.builder.SearchSourceBuilder;

import java.io.IOException;
import java.util.List;

/**
 * @作者:袁哥
 * @时间:2021/7/9 17:03
 * 使用对象封装查询的参数
 */
public class READDemo2 {

    public static void main(String[] args) throws IOException {
        //创建一个 JestClientFactory
        JestClientFactory jestClientFactory = new JestClientFactory();
        HttpClientConfig httpClientConfig = new HttpClientConfig.Builder("http://hadoop102:9200").build();

        jestClientFactory.setHttpClientConfig(httpClientConfig);

        // 从工厂中获取一个 客户端对象
        JestClient jestClient = jestClientFactory.getObject();

        //封装  match: {}
        MatchQueryBuilder matchQueryBuilder = new MatchQueryBuilder("hobby", "喝酒");

        //封装aggs:{}    AggregationBuilders工具类,封装出各种类型的aggs的参数请求体
        TermsAggregationBuilder aggs = AggregationBuilders.terms("gendercount").field("gender.keyword").size(2)
                .subAggregation(AggregationBuilders.avg("avgage").field("age"));

        //封装 整个请求体 {}
        SearchSourceBuilder searchSourceBuilder = new SearchSourceBuilder().aggregation(aggs).query(matchQueryBuilder);

        // 获取到字符串类型的请求体
        String s = searchSourceBuilder.toString();

        // 封装search对象
        Search search = new Search.Builder(s).addType("emps").addIndex("test").build();

        // 对应 hits
        SearchResult searchResult = jestClient.execute(search);

        System.out.println(searchResult.getTotal());

        System.out.println(searchResult.getMaxScore());

        List<SearchResult.Hit<Emp, Void>> hits = searchResult.getHits(Emp.class);

        for (SearchResult.Hit<Emp, Void> hit : hits) {
            System.out.println("_index:"+hit.index);
            System.out.println("_type:"+hit.type);
            System.out.println("_id:"+hit.id);
            System.out.println("_score:"+hit.score);

            System.out.println(hit.source);
        }

        //获取 aggregations
        MetricAggregation aggregations = searchResult.getAggregations();

        TermsAggregation gendercount = aggregations.getTermsAggregation("gendercount");

        List<TermsAggregation.Entry> buckets = gendercount.getBuckets();

        for (TermsAggregation.Entry bucket : buckets) {
            System.out.println("key:"+bucket.getKey());
            System.out.println("doc_count:"+bucket.getCount());

            AvgAggregation avgage = bucket.getAvgAggregation("avgage");
            System.out.println("avgageValue:"+avgage.getAvg());
        }

        //关闭客户端
        jestClient.close();
    }
}
第5章 需求实战
5.1 建表(若之前建立过test索引请先删除它)
#删除
DELETE test
PUT /test
{
  "mappings": {
    "emps": {
      "properties": {
        "empid": {
          "type": "long"
        },
        "age": {
          "type": "long"
        },
        "balance": {
          "type": "double"
        },
        "name": {
          "type": "text",
          "fields": {
            "keyword": {
              "type": "keyword",
              "ignore_above": 256
            }
          }
        },
        "gender": {
          "type": "text",
          "fields": {
            "keyword": {
              "type": "keyword",
              "ignore_above": 256
            }
          }
        },
        "hobby": {
          "type": "text",
          "analyzer": "ik_max_word",
          "fields": {
            "keyword": {
              "type": "keyword",
              "ignore_above": 256
            }
          }
        }
      }
    }
  }
}
5.2 导入数据
POST /test/emps/_bulk
{"index":{"_id":"1"}}
{"empid":1001,"age":20,"balance":2000,"name":"李三","gender":"男","hobby":"吃饭睡觉"}
{"index":{"_id":"2"}}
{"empid":1002,"age":30,"balance":2600,"name":"李小三","gender":"男","hobby":"吃粑粑睡觉"}
{"index":{"_id":"3"}}
{"empid":1003,"age":35,"balance":2900,"name":"张伟","gender":"女","hobby":"吃,睡觉"}
{"index":{"_id":"4"}}
{"empid":1004,"age":40,"balance":2600,"name":"张伟大","gender":"男","hobby":"打篮球睡觉"}
{"index":{"_id":"5"}}
{"empid":1005,"age":23,"balance":2900,"name":"大张伟","gender":"女","hobby":"打乒乓球睡觉"}
{"index":{"_id":"6"}}
{"empid":1006,"age":26,"balance":2700,"name":"张大喂","gender":"男","hobby":"打排球睡觉"}
{"index":{"_id":"7"}}
{"empid":1007,"age":29,"balance":3000,"name":"王五","gender":"女","hobby":"打牌睡觉"}
{"index":{"_id":"8"}}
{"empid":1008,"age":28,"balance":3000,"name":"王武","gender":"男","hobby":"打桥牌"}
{"index":{"_id":"9"}}
{"empid":1009,"age":32,"balance":32000,"name":"王小五","gender":"男","hobby":"喝酒,吃烧烤"}
{"index":{"_id":"10"}}
{"empid":1010,"age":37,"balance":3600,"name":"赵六","gender":"男","hobby":"吃饭喝酒"}
{"index":{"_id":"11"}}
{"empid":1011,"age":39,"balance":3500,"name":"张小燕","gender":"女","hobby":"逛街,购物,买"}
{"index":{"_id":"12"}}
{"empid":1012,"age":42,"balance":3400,"name":"李三","gender":"男","hobby":"逛酒吧,购物"}
{"index":{"_id":"13"}}
{"empid":1013,"age":42,"balance":3400,"name":"李球","gender":"男","hobby":"体育场,购物"}
{"index":{"_id":"14"}}
{"empid":1014,"age":22,"balance":3400,"name":"李健身","gender":"男","hobby":"体育场,购物"}
{"index":{"_id":"15"}}
{"empid":1015,"age":22,"balance":3400,"name":"Nick","gender":"男","hobby":"坐飞机,购物"}
5.3 需求
5.3.1 查询的两种方式
1)查询方式一:发送REST请求的方式 将请求参数附加在url的后面
GET /test/emps/_search

GET /test/emps/_search?q=*

GET /test/emps/_search?q=age:22
2)查询方式二,使用ES 的DSL(特定领域语言)语法 ,将请求参数附加在请求体中
GET /test/emps/_search
{
  "query": {
    "match_all": {}
  }
}
5.3.2 全表查询
GET /test/emps/_search
5.3.3 全表查询,按照年龄降序排序,再按照工资降序排序,只取前5条记录的示account_number,age,balance
GET /test/emps/_search
{
  "sort":[
    {
      "age":{
        "order":"desc"
      }
    },
    {
      "balance":{
        "order":"desc"
      }
    }
  ],
  "from": 0,
  "size":5,
  "_source":[
    "empid",
    "age",
    "balance"
  ]
}
5.3.4 匹配之match分词匹配: 搜索hobby是吃饭睡觉的员工
#原理:先将查询条件切词,切为 吃饭、睡觉,分别从hobby的倒排索引上
GET /_analyze
{
  "analyzer":"ik_max_word",
  "text":"吃饭睡觉"
}
#检索吃饭、睡觉
GET /test/emps/_search
{
  "query":{
    "match":{
      "hobby": "吃饭睡觉"
    }
  }
}
5.3.5 匹配之match/term不分词匹配: 搜索工资是2000的员工
# 2000会不会被切词?  不会!只有text类型能被切词,精确匹配
# 在ES中官方建议,在对 text类型进行全文检索时,才用match
GET /test/emps/_search
{
  "query":{
    "match": {
      "balance": 2000
    }
  }
}
5.3.6 匹配之term不分词匹配: 搜索工资是2000的员工
# 如果搜索的不是text类型,建议使用term
GET /test/emps/_search
{
  "query":{
    "term": {
      "balance": 2000
    }
  }
}
5.3.7 匹配之match不分词匹配: 搜索hobby是吃饭睡觉的员工
#keyword类型不切词
GET /test/emps/_search
{
  "query":{
    "match": {
      "hobby.keyword": "吃饭睡觉"
    }
  }
}
5.3.8 匹配之短语匹配: 搜索hobby是吃饭的员工
GET /test/emps/_search
{
  "query": {
    "match_phrase": {
      "hobby": "吃饭"
    }
  }
}
5.3.9 匹配之多字段匹配: 搜索name或hobby中带球的员工
GET /test/emps/_search
{
  "query":{
    "multi_match":{
      "query": "球",
      "fields":["name","hobby"]
    }
  }
}
5.3.10 匹配之多条件匹配,搜索男性中喜欢购物的员工
GET /test/emps/_search
{
  "query":{
    "bool":{
      "must": [
        {
          "match": {
            "hobby": "购物"
          }
        },
        {
          "term": {
            "gender": {
              "value": "男"
            }
          }
        }
      ]
    }
  }
}
5.3.11 匹配之多条件匹配,搜索男性中喜欢购物,还不能爱去酒吧的员工
GET /test/emps/_search
{
  "query":{
    "bool":{
      "must": [
        {
          "match": {
            "hobby": "购物"
          }
        },
        {
          "term": {
            "gender": {
              "value": "男"
            }
          }
        }
      ],
      "must_not": [
        {
          "match": {
            "hobby": "去酒吧"
          }
        }
      ]
    }
  }
}
5.3.12 匹配之多条件匹配,搜索男性中喜欢购物,还不能爱去酒吧的员工,最好在20-30之间
#最好在20-30之间: 如果这个人年龄在20-30之间,优先选择!加分!
#should: 符合条件就加分
GET /test/emps/_search
{
  "query":{
    "bool":{
      "must": [
        {
          "match": {
            "hobby": "购物"
          }
        },
        {
          "term": {
            "gender": {
              "value": "男"
            }
          }
        }
      ],
      "must_not": [
        {
          "match": {
            "hobby": "去酒吧"
          }
        }
      ],
      "should": [
        {
          "range": {
            "age": {
              "gte": 20,
              "lte": 30
            }
          }
        }
      ]
    }
  }
}
5.3.13 匹配之多条件匹配,搜索男性中喜欢购物,还不能爱去酒吧的员工,最好在20-30之间,不要40岁以上的
#filter: 过滤出我们想要的结果
GET /test/emps/_search
{
  "query":{
    "bool":{
      "must": [
        {
          "match": {
            "hobby": "购物"
          }
        },
        {
          "term": {
            "gender": {
              "value": "男"
            }
          }
        }
      ],
      "must_not": [
        {
          "match": {
            "hobby": "去酒吧"
          }
        }
      ],
      "should": [
        {
          "range": {
            "age": {
              "gte": 20,
              "lte": 30
            }
          }
        }
      ],
      "filter": {
        "range": {
          "age": {
            "lte": 40
          }
        }
      }
    }
  }
}
5.3.14 匹配之字段模糊联想匹配,搜索Nick
GET /test/emps/_search
{
  "query":{
    "fuzzy":{
      "name":"Fick"
    }
  }
}
5.3.15 聚合之单聚合,统计男女员工各多少人
GET /test/emps/_search
{
  "query":{
    "match_all":{}
  },
  "aggs": {
    "gendercount": {
      "terms": {
        "field": "gender.keyword",
        "size": 10
      }
    }
  }
}
5.3.16 聚合之先查询再聚合,统计喜欢购物的男女员工各多少人
GET /test/emps/_search
{
  "query":{
    "match":{
      "hobby": "购物"
    }
  },
  "aggs": {
    "gendercount": {
      "terms": {
        "field": "gender.keyword",
        "size": 10
      }
    }
  }
}
5.3.17 聚合之多聚合,统计喜欢购物的男女员工各多少人,及这些人总体的平均年龄
GET /test/emps/_search
{
  "query":{
    "match":{
      "hobby": "购物"
    }
  },
  "aggs": {
    "gendercount": {
      "terms": {
        "field": "gender.keyword",
        "size": 10
      }
    },
    "avgage":{
      "avg": {
        "field": "age"
      }
    }
  }
}
5.3.18 聚合之多聚合和嵌套聚合,统计喜欢购物的男女员工各多少人,及这些人不同性别的平均年龄
GET /test/emps/_search
{
  "query": {
    "match": {
      "hobby": "购物"
    }
  },
  "aggs": {
    "gendercount": {
      "terms": {
        "field": "gender.keyword",
        "size": 10
      },
      "aggs": {
        "avgage": {
          "avg": {
            "field": "age"
          }
        }
      }
    }
  }
}