1、Struts2做异步操作
- 首先创建web项目,导入相应的jar包
1. 导入Struts2相关jar包,并导入 struts2-json-plugin-版本.jar包

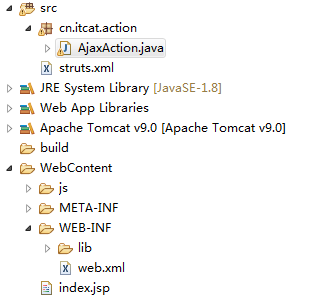
2. 创建一个Action类,包名随意(项目整体结构图)

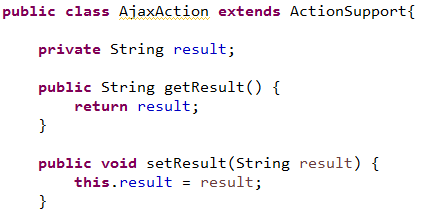
3. 这个Action类继承ActionSupport并重写它的execute()方法,之前提到过默认找这个方法,设置之后可找设置的方法,给它一个属性 result 并生成get,set方法。

4. 在src下创建 struts.xml配置文件配置Action

5. 在WebContent下创建index.jsp(jQuery.js文件需要自行下载放在js文件夹下)
<%@ page language="java" contentType="text/html; charset=UTF-8"
    pageEncoding="UTF-8"%>
<!DOCTYPE html PUBLIC "-//W3C//DTD HTML 4.01 Transitional//EN" "http://www.w3.org/TR/html4/loose.dtd">
<html>
<head>
<meta http-equiv="Content-Type" content="text/html; charset=UTF-8">
<title>Insert title here</title>
</head>
<body>
<script type="text/javascript" src="js/jquery-1.7.js"></script>
<script type="text/javascript">
$(function(){
    $(":input[name='username']").change(function(){
        var val = $(this).val();
        var username = $('#username').val();
        val = $.trim(val);
        if(val != ""){
            $.ajax({
                type:"post",
                url: "ajax.action",
                data:{
                    username:username
                },
                dataType:"json",

                success : function(data){
                    $("#message").html(data.result);
                },
                error : function(){
                    alert("错误");
                }
            })
        }else{
            $("#message").html("");
        }
    });
})
</script>
    <form>
        账 号: <input id="username" type="text" name="username"/>
        <div style="margin-left:45px;" id="message"></div>
        密 码: <input type="password" name="password"/><br/>
        <input style="margin-left:149px;" type="submit" name="submit" value="添加用户"/>
    </form>
</body>
</html>
6. 在WEB-INF下创建web.xml配置过滤器
<?xml version="1.0" encoding="UTF-8"?>
<web-app xmlns:xsi="http://www.w3.org/2001/XMLSchema-instance" xmlns="http://java.sun.com/xml/ns/j2ee" xmlns:web="http://xmlns.jcp.org/xml/ns/javaee" xsi:schemaLocation="http://java.sun.com/xml/ns/j2ee http://java.sun.com/xml/ns/j2ee/web-app_2_4.xsd http://xmlns.jcp.org/xml/ns/javaee http://java.sun.com/xml/ns/javaee/web-app_2_5.xsd" id="WebApp_9" version="2.4">
  <filter>
    <filter-name>struts2</filter-name>
    <filter-class>org.apache.struts2.dispatcher.ng.filter.StrutsPrepareAndExecuteFilter</filter-class>
  </filter>
  <filter-mapping>
    <filter-name>struts2</filter-name>
    <url-pattern>/*</url-pattern>
  </filter-mapping>
</web-app>
7. 在execute方法中处理请求
package cn.itcat.action;

import java.util.Arrays;
import java.util.List;

import javax.servlet.http.HttpServletRequest;

import org.apache.struts2.ServletActionContext;

import com.opensymphony.xwork2.ActionSupport;

public class AjaxAction extends ActionSupport{

    private String result;

    public String getResult() {
        return result;
    }

    public void setResult(String result) {
        this.result = result;
    }

    @Override
    public String execute() {
        //创建一些已存在的账户做测试用
        List<String> userNames = Arrays.asList("Mary","lucy","leo");
        HttpServletRequest request = ServletActionContext.getRequest();
        //获取请求中的账户名
        String userName = request.getParameter("username");
        //对比已存在的账户名
        if(userNames.contains(userName)) {
            //存在直接返回result (返回的是一个 json格式的对象,这里只有一条数据,多条数据需要通过插件或者自己构造json对象的字符串)
            this.result = "<span style="color: red">当前账户已存在,请重新输入!</span>";
        }else {
            this.result = "<span style="color: green">当前账户不存在,可以使用</span>";
        }
        return "success";
    }

}
8. 启动项目做测试
- 项目启动成功后在浏览器输入 localhost:8080/项目名称/index.jsp


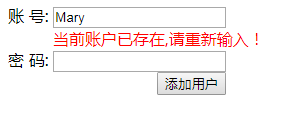
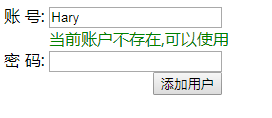
- 在账号处输入账号测试异步请求是否成功


至此,异步请求成功,此文章为了提升自身知识,望大神们多多指点.