前言
传统的Asmx服务,由于遵循SOAP协议,所以返回内容以xml方式组织。并且客户端需要添加服务端引用才能使用(虽然看到网络上已经提供了这方面的Dynamic Proxy,但是没有这种方式简便),所以给开发和部署带来了不小的麻烦。并且当服务过多的时候,生成的引用文件会很大,之前项目的一个引用文件光引用代码都有5000多行,全部在一个类中。确实不方便维护。
基于以上几点,就特别研究了一下基于Restful的服务开发,当时手头有两种框架,一个是WCF Restful Service,另一个是Asp.net Web API。由于对WCF比较熟悉一些,所以就选择了前者。
Restful Service及其相关
说到Restful Service,不得不提到其中的Rest这个关键字。它是用于创建分布式超文本媒体的一种架构方式,我们可以通过标准的HTTP(GET,POST,PUT,DELETE)操作来构建基于面向资源的软件架构方式(Resource-Oriented Architecture (ROA))。它是独立于任何技术或者平台的,所以人们经常将符合这种操作规范的服务称为“RESTful services”。因为WCF能够构建符合这种规范的服务,所以我们经常称之为 WCF Restful Services。
由于传统的WCF Service可以使用tcp,net.msmq,http等协议进行数据交换,并且采用了RPC(Remote Procedure Call)的工作方式,客户端需要添加对服务端的引用才能完成。但是WCF Restful Service完全使用Http协议来进行,并且无需添加客户端引用,所以方便很多。
服务端开发一瞥
下面以图书馆的例子来做具体的说明。
打开VS2010,新建一个WCF REST Service Application项目,然后在项目中,添加一个BookService.cs用于处理逻辑操作,再添加一个BookEntity.cs用于提供实体类。
打开Global.asax,可以看到如下代码:
1: void Application_Start(object sender, EventArgs e)
2: {
3: RegisterRoutes();
4: }
5:
6: private void RegisterRoutes()
7: {
8: RouteTable.Routes.Add(new ServiceRoute("BookService", new WebServiceHostFactory(), typeof(BookService)));
9: }
其中RegisterRoutes是设定服务启动的入口点的。
然后是BookEntity实体类的组织方式:
1: public class BookEntity
2: {
3: public int BookID { get; set; }
4:
5: public string BookName { get; set; }
6:
7: public decimal BookPrice { get; set; }
8:
9: public string BookPublish { get; set; }
10: }
这里我就不用多说了,实体类包含图书序号,图书名称,图书价格,出版单位四个属性。
然后就是我们的核心内容:
1: [ServiceContract]
2: [AspNetCompatibilityRequirements(RequirementsMode = AspNetCompatibilityRequirementsMode.Allowed)]
3: [ServiceBehavior(InstanceContextMode = InstanceContextMode.Single)]
4: public class BookService
5: {
6: public BookService()
7: {
8: bookList = new List<BookEntity>();
9: BookEntity book = new BookEntity();
10: book.BookID = 1;
11: book.BookName = "大话设计模式";
12: book.BookPrice = (decimal)45.2;
13: book.BookPublish = "中国邮电出版社";
14: bookList.Add(book);
15:
16: BookEntity book1 = new BookEntity();
17: book1.BookID = 2;
18: book1.BookName = "测试用例";
19: book1.BookPrice = (decimal)21.0;
20: book1.BookPublish = "清华大学出版社";
21: bookList.Add(book1);
22:
23: BookEntity book2 = new BookEntity();
24: book2.BookID = 3;
25: book2.BookName = "Rework";
26: book2.BookPrice = (decimal)15.4;
27: book2.BookPublish = "Wrox pulishment";
28: bookList.Add(book2);
29: }
30:
31: private static List<BookEntity> bookList;
32:
33: [WebInvoke(Method = "GET"
34: , ResponseFormat = WebMessageFormat.Json
35: , BodyStyle = WebMessageBodyStyle.Bare //不需要任何修饰,否则生成的json无法解析
36: , UriTemplate = "/?bookID={bookID}")] //只接收string类型,如果是其他类型,需要按照 /?para={parameter}的方式来组织。
37: public BookEntity Get(int bookID)
38: {
39: return bookList.Where(p => p.BookID == bookID).FirstOrDefault();
40: }
41:
42: [WebInvoke(Method = "GET"
43: , ResponseFormat = WebMessageFormat.Json
44: , BodyStyle = WebMessageBodyStyle.Bare
45: , UriTemplate = "/")]
46: public List<BookEntity> GetALL()
47: {
48: return bookList;
49: }
50:
51: [WebInvoke(Method = "POST"
52: , ResponseFormat = WebMessageFormat.Json
53: , BodyStyle = WebMessageBodyStyle.Bare
54: , UriTemplate = "/")]
55: public bool Update(BookEntity book)
56: {
57: BookEntity query = (from p in bookList where p.BookID == book.BookID select p).FirstOrDefault();
58: bookList.Remove(query);
59: bookList.Add(book);
60: return true;
61: }
62:
63: [WebInvoke(Method = "PUT"
64: , ResponseFormat = WebMessageFormat.Json
65: , BodyStyle = WebMessageBodyStyle.Bare
66: , UriTemplate = "/")]
67: public bool Add(BookEntity book)
68: {
69: bookList.Add(book);
70: return true;
71: }
72:
73: [WebInvoke(Method = "DELETE"
74: , ResponseFormat = WebMessageFormat.Json
75: , BodyStyle = WebMessageBodyStyle.Bare
76: , UriTemplate = "/")]
77: public bool Delete(BookEntity book)
78: {
79: BookEntity bookCurrent = (from p in bookList where p.BookID == book.BookID select p).FirstOrDefault();
80: return bookList.Remove(bookCurrent);
81: }
82: }
其中,Method 方法主要是表明可以接受客户端的请求类型,这里有四种:GET,POST,PUT,DELETE,其中GET为请求数据,POST为更新数据,PUT为新增数据,DELETE代表着删除数据。
然后ResponseFormat 则代表着返回的数据组织,如果是Json则表明客户端会接收到Json数据,如果是XML则表明客户端会接收到XML组织的数据。BodyStyle 代表返回数据的包装对象,如果是Bare则表明数据无任何包装,原生数据返回;如果是Wrapped则表明数据会在最外层包装一个当前函数名称加上Result的套。比如对于Delete对象,则会返回 DeleteResult:{******},会造成DataContractJsonSerializer无法进行反序列化。
UriTemplate 主要用于指定操作的URI路径,只要用户输入了合法路径并采用了正确的请求方式,就会触发该函数。
最后说到的就是URI后面跟的参数的问题,由于函数只能接受string类型的,所以如果传入参数是string类型,则可以使用UriTemplate = "{bookID}"的路径,反之,则需要加上/?param1={paramname}的方式,比如我代码中使用的是:UriTemplate = "/?bookID={bookID}"。
当一切都弄好以后,让我们运行一下,访问如下路径,就可以得到结果:
http://localhost:45345/BookService/
得到的结果如下:
[{"BookID":1,"BookName":"大话设计模式","BookPrice":45.2,"BookPublish":"中国邮电出版社"},{"BookID":2,"BookName":"测试用例","BookPrice":21,"BookPublish":"清华大学出版社"},{"BookID":3,"BookName":"Rework","BookPrice":15.4,"BookPublish":"Wrox pulishment"}]
如果访问http://localhost:45345/BookService/?bookID=1,则会得到如下的结果:
{"BookID":1,"BookName":"大话设计模式","BookPrice":45.2,"BookPublish":"中国邮电出版社"}
客户端开发一瞥
初步测试成功后,让我们来进行一下全面的测试。
首先,在项目中,我们新建一个Asp.net WebForm Application,用于做测试工作。
然后,在Default.aspx.cs中,针对GET操作,我们添加如下代码:
1: private void GetBookByID(string id)
2: {
3: WebClient proxy = new WebClient();
4: string serviceURL = string.Empty;
5: DataContractJsonSerializer obj ;
6: if (string.IsNullOrEmpty(id))
7: {
8: serviceURL = string.Format("http://localhost:45345/BookService/");
9: obj = new DataContractJsonSerializer(typeof(List<BookEntity>));
10: }
11: else
12: {
13: serviceURL = string.Format("http://localhost:45345/BookService/?bookID=" + id);
14: obj = new DataContractJsonSerializer(typeof(BookEntity));
15: }
16: byte[] data = proxy.DownloadData(serviceURL);
17: Stream stream = new MemoryStream(data);
18: var result = obj.ReadObject(stream);
19: List<BookEntity> list=new List<BookEntity>();
20: if (result is BookEntity)
21: list.Add(result as BookEntity);
22: else if (result is List<BookEntity>)
23: list = result as List<BookEntity>;
24: GridView1.DataSource = list;
25: GridView1.DataBind();
26: }
在以上代码中,DataContractJsonSerializer 是WCF提供的一个序列化类,用于将对象序列化或者反序列化。
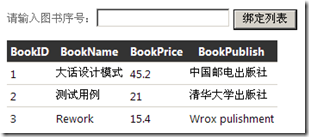
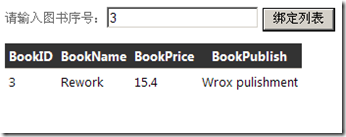
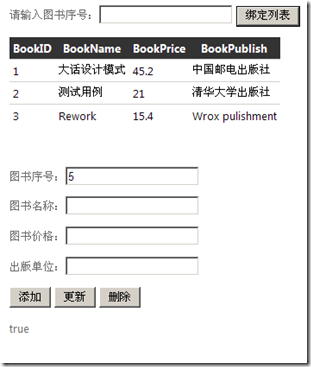
写好之后,我们点击界面按钮,出现了以下的结果:
针对PUT操作,也就是添加操作,我们添加如下代码:
1: BookEntity bookEntity = new BookEntity();
2: bookEntity.BookID = Int32.Parse(txtBookID.Text);
3: bookEntity.BookName = txtBookName.Text;
4: bookEntity.BookPrice = decimal.Parse(txtBookPrice.Text);
5: bookEntity.BookPublish = txtBookPublish.Text;
6:
7: DataContractJsonSerializer obj = new DataContractJsonSerializer(typeof(BookEntity));
8: MemoryStream ms = new MemoryStream();
9: obj.WriteObject(ms, bookEntity);
10: byte[] byteSend = ms.ToArray();
11: ms.Close();
12:
13: string serviceURL = string.Format("http://localhost:45345/BookService");
14:
15: WebClient test = new WebClient();
16: test.Headers.Add("Content-Type", "application/json");
17: test.Headers.Add("ContentLength", byteSend.Length.ToString());
18:
19:
20: byte[] responseData = test.UploadData(serviceURL, "PUT", byteSend);
21:
22: string result = Encoding.GetEncoding("UTF-8").GetString(responseData);
23: lblLog.Text = result;
在做这步的时候,需要注意,test.Headers.Add("Content-Type", "application/json") 和test.Headers.Add("ContentLength", byteSend.Length.ToString())需要添加,否则会造成Http 400 返回的错误。并且,向服务端传递实体的时候,可以通过使用UploadData的方式来进行,如果数据量过大,可以考虑使用异步方式传送。
接下来的POST和DELETE方法和上面类似,我都贴一下:
POST方法:
1: BookEntity bookEntity = new BookEntity();
2: bookEntity.BookID = Int32.Parse(txtBookID.Text);
3: bookEntity.BookName = txtBookName.Text;
4: bookEntity.BookPrice = decimal.Parse(txtBookPrice.Text);
5: bookEntity.BookPublish = txtBookPublish.Text;
6:
7: DataContractJsonSerializer obj = new DataContractJsonSerializer(typeof(BookEntity));
8: MemoryStream ms = new MemoryStream();
9: obj.WriteObject(ms, bookEntity);
10: byte[] byteSend = ms.ToArray();
11: ms.Close();
12:
13: string serviceURL = string.Format("http://localhost:45345/BookService");
14:
15: WebClient test = new WebClient();
16: test.Headers.Add("Content-Type", "application/json");
17: test.Headers.Add("ContentLength", byteSend.Length.ToString());
18:
19: byte[] responseData = test.UploadData(serviceURL, "POST", byteSend);
20:
21: string result = Encoding.GetEncoding("UTF-8").GetString(responseData);
22: lblLog.Text = result;
DELETE方法:
1: BookEntity bookEntity = new BookEntity();
2: bookEntity.BookID = Int32.Parse(txtBookID.Text);
3:
4: DataContractJsonSerializer obj = new DataContractJsonSerializer(typeof(BookEntity));
5: MemoryStream ms = new MemoryStream();
6: obj.WriteObject(ms, bookEntity);
7: byte[] byteSend = ms.ToArray();
8: ms.Close();
9:
10: string serviceURL = string.Format("http://localhost:45345/BookService");
11:
12: WebClient test = new WebClient();
13: test.Headers.Add("Content-Type", "application/json");
14: test.Headers.Add("ContentLength", byteSend.Length.ToString());
15:
16:
17: byte[] responseData = test.UploadData(serviceURL, "DELETE", byteSend);
18:
19: string result = Encoding.GetEncoding("UTF-8").GetString(responseData);
20: lblLog.Text = result;
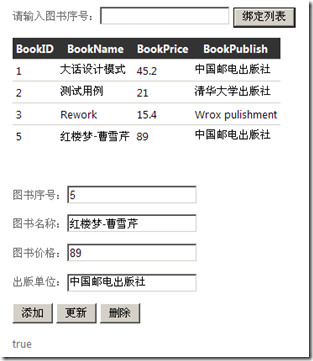
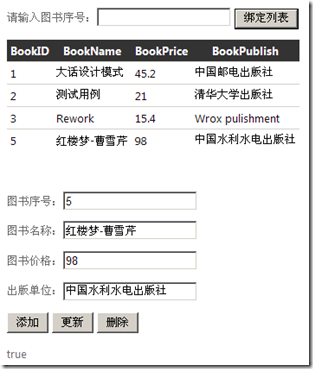
最后得到的效果图如下:
(新增记录)
(更新记录)
(删除记录)
成文仓促,难免有误,还请指出,在此谢过。
源代码下载
Edit:基于本方法构建的Android服务已经在使用中。后续继续跟进各种使用信息。
在StackOverFlow问答如下:点击这里查看
看评论中提到了IContract问题,由于这是Restful Service,不是基于RPC模式,所以没必要使用的。不过用上去也没错。
C#编程总结(十三)数据压缩
Posted on 2014-02-25 14:31 停留的风 阅读(931) 评论(1) 编辑 收藏C#编程总结(十三)数据压缩
在进行文件存储或者数据传输时,为了节省空间流量,需要对数据或文件进行压缩。在这里我们讲述通过C#实现数据压缩。
一、GZipStream压缩
微软提供用于压缩和解压缩流的方法。
此类表示 GZip 数据格式,它使用无损压缩和解压缩文件的行业标准算法。 这种格式包括一个检测数据损坏的循环冗余校验值。 GZip 数据格式使用的算法与 DeflateStream 类的算法相同,但它可以扩展以使用其他压缩格式。 这种格式可以通过不涉及专利使用权的方式轻松实现。
可以使用许多常见的压缩工具对写入到扩展名为 .gz 的文件的压缩 GZipStream 对象进行解压缩;但是,此类原本并不提供用于向 .zip 存档中添加文件或从 .zip 存档中提取文件的功能。
DeflateStream 和 GZipStream 中的压缩功能作为流公开。 由于数据是以逐字节的方式读取的,因此无法通过进行多次传递来确定压缩整个文件或大型数据块的最佳方法。 对于未压缩的数据源,最好使用 DeflateStream 和 GZipStream 类。 如果源数据已压缩,则使用这些类时实际上可能会增加流的大小。
具体实现源码
1、压缩字节数组
        /// <summary>
        /// 压缩字节数组
        /// </summary>
        /// <param name="str"></param>
        public static byte[] Compress(byte[] inputBytes)
        {
            using (MemoryStream outStream = new MemoryStream())
            {
                using (GZipStream zipStream = new GZipStream(outStream, CompressionMode.Compress, true))
                {
                    zipStream.Write(inputBytes, 0, inputBytes.Length);
                    zipStream.Close(); //很重要,必须关闭,否则无法正确解压
                    return outStream.ToArray();
                }
            }
        }

        /// <summary>
        /// 解压缩字节数组
        /// </summary>
        /// <param name="str"></param>
        public static byte[] Decompress(byte[] inputBytes)
        {

            using (MemoryStream inputStream = new MemoryStream(inputBytes))
            {
                using (MemoryStream outStream = new MemoryStream())
                {
                    using (GZipStream zipStream = new GZipStream(inputStream, CompressionMode.Decompress))
                    {
                        zipStream.CopyTo(outStream);
                        zipStream.Close();
                        return outStream.ToArray();
                    }
                }

            }
        }
2、压缩字符串
在压缩字节的基础扩展而来,注意字符转换,保证不出现乱码。具体原理,这里不再介绍,可见:
C#编程总结(十)字符转码 http://www.cnblogs.com/yank/p/3536863.html
        /// <summary>
        /// 压缩字符串
        /// </summary>
        /// <param name="input"></param>
        /// <returns></returns>
        public static string Compress(string input)
        {
            byte[] inputBytes = Encoding.Default.GetBytes(input);
            byte[] result = Compress(inputBytes);
            return Convert.ToBase64String(result);
        }
        /// <summary>
        /// 解压缩字符串
        /// </summary>
        /// <param name="input"></param>
        /// <returns></returns>
        public static string Decompress(string input)
        {
            byte[] inputBytes = Convert.FromBase64String(input);
            byte[] depressBytes = Decompress(inputBytes);
            return Encoding.Default.GetString(depressBytes);
        }
3、压缩文件
如果你试图自己做一个压缩工具,相比这个方法很管用
        /// <summary>
        /// 压缩目录
        /// </summary>
        /// <param name="dir"></param>
        public static void Compress(DirectoryInfo dir)
        {
            foreach (FileInfo fileToCompress in dir.GetFiles())
            {
                Compress(fileToCompress);
            }
        }
        /// <summary>
        /// 解压缩目录
        /// </summary>
        /// <param name="dir"></param>
        public static void Decompress(DirectoryInfo dir)
        {
            foreach (FileInfo fileToCompress in dir.GetFiles())
            {
                Decompress(fileToCompress);
            }
        }
        /// <summary>
        /// 压缩文件
        /// </summary>
        /// <param name="fileToCompress"></param>
        public static void Compress(FileInfo fileToCompress)
        {
            using (FileStream originalFileStream = fileToCompress.OpenRead())
            {
                if ((File.GetAttributes(fileToCompress.FullName) & FileAttributes.Hidden) != FileAttributes.Hidden & fileToCompress.Extension != ".gz")
                {
                    using (FileStream compressedFileStream = File.Create(fileToCompress.FullName + ".gz"))
                    {
                        using (GZipStream compressionStream = new GZipStream(compressedFileStream, CompressionMode.Compress))
                        {
                            originalFileStream.CopyTo(compressionStream);
                        }
                    }
                }
            }
        }
        /// <summary>
        /// 解压缩文件
        /// </summary>
        /// <param name="fileToDecompress"></param>
        public static void Decompress(FileInfo fileToDecompress)
        {
            using (FileStream originalFileStream = fileToDecompress.OpenRead())
            {
                string currentFileName = fileToDecompress.FullName;
                string newFileName = currentFileName.Remove(currentFileName.Length - fileToDecompress.Extension.Length);

                using (FileStream decompressedFileStream = File.Create(newFileName))
                {
                    using (GZipStream decompressionStream = new GZipStream(originalFileStream, CompressionMode.Decompress))
                    {
                        decompressionStream.CopyTo(decompressedFileStream);
                    }
                }
            }
        }
二、开源组件ICSharpCode.SharpZipLib进行压缩
ICSharpCode.SharpZipLib,开源组件,支持Zip,GZip,BZip2,Tar等
其压缩效率及压缩比比微软自带的要好。并提供了源码,开源对其算法进行研究、改进。具体可见:
http://www.icsharpcode.net/OpenSource/SharpZipLib/
这里提供简单的一种实现以供参考,其他算法比较类似,不再赘述。
1、使用BZip2压缩字符串
        /// <summary>
        /// 压缩
        /// </summary>
        /// <param name="input"></param>
        /// <returns></returns>
        public static string Compress(string input)
        {
            string result = string.Empty;
            byte[] buffer = Encoding.UTF8.GetBytes(input);
            using (MemoryStream outputStream = new MemoryStream())
            {
                using (BZip2OutputStream zipStream = new BZip2OutputStream(outputStream))
                {
                    zipStream.Write(buffer, 0, buffer.Length);
                    zipStream.Close();
                }
                return Convert.ToBase64String(outputStream.ToArray());
            }
        }
        /// <summary>
        /// 解压缩
        /// </summary>
        /// <param name="input"></param>
        /// <returns></returns>
        public static string Decompress(string input)
        {
            string result = string.Empty;
            byte[] buffer = Convert.FromBase64String(input);
            using (Stream inputStream = new MemoryStream(buffer))
            {
                BZip2InputStream zipStream = new BZip2InputStream(inputStream);

                using (StreamReader reader = new StreamReader(zipStream, Encoding.UTF8))
                {
                    //输出
                    result = reader.ReadToEnd();
                }
            }

            return result;
        }
三、Demo下载地址
http://files.cnblogs.com/yank/CompressSample.zip
四、后续
如有其他更好的压缩方法,请指出。后续会更新至此。
