.NetCore(.NET6)中使用swagger和swagger版本控制
一、.NET6中使用swagger
swagger支持 API 自动生成同步的在线文档,下面在.NET6中引入
1.建.NET6应用并建以下控制器

/// <summary>
    /// 订单接口
    /// </summary>
    [ApiController]
    [Route("[controller]/[action]")]
    public class OrderController : Controller
    {
        /// <summary>
        /// 获取订单
        /// </summary>
        /// <returns></returns>
        [HttpGet]
        public string GetOrder()
        {
            return "ok";
        }
        /// <summary>
        /// 创建订单
        /// </summary>
        /// <param name="request">订单信息</param>
        /// <returns></returns>
        [HttpPost]
        public string CreateOrder([FromBody] OrderRequest request)
        {
            return "ok";
        }
        /// <summary>
        /// 删除订单
        /// </summary>
        /// <returns></returns>
        [HttpDelete]
        public string DeleteOrder()
        {
            return "ok";
        }
        /// <summary>
        /// 更新订单
        /// </summary>
        /// <returns></returns>
        [HttpPut]
        public string UpdateOrder()
        {
            return "ok";
        }

    }
  /// <summary>
    /// 订单请求
    /// </summary>
    public class OrderRequest
    {
        /// <summary>
        /// 订单名称
        /// </summary>
        public string orderName { get; set; }
        /// <summary>
        /// 订单编号
        /// </summary>
        public string orderNo { get; set; }
        /// <summary>
        /// 价格
        /// </summary>
        public decimal price { get; set; }
    }
2.Nuget包安装swagger需要dll
Swashbuckle.AspNetCore
3.Program.cs中加入swagger
using Microsoft.OpenApi.Models;
using System.Reflection;
var builder = WebApplication.CreateBuilder(args);

// Add services to the container.
builder.Services.AddControllersWithViews();
builder.Services.AddSwaggerGen(options =>
{
    options.SwaggerDoc("v1", new OpenApiInfo
    {
        Version = "v1",
        Title = "API标题",
        Description = "API描述"
    });
});

var app = builder.Build();

if (app.Environment.IsDevelopment())
{
    app.UseSwagger();
    app.UseSwaggerUI();
}

app.UseHttpsRedirection();
app.UseStaticFiles();

app.UseRouting();

app.UseAuthorization();

app.MapControllerRoute(
    name: "default",
    pattern: "{controller=Home}/{action=Index}/{id?}");

app.Run();
这时候访问 http://localhost:xxx/swagger/index.html 已经能访问和显示接口了,但是少了注释

4.生成xml文件,接口文档生成注释需要程序集的xml文件
打开项目的.csproj文件加上标识让程序生成这个程序集的文档
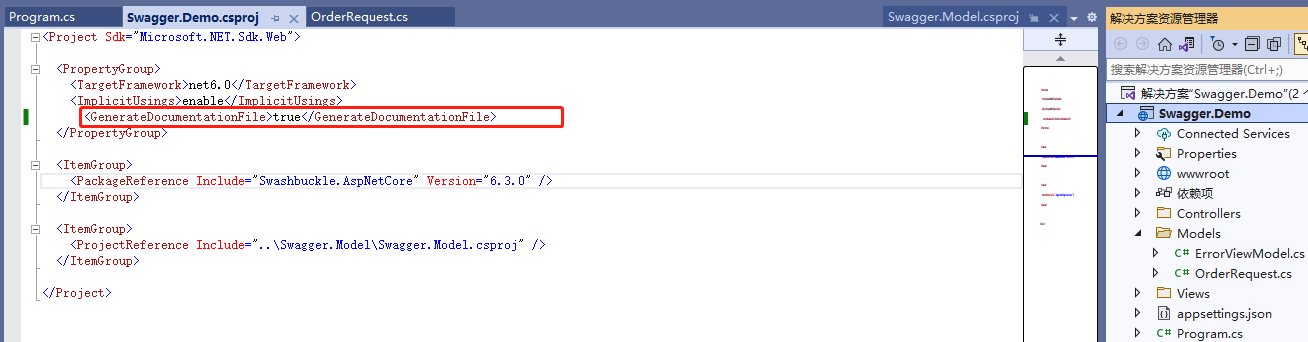
<GenerateDocumentationFile>true</GenerateDocumentationFile>
5.在Program.cs处加上加载这个xml文件
完整的 Program.cs文件
using Microsoft.OpenApi.Models;
using System.Reflection;
var builder = WebApplication.CreateBuilder(args);

// Add services to the container.
builder.Services.AddControllersWithViews();
builder.Services.AddSwaggerGen(options =>
{
    options.SwaggerDoc("v1", new OpenApiInfo
    {
        Version = "v1",
        Title = "API标题",
        Description = "API描述"
    });
    var xmlFilename = $"{Assembly.GetExecutingAssembly().GetName().Name}.xml";
    options.IncludeXmlComments(Path.Combine(AppContext.BaseDirectory, xmlFilename));
});

var app = builder.Build();

if (app.Environment.IsDevelopment())
{
    app.UseSwagger();
    app.UseSwaggerUI();
}

app.UseHttpsRedirection();
app.UseStaticFiles();

app.UseRouting();

app.UseAuthorization();

app.MapControllerRoute(
    name: "default",
    pattern: "{controller=Home}/{action=Index}/{id?}");

app.Run();
这时再运行就能看到注释了
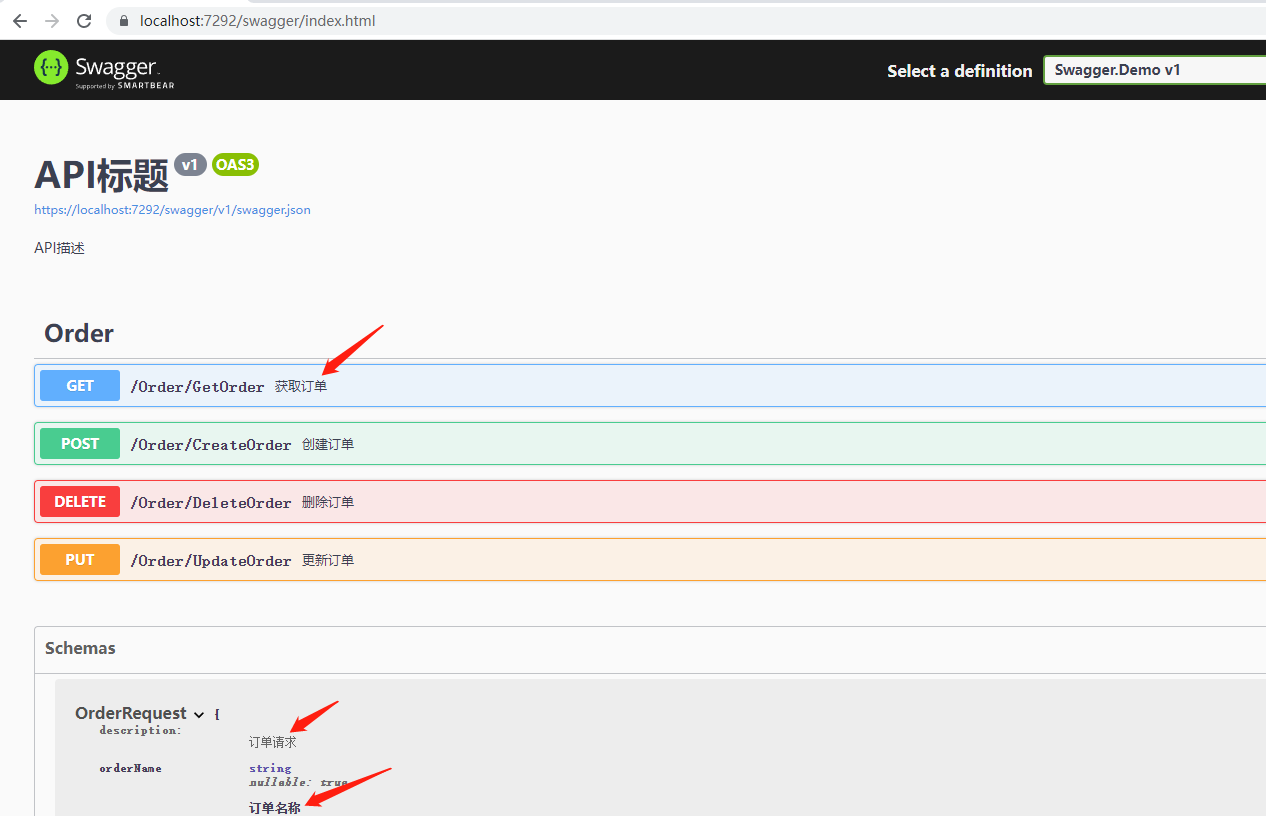
注意:如果参数的Model在其它类库,那么所引用的类库的.csproj文件也要加上上面的标识,并在Program.cs引入程序集的xml文件才能展示参数的注释。
二、.NET6中使用swagger版本控制
1.增加文件 ApiVerionInfo.cs记录版本号
  /// <summary>
    /// api版本号
    /// </summary>
    public class ApiVersionInfo
    {
        public static string V1;
        public static string V2;
        public static string V3;
        public static string V4;
        public static string V5;
    }
2.在api控制器上增加版本
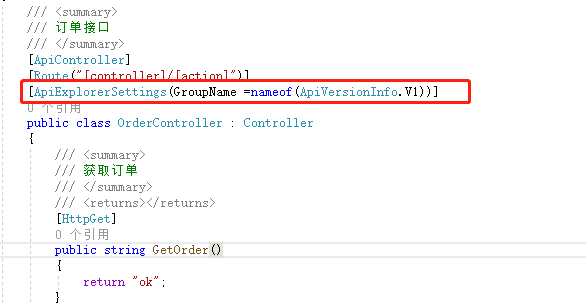
[ApiExplorerSettings(GroupName =nameof(ApiVersionInfo.V1))]
3.再建一个控制器,写v2版本的接口
/// <summary>
    ///  订单接口
    /// </summary>
    [ApiController]
    [Route("[controller]/[action]")]
    [ApiExplorerSettings(GroupName = nameof(ApiVersionInfo.V2))]
    public class OrderV2Controller : Controller
    {
        /// <summary>
        /// 获取订单
        /// </summary>
        /// <returns></returns>
        [HttpGet]
        public string GetOrder()
        {
            return "ok";
        }
        /// <summary>
        /// 创建订单
        /// </summary>
        /// <param name="request">订单信息</param>
        /// <returns></returns>
        [HttpPost]
        public string CreateOrder([FromBody] OrderRequest request)
        {
            return "ok";
        }
    }
4.Program.cs中swagger的引入
完整配置:
using Microsoft.OpenApi.Models;
using Swagger.Demo;
using System.Reflection;
var builder = WebApplication.CreateBuilder(args);

// Add services to the container.
builder.Services.AddControllersWithViews();
builder.Services.AddSwaggerGen(options =>
{
    foreach (FieldInfo fileld in typeof(ApiVersionInfo).GetFields())
    {
        options.SwaggerDoc(fileld.Name, new OpenApiInfo
        {
            Version = fileld.Name,
            Title = "API标题",
            Description = $"API描述,{fileld.Name}版本"
        });

    }
    var xmlFilename = $"{Assembly.GetExecutingAssembly().GetName().Name}.xml";
    options.IncludeXmlComments(Path.Combine(AppContext.BaseDirectory, xmlFilename));
});

var app = builder.Build();

if (app.Environment.IsDevelopment())
{
    app.UseSwagger();
    app.UseSwaggerUI(c =>
    {
        foreach (FieldInfo field in typeof(ApiVersionInfo).GetFields())
        {
            c.SwaggerEndpoint($"/swagger/{field.Name}/swagger.json", $"{field.Name}");
        }
    });
}

app.UseHttpsRedirection();
app.UseStaticFiles();

app.UseRouting();

app.UseAuthorization();

app.MapControllerRoute(
    name: "default",
    pattern: "{controller=Home}/{action=Index}/{id?}");

app.Run();
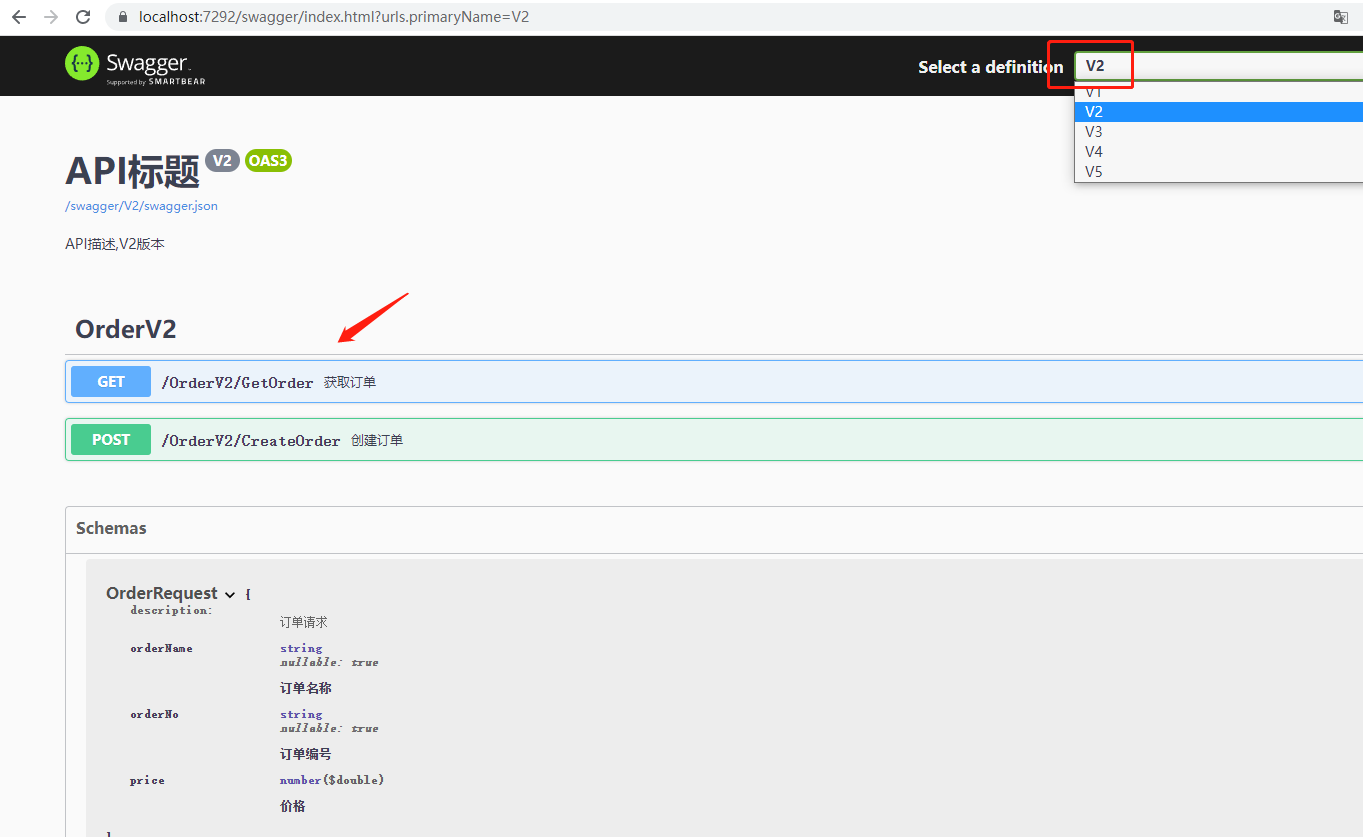
5.配置完成,查看效果
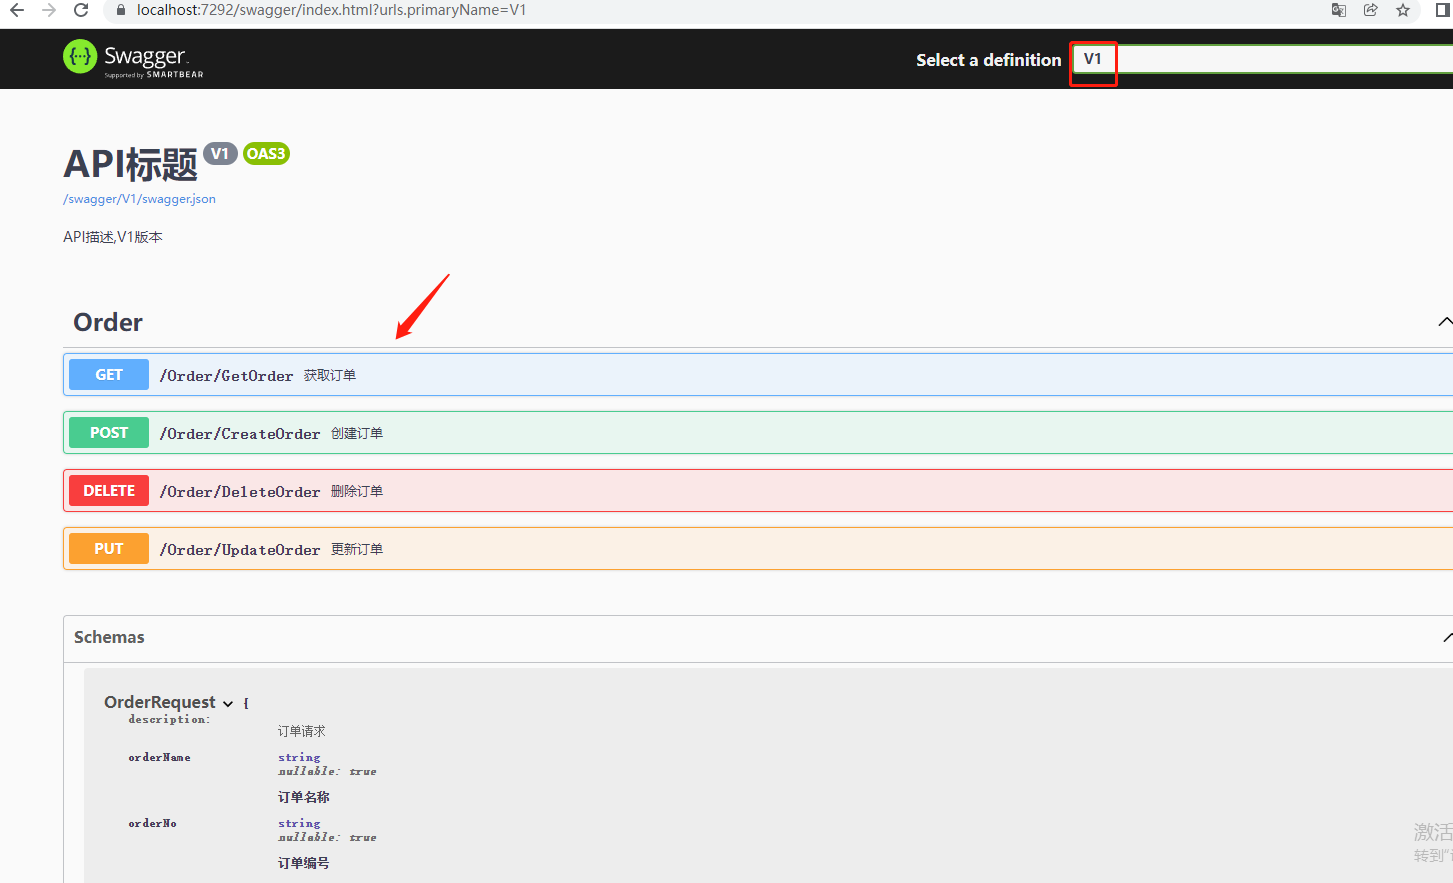
到这里版本控制就完成了!