Spring Boot 的一些坑 https://www.jianshu.com/p/3494c84b4be3
国际化:
1)设置首页:
方法1:在controller添加一个请求
    @RequestMapping({"/","index.html"})
    public String index(){
        return "index.html";
    }
方法2:设置配置文件 :WebMvcConfigurer 的 addViewControllers 中 registry.addViewController("/index.html").setViewName("login"); registry.addViewController("/").setViewName("login");
package com.anitano.config;

import com.anitano.component.MyLocaleResolver;
import org.springframework.context.annotation.Bean;
import org.springframework.context.annotation.Configuration;
import org.springframework.web.servlet.LocaleResolver;
import org.springframework.web.servlet.config.annotation.InterceptorRegistry;
import org.springframework.web.servlet.config.annotation.ViewControllerRegistry;
import org.springframework.web.servlet.config.annotation.WebMvcConfigurer;

/**
 *扩展SpringMVC的功能
 */
@Configuration
public class MyMvcConfig implements WebMvcConfigurer {
    @Override
    public void addViewControllers(ViewControllerRegistry registry) {
        /*视图映射 :当浏览器发送 anita 会来到success*/
        registry.addViewController("/anita").setViewName("success");
    }

    /**
     * 所以的WebMvcConfigurer组件都会起作用
     * @return
     */
    @Bean //记得加到容器里
    public WebMvcConfigurer webMvcConfigurer(){
        WebMvcConfigurer adapter= new WebMvcConfigurer() {
            @Override
            public void addViewControllers(ViewControllerRegistry registry) {
                registry.addViewController("/login.html").setViewName("login");
                registry.addViewController("/index.html").setViewName("login");
                registry.addViewController("/").setViewName("login");
                registry.addViewController("/dashboard.html").setViewName("dashboard");
            }

            /*设置拦截器*/
            @Override
            public void addInterceptors(InterceptorRegistry registry) {

            }
        };
        return adapter;
    }
    /**
     * 修改区域信息解析器
     * @return
     */
    @Bean
    public LocaleResolver localeResolver(){
        return new MyLocaleResolver();
    }
}
2)修改细节:导入命名空间并设置中文页面
<html lang="zh-cn" xmlns:th="http://www.thymeleaf.org">
添加 th:src="@{ asserts/img/bootstrap-solid.svg }" 当项目名称改变时,链接会自动加上 项目名称。
<img class="mb-4" src="asserts/img/bootstrap-solid.svg" th:src="@{asserts/img/bootstrap-solid.svg}" alt="" width="72" height="72">
2)国际化 i18n
1、新建一个文件夹 i18n 和几个配置文件,IDEA会自动识别你要做国际化。 注意要在setting 里边设置 File Encoding 将 配置文件设置 UTF-8编码 和 asii 的方式,

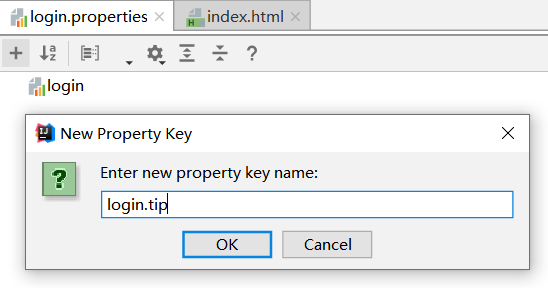
2、打开随便其中一个文件,点击下方的 Resource Bundle ,在上方有一个 + 号,点击 + 添加属性。 添加完成后增加属性内容。

3、指定国际化资源的配置文件位置 : 在项目的配置文件里边添加 :spring.messages.basename=i18n.login
4、在页面获取国际化的值:th:text="#{login.tip}"
<h1 class="h3 mb-3 font-weight-normal" th:text="#{login.tip}">Please sign in</h1>
<!DOCTYPE html>
<html lang="zh-cn" xmlns:th="http://www.thymeleaf.org">
	<head>
		<meta http-equiv="Content-Type" content="text/html; charset=UTF-8">
		<meta name="viewport" content="width=device-width, initial-scale=1, shrink-to-fit=no">
		<meta name="description" content="">
		<meta name="author" content="">
		<title>Signin Template for Bootstrap</title>
		<!-- Bootstrap core CSS -->
		<link href="asserts/css/bootstrap.min.css" th:href="@{/asserts/css/bootstrap.min.css}" rel="stylesheet">
		<!-- Custom styles for this template -->
		<link href="asserts/css/signin.css" th:href="@{/asserts/css/signin.css}" rel="stylesheet">
	</head>

	<body class="text-center">
		<form class="form-signin" action="dashboard.html" th:action="@{/user/login}" method="post">
			<img class="mb-4" src="asserts/img/bootstrap-solid.svg" th:src="@{/asserts/img/bootstrap-solid.svg}"  alt="" width="72" height="72">
			<h1 class="h3 mb-3 font-weight-normal" th:text="#{login.tip}">Please sign in</h1>
			<label class="sr-only" th:text="#{login.username}">Username</label>
			<input type="text" name="username" class="form-control" placeholder="Username" th:placeholder="#{login.username}" required="" autofocus="">
			<label class="sr-only" th:text="#{login.password}">Password</label>
			<input type="password" name="password" class="form-control" placeholder="Password" th:placeholder="#{login.password}" required="">
			<div class="checkbox mb-3">
				<label>
          <input type="checkbox" value="remember-me"> [[#{login.remember}]]
        </label>
			</div>
			<button class="btn btn-lg btn-primary btn-block" type="submit" th:text="#{login.btn}">Sign in</button>
			<p class="mt-5 mb-3 text-muted">© 2017-2018</p>
			<a class="btn btn-sm" th:href="@{index.html(language='zh-CN')}">中文</a>
			<a class="btn btn-sm" th:href="@{index.html(language='en-US')}">English</a>
		</form>

	</body>

</html>
到这里就会根据浏览器的语言显示中英文。 如果到这里有中文乱码,是因为前面说过的 配置文件的编码方式不是 UTF-8
5 ) 修改 SpringMVC 配置文件,将默认的 根据请求头 设置区域信息进行国际化,改为 点击链接 切换国际化。
添加一个类
package com.anitano.component;

import org.springframework.util.StringUtils;
import org.springframework.web.servlet.LocaleResolver;

import javax.servlet.http.HttpServletRequest;
import javax.servlet.http.HttpServletResponse;
import java.util.Locale;

/**
 * 区域信息解析器
 */
    public class MyLocaleResolver implements LocaleResolver {
        @Override
        public Locale resolveLocale(HttpServletRequest httpServletRequest) {
            String language = httpServletRequest.getParameter("language");
            Locale locale=Locale.getDefault();
            if(!StringUtils.isEmpty(language)){
                String[] strings = language.split("_");
                locale=new Locale(strings[0],strings[1]);
            }
            return locale;
        }

    @Override
    public void setLocale(HttpServletRequest httpServletRequest, HttpServletResponse httpServletResponse, Locale locale) {

    }
}
修改自己新增加的SpringMVC的配置文件类:
    /**
     * 修改区域信息解析器
     * @return
     */
    @Bean
    public LocaleResolver localeResolver(){
        return new MyLocaleResolver();
    }
切换中英文的链接
<a class="btn btn-sm" th:href="@{index.html(language='zh-CN')}">中文</a>
<a class="btn btn-sm" th:href="@{index.html(language='en-US')}">English</a>
用户登录
开发期间模板引擎页面修改以后,要实时生效: 首先 禁止模板引擎的缓存, Ctrl+F9 :重新编译
#禁止模板引擎的缓存
spring.thymeleaf.cache=false
当密码错误时:从返回的信息中读取错误信息。 只有存在错误信息才显示出来
<p class="text-danger" th:text="${msg}" th:if="${ not #strings.isEmpty(msg)}"></p>
登录成功后的重定向 :
registry.addViewController("/dashboard.html").setViewName("dashboard")
package com.anitano.config;

import com.anitano.component.MyLocaleResolver;
import org.springframework.context.annotation.Bean;
import org.springframework.context.annotation.Configuration;
import org.springframework.web.servlet.LocaleResolver;
import org.springframework.web.servlet.config.annotation.ViewControllerRegistry;
import org.springframework.web.servlet.config.annotation.WebMvcConfigurer;
/**
 *扩展SpringMVC的功能
 */
@Configuration
public class MyMvcConfig implements WebMvcConfigurer {
    @Override
    public void addViewControllers(ViewControllerRegistry registry) {
        /*视图映射 :当浏览器发送 anita 会来到success*/
        registry.addViewController("/anita").setViewName("success");
        registry.addViewController("/dashboard.html").setViewName("dashboard");
    }

    /**
     * 修改区域信息解析器
     * @return
     */
    @Bean
    public LocaleResolver localeResolver(){
        return new MyLocaleResolver();
    }
}
return "redirect:/dashboard.html";
    @PostMapping(value = "user/login")
    public String login(@RequestParam("username")String username, @RequestParam("password")String password, Map<String,Object> map){
        if(!StringUtils.isEmpty(username) && "123456".equals(password)){
            //return "dashboard";
            return "redirect:/dashboard.html";
        }
        map.put("msg","用户名或密码错误");
        return "index";
    }
设置拦截器:Spring Boot 1.x 版本设置拦截器后静态资源不会被拦截, 2.x 版本静态资源反而会被拦截 ,所以要放行
关于设置拦截器后的静态资源被拦截: https://my.oschina.net/dengfuwei/blog/1795346
1) 新添加一个方法:
package com.anitano.component;

import org.springframework.web.servlet.HandlerInterceptor;
import org.springframework.web.servlet.ModelAndView;

import javax.servlet.http.HttpServletRequest;
import javax.servlet.http.HttpServletResponse;

/**
 * 拦截器组件:登录拦截,没有登录不允许进入后台页面 和 对员工进行增删改查
 */
public class LoginHandlerInterceptor implements HandlerInterceptor {
    @Override
    public boolean preHandle(HttpServletRequest request, HttpServletResponse response, Object handler) throws Exception {
        //方法执行前
        Object user = request.getSession().getAttribute("LoginUser");
        if(user == null){
            //未登录,返回登录页面
            request.setAttribute("msg","没有登录请先登录");
            request.getRequestDispatcher("/login.html").forward(request,response);
            return false;
        }else {
            //已登录,
            return true;
        }
    }

    @Override
    public void postHandle(HttpServletRequest request, HttpServletResponse response, Object handler, ModelAndView modelAndView) throws Exception {

    }

    @Override
    public void afterCompletion(HttpServletRequest request, HttpServletResponse response, Object handler, Exception ex) throws Exception {

    }
}
2) 在配置文件配置: 注意放行 /user/login 前面要加 /
 /*注册拦截器*/
@Override
public void addInterceptors(InterceptorRegistry registry) {
       registry.addInterceptor(new LoginHandlerInterceptor()).addPathPatterns("/**")
        .excludePathPatterns("/","/index.html","/user/login","/login.html","/asserts/**");
       /*拦截 所有请求, 放行 "/","/index.html","user/login" */
}
完整配置文件:
package com.anitano.config;

import com.anitano.component.LoginHandlerInterceptor;
import com.anitano.component.MyLocaleResolver;
import org.springframework.context.annotation.Bean;
import org.springframework.context.annotation.Configuration;
import org.springframework.web.servlet.LocaleResolver;
import org.springframework.web.servlet.config.annotation.InterceptorRegistry;
import org.springframework.web.servlet.config.annotation.ResourceHandlerRegistry;
import org.springframework.web.servlet.config.annotation.ViewControllerRegistry;
import org.springframework.web.servlet.config.annotation.WebMvcConfigurer;

/**
 *扩展SpringMVC的功能
 */
@Configuration
public class MyMvcConfig implements WebMvcConfigurer {
    @Override
    public void addViewControllers(ViewControllerRegistry registry) {
        /*视图映射 :当浏览器发送 anita 会来到success*/
        registry.addViewController("/anita").setViewName("success");
    }

    /**
     * 所以的WebMvcConfigurer组件都会起作用
     * @return
     */
    @Bean //记得加到容器里
    public WebMvcConfigurer webMvcConfigurer(){
        WebMvcConfigurer adapter= new WebMvcConfigurer() {
            @Override
            public void addViewControllers(ViewControllerRegistry registry) {
                registry.addViewController("/login.html").setViewName("login");
                registry.addViewController("/index.html").setViewName("login");
                registry.addViewController("/").setViewName("login");
                registry.addViewController("/main.html").setViewName("dashboard");
            }
            /*注册拦截器*/
            @Override
            public void addInterceptors(InterceptorRegistry registry) {
                registry.addInterceptor(new LoginHandlerInterceptor()).addPathPatterns("/**")
                        .excludePathPatterns("/","/index.html","/user/login","/login.html","/asserts/**");
                /*拦截 所有请求, 放行 "/","/index.html","user/login" */
            }
        };
        return adapter;
    }
    /**
     * 修改区域信息解析器
     * @return
     */
    @Bean
    public LocaleResolver localeResolver(){
        return new MyLocaleResolver();
    }
}
公共页抽取
#在 dashboard.html 抽取公共页
<nav class="navbar navbar-dark sticky-top bg-dark flex-md-nowrap p-0" th:fragment="topbar"></nav>

#在 list.html 页面应用   ---> 这样只会插入 <nav></nav>,不会也把 <div></div> 插进去
<div th:replace="dashboard::topbar">
所谓 模板名::选择器 HTML模板 ::ID选择器 或者 class选择器 ----> # 选择器名 .选择器名
1、抽取公共片段 <div th:fragment="copy"> © 2011 The Good Thymes Virtual Grocery </div>
2、引入公共片段 <div th:insert="~{footer :: copy}"></div>
~{templatename::selector}:模板名::选择器
~{templatename::fragmentname}:模板名::片段名
3、默认效果:
insert的公共片段在div标签中
如果使用th:insert等属性进行引入,可以不用写~{}:
行内写法可以加上:[[~{}]];[(~{})];
三种引入公共片段的th属性:
th:insert:将公共片段整个插入到声明引入的元素中 ----> 例如上面,这个会把 <div> <nav></nav> </div> 导入进去
th:replace:将声明引入的元素替换为公共片段 ------> 这样只会插入 <nav></nav>,不会也把 <div></div> 导入进去
th:include:将被引入的片段的内容包含进这个标签中 ----->只有<div></div> ,里边不会有 <nav></nav>
动态链接高亮:
1)抽取时添加一个 变量 activeUri
th:fragment="navbar(activeUri)"
2)进行判断: 加入这个变量值为 main 则标为 高亮
th:classappend="${activeUri}=='main'?' active ' :''"
3)引入时设置一个变量值
<!--引入侧边栏-->
<div th:replace="commons/bar::navbar(activeUri='main')"></div>
显示员工数据:
时间格式化:${ #dates.format(emp.birth,'yyyy/MM/dd HH:mm') }
    						<table class="table table-striped table-sm">
							<thead>
								<tr>
									<th>#</th>
									<th>lastName</th>
									<th>email</th>
									<th>gender</th>
									<th>department</th>
									<th>birth</th>
								</tr>
							</thead>
							<tbody>
							<tr th:each="emp:${emps}">
								<td th:text="${emp.id}"></td>
								<td th:text="${emp.lastName}"></td>
								<td th:text="${emp.email}"></td>
								<td th:text="${emp.gender}==0?'女':'男' "></td>
								<td th:text="${emp.department.departmentName}"></td>
								<td th:text="${ #dates.format(emp.birth,'yyyy/MM/dd  HH:mm')  }"></td>
							</tr>
							</tbody>
						</table>
自动化装配,修改日期格式 :
#日期格式化类型
spring.mvc.date-format=yyyy-MM-dd HH:mm
路径变量: 链接 http://localhost:8080/emp/1001 想要把 1001 当做一个值获取。 使用@GetMapping("/emp/{id}") ,在参数上 使用 @PathVariable("id") Integer id
    @GetMapping("/emp/{id}")
    public String toEditPage(@PathVariable("id") Integer id,Model model){
        Employee employee = employeeDao.get(id);
        model.addAttribute("employee",employee);
        return "/emp/add";
    }
修改表单的提交方式:在from表单里添加 下面的语句:当employee这个值存在时,将这条标签添加到页面里边,并且提交方式为 put。
<input type="hidden" value="put" th:if="${employee} !=null">
form表单必填: required=""
end