配置TCP远程连接
为什么要配置这个呢,因为用到的docker-maven-plugin插件默认连接到localhost:2375上的docker。然而:1. 我们的Docker不在本地,执行打包命令之前要设置一下环境变量【DOCKER_HOST=tcp://<host>:2375】;2. 默认Docker是关闭tcp远程连接的,所以我们要打开。
方法一:之前我们配置阿里云镜像的时候,新建了一个daemon.json文件,现在还要用到这个。就是配置【"hosts": ["tcp://0.0.0.0:2375","unix:///var/run/docker.sock"]】
vim /etc/docker/daemon.json

# 添加如下内容,具体地址自己申请咯
{
  "registry-mirrors": ["https://****.mirror.aliyuncs.com"],
  "hosts": ["tcp://0.0.0.0:2375","unix:///var/run/docker.sock"]
}

# 重启服务
systemctl daemon-reload
systemctl restart docker
然后开启防火墙端口 2375
[root@localhost admin]# firewall-cmd --zone=public --add-port=2375/tcp --permanent
success
[root@localhost admin]# systemctl restart firewalld
测试一下是否访问的通,可以在浏览器里访问,也可以在虚拟机里curl

如果是虚拟机
[root@localhost admin]# curl localhost:2375
{"message":"page not found"}
方法二:
[root@localhost admin]# vim /lib/systemd/system/docker.service

[Unit]
Description=Docker Application Container Engine
Documentation=http://docs.docker.com
After=network.target rhel-push-plugin.socket registries.service
Wants=docker-storage-setup.service
Requires=docker-cleanup.timer

[Service]
Type=notify
NotifyAccess=all
EnvironmentFile=-/run/containers/registries.conf
EnvironmentFile=-/etc/sysconfig/docker
EnvironmentFile=-/etc/sysconfig/docker-storage
EnvironmentFile=-/etc/sysconfig/docker-network
Environment=GOTRACEBACK=crash
Environment=DOCKER_HTTP_HOST_COMPAT=1
Environment=PATH=/usr/libexec/docker:/usr/bin:/usr/sbin
ExecStart=/usr/bin/dockerd-current
          --add-runtime docker-runc=/usr/libexec/docker/docker-runc-current
          --default-runtime=docker-runc
          --exec-opt native.cgroupdriver=systemd
          --userland-proxy-path=/usr/libexec/docker/docker-proxy-current
          --init-path=/usr/libexec/docker/docker-init-current
          --seccomp-profile=/etc/docker/seccomp.json
          $OPTIONS
          $DOCKER_STORAGE_OPTIONS
          $DOCKER_NETWORK_OPTIONS
          $ADD_REGISTRY
          $BLOCK_REGISTRY
          $INSECURE_REGISTRY
          $REGISTRIES
ExecReload=/bin/kill -s HUP $MAINPID
LimitNOFILE=1048576
LimitNPROC=1048576
LimitCORE=infinity
TimeoutStartSec=0
Restart=on-abnormal
KillMode=process

[Install]
WantedBy=multi-user.target
将其中的ExecStart的最后新增下面红色所示
ExecStart=/usr/bin/dockerd-current
          --add-runtime docker-runc=/usr/libexec/docker/docker-runc-current
          --default-runtime=docker-runc
          --exec-opt native.cgroupdriver=systemd
          --userland-proxy-path=/usr/libexec/docker/docker-proxy-current
          --init-path=/usr/libexec/docker/docker-init-current
          --seccomp-profile=/etc/docker/seccomp.json
          $OPTIONS
          $DOCKER_STORAGE_OPTIONS
          $DOCKER_NETWORK_OPTIONS
          $ADD_REGISTRY
          $BLOCK_REGISTRY
          $INSECURE_REGISTRY
          $REGISTRIES
          -H unix:///var/run/docker.sock
          -H tcp://0.0.0.0:2375
然后重启服务,照样能满足需要
# 重启服务
systemctl daemon-reload
systemctl restart docker
配置私有仓库
先去配置一下文件
[root@localhost admin]# vim /etc/docker/daemon.json
# 在最后加上仓库配置
{
  "registry-mirrors": ["https://****.mirror.aliyuncs.com","http://hub-mirror.c.163.com"],
  "hosts": ["tcp://0.0.0.0:2375","unix:///var/run/docker.sock"],
  "insecure-registries":["192.168.192.128:443"]
}
记得重启服务
然后下载registry镜像,启动,我是把registry的5000容器端口映射到宿主443端口了,你们随意
[root@localhost admin]# docker pull registry
Using default tag: latest
Trying to pull repository docker.io/library/registry ...
latest: Pulling from docker.io/library/registry
c87736221ed0: Pull complete
1cc8e0bb44df: Pull complete
54d33bcb37f5: Pull complete
e8afc091c171: Pull complete
b4541f6d3db6: Pull complete
Digest: sha256:8004747f1e8cd820a148fb7499d71a76d45ff66bac6a29129bfdbfdc0154d146
Status: Downloaded newer image for docker.io/registry:latest
[root@localhost admin]# docker run -d -p 443:5000 registry
b56713ddca3f4b5903cc456002624a6cd6a6b3b79b8a542b873c461ed31b1b3b
记得把防火墙端口打开,参照上面
关于【docker 镜像删除后会把所有的数据和文件都删除,所以要把宿主机的本地目录挂载到registry容器内部的目录上,在删除registry容器后依旧能保证文件和数据不丢失】
无非先在宿主机上新建个目录,然后启动registry的时候,用-v参数做个映射。类似于下面:
进入registry容器内部,看它目录在哪
[root@localhost admin]# docker ps
CONTAINER ID        IMAGE               COMMAND                  CREATED             STATUS              PORTS                   NAMES
b56713ddca3f        registry            "/entrypoint.sh /e..."   36 minutes ago      Up 21 minutes       0.0.0.0:443->5000/tcp   confident_
[root@localhost admin]# docker exec -it b56713ddca3f sh
/ # find / -name registry
/bin/registry
/etc/docker/registry
find: /proc/scsi: Permission denied
find: /sys/firmware: Permission denied
/var/lib/registry
/var/lib/registry/docker/registry
可以看到,挂载在 var/lib/registry 目录下,所以:
# 停止容器
[root@localhost admin]# docker stop b56713ddca3f
b56713ddca3f
# 删除容器
[root@localhost admin]# docker rm b56713ddca3f
b56713ddca3f

# 新建宿主机目录
mkdir /usr/docker_registry_data
# 启动容器
docker run -d -p 443:5000 -v /usr/docker_registry_data:/var/lib/registry registry
新建工程
在pom文件里配置
    <build>
        <plugins>
            <plugin>
                <groupId>org.springframework.boot</groupId>
                <artifactId>spring-boot-maven-plugin</artifactId>
            </plugin>
            <plugin>
                <groupId>com.spotify</groupId>
                <artifactId>docker-maven-plugin</artifactId>
                <version>1.2.0</version>
                <configuration>
                    <!--Docker要求推送的映像名称以仓库的主机名和端口为前缀。例如,要推送my-image到registry.example.com,镜像需要标记为registry.example.com/my-image-->
                    <imageName>192.168.192.128:443/hello</imageName>
                    <!--基础镜像-->
                    <baseImage>java</baseImage>
                    <entryPoint>["java", "-jar", "/${project.build.finalName}.jar"]</entryPoint>
                    <!-- copy the service's jar file from target into the root directory of the image -->
                    <resources>
                        <resource>
                            <targetPath>/</targetPath>
                            <directory>${project.build.directory}</directory>
                            <include>${project.build.finalName}.jar</include>
                        </resource>
                    </resources>
                    <forceTags>true</forceTags>
                    <imageTags>
                        <imageTag>latest</imageTag>
                    </imageTags>
                </configuration>
            </plugin>
        </plugins>
    </build>
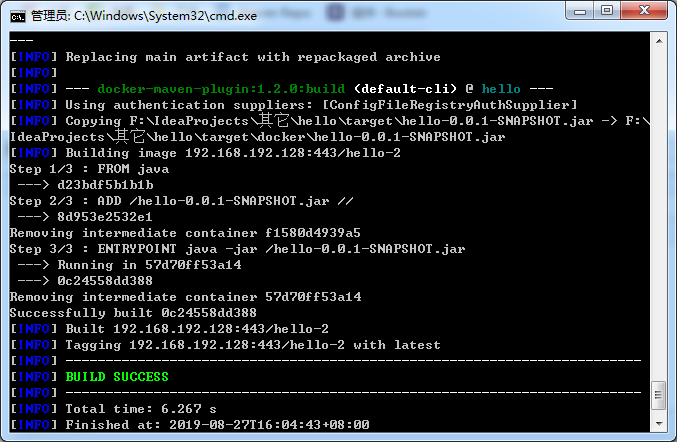
然后build,先配置docker地址,然后执行build命令
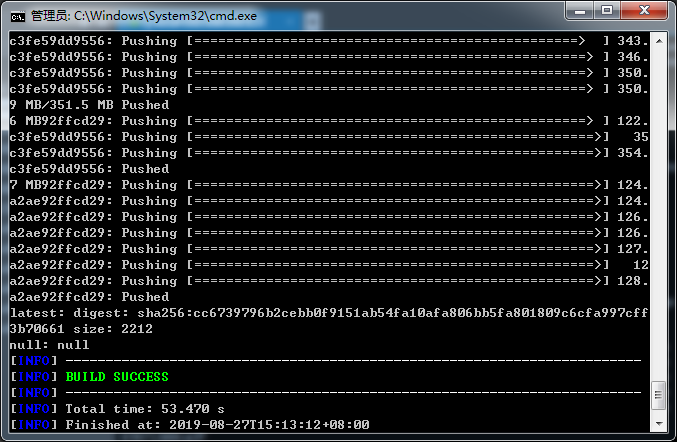
SET DOCKER_HOST=tcp://192.168.192.128:2375
mvn clean package -Dmaven.test.skip=true docker:build -DpushImageTag
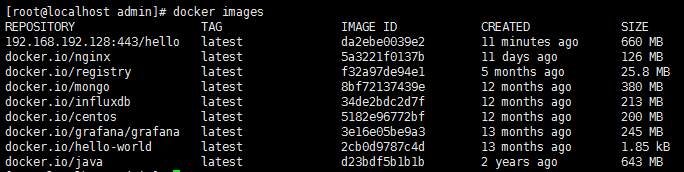
回到服务器,查看镜像
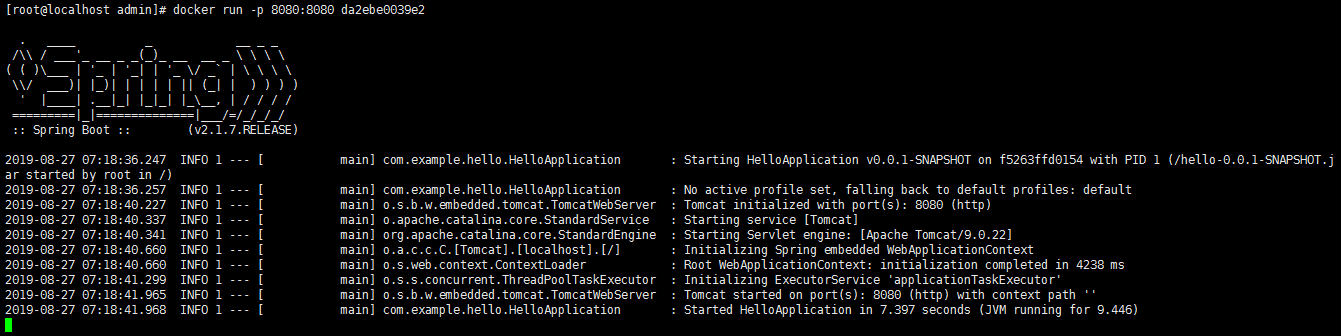
启动镜像
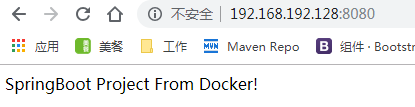
浏览器访问
以上第一次推送,会有一大堆东西输出,然而之后的推送就不会了,如下:
镜像:

你也可以进入容器内部,看看日志什么的。。。虽然我这个没有日志
[root@localhost admin]# docker ps -a
CONTAINER ID        IMAGE               COMMAND                  CREATED             STATUS                       PORTS                   NAMES
d71e487f00a6        0c24558dd388        "java -jar /hello-..."   12 minutes ago      Exited (130) 4 minutes ago                           nervous_noether

[root@localhost admin]# docker start d71e487f00a6
d71e487f00a6
[root@localhost admin]# docker exec -it d71e487f00a6 bash
root@d71e487f00a6:/# ls
bin  boot  dev    etc  hello-0.0.1-SNAPSHOT.jar  home  lib  lib64  media    mnt  opt  proc    root  run  sbin  srv  sys  tmp    usr  var
root@d71e487f00a6:/#