MIPS汇编学习
mips汇编不同于x86汇编,属于精简指令集,常见于路由器等一些嵌入式设备中。
mips汇编没有对堆栈的直接操作,也就是没有push和pop指令,mips汇编中保留了32个通用寄存器,但是不同于x86汇编,mips汇编中没有ebp/rbp寄存器。
mips每条指令都用固定的长度,每条指令都是四个字节,所以内存数据的访问必须以32位严格对齐,这一点也不同于x86汇编。
通过一个demo,用mips-linux-gnu-gcc编译,通过IDA远程调试,来理解mips汇编中的一些概念。
#include<stdio.h>

int sum(int a,int b){
    return a+b;
}

int main()
{
    int a=1,b=2,c;
    c=sum(a,b);
    printf("%d
",c);

    return 0;
}
32个通用寄存器的功能和使用约定定义如下:
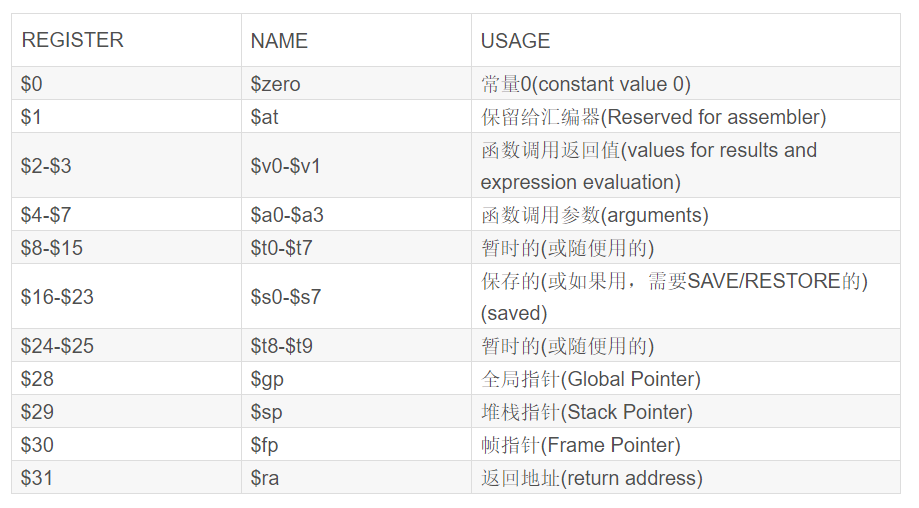
mips汇编中重要的寄存器:
1.堆栈指针$sp,也就是$29指向堆栈的栈顶,类似于x86中的ebp和rbp指针;
2.$0寄存器的值始终为常数0;
3.PC寄存器保留程序执行的下一条指令,相当于x86架构中的eip寄存器;
4.参数传递的时候,$a0-$a3寄存器保存函数的前四个参数,其他的参数保存在栈中;
5.$ra寄存器,保存着函数的返回地址,这一点也不同于x86汇编中将返回地址保存在栈中。在函数A执行到调用函数B的指令时,函数调用指令复制当前的$PC寄存器的值到$RA寄存器,然后跳转到B函数去执行,即当前$RA寄存器的值就是函数执行结束时的返回地址。
 如上图所示,调用sum函数之前,$ra寄存器的值是0x7f62eca8。

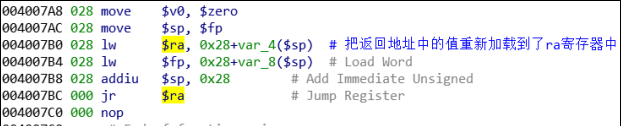
进入分支延迟槽之后,$ra寄存器的值被赋值为$pc寄存器的下一条指令地址。在结束sun函数调用之后,通过:jr $ra指令跳转回main函数继续执行。
5.mips架构下,对静态数据段的访问,通过$gp寄存器配合基址寻址来实现;
7.$30寄存器表示帧指针,指向正在被调用的栈桢,mips和x86由于堆栈结构的区别,调用栈时会出现一些不同。mips硬件并不直接支持堆栈,x86有单独的push和pop指令,但是mips没有栈操作指令,所有对栈的操作都是统一的内存访问方式。
x86中,栈桢入口点开辟栈桢的操作:
push ebp
mov ebp,esp
sub esp,0x30
x86中,栈桢出口点退栈的操作:
leave    #  push ebp
         #  mov ebp,esp
ret      #  pop eip
由以上函数入口点和出口点的操作我们可以清晰地看出,x86架构中,同一个函数中,esp始终指向函数调用栈的栈顶,ebp始终指向函数调用栈的栈基。
但是在mips架构下,没有指向栈基的寄存器,这时候如何确定函数调用的栈桢呢?
$fp(帧指针)和 $sp(栈指针) 来确定函数的调用栈。$sp寄存器作为堆栈寄存器,始终指向栈顶。进入一个函数是,需要将当前栈指针向下移动n比特,这个大小为n比特的存储空间就是此函数的Stack Frame的存储区域,此后栈指针便不再移动,只通过函数返回是将栈指针加上偏移量恢复栈现场。由于不能随便移动栈指针,所以寄存器压栈和出栈时都要指定偏移量。

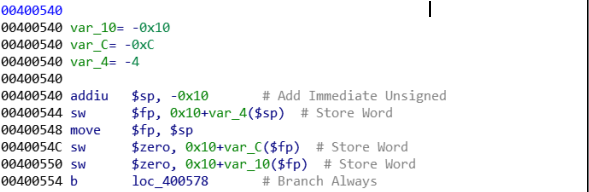
可以看到,mips架构中,在函数入口处以addiu $sp,-0x30来开辟栈桢,当程序运行到0x400770地址处时,$fp寄存器的值被保留到了栈上,$fp寄存器的值为0。

继续单步执行,看到将$sp寄存器的值赋值给了$fp寄存器,这时候堆栈寄存器和帧指针同时指向当前调用栈的栈顶。

继续单步执行,0x40079c地址处,我们在sum函数的入口处下一个断点,由于mips架构的分支延迟机制,nop指令就是一个分支延迟槽。执行完nop指令之后,接下来我们会步进到sum函数中,进入sum函数之后,我们再来观察$sp寄存器和$fp寄存器的变化情况。

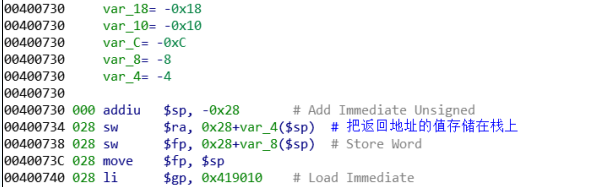
可以看到,addiu指令再次开辟了8字节大小的栈桢。

单步执行到0x40073c地址处,$fp寄存器的值在赋值前被保留在栈上,$fp寄存器被再次赋值,指向当前调用栈的栈顶。

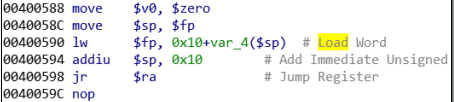
结束函数调用之后,$fp和$sp还原为指向main函数调用栈的栈顶。可以看到,$fp寄存器主要用来进行基址寻址。所有针对栈区变量的取址,都通过基址寻址来对内存进行访问。
mips汇编函数调用过程中与x86架构的区别:
- mips架构和x86架构中,栈的增长方向相同,都是从高地址向低地址增长,但是没有栈底指针,所以调用一个函数是,需要将当前栈向低地址处移动n比特这个大小为n比特的空间就是此函数的栈桢存储区域;
- mips架构中有叶子函数和非叶子函数的区别,叶子函数就是此函数自身不再调用别的函数,非叶子函数就是此函数自身调用别的函数。如果函数A调用函数B,调用者函数会在自己的栈顶预留一部分空间来保存被调用者(函数B)的参数,称之为参数调用空间;
- 函数调用过程中,父函数调用子函数,复制当前$PC的值到$RA寄存器,然后跳转到子函数执行。到子函数是,子函数如果为非叶子函数,则子函数的返回地址会先存入堆栈
- 参数传递方式,前四个参数通过$a0-$a3来传递,多于的参数会放入调用参数空间(参数会被保存在栈上),可以类别x86_64参数传递规则来进行记忆。
mips架构的四种取址方式:
1.基址寻址;(load-store)
根据我们上面的例子可以看到,基址寻址是对mips架构下堆栈数据进行存储和加载的主要方式。
2.立即数寻址;(load-store)
3.寄存器寻址;(R型指令)
4.伪立即数寻址;(J型指令)
叶子函数和非叶子函数:
一个函数如果不再调用其他的函数,那么这个函数是叶子函数,一个函数如果调用其他的函数,那么这个函数是非叶子函数。一般来说,函数都是非叶子函数。
叶子函数和非叶子函数在存放返回地址的时候,存在差异。叶子函数只把返回地址保存在$ra寄存其中,结束函数调用的时候,通过jr $ra指令返回即可。非叶子函数把在函数调用初始把$ra寄存器中的返回地址保存在栈中,然后结束函数调用的时候将栈中保存的返回地址加载到$ra寄存器中,再通过jr $ra指令返回。
举例如下:
叶子函数函数入口:
非叶子函数函数入口:
叶子函数函数出口:
非叶子函数函数出口:
叶子函数和非叶子函数的差别,造成栈溢出漏洞利用的差别。对于非叶子函数而言,如果我们的溢出可以覆盖栈上保存的$ra寄存器的值,这时候在栈上的值返回给$ra寄存器的时候,我们就可以劫持程序的数据流。
通过《揭秘家用路由器0day漏洞挖掘技术》这本书中的一个例子来展示MIPS32架构下函数的参数传递及堆栈布局的变化:
#include<stdio.h>

int more_reg(int a,int b,int c,int d,int e)
{
               char dst[100]={0};
               sprintf(dst,"%d%d%d%d%d
",a,b,c,d,e);
}

int main()
{
                int a1=1,a2=2,a3=3,a4=4,a5=5;
                more_reg(a1,a2,a3,a4,a5);
                return 0;
}
静态链接,编译选项:
mips-linux-gnu-gcc -o demo1 demo1.c -static

由上图看到,函数传递了5个参数,前四个参数首先保存在栈上,然后在调用more_reg函数的时候,把栈区的变量传递到$a0-$a3这四个寄存器中。其中第五个参数保留在0x40+var_30($sp)这个地址处。可以看到,虽然函数more_reg的前四个参数是由$a0-$a3这四个寄存器传递的,但是栈区仍然保留了16个字节的参数空间,就是0x40+var_20($fp)到0x40+var_30($fp)这段空间。
断点0x400660处,就是将变量值从临时变量$v0中取出,存储到0x40+var_30($fp)处,然后0x40+var_30($fp)作为第五个参数传递到more_reg函数中去。
MIPS系统调用
mips架构中,syscall用于从内核请求服务。对于MIPS,必须在$v0中传递服务编号/代号,然后将参数赋值给$a0,$a1,$a2三个,然后使用syscall指令触发中断,来调用相应函数。
如果linux中搭建了mips的交叉编译环境的话,mips的系统调用号可以在/usr/mips-linux-gnu/include/asm/unistd.h中看到,调用号是从4000开始的。
#define __NR_Linux            4000
#define __NR_syscall            (__NR_Linux +    0)
#define __NR_exit            (__NR_Linux +    1)
#define __NR_fork            (__NR_Linux +    2)
#define __NR_read            (__NR_Linux +    3)
#define __NR_write            (__NR_Linux +    4)
#define __NR_open            (__NR_Linux +    5)
#define __NR_close            (__NR_Linux +    6)
#define __NR_waitpid            (__NR_Linux +    7)
#define __NR_creat            (__NR_Linux +    8)
#define __NR_link            (__NR_Linux +    9)
#define __NR_unlink            (__NR_Linux +  10)
#define __NR_execve            (__NR_Linux +  11)
#define __NR_chdir            (__NR_Linux +  12)
#define __NR_time            (__NR_Linux +  13)
#define __NR_mknod            (__NR_Linux +  14)
#define __NR_chmod            (__NR_Linux +  15)
#define __NR_lchown            (__NR_Linux +  16)
#define __NR_break            (__NR_Linux +  17)
#define __NR_unused18            (__NR_Linux +  18)
#define __NR_lseek            (__NR_Linux +  19)
#define __NR_getpid            (__NR_Linux +  20)
#define __NR_mount            (__NR_Linux +  21)
#define __NR_umount            (__NR_Linux +  22)
#define __NR_setuid            (__NR_Linux +  23)
#define __NR_getuid            (__NR_Linux +  24)
#define __NR_stime            (__NR_Linux +  25)
#define __NR_ptrace            (__NR_Linux +  26)
#define __NR_alarm            (__NR_Linux +  27)
#define __NR_unused28            (__NR_Linux +  28)
#define __NR_pause            (__NR_Linux +  29)
#define __NR_utime            (__NR_Linux +  30)
#define __NR_stty            (__NR_Linux +  31)
#define __NR_gtty            (__NR_Linux +  32)
#define __NR_access            (__NR_Linux +  33)
#define __NR_nice            (__NR_Linux +  34)
#define __NR_ftime            (__NR_Linux +  35)
#define __NR_sync            (__NR_Linux +  36)
#define __NR_kill            (__NR_Linux +  37)
#define __NR_rename            (__NR_Linux +  38)
#define __NR_mkdir            (__NR_Linux +  39)
#define __NR_rmdir            (__NR_Linux +  40)
#define __NR_dup            (__NR_Linux +  41)
#define __NR_pipe            (__NR_Linux +  42)
#define __NR_times            (__NR_Linux +  43)
#define __NR_prof            (__NR_Linux +  44)
#define __NR_brk            (__NR_Linux +  45)
#define __NR_setgid            (__NR_Linux +  46)
#define __NR_getgid            (__NR_Linux +  47)
#define __NR_signal            (__NR_Linux +  48)
#define __NR_geteuid            (__NR_Linux +  49)
#define __NR_getegid            (__NR_Linux +  50)
#define __NR_acct            (__NR_Linux +  51)
#define __NR_umount2            (__NR_Linux +  52)
#define __NR_lock            (__NR_Linux +  53)
#define __NR_ioctl            (__NR_Linux +  54)
#define __NR_fcntl            (__NR_Linux +  55)
#define __NR_mpx            (__NR_Linux +  56)
#define __NR_setpgid            (__NR_Linux +  57)
#define __NR_ulimit            (__NR_Linux +  58)
#define __NR_unused59            (__NR_Linux +  59)
#define __NR_umask            (__NR_Linux +  60)
#define __NR_chroot            (__NR_Linux +  61)
#define __NR_ustat            (__NR_Linux +  62)
#define __NR_dup2            (__NR_Linux +  63)
#define __NR_getppid            (__NR_Linux +  64)
#define __NR_getpgrp            (__NR_Linux +  65)
#define __NR_setsid            (__NR_Linux +  66)
#define __NR_sigaction            (__NR_Linux +  67)
#define __NR_sgetmask            (__NR_Linux +  68)
#define __NR_ssetmask            (__NR_Linux +  69)
#define __NR_setreuid            (__NR_Linux +  70)
#define __NR_setregid            (__NR_Linux +  71)
#define __NR_sigsuspend            (__NR_Linux +  72)
#define __NR_sigpending            (__NR_Linux +  73)
#define __NR_sethostname        (__NR_Linux +  74)
#define __NR_setrlimit            (__NR_Linux +  75)
#define __NR_getrlimit            (__NR_Linux +  76)
#define __NR_getrusage            (__NR_Linux +  77)
#define __NR_gettimeofday        (__NR_Linux +  78)
#define __NR_settimeofday        (__NR_Linux +  79)
#define __NR_getgroups            (__NR_Linux +  80)
#define __NR_setgroups            (__NR_Linux +  81)
#define __NR_reserved82            (__NR_Linux +  82)
#define __NR_symlink            (__NR_Linux +  83)
#define __NR_unused84            (__NR_Linux +  84)
#define __NR_readlink            (__NR_Linux +  85)
#define __NR_uselib            (__NR_Linux +  86)
#define __NR_swapon            (__NR_Linux +  87)
#define __NR_reboot            (__NR_Linux +  88)
#define __NR_readdir            (__NR_Linux +  89)
#define __NR_mmap            (__NR_Linux +  90)
#define __NR_munmap            (__NR_Linux +  91)
#define __NR_truncate            (__NR_Linux +  92)
#define __NR_ftruncate            (__NR_Linux +  93)
#define __NR_fchmod            (__NR_Linux +  94)
#define __NR_fchown            (__NR_Linux +  95)
#define __NR_getpriority        (__NR_Linux +  96)
#define __NR_setpriority        (__NR_Linux +  97)
#define __NR_profil            (__NR_Linux +  98)
#define __NR_statfs            (__NR_Linux +  99)
#define __NR_fstatfs            (__NR_Linux + 100)
#define __NR_ioperm            (__NR_Linux + 101)
#define __NR_socketcall            (__NR_Linux + 102)
#define __NR_syslog            (__NR_Linux + 103)
#define __NR_setitimer            (__NR_Linux + 104)
#define __NR_getitimer            (__NR_Linux + 105)
#define __NR_stat            (__NR_Linux + 106)
#define __NR_lstat            (__NR_Linux + 107)
#define __NR_fstat            (__NR_Linux + 108)
#define __NR_unused109            (__NR_Linux + 109)
#define __NR_iopl            (__NR_Linux + 110)
#define __NR_vhangup            (__NR_Linux + 111)
#define __NR_idle            (__NR_Linux + 112)
#define __NR_vm86            (__NR_Linux + 113)
#define __NR_wait4            (__NR_Linux + 114)
#define __NR_swapoff            (__NR_Linux + 115)
#define __NR_sysinfo            (__NR_Linux + 116)
#define __NR_ipc            (__NR_Linux + 117)
#define __NR_fsync            (__NR_Linux + 118)
#define __NR_sigreturn            (__NR_Linux + 119)
#define __NR_clone            (__NR_Linux + 120)
#define __NR_setdomainname        (__NR_Linux + 121)
#define __NR_uname            (__NR_Linux + 122)
#define __NR_modify_ldt            (__NR_Linux + 123)
#define __NR_adjtimex            (__NR_Linux + 124)
#define __NR_mprotect            (__NR_Linux + 125)
#define __NR_sigprocmask        (__NR_Linux + 126)
#define __NR_create_module        (__NR_Linux + 127)
#define __NR_init_module        (__NR_Linux + 128)
#define __NR_delete_module        (__NR_Linux + 129)
#define __NR_get_kernel_syms        (__NR_Linux + 130)
#define __NR_quotactl            (__NR_Linux + 131)
#define __NR_getpgid            (__NR_Linux + 132)
#define __NR_fchdir            (__NR_Linux + 133)
#define __NR_bdflush            (__NR_Linux + 134)
#define __NR_sysfs            (__NR_Linux + 135)
#define __NR_personality        (__NR_Linux + 136)
#define __NR_afs_syscall        (__NR_Linux + 137) /* Syscall for Andrew File System */
可以写一个write.c的,然后生成汇编代码,看一下write函数的系统调用。
#include<stdio.h>
#include<stdlib.h>

int main()
{
    char *dst="Hello world!
";
    write(1,dst,13);
    return 0;
}
以下命令编译:
mips-linux-gnu-gcc write_syscall.c -S -o write_syscall.s
生成汇编代码如下所示:
.file 1 "write_syscall.c" .section .mdebug.abi32 .previous .nan legacy .module fp=xx .module nooddspreg .abicalls .text .rdata .align 2 $LC0: .ascii "Hello world!�12�00" .text .align 2 .globl main .set nomips16 .set nomicromips .ent main .type main, @function main: .frame $fp,40,$31 # vars= 8, regs= 2/0, args= 16, gp= 8 .mask 0xc0000000,-4 .fmask 0x00000000,0 .set noreorder .set nomacro addiu $sp,$sp,-40 sw $31,36($sp) sw $fp,32($sp) move $fp,$sp lui $28,%hi(__gnu_local_gp) addiu $28,$28,%lo(__gnu_local_gp) .cprestore 16 lui $2,%hi($LC0) addiu $2,$2,%lo($LC0) sw $2,28($fp) li $6,13 # 0xd $a2寄存器 lw $5,28($fp) # $a1 寄存器 li $4,1 # 0x1 $a0寄存器 lw $2,%call16(write)($28) # $v0寄存器 move $25,$2 .reloc 1f,R_MIPS_JALR,write 1: jalr $25 nop lw $28,16($fp) move $2,$0 move $sp,$fp lw $31,36($sp) lw $fp,32($sp) addiu $sp,$sp,40 jr $31 nop .set macro .set reorder .end main .size main, .-main .ident "GCC: (Ubuntu 7.5.0-3ubuntu1~18.04) 7.5.0"
简化之后,write.s的系统调用可以写为如下形式:
.section .text
.globl __start
.set noreorder
__start:
addiu $sp,$sp,-32
lui $t6,0x4142
ori $t6,$t6,0x430a
sw $t6,0($sp)
li $a0,1
addiu $a1,$sp,0
li $a2,5
li $v0,4004
syscall
shell脚本编译为二进制可执行文件:
#!/bin/sh
# $ sh name.sh <source file><excute file>

src=$1
dst=$2
mips-linux-gnu-as $src -o s.o
mips-linux-gnu-ld s.o -o $dst
rm s.o
readelf -S write定位text段入口地址:
pwndbg> disass /r 0x4000d0
Dump of assembler code for function _ftext:
   0x004000d0 <+0>:    27 bd ff e0    addiu    sp,sp,-32
   0x004000d4 <+4>:    3c 0e 41 42    lui    t6,0x4142
   0x004000d8 <+8>:    35 ce 43 0a    ori    t6,t6,0x430a
   0x004000dc <+12>:    af ae 00 00    sw    t6,0(sp)
   0x004000e0 <+16>:    24 04 00 01    li    a0,1
   0x004000e4 <+20>:    27 a5 00 00    addiu    a1,sp,0
   0x004000e8 <+24>:    24 06 00 05    li    a2,5
   0x004000ec <+28>:    24 02 0f a4    li    v0,4004
   0x004000f0 <+32>:    00 00 00 0c    syscall
   0x004000f4 <+36>:    00 00 00 00    nop
   0x004000f8 <+40>:    00 00 00 00    nop
   0x004000fc <+44>:    00 00 00 00    nop
End of assembler dump.
可以提取16进制数来写shellcode。
qemu: uncaught target signal 4 (Illegal instruction) - core dumped

Illegal instruction (core dumped)
在我们前面的write程序执行的时候,会出现这样两行报错。出现的原因是调用write系统调用之后,没有调用exit系统调用退出,继续执行了非法代码,下面写入exit系统调用来使程序正常退出:
.section .text
.globl __start
.set noreorder
__start:
addiu $sp,$sp,-32
lui $t6,0x4142
ori $t6,$t6,0x430a
sw $t6,0($sp)
li $a0,1
addiu $a1,$sp,0
li $a2,5
li $v0,4004
syscall
li $a0,1
li $v0,4001
li $a1,0
li $a2,0
syscall